概要
この記事は2019年にICML発表された画像分類モデルであるEfficienNetのモデルを、pytorchで実装してみたという記事である。
EfficientNetとは一言でいえばConvNetsのスケーリングアップを行う際に、非常に効率的な手法を提案し、最高水準であるState-of-The-Art(SoTA)を達成したCNNの手法である。具体的には、モデルのスケールアップを行う際に変更する、モデルの「深さ」「幅」「解像度(=入力画像の大きさ)」の3つの要素をバランスよく調整するため、それらの要素が性能にどのように影響するのかを調べ、Compound Coefficient(複合係数) というものを導入した。精度においてだけでなく、モデル自体の大きさや速さという面でも大幅に改善した手法である。
論文中ではサイズごとにB0~B7のモデルをTensorFlowを用いて構成していたが、この記事では最も単純なB0のモデルをpytorchを用いて実装している。
なぜEfficientNetは重要なのか
技術的な特徴
ConvNetsのスケールアップのためには「深さ(レイヤーの数)」「幅(1レイヤーのサイズ=ニューロンの数)」「解像度(入力画像の大きさ)」の3要素のいずれかをスケールすると性能が改善することが知られていた。しかし、これらがどのように相互作用しているのかは説明されていなかった。

Tan, M. & Le, Q.. (2019). EfficientNet: Rethinking Model Scaling for Convolutional Neural Networks. Proceedings of the 36th International Conference on Machine Learning, in Proceedings of Machine Learning Research 97:6105-6114
EfficientNetで求めているのはこの一番右の(e)のスケーリングをバランスよく調整することである。

Tan, M. & Le, Q.. (2019). EfficientNet: Rethinking Model Scaling for Convolutional Neural Networks. Proceedings of the 36th International Conference on Machine Learning, in Proceedings of Machine Learning Research 97:6105-6114
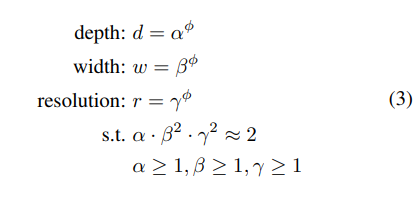
そこでEfficientNetが導入したのがCompound Coefficient(複合係数)である。これは以下の式のΦに相当する係数である。
Tan, M. & Le, Q.. (2019). EfficientNet: Rethinking Model Scaling for Convolutional Neural Networks. Proceedings of the 36th International Conference on Machine Learning, in Proceedings of Machine Learning Research 97:6105-6114
具体的にこの係数を決めていくわけだが今回実装しているB0のモデルに対しては次のように決定している。
・step1 グリッドサーチを施して、α=1.2,β=1.1,γ=1.15が最適であることを導出
・step2 α,β,γを定数として固定して、ϕを変更することでスケールアップ(B1-B7までのモデルはスケールの違いによる)
Tan, M. & Le, Q.. (2019). EfficientNet: Rethinking Model Scaling for Convolutional Neural Networks. Proceedings of the 36th International Conference on Machine Learning, in Proceedings of Machine Learning Research 97:6105-6114
学術的な意義
EfficientNetが優れていたのは既存の手法に対して、飛躍的に精度、モデルサイズ、速度を向上させることができたからである。精度については、ImageNetで84.4% top-1 Accuracy, 97.1% top-5 Accuracyを記録。 当時までのベストケースに対してモデルと比べて8.4倍小さく6.1倍速いという結果を残した。
もう一点EfficientNetが優れていた点としては、転移学習においても高い成果を残したことであり、スケーリングアップの手法としての効果が高いということが示されたからである。
実装したこと
今回実装したのはEfficientNet-B0のモデルである。詳しいコードはgithub に載せているのでそちらを参照。
基本的にはMBconvを組み合わせたものになっており、MBconv自体はpixelwise conv -> Depthwise conv -> Squeeze-and-Excitation -> pixelwise convの一連の操作からなる。
Tan, M. & Le, Q.. (2019). EfficientNet: Rethinking Model Scaling for Convolutional Neural Networks. Proceedings of the 36th International Conference on Machine Learning, in Proceedings of Machine Learning Research 97:6105-6114
MBconvモジュール
class MBConv(nn.Module):
  def __init__(self, input_plane, output_plane, kernel=5, stride=1, expansion=1):
    super().__init__()
    self.input_plane = input_plane
    self.output_plane = output_plane
    self.pixel_wise1 = pixel_wise_conv(input_plane, input_plane*expansion, bias=False)
    self.stride = stride
    self.depth_wise = depth_wise_conv(input_plane*expansion, kernel, stride, padding=kernel//2, bias=False)
    self.SE = squeeze_excitation(input_plane*expansion)
    self.pixel_wise2 = pixel_wise_conv(input_plane*expansion, output_plane, bias=False, act=None)

  def forward(self, x):
    out = self.pixel_wise2(self.se(self.depth_wise(self.pixel_wise1(x))))
    if self.stride == 1 and self.input_plane==self.output_plane:
      out = out+x
    return out
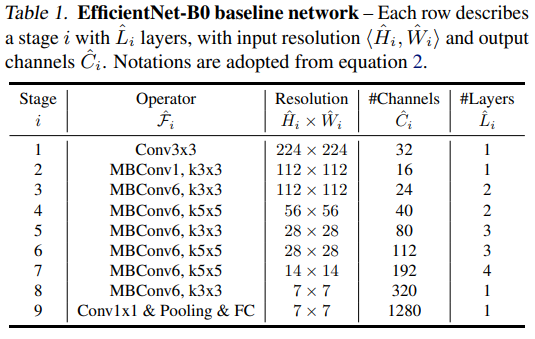
また、EfficientNet-B0のモデルはは次の通り
EfficientNet
class EfficientNet(nn.Module):
  def __init__(self, n_c=3, n_classes=10):
    super().__init__()

    self.stage1 = nn.Sequential(
        nn.Conv2d(n_c,32,3,1,1,bias=False),
        nn.BatchNorm2d(32),
        Swish()
    )

    self.MBconv1 = MBConv(32, 16, 3, expansion=1)

    self.MBconv6_stage3 = nn.Sequential(
        MBConv(16, 24, kernel=3, stride=1, expansion=6),
        MBConv(24, 24, kernel=3, stride=1, expansion=6)
    )

    self.MBconv6_stage4 = nn.Sequential(
        MBConv(24, 40, kernel=5, stride=1, expansion=6),
        MBConv(40, 40, kernel=5, stride=1, expansion=6)
    )

    self.MBconv6_stage5 = nn.Sequential(
        MBConv(40, 80, kernel=3, stride=2, expansion=6),
        MBConv(80, 80, kernel=3, stride=1, expansion=6),
        MBConv(80, 80, kernel=3, stride=1, expansion=6),
    )

    self.MBconv6_stage6 = nn.Sequential(
        MBConv(80, 112, kernel=5, stride=1, expansion=6),
        MBConv(112, 112, kernel=5, stride=1, expansion=6),
        MBConv(112, 112, kernel=5, stride=1, expansion=6),
    )

    self.MBconv6_stage7 = nn.Sequential(
        MBConv(112, 192, kernel=5, stirde=2, expansion=6),
        MBConv(192, 192, kernel=5, stirde=1, expansion=6),
        MBConv(192, 192, kernel=5, stirde=1, expansion=6),
        MBConv(192, 192, kernel=5, stirde=1, expansion=6),
    )

    self.MBconv6_stage8 = nn.Sequential(
        MBConv(192, 320, kernel=3, stirde=1, expansion=6),
    )

    self.pixel_wise = pixel_wise_conv(320, 1280)
    self.GAP = nn.AdaptiveAvgPool2d(1)
    self.dropout = nn.Dropout(0.2)
    self.FC = nn.Linear(1280, n_classes)

  def forward(self, x):
    out = self.stage1(x)
    out = self.MBconv1(out)
    out = self.MBconv6_stage3(out)
    out = self.MBconv6_stage4(out)
    out = self.MBconv6_stage5(out)
    out = self.MBconv6_stage6(out)
    out = self.MBconv6_stage7(out)
    out = self.MBconv6_stage8(out)
    out = self.pixel_wise(out)
    out = self.GAP(out).view(x.size(0), -1)
    out = self.dropout(out)
    out = self.FC(out)
    return out
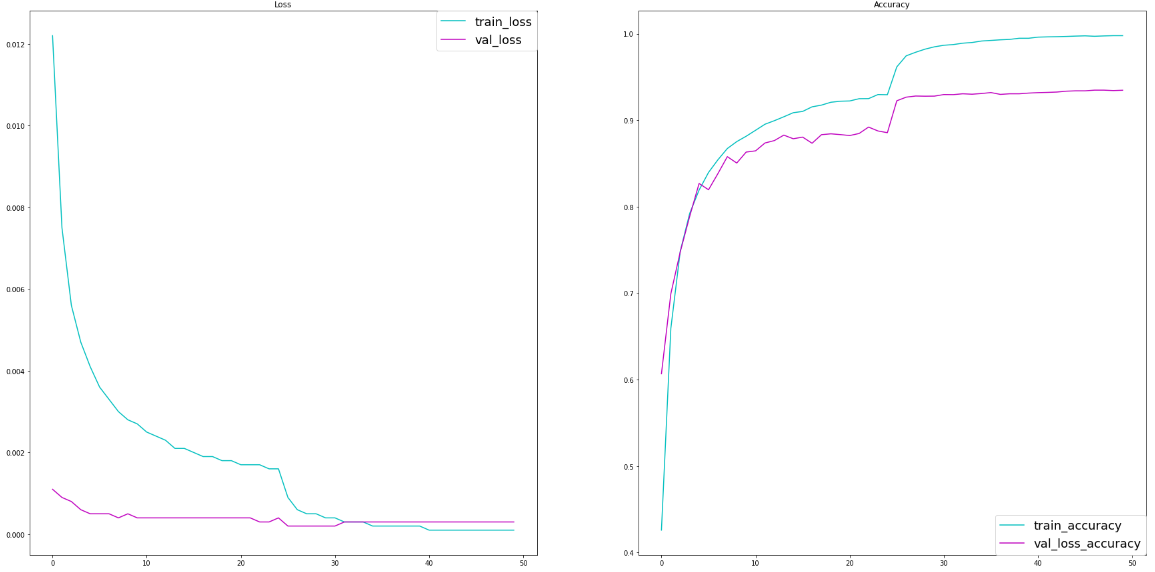
結果
Cifar-10のデータセットを用いて適用し、以下のような結果を得た。
まとめと感想
EfficientNetはCNNにおいて非常に効率的な手法として登場した。余裕があればきちんとスケーリングアップしたモデルを用いたり、他のデータセットでも試してみたいと思った。
画像やAIを専門にしているわけではないので、この実装に関しては非常に大変だったが、面白い経験になった。
参考
Tan, M. & Le, Q.. (2019). EfficientNet: Rethinking Model Scaling for Convolutional Neural Networks. Proceedings of the 36th International Conference on Machine Learning, in Proceedings of Machine Learning Research 97:6105-6114