はじめに
会社の上司は部下の生存確認をしたいお年頃になったようです。
在宅勤務も増え、上司は目隠しでサッカーやってる感覚でしょう。
さすがに「ピッチに出てるか否か」ぐらいは知りたい、ということだったので
ビジネスチャットツールであるMicrosoft Teamsで勤怠管理botをつくってみました。
構成
部下は何かとAPIを使いたいお年頃になってきましたので、ご多分に漏れずAWSでサクッとつくります。

1.TeamsのOutgoing Webhook設定
2.Lambdaで情報を受け取って処理
3.出退勤時刻と名前をDynamoDBに保存
4.FlaskをバックエンドにDynamoDBのデータを読みこんで表示
5.上司はWeb上で勤怠管理ができるようになって楽ちん
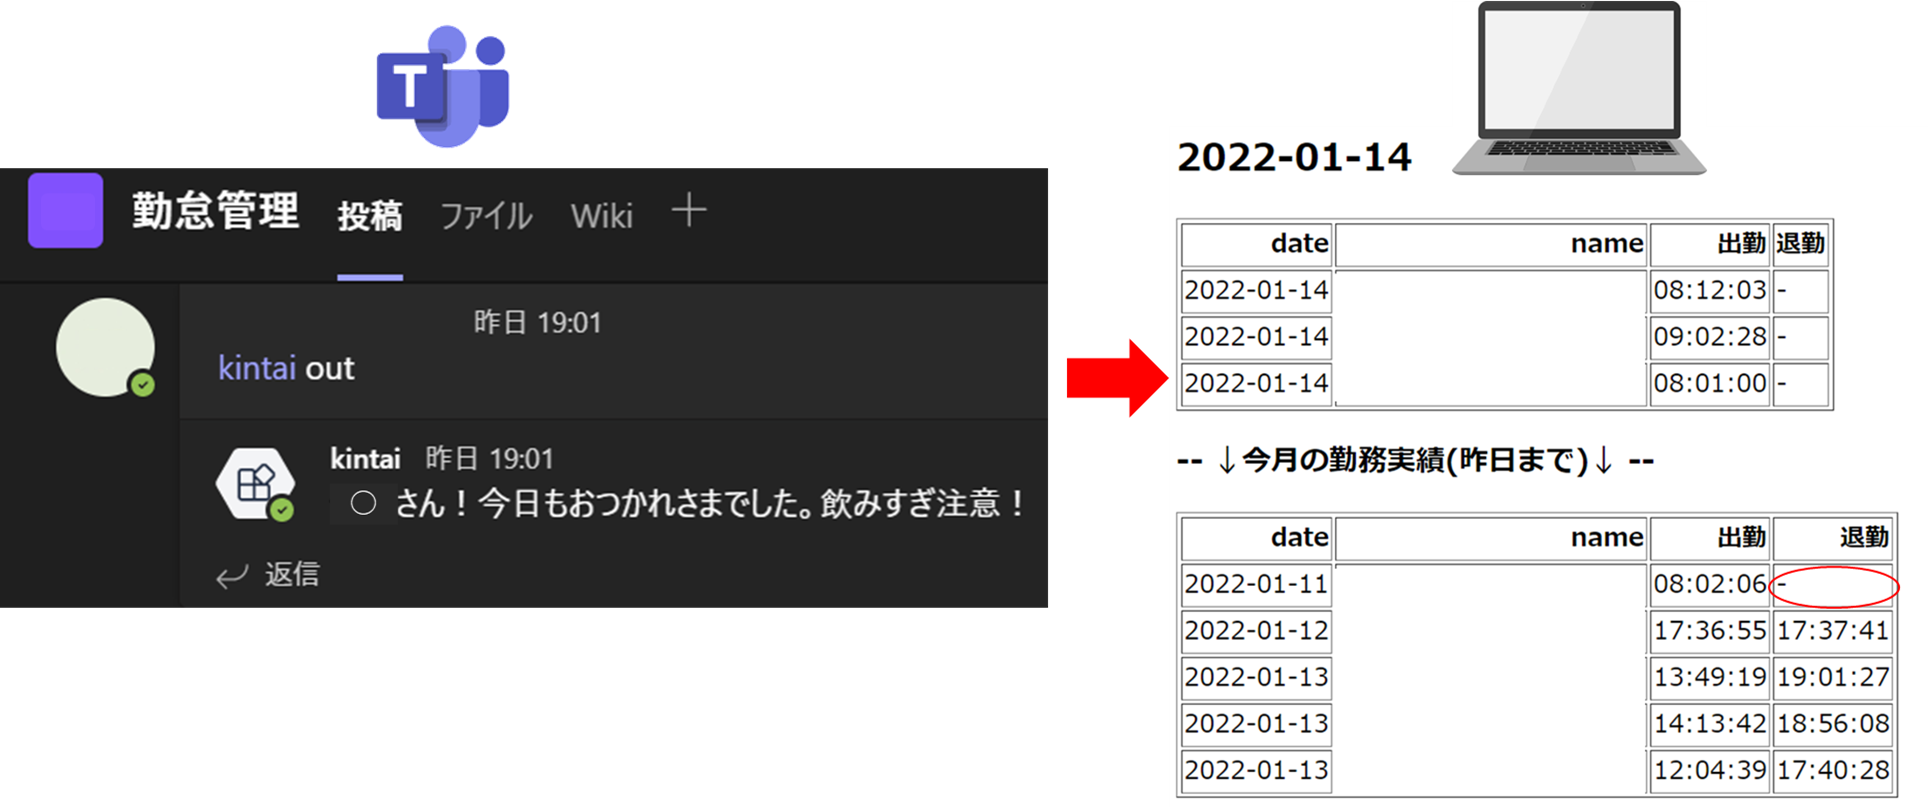
こんな感じです.1のWebhook設定をよしなにすれば、SlackでもLINEでも好きなプラットフォームで実現できます。
手順詳細
上記の各手順を詳しく掘ります。
0.下準備
API Gatewayの、エンドポイントURL取得およびLambdaとのつなぎ込みに関しては、こちらの素晴らしい記事を参考にさせて頂きました。このあたりの下準備は息を吐くようにデキるようになると楽ちんです。
DynamoDBはattendance-recordという名前で、下記のキー仕様で作成しておきます。
プライマリーキー:date(string)
ソートキー:name(string)
1. TeamsのOutgoing Webhook設定
Teams上での操作になります。

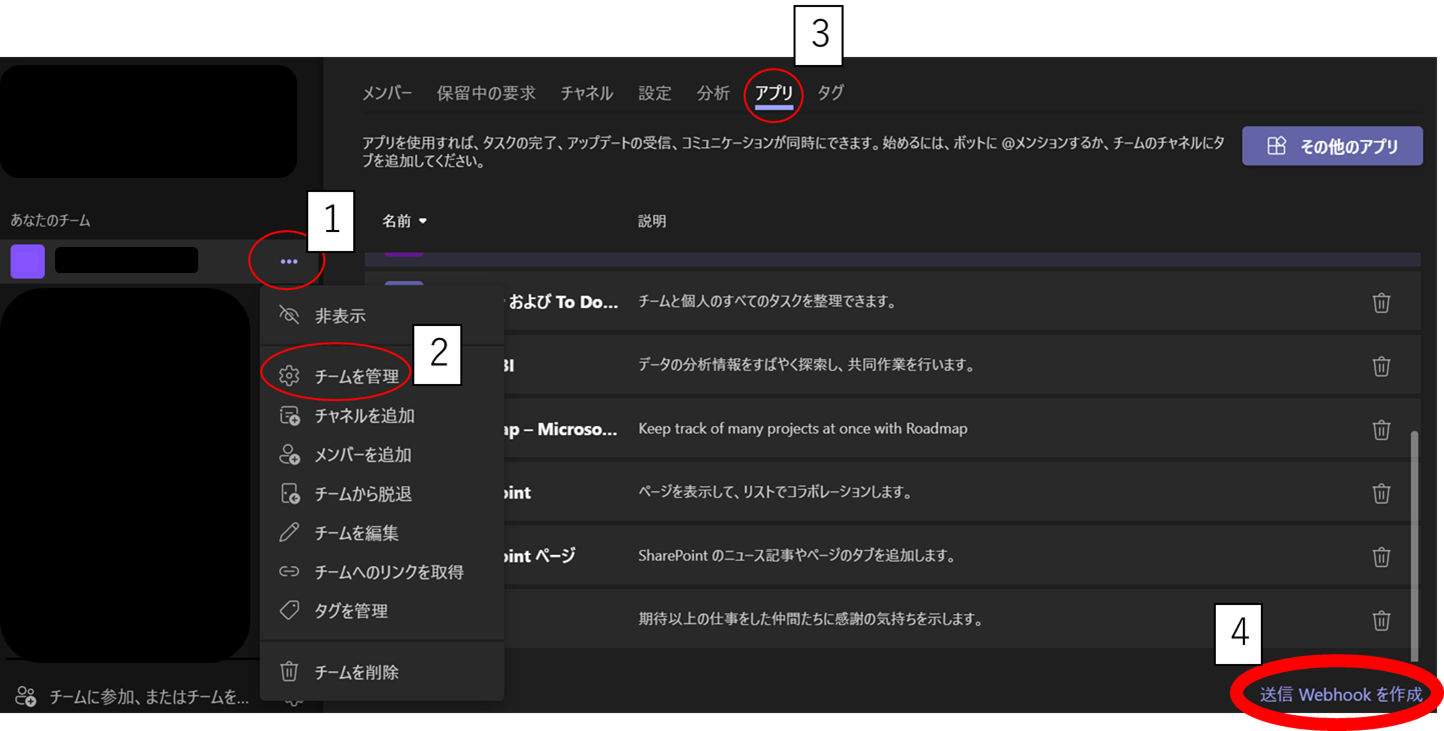
Teamsのチーム画面で、↑いちにのさんよんで「送信Webhookを作成」します。
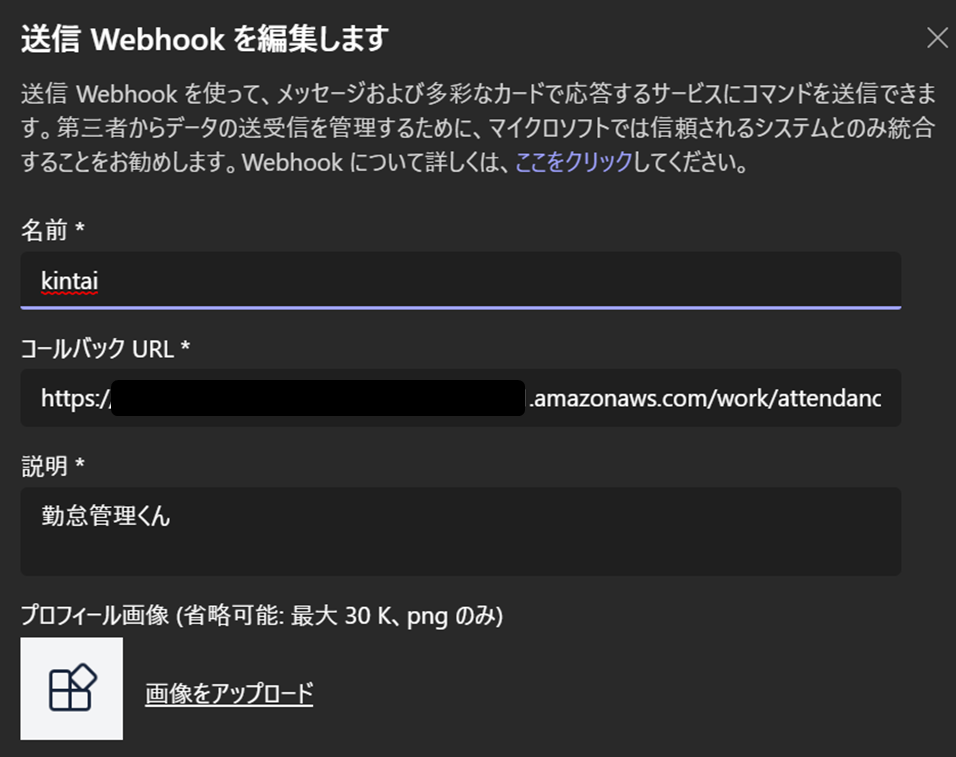
そうすると、送信webhook作成画面になります。

ここで、名前*はメンションするときの名前です。上記の例では「@kintai」でメンションします。
で、このコールバックURL*にはAPI GatewayのエンドポイントURLを指定します。
この設定により@kintai で送信すると、API Gatewayにリーチできます。
2&3. Lambdaで情報を受け取ってDynamoDBに保存
Teamsで送信した内容が、API Gatewayを通ってLambdaに送られます。
今回はメッセージに「in」が含まれていたら「出勤」とし、「out」が含まれていたら「退勤」としました。
import json
import datetime
import boto3
from boto3.dynamodb.conditions import Key, Attr

# -- get dynamodb object
dynamodb = boto3.resource('dynamodb')
table_name = "attendance-record"

def lambda_handler(event, context):

    #-- 0. check event(for debug)
    print(json.dumps(event))

    #-- 1. extract information
    timestamp=event['localTimestamp'] #2022-01-13T14:13:42.108816
    date_today=timestamp.split('T')[0] #2022-01-13
    time=timestamp.split('T')[-1].split('.')[0] #14:13:42
    name=event['from']['name']
    in_out=in_out.replace('kintai','') #[ハマった場所]

    #-- 2. attendance / leaving
    if 'in' in in_out:
        status='出勤'
        msg=msg_name+'今日も楽しんでいきましょう!'
    elif 'out' in in_out:
        status='退勤'
        msg=msg_name+'今日もおつかれさまでした。飲みすぎ注意!'
    else:
        return {
            'type': 'message',
            'text': 'ERROR! put [in] or [out] !'
        }

    #-- 3. item store to dynamodb
    dynamotable = dynamodb.Table(table_name)
    keydata={
        'date':date_today,
        'name':name
        }
    try:
        option = {
            'Key': keydata,
            'UpdateExpression': 'set #in_out=:in_out',
            'ExpressionAttributeNames': {
                '#in_out': status,
            },
            'ExpressionAttributeValues': {
                ':in_out': time,
            },
        }
        res=dynamotable.update_item(**option)
        print('Successed!')
    except Exception as e:
        print("Failed.")
        print(e)

    #-- 4. return
    return {
        'type': 'message',
        'text': msg
    }
受け取った情報から,下記の手順でLambda処理します。
- 時間と名前,メッセージ内容を受け取る
- メッセージ内容に基づき加工
3.DynamoDBに格納
1のハマッた場所について
「@kintai」の文字列に'in'が入っており、2の条件分岐で出勤ステータスにしか入りませんでした。このままだと一生出勤社畜地獄奴なので、kintaiの文字を消すようにしました。
3のupdate_itemについて
DynamoDBのプライマリーキーにdate、ソートキーにnameを指定しており、出退勤はPキーとSキーに合致したアイテムに対してupdate_itemで打刻するようにしてます。
絶対もっと美しく書く方法がありそう...
Lambdaおわり。
4.DynamoDBのデータをWeb表示(Flask)
DynamoDBのデータをweb表示させます。バックエンドはFlaskで。
上司が分かれば良いので、テーブル表示させるだけの超シンプル構成です。
せめてもの見やすさのために「本日」と「今月全体」を分けて表示させるようにしてます。
from flask import Flask, render_template
import datetime
import boto3
import pandas as pd
import pytz
app = Flask(__name__)
jst = pytz.timezone('Asia/Tokyo')
table_name='attendance-record'

@app.route('/',methods=["GET","POST"])
def index():
    df_today, df_month=get_table_from_dynamodb(table_name)
    return render_template("/index.html",
                           date=df_today['date'].iat[0],
                           tables_today=df_today.to_html(classes='data', header="true",index=False),
                           tables_month=df_month.to_html(classes='data', header="true",index=False),
                           )

def get_table_from_dynamodb(table_name):
    today=jst.localize(datetime.datetime.today()).strftime('%Y-%m-%d')

    #-- dynamodb設定 & 全データ取り出し
    dynamodb = boto3.resource('dynamodb',region_name='ap-northeast-1')
    table = dynamodb.Table(table_name)
    response = table.scan()

    #-- db to df
    df = pd.json_normalize(response['Items']).fillna('-')
    df_today=df[df['date']==today]
    df_month=df[df['date'].str.contains(today[:7])] #2022-01

    #-- reindex column(today:出勤時間順, month:日付順にソート)
    df_today=df_today.reindex(columns=['date','name','出勤','退勤']).sort_values('出勤')
    df_month=df_month.reindex(columns=['date','name','出勤','退勤']).sort_values('date')

    return df_today,df_month

if __name__ == '__main__':
    app.run(debug=True)
DynamoDB->PandasDataFrameにできるpd.json_normalize()
PandasDataFrame->HTML Tableにできるdf.to_html()
なんて便利なのでしょうか。ふんだんに使わせていただきました。
そしてHTMLのトップ画面はこんな感じ。説明不要なシンプルさです。
<!DOCTYPE html>
<html lang="ja">
    <head>
        <meta charset="UTF-8">
        <title>attendance record</title>
    </head>
    <body>
        <h2>今日の日付 {{date}}</h2>
        {% for table in tables_today %}
        {{ table|safe }}
        {% endfor %}
        <h3>-- ↓今月の勤務実績↓ --</h3>
        {% for table in tables_month %}
        {{ table|safe }}
        {% endfor %}
    </body>
</html>
あとはFlaskのページを上司が確認するだけですね!
いつでもどこでも見られるようにWebサーバーにデプロイしてます。
まとめ
今回はMicrosoft Teamsで勤怠情報を送信し、Web上で表示する「勤怠管理bot」を作りました。
API-Lambda-DBという割とよくある(?)構成でやってみました。
botという割には応答が定型文 なのは、要改善ということで。
上司の疲労軽減になりますように。
