はじめに
Cisco Guest Shellは、ホストデバイス(IOS-XE)とは分離されたLinuxベースのコンテナ環境で、Python等を利用してIOS-XE設定を自動制御可能です。
今回は、Python Webフレームワーク「Flask」を用いてGuest Shell上でAPIサーバを構築し、Postmanからshowコマンド結果の取得、インターフェース設定変更を行ってみました。
CSR1000V セットアップ
IOS-XE
IOS-XE側で仮想インターフェースVirtualPortGroup0(192.168.30.1)を作成し、Guest Shellのアドレス(192.168.30.2)と関連付けを行い、外部からGuest Shellへのアクセスを可能としています。
環境依存のため割愛しますが、インターネットアクセスのため、Guest ShellのアドレスをGigabitEthernet1のアドレスに変換するPAT設定も行っています。
Router(config)#iox

Router(config)#ip http server

Router(config)#interface GigabitEthernet1
Router(config-if)# ip address 192.168.100.196 255.255.255.0
Router(config-if)# exit

Router(config)#interface VirtualPortGroup0
Router(config-if)# ip address 192.168.30.1 255.255.255.0
Router(config-if)# exit

Router(config)#app-hosting appid guestshell
Router(config-app-hosting)# app-vnic gateway0 virtualportgroup 0 guest-interface 0
Router(config-app-hosting-gateway0)# guest-ipaddress 192.168.30.2 netmask 255.255.255.0
Router(config-app-hosting-gateway0)# app-default-gateway 192.168.30.1 guest-interface 0
Router(config-app-hosting)# name-server0 192.168.100.1
Router(config-app-hosting)# end

Router#guestshell enable
Router#show iox-service

IOx Infrastructure Summary:
---------------------------
IOx service (CAF) 1.10.0.1 : Running
IOx service (HA)          : Not Supported
IOx service (IOxman)      : Running
IOx service (Sec storage) : Not Supported
Libvirtd   1.3.4          : Running

Router#show app-hosting list
App id                                   State
---------------------------------------------------------
guestshell                               RUNNING
Guest Shell
デフォルト設定をそのまま使用。
Router#guestshell
[guestshell@guestshell ~]$ sudo ifconfig
eth0: flags=4163<UP,BROADCAST,RUNNING,MULTICAST>  mtu 1500
        inet 192.168.30.2  netmask 255.255.255.0  broadcast 192.168.30.255
(省略)

[guestshell@guestshell ~]$ netstat -nr
Kernel IP routing table
Destination     Gateway         Genmask         Flags   MSS Window  irtt Iface
0.0.0.0         192.168.30.1    0.0.0.0         UG        0 0          0 eth0
192.168.30.0    0.0.0.0         255.255.255.0   U         0 0          0 eth0
Pythonパッケージのインストール
プリインストールされているPython2.7.5を使用し、Flaskと、showコマンドのパーサーテンプレートntc_templatesをインストールしました。
[guestshell@guestshell ~]$ python -V
Python 2.7.5
[guestshell@guestshell ~]$ pip -V
pip 20.2.3 from /usr/lib/python2.7/site-packages/pip (python 2.7)
[guestshell@guestshell ~]$ pip install flask
[guestshell@guestshell ~]$ pip install ntc_templates
HTTP GETでshowコマンド結果を取得
Pythonコード
Guest Shellのホームディレクトリ直下にapi.pyを作成しました。
[guestshell@guestshell ~]$ pwd
/home/guestshell
[guestshell@guestshell ~]$ touch api.py
処理の大まかな流れは以下の通りです。
- 実行のトリガーは、APIクライアントからURI
http://<Guest ShellのIPアドレス>/show/<コマンド名を_を繋いだもの>宛てのHTTP GET - 関数
getCommand()を実行 - URI末尾の'_'を' '(スペース)に変換し、showコマンドを生成
- プリインストールされているCisco CLI Pythonモジュールでshowコマンドを実行
- 出力結果をNTC-templates/TextFSMでパースしてJSONで返す
- 途中で失敗した場合はエラーメッセージをJSONで返す
また外部からアクセスするために、app.run()の引数としてhost='0.0.0.0'を指定しています。
from flask import Flask, jsonify, request
from cli import configurep, cli
from ntc_templates.parse import parse_output

app = Flask(__name__)

@app.route("/show/<command>", methods=["GET"])
def getCommand(command):
    cmd = "show " + command.replace("_", " ")
    try:
        sh_output = cli(cmd)
        sh_output_parsed = parse_output(platform="cisco_ios", command=cmd, data=sh_output)
        return jsonify(sh_output_parsed)
    except:
        return jsonify([{"result": "Fail to parse the output"}])

if __name__ == '__main__':
    app.run(debug=False, host='0.0.0.0', port=8080)
Python実行/APIサーバ起動
[guestshell@guestshell ~]$ python api.py
 * Serving Flask app "api" (lazy loading)
 * Environment: production
   WARNING: This is a development server. Do not use it in a production deployment.
   Use a production WSGI server instead.
 * Debug mode: off
 * Running on http://0.0.0.0:8080/ (Press CTRL+C to quit)
PostmanからHTTP GET
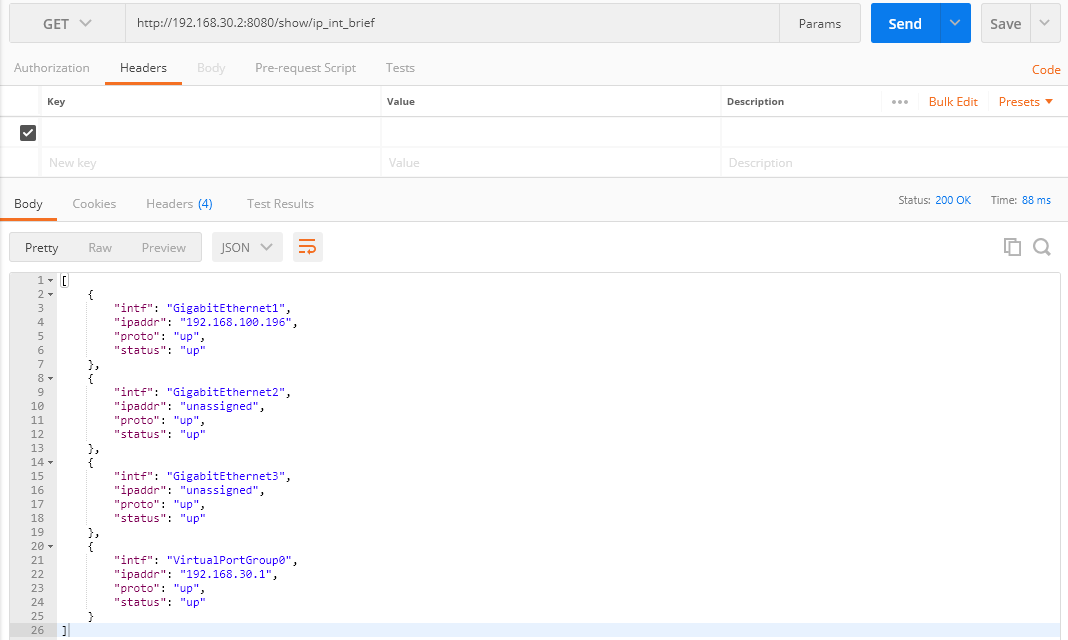
Postmanからshowコマンドshow ip interface briefの結果を取得する例です。
GETで以下の通りURIを入力します。末尾がip_int_briefと省略されていますが、NTC-templates側で許容された省略形であれば問題なくパース可能です。
HTTP POSTでインターフェース設定変更
Pythonコード
上記のapi.pyにコードを追加しました。処理の大まかな流れは以下の通りです。
- 実行のトリガーは、APIクライアントからURI
http://<Guest ShellのIPアドレス>/set/interface宛てのHTTP POST。Body内にインタフェースの設定パラメータをJSON形式で記載。 - 関数
setInterface()を実行 - 設定パラメータに従いCLIコマンドを生成
- Cisco CLI Pythonモジュールで設定変更と設定保存を実施
- 成功した場合は、SuccessメッセージをJSONで返す
編集後、再度Python実行/APIサーバ起動を行います。
@app.route("/set/interface", methods=["POST"])
def setInterface():
    interface_cmd = "interface " + request.json['interface']

    if 'state' in request.json:
        if request.json['state'] == "enabled":
            state_cmd = "no shutdown"
        elif request.json['state']  == "disabled":
            state_cmd = "shutdown"
    else:
            state_cmd = ""

    if 'description' in request.json:
        description_cmd = "description " + request.json['description']
    else:
        description_cmd = ""

    if 'address' in request.json:
        address_cmd = "ip address " + request.json['address'] + " " + request.json['netmask']
    else:
        address_cmd = ""

    configurep([interface_cmd, state_cmd, description_cmd, address_cmd, "end"])
    cli("write")

    return jsonify([{"result": "Success"}])
PostmanからHTTP POST
PostmanからGigabitEthernet2のDescription、IPアドレスの設定と、ポート開放を行う例です。
POSTで以下の通りURIを入力し、HeaderでContent-Typeをapplication/jsonに指定します。

Bodyに設定パラメータを記載します。下記の内、インターフェース名interfaceは必須ですが、その他の開放/閉塞state、Descriptiondescription、IPアドレスaddress/netmaskの指定は任意です。

Sendボタンをクリックし、成功した場合は以下メッセージが表示されます。

api.py実行中のターミナル画面からも、設定状況が確認できます。
192.168.100.100 - - [27/Sep/2020 05:59:20] "POST /set/interface HTTP/1.1" 200 -
Line 1 SUCCESS: interface GigabitEthernet2
Line 2 SUCCESS: no shutdown
Line 3 SUCCESS: description TEST
Line 4 SUCCESS: ip address 10.1.1.1 255.255.255.0
Line 5 SUCCESS: end
IOS-XE側でも問題なく設定変更、保存が行われていました。
Router#sh conf | begin interface GigabitEthernet2
interface GigabitEthernet2
 description TEST
 ip address 10.1.1.1 255.255.255.0
 negotiation auto
 no mop enabled
 no mop sysid
最後に
簡単な例ですが、無事Guest ShellでAPIサーバが構築出来ました。ただし、Guest Shellは認証無しでデバイスのshowコマンド実行/設定変更が出来てしまうので、セキュリティや証跡管理の観点で課題はあるかもしれません。
また今回の用途であれば、Guest ShellのようなOn-Box形式ではなく、Ansibleのような外部ツールを使ってOff-Boxで制御するのがベターかも知れません。