はじめに
NW機器のConfig作成、手動でちまちまやるのって面倒くさいですよね?
特にL2SWは、まとめて大量に導入することが多く、コピペで作成すると、固有の設定をうっかり修正し忘れたりしがちです。
ポート管理表を個別に作成するケースも多く、何となく二度手間だと思っているのは自分だけではないはずです。
そこで今回は、ポート管理表と、その他のパラメータ表を元データとし、これにConfigのテンプレート(Jinja2テンプレート)をレンダリングすることで、L2SWの設定Configを自動生成してみました。
Jinja2とは
Python用のテンプレートエンジンの一つです。
詳しくは、下記のテンプレートファイルを見て頂くと分かると思いますが、テキストデータの中に、例えば{{ var }}と記載すると、そこに別で定義した変数varの値を埋め込むことができます。
他にも、‘{% for a in b %}~{% endfor %}で繰り返し、{% if x == 'y' %}~{% endif %}で条件分岐させることも可能です。
ポート管理表
今回は、8+2ポートのCisco Catalystスイッチをイメージして、CSV形式の管理表を作成しました。
port_list_hqaccess1.csv
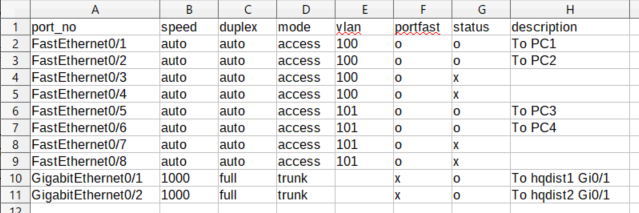
アップリンクの2ポートはL3SWに接続し、ダウンリンクの8ポートは端末に接続するか閉塞(status=x)しておくものとします。
また、アップリンクはトランクで接続し、ダウンリンクのアクセスポートは用途毎にVLAN100と101を使い分け、かつPortfastを適用するものとします。
パラメータ表
同じくCSV形式で、ホスト名、ログイン情報、アドレス等、各機器固有のパラメータを定義しました。
parameter_list_hqaccess1.csv

Jinja2テンプレート
機器毎に異なる設定は{{ var }}で定義しています。
物理インターフェース設定は、ポート管理表のデータを繰り返し処理するため、‘{% for a in b %}~{% endfor %}で囲っています。
さらに、インターフェースの種別(Description有無、アクセス/トランク、Speed/Duplex、開放/閉塞、Portfast有無)に従い、{% if x == 'y' %}~{% endif %}で設定内容を条件分けしています。
!
no service pad
service timestamps debug datetime localtime
service timestamps log datetime localtime
service password-encryption
!
hostname {{ hostname }}
!
no logging console
enable secret {{ secret }}
!
username {{ username }} privilege 15 password {{ password }}
clock timezone JST 9
ip subnet-zero
no ip domain-lookup
ip domain-name {{ hostname }}
ip ssh version 2
!
spanning-tree mode pvst
no spanning-tree optimize bpdu transmission
spanning-tree extend system-id
!
!
{%- for item in interfaces %}
interface {{ item.port_no }}
{%- if item.description != '' %}
 description << {{ item.description }} >>
{%- endif %}
{%- if item.mode == 'access' %}
 switchport access {{ item.vlan }}
 switchport mode access
{%- elif item.mode == 'trunk' %}
 switchport mode trunk
{%- endif %}
{%- if item.duplex != 'auto' %}
 duplex {{ item.duplex }}
{%- endif %}
{%- if item.speed != 'auto' %}
 speed {{ item.speed }}
{%- endif %}
{%- if item.status == 'x' %}
 shutdown
{%- endif %}
{%- if item.portfast == 'o' %}
 spanning-tree portfast
{%- endif %}
!
{%- endfor %}
!
interface Vlan1
 no ip address
 no ip route-cache
 shutdown
!
interface Vlan{{ vlan_num }}
 description {{ vlan_desc }}
 ip address {{ ip_address }} {{ subnet }}
 no ip route-cache
!
ip default-gateway {{ default_gw }}
no ip http server
no ip http secure-server
!
logging 192.168.100.107
snmp-server community C1sc0 RO
snmp-server host 192.168.100.107 C1sc0
banner login ^C
============NOTICE==============
| This is test device for demo |
================================
^C
!
line con 0
line vty 0 4
 login local
line vty 5 15
 login local
!
ntp server {{ ntp_server }}
!
crypto key generate rsa modulus 2048
!
end
Pythonスクリプト
# -*- coding: utf-8 -*-
import jinja2
import csv
import re

# 各種ファイルのパスを定義
TEMPLATE = './catalyst2960_template.txt'
PARAMETER_LIST = './parameter_list_hqaccess1.csv'
PORT_LIST = './port_list_hqaccess1.csv'
CONFIG_FILENAME = './config_hqaccess1.txt'


def build_templates(template_file, parameter_list, port_list, config_filename):

    templateLoader = jinja2.FileSystemLoader('./')
    templateEnv = jinja2.Environment(loader=templateLoader)
    template = templateEnv.get_template(template_file)

    # パラメータ表を読み込み、辞書形式に変換
    with open(parameter_list, 'rt') as fp:
        reader_param = csv.DictReader(fp)
        for dict_row1 in reader_param:
            dict_param = dict(dict_row1)

    # ポート表を読み込み、辞書形式に変換
    with open(port_list, 'rt') as fl:
        reader_port = csv.DictReader(fl)
        dict_port = {'interfaces':[]}
        for dict_row2 in reader_port:
            dict_port['interfaces'].append(dict(dict_row2))

    # ポート表をパラメータ表へ結合
    dict_param.update(dict_port)
    print(dict_param)

    # 結合データをJinja2テンプレートにレンダリングし、Configを出力
    with open(config_filename, 'w') as cf:
        outputText = template.render(dict_param)
        cf.write(outputText)

    print("Configファイル生成: %s" % config_filename)


if __name__ == "__main__":
    build_templates(TEMPLATE, PARAMETER_LIST, PORT_LIST, CONFIG_FILENAME)
処理内容はスクリプト内に記載していますが、ポイントは、Jinja2テンプレートにレンダリングするにあたり、ポート管理表とパラメータ表をCSV形式から辞書データ形式に変換している点です。
以下は辞書データdict_paramの中身です。
{'hostname': 'hqaccess1', 'hardware': 'Catalyst2960', 'secret': 'test', 'username': 'test', 'password': 'cisco', 'vlan_num': '100', 'vlan_desc': '<< Server Segment >>', 'ip_address': '192.168.100.47', 'subnet': '255.255.255.0', 'default_gw': '192.168.100.150', 'ntp_server': '192.168.100.44', 'interfaces': [{'port_no': 'FastEthernet0/1', 'speed': 'auto', 'duplex': 'auto', 'mode': 'access', 'vlan': '100', 'portfast': 'o', 'status': 'o', 'description': 'To PC1'}, {'port_no': 'FastEthernet0/2', 'speed': 'auto', 'duplex': 'auto', 'mode': 'access', 'vlan': '100', 'portfast': 'o', 'status': 'o', 'description': 'To PC2'}, {'port_no': 'FastEthernet0/3', 'speed': 'auto', 'duplex': 'auto', 'mode': 'access', 'vlan': '100', 'portfast': 'o', 'status': 'x', 'description': ''}, {'port_no': 'FastEthernet0/4', 'speed': 'auto', 'duplex': 'auto', 'mode': 'access', 'vlan': '100', 'portfast': 'o', 'status': 'x', 'description': ''}, {'port_no': 'FastEthernet0/5', 'speed': 'auto', 'duplex': 'auto', 'mode': 'access', 'vlan': '101', 'portfast': 'o', 'status': 'o', 'description': 'To PC3'}, {'port_no': 'FastEthernet0/6', 'speed': 'auto', 'duplex': 'auto', 'mode': 'access', 'vlan': '101', 'portfast': 'o', 'status': 'o', 'description': 'To PC4'}, {'port_no': 'FastEthernet0/7', 'speed': 'auto', 'duplex': 'auto', 'mode': 'access', 'vlan': '101', 'portfast': 'o', 'status': 'x', 'description': ''}, {'port_no': 'FastEthernet0/8', 'speed': 'auto', 'duplex': 'auto', 'mode': 'access', 'vlan': '101', 'portfast': 'o', 'status': 'x', 'description': ''}, {'port_no': 'GigabitEthernet0/1', 'speed': '1000', 'duplex': 'full', 'mode': 'trunk', 'vlan': '', 'portfast': 'x', 'status': 'o', 'description': 'To hqdist1 Gi0/1'}, {'port_no': 'GigabitEthernet0/2', 'speed': '1000', 'duplex': 'full', 'mode': 'trunk', 'vlan': '', 'portfast': 'x', 'status': 'o', 'description': 'To hqdist2 Gi0/1'}]}
Configファイル生成: ./config_hqaccess1.txt
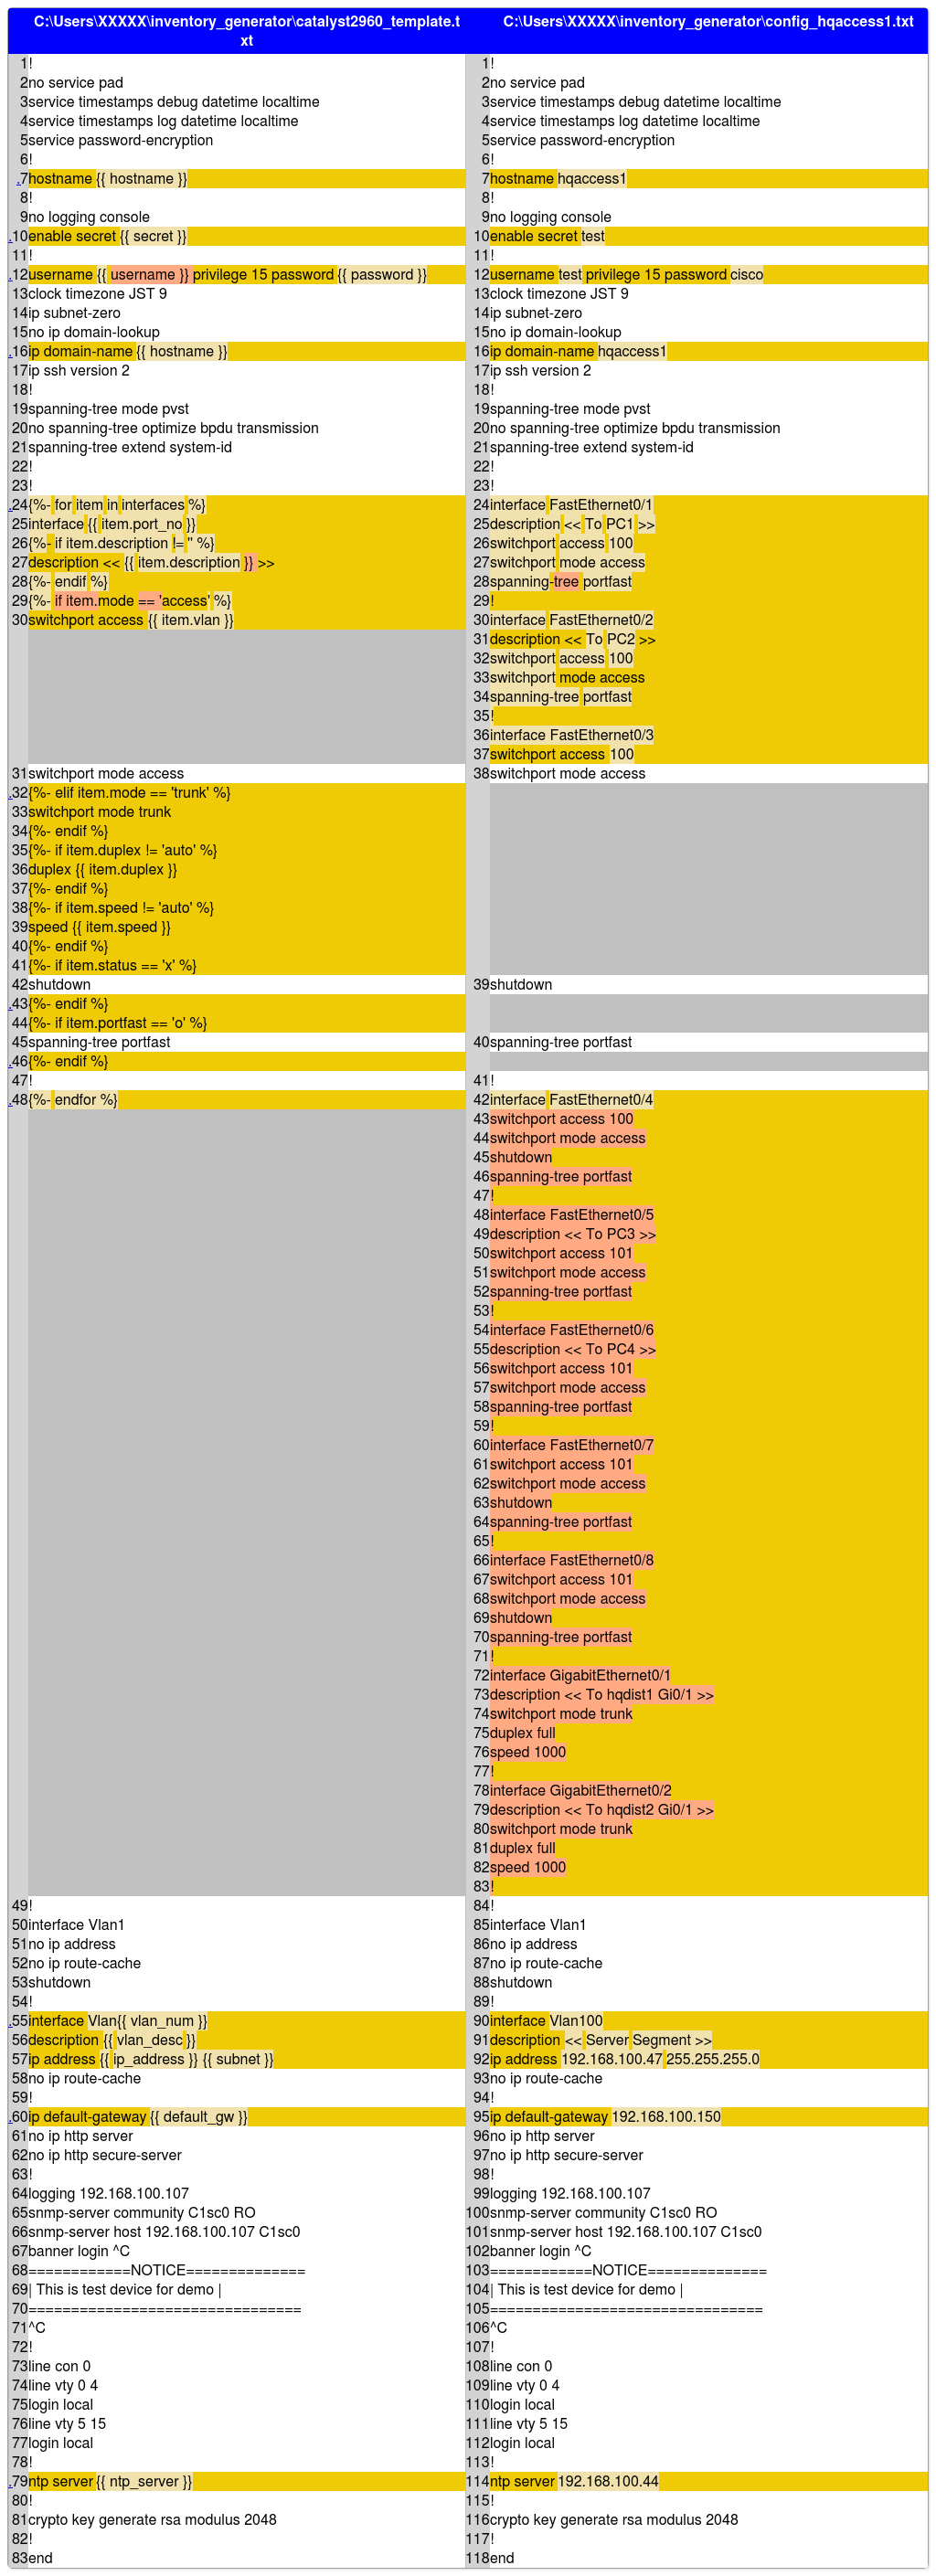
生成されたConfig
Jinja2テンプレート(左)と生成されたConfig(右)を比較しています。
想定通りの値がConfigに埋め込まれていることが分かります。
最後に
今回はサンプルとして、1台のConfig生成を行いましたが、別機種のテンプレートも用意し、複数機器をループ処理で回せるようにすれば、かなりの効率化、品質向上が見込めるのではないでしょうか。