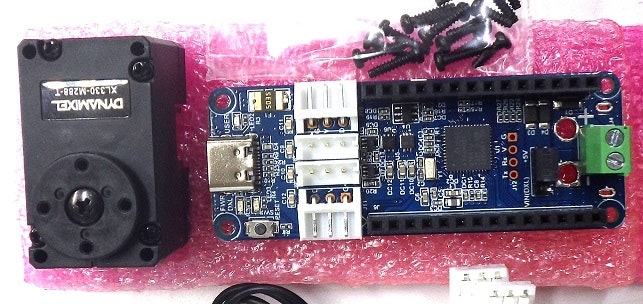
Arduino互換ボードであるOpenRB-150とサーボモータXL330-M288-TのセットであるOpenRB-150 Starter Kitを今回は、ROBOTIS様のご厚意で提供いただきました。ROBOTIS様に感謝申し上げます。
以下は、キットを動かすまでの備忘録です。
ROBOTISのe-manualの通りで、動作確認できました。
事前準備
OpenRB-150 と XL330 はあらかじめ接続しておく。
低トルク・低速でサーボを動かすならUSBパワーでよいが、
高トルク・高速で動かすなら、外部電源でサーボモータを動かすこと。
その場合、ジャンパーをVIN側に差し替えて、±に気を付けて外部電源端子に供給すること。
Arduino IDE のインストールと設定
Arduino IDE を ここからインストール(2025.3.29時点で、ver. 2.3.5)以下はWindowsの場合。
A「インストールしようとしているアプリは、Microsoft検証済みアプリではありません」と表示されるが、B「了解してインストール」を選択
B が表示されない場合、
「アプリ推奨事項の設定変更」をクリックして、「アプリを入手する場所の選択」で
「入手元を制限しないが、Microsoft Store以外からのアプリをインストールする前に警告を表示する」を選んでおくこと
- Arduino IDE を起動
- File > Preference で Additional Boards Manager URLS の欄に以下をコピペし、OK をクリック
- https://raw.githubusercontent.com/ROBOTIS-GIT/OpenRB-150/master/package_openrb_index.json
- Tools > Board > Boards Manager で 「Arduino SAMD」を検索し、インストール
(2025.3.29時点で、ver. 1.8.14) - Tools > Board > Boards Manager で 「OpenRB」を検索し、「OpenRB-150」をインストール
(2025.3.29時点で、ver. 0.2.1) - Sketch > Include Library で 「Manage Libraries ...」を選択し、
「dynamixel2arduino」を検索し、インストール
(2025.3.29時点で、ver. 0.8.0) - XL330とつないだOpenRB-150をPCと接続してから、
- Tools > Board > OpenRB-150 で「OpenRB-150」を選択
- Tools > Port で COM# を選択(#は数字)
- File > Examples で 最下段の Dynamixel2Arduino > basic > position_mode を選択
- 新しく窓が開くので、「→」でコンパイル+書き込みをする
- XL330が動く
XL330の設定は e-mannual の こちらを参照のこと
position_mode の一部のみ
void loop() {

  // GoalPosition は Min-Maxの間の値で、defaultは Min=0、Max=4095
  // 0:0 deg., 2048:180 deg., 4095: 360deg.
  // 1000 なら 約90 deg.
  dxl.setGoalPosition(DXL_ID, 1000); // GoalPositionをセット
  int i_present_position = 0;
  float f_present_position = 0.0;

  // 現在位置と目標位置(1000)の差が10以下になるまで繰り返す
  while (abs(1000 - i_present_position) > 10)
  {
    i_present_position = dxl.getPresentPosition(DXL_ID);
    DEBUG_SERIAL.print("Present_Position(raw) : ");
    DEBUG_SERIAL.println(i_present_position);
  }
  delay(1000); // 1000ms 待つ

  // Goal Position を 5.7 deg. にセット
  // UNIT_DEGREE で 単位は deg. になる
  dxl.setGoalPosition(DXL_ID, 5.7, UNIT_DEGREE);

  // 現在位置と目標位置(5.7)の差が 2.0 deg. 以下になるまで繰り返す
  while (abs(5.7 - f_present_position) > 2.0)
  {
    f_present_position = dxl.getPresentPosition(DXL_ID, UNIT_DEGREE);
    DEBUG_SERIAL.print("Present_Position(degree) : ");
    DEBUG_SERIAL.println(f_present_position);
  }
  delay(1000); // 1000ms 待つ
}