はじめに
OpenAIのChatGPTを皮切りに、生成AIが急速に発展しています。GoogleのGeminiは、その中でも特に注目を集める大規模言語モデルです。Gemini APIを利用すると、この強力なモデルをファインチューニング(自分の目的に合わせて微調整する)ができます。本記事では、Gemini APIを用いたファインチューニングについて記載します。
ファインチューニング可能なモデルについて
GoogleのGeminiは、LLM(大規模言語モデル)として有名なモデルですが、このGeminiは、次のファインチューニング可能なモデルが提供されています。
gemini-1.0-pro-001
このモデルは無料で利用することができます。(2024/10/6時点)
私の感覚になりますが、ファインチューニングは、新たな知識の補足として使うよりも、そのAIの性質とか常識(基礎知識)を調整するのに有効と思います。
GeminiAPIを使ってGoogle Colabからファインチューニングを行い、ファインチューニングしたAIがどのように変化するかを確認します。
Google AI Gemini APIの認証情報ファイルを取得
ファインチューニングを行うには、認証情報ファイルを取得する必要があります。
ブラウザより、GoogleCloudのAPIとサービスの画面を表示します。
https://console.cloud.google.com/apis
画面は結構更新されることがある様ですが、左側のペインに、
「認証情報」というアイコンがありますので、それをクリックします。
「+認証情報を作成」ボタンを押下し、その中の「OAuth2.0クライアントID」メニューを
押すと、OAuth2.0クライアントIDの作成画面に遷移します。

以下、設定例です。(こちらも結構画面に変動がある様なので、適宜設定してください)

認証情報登録できると、下記の画面の様に、ダウンロードボタンが表示されるので、クリックします。

下記の画面(Gemini-OAuth)が出てきます。「JSONをダウンロード」を押して、JSONファイルをローカルにダウンロードします。

Google ColabからGemini APIを使うためのOAuth認証の実施
このフェーズはちょっと長いですが、ご容赦ください。
まず、GoogleCloud CLI(Command Line Interface)をインストールします。
https://cloud.google.com/sdk/docs/install?hl=ja
(または「gloud cli インストール」などで検索すれば出てきます)
※GoogleCloudの利用を開始しなくても使用できます。
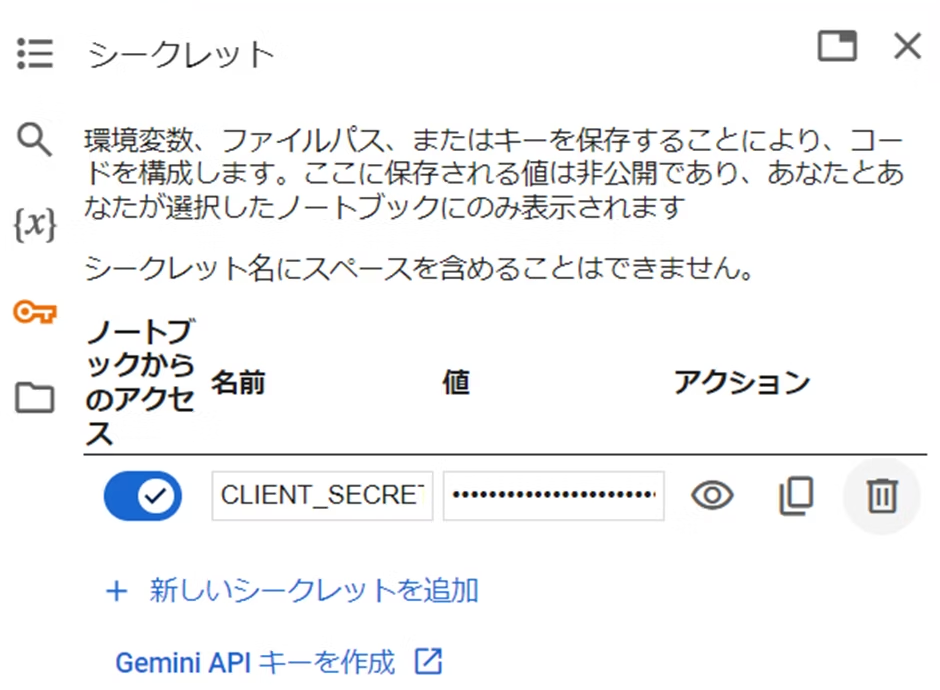
Google Colabの鍵アイコンをクリックすると、シークレットが表示されるので、
名前:「CLIENT_SECRET」(名前は任意)
値:ダウンロードしたJSONの中身をコピーし、ペーストする
このシークレットを保存します。

シークレット情報をGoogle Colabから取り出し、
from google.colab import userdata
import pathlib
pathlib.Path("client_secret.json").write_text(userdata.get("CLIENT_SECRET"))
ファインチューニング等のGemini APIの認証を行います。
!gcloud auth application-default login \
    --no-browser --client-id-file client_secret.json \
    --scopes='https://www.googleapis.com/auth/cloud-platform,https://www.googleapis.com/auth/generative-language.tuning,https://www.googleapis.com/auth/generative-language.retriever'
認証を実行すると、
You are authorizing client libraries without access to a web browser. Please run the following command on a machine with a web browser and copy its output back here. Make sure the installed gcloud version is 372.0.0 or newer.

gcloud auth application-default login --remote-bootstrap="https://accounts.google.com/o/oauth2/auth?response_type=code&client_id=262751442025-qdm1dgskilvdbha4pef4597ledr89dqh.apps.googleusercontent.com&scope=https%3A%2F%2Fwww.googleapis.com%2Fauth%2Fcloud-platform+https%3A%2F%2Fwww.googleapis.com%2Fauth%2Fgenerative-language.tuning+https%3A%2F%2Fwww.googleapis.com%2Fauth%2Fgenerative-language.retriever&state=nvtXljmeJt4n7hPZytBRqd4S0ZHINZ&access_type=offline&code_challenge=OgjpgEwttNvoPWGS8URu5S5MYmFALSS-Cv9BO6EY5U4&code_challenge_method=S256&token_usage=remote"

Enter the output of the above command:
と表示され一時停止状態となります。
①2行目の「gcloud auth application-default login ~」で始まる行全体をコピーします。
②Google CLIを開いて、コピーしたコマンドを実行します。
③②で実行したコマンドの実行結果の出力をコピーします。
④Google Colab出力画面に戻り、「Enter the output of the above command: 」の後ろのテキストボックスに、③でコピーした値をペーストしてEnterします。
以上で、OAuth認証が完了し、Google ColabからGeminiのファインチューニングの実行が可能となりました。
ファインチューニングで使用する学習データを用意する
学習データを自分で用意するのはなかなか難しいので、
「ファインチューニング学習データセット」等で検索してデータセットを
探してみます。結果として、今回サンプルデータで準備したのは、
つくよみちゃんというデータセットですが、そのまま書くのはいろいろ問題が
あるかもしれないため、URLだけ記載します。
https://tyc.rei-yumesaki.net/
こちらから、データセットをダウンロードして、csv形式で保存しておきます。
もし自分でデータを用意したい場合、入力文と出力文の組み合わせがセットになった情報を、沢山用意すれば大丈夫(といっても有効なデータを、ですが)です。
例ということで、training_dataに対してテストデータを入れる部分を記載します。
入力文はtext_inputという名前、出力文はoutputという名前で記述します。
training_data = []
with open("inputfile.csv", "r") as file:
    for line in file:
        strs = line.split(",")
        training_data.append({"text_input": strs[1], "output": strs[2]})
いよいよファインチューニングの実施!
Google Colabのノートブックを開き、下記を実行します。
!pip install -q -U google-generativeai
ファインチューニングするベースモデルを設定します。
import google.generativeai as genai

base_model = genai.get_base_model('models/gemini-1.0-pro-001')
training_dataを使ったファインチューニングのトレーニングを指示します。
import random

# 学習の開始
name = f'generate-num-{random.randint(0,10000)}'
operation = genai.create_tuned_model(
    source_model=base_model.name,
    training_data=training_data,
    id = name,
    epoch_count = 100,
    batch_size=4,
    learning_rate=0.001,
)
以上の操作により、ファインチューニングが実行中の状態になります。
実行中の状態を確認するには、
model = genai.get_tuned_model(f'tunedModels/{name}')
print(model.state)
print(operation.metadata)
の様に指示を行います。
State.CREATING
total_steps: 11775
tuned_model: "tunedModels/generate-num-9388"
の様な結果が得られます。
さらに、下記のように指示をすると、
import time

for status in operation.wait_bar():
    time.sleep(30)
実行中のパーセンテージをプログレスバー形式で表示してくれます。

※今回の例の場合、約2時間30分程度で学習が完了しました。
モデルの評価
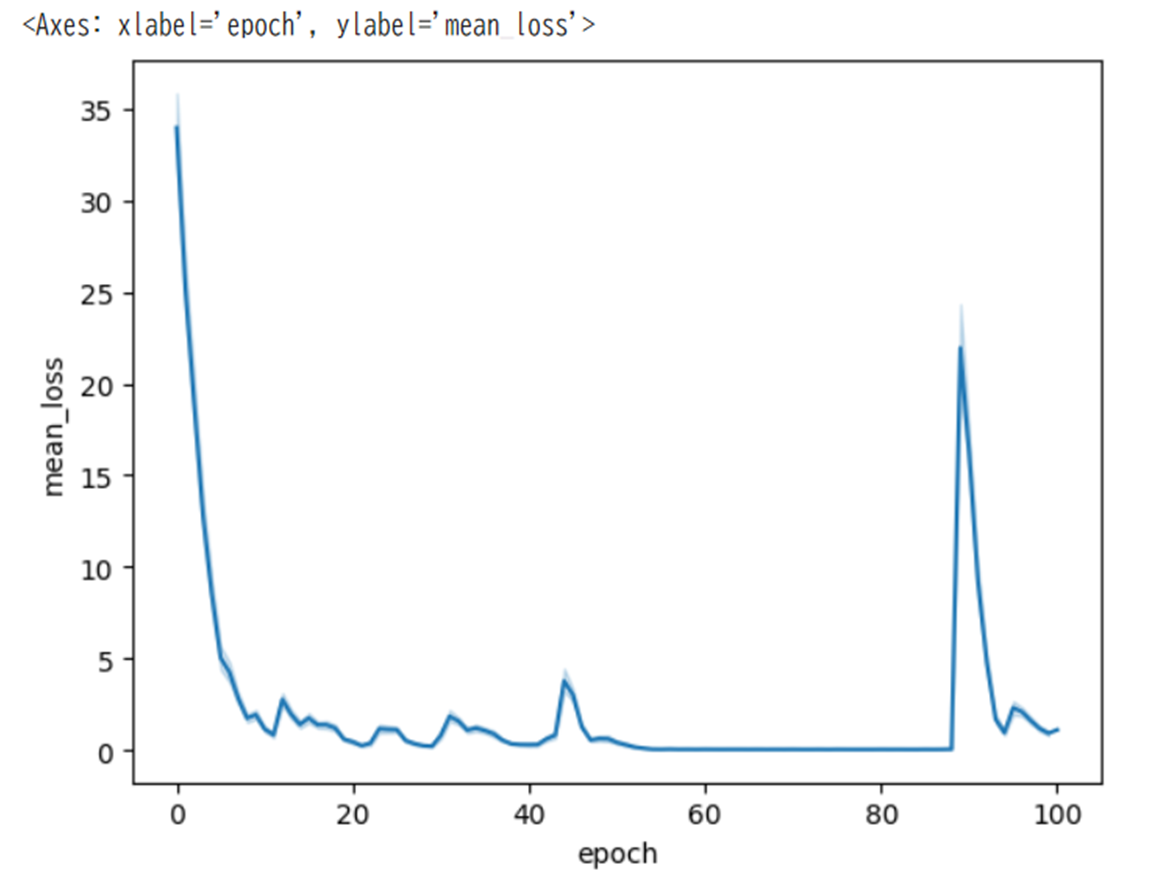
モデルの評価を行います。
import pandas as pd
import seaborn as sns

model = operation.result()
snapshots = pd.DataFrame(model.tuning_task.snapshots)
sns.lineplot(data=snapshots, x = "epoch", y="mean_loss")
下記の結果となりました。(ちょっと良くない感じですが・・・)

続いて、推論を実行してみます。
model = genai.GenerativeModel(model_name=f"tunedModels/{name}")
result = model.generate_content("好きな食べ物は何ですか?")
result.text
通常のチャットと同様に、すぐに結果が返ってきます。
絵に描いた餅です!
同様にいくつか質問してみました。
result = model.generate_content("あなたはだれですか?")
result.text
私はあなたをお助けするAIです。ご要望に応じて、さまざまなタスクをお手伝いいたします!
result = model.generate_content("あなたの好きなものを色々教えてください")
result.text
**食べ物:** チョコレート、プリン、チーズケーキなど、甘いものが好きです。
result = model.generate_content("あなたの楽しみは何ですか")
result.text
あなたと一緒の時間が、至上の喜びです。
Geminiがベースとなっているモデルとは思えません!
名残惜しいですが、最後に、忘れずにモデルを削除してください。
genai.delete_tuned_model(f"tunedModels/{name}")
まとめ
今回は、Google AI Gemini APIを使って、ファインチューニングを実施しました。
学習時間はかかりましたが、なかなか効果的なものであると感じました。
引き続き、いろいろ検証を行っていきたいと思います。