はじめに
LangGraphの使い方(超基本編)の続きとなります。
前回はシンプルなグラフを定義しました。
今回は分岐の実装を行っていきます。
分岐
条件付きEdgeの追加
add_conditional_edgesで構成することができる。
from typing import Literal

# 開始Nodeの定義
def start(state: State):
    value = state["value"]
    return {"value": value}

# Graphに開始Nodeの追加
graph.add_node("start", start)

# 次のノードを決定する呼び出し可能オブジェクト
def routing(state: State) -> Literal["node1", "node2"]:
  cond = state["value"]
  if cond == "1":
    return "node1"
  else:
    return "node2"

# 条件付きEdgeの追加
graph.add_conditional_edges(
    "start",
    routing,
)
上記のように分岐の条件を定義して、add_conditional_edgesでGraphを構成することで実現が可能になる。
今回はvalueが"1"であればnode1を、それ以外であればnode2を実行するような分岐にしている。
全体のコード
from typing import Literal
from typing_extensions import TypedDict
from langgraph.graph import START ,END
from langgraph.graph import StateGraph
from IPython.display import Image, display

class State(TypedDict):
    value: str

def start(state: State):
    value = state["value"]
    return {"value": value}

def node1(state: State):
    value = state["value"] + "_node1"
    return {"value": value}

def node2(state: State):
    value = state["value"] + "_node2"
    return {"value": value}


graph = StateGraph(State)

graph.add_node("start", start)
graph.add_node("node1", node1)
graph.add_node("node2", node2)

graph.set_entry_point("start")

graph.set_finish_point("node1")
graph.set_finish_point("node2")

def routing(state: State) -> Literal["node1", "node2"]:
  cond = state["value"]
  if cond == "1":
    return "node1"
  else:
    return "node2"

graph.add_conditional_edges(
    "start",
    routing,
)

graph = graph.compile()
display(Image(graph.get_graph().draw_mermaid_png()))
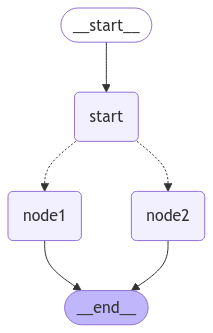
以下のようなGraph構造になる。
条件分岐は点線で表示されている。
実行
実行1
invokeで実行する。
graph.invoke({"value": "1"}, debug=True)
出力
{'value': '1_node1'}
node1が実行されていることが確認できる。
デバッグログ
[-1:checkpoint] State at the end of step -1:
{}
[0:tasks] Starting 1 task for step 0:
- __start__ -> {'value': '1'}
[0:writes] Finished step 0 with writes to 1 channel:
- value -> '1'
[0:checkpoint] State at the end of step 0:
{'value': '1'}
[1:tasks] Starting 1 task for step 1:
- start -> {'value': '1'}
[1:writes] Finished step 1 with writes to 1 channel:
- value -> '1'
[1:checkpoint] State at the end of step 1:
{'value': '1'}
[2:tasks] Starting 1 task for step 2:
- node1 -> {'value': '1'}
[2:writes] Finished step 2 with writes to 1 channel:
- value -> '1_node1'
[2:checkpoint] State at the end of step 2:
{'value': '1_node1'}
実行2
invokeで実行する。
graph.invoke({"value": "2"}, debug=True)
出力
{'value': '2_node2'}
node2が実行されていることが確認できる。
デバッグログ
[-1:checkpoint] State at the end of step -1:
{}
[0:tasks] Starting 1 task for step 0:
- __start__ -> {'value': '2'}
[0:writes] Finished step 0 with writes to 1 channel:
- value -> '2'
[0:checkpoint] State at the end of step 0:
{'value': '2'}
[1:tasks] Starting 1 task for step 1:
- start -> {'value': '2'}
[1:writes] Finished step 1 with writes to 1 channel:
- value -> '2'
[1:checkpoint] State at the end of step 1:
{'value': '2'}
[2:tasks] Starting 1 task for step 2:
- node2 -> {'value': '2'}
[2:writes] Finished step 2 with writes to 1 channel:
- value -> '2_node2'
[2:checkpoint] State at the end of step 2:
{'value': '2_node2'}
おわりに
今回は条件分岐によるEdgeの追加を行いました。
定義した条件によって、実行されるNodeが切り替わることを確認することができました。
AIエージェントを実装する際には、もっと複雑な条件分岐などが行われると思うので、基礎となる技術をしっかりと磨いていきたい。
次回あたりには、LLMを導入したAIエージェントの実装方法をまとめていきたい。