はじめに
ROS Advent Calendar 2021の15日目の記事です。
本記事では、Unity側でバーチャルなロボットを動かすと、ROS側のロボットもそれに同期して動く仕組みについて説明します。
最終的には以下の動画のようなことができます。バーチャルロボットがUnity内の壁に衝突して停止すると、ROSで制御されている実機も停止します。リアルな壁はありませんが、あたかもそこに壁があるかのようにふるまいます。
※ちなみに、ROSのコードは一切書きません (ROSアドベントカレンダーとは...?)
実行環境
本記事で用いる実行環境は以下の通りです。
- Windows 10
- linuxでも同様の手順で問題なく動くと思います
- ROS2 Foxy Fitzroy
- Unity 2020.3.17f1
- Turtlebot3 waffle pi
- gazebo等のシミュレーション環境でも問題なく動作します
UnityとROS2の連携にはROS-TCP-ConnectorとROS-TCP-Endpointのインストールが必要です。手順については以下の記事でも紹介しています。
仕組み
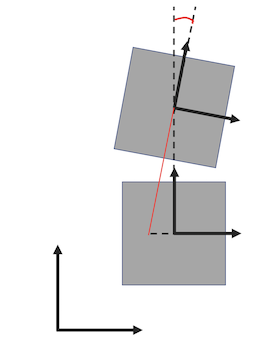
Unityから現在の座標を送り、そこを目標地点としてnavigation2を使って移動する、などの方法も考えられますが、ここではシンプルに前のフレームと現在のフレームの間の姿勢の差分(速度)を計算し、それに応じて/cmd_velをパブリッシュする、という方法を用いています。姿勢の差分は現在のロボットのローカル座標系に変換したものを用います。
実装
ロボットと壁を作る
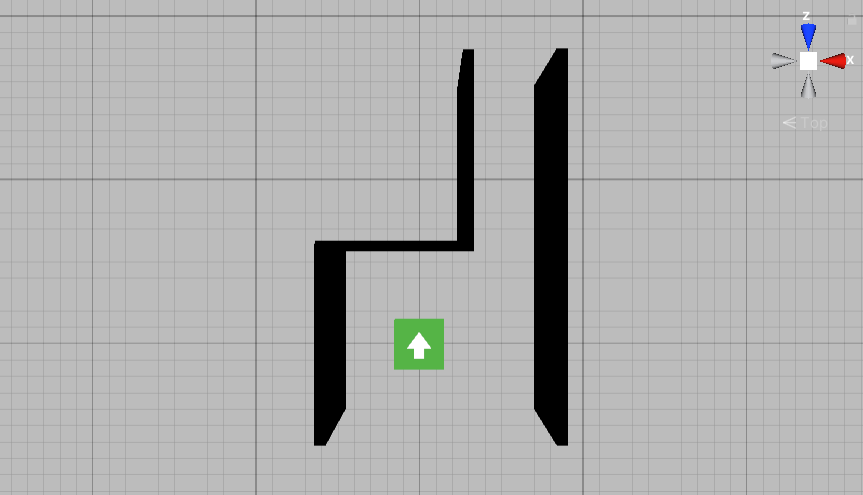
Unity内で動かすロボットとその周辺の壁を、適当にCubeか何かで作ります。ロボットの向きがわかりやすいように、上面に矢印を貼り付けています。ロボットにはTurtlesimという名前をつけておきます。
トピックをパブリッシュするスクリプト
ROSでロボットを動かすためのトピックを、Unityからパブリッシュする処理を作成します。TwistPublisher.csというスクリプトを作り、シーン内の適当なオブジェクトにアタッチします。/cmd_velトピックにTwistメッセージを一定周期でパブリッシュし続けるコードです。
using UnityEngine;
using Unity.Robotics.ROSTCPConnector;
using RosMessageTypes.Geometry;
using Unity.Robotics.ROSTCPConnector.ROSGeometry;

public class TwistPublisher : MonoBehaviour
{
    public string topicName = "/cmd_vel";
    public float publishMessageFrequency = 0.5f;
    private ROSConnection ros;
    private float timeElapsed;
    private TwistMsg twist = new TwistMsg();

    void Start()
    {
        ros = ROSConnection.GetOrCreateInstance();
        ros.RegisterPublisher<TwistMsg>(topicName);
    }

    private void Update()
    {
        timeElapsed += Time.deltaTime;

        // 一定周期でパブリッシュする
        if (timeElapsed > publishMessageFrequency)
        {
            SendTwistMsg(twist);
            timeElapsed = 0;
        }
    }

    public void SendTwistMsg(TwistMsg msg)
    {
        ros.Publish(topicName, msg);
    }

    public void SendTwistMsgInstance()
    {
        ros.Publish(topicName, twist);
    }

    public void SetTwistMsgValue(Vector3 linearVector, Vector3 angularVector) {
        // 移動速度と回転速度をそれぞれROSの座標系に変換
        Vector3<FLU> rosLinear = linearVector.To<FLU>();
        Vector3<FLU> rosAngular = angularVector.To<FLU>();
        rosAngular.z *= -1f;

        // 速度をTwistMsgインスタンスにセット
        twist.linear = rosLinear;
        twist.angular = rosAngular;
    }
}
Unityのロボットを動かせるようにする
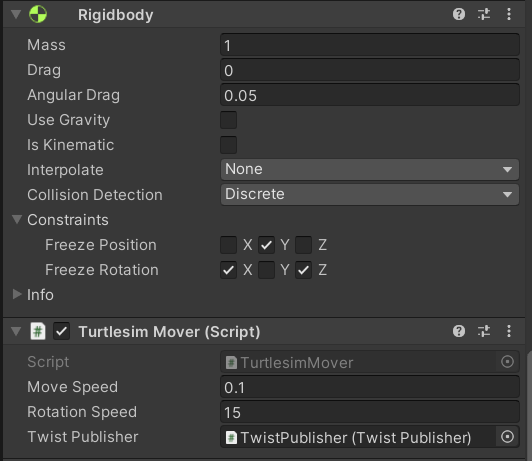
先ほど作ったTurtlesimオブジェクトをキー入力で動かせるようにします。TurtlesimオブジェクトにRigidbodyをアタッチします、RigidbodyのUse Gravityをオフに、ConstraintsのFreeze PositionをY軸、Freeze RotationをX・Z軸に設定します。これはUnity内のロボットが物理演算によって宙返りしたりしないようにするためです。
さらに、Turtlesimオブジェクトに以下のTurtlesimMover.csをアタッチします。矢印キーで移動できます。
using System.Collections.Generic;
using UnityEngine;

public class Turtlesim : MonoBehaviour
{
    [SerializeField] private float moveSpeed = 0.1f;
    [SerializeField] private int rotationSpeed = 30;
    private Dictionary<string, bool> moveKey = new Dictionary<string, bool>
    {
        {"up", false },
        {"down", false },
        {"right", false },
        {"left", false },
    };
    private Vector3 lastPos;
    private Vector3 lastRot;
    [HideInInspector] public (Vector3 linear, Vector3 angular) velocity = (new Vector3(), new Vector3());

    void Update()
    {
        moveKey["up"] = Input.GetKey(KeyCode.UpArrow);
        moveKey["down"] = Input.GetKey(KeyCode.DownArrow);
        moveKey["right"] = Input.GetKey(KeyCode.RightArrow);
        moveKey["left"] = Input.GetKey(KeyCode.LeftArrow);
    }

    void FixedUpdate()
    {
        // キー入力で移動させる
        if (moveKey["up"])
        {
            transform.Translate(0f, 0f, moveSpeed * Time.deltaTime);
        }
        if (moveKey["down"])
        {
            transform.Translate(0f, 0f, -moveSpeed * Time.deltaTime);
        }
        if (moveKey["right"])
        {
            transform.Rotate(new Vector3(0, rotationSpeed, 0) * Time.deltaTime, Space.World);
        }
        if (moveKey["left"])
        {
            transform.Rotate(new Vector3(0, -rotationSpeed, 0) * Time.deltaTime, Space.World);
        }

        // 移動速度を計算
        velocity = CalculateVelocity(transform, lastPos, lastRot);
        lastPos = transform.position;
        lastRot = transform.rotation.eulerAngles;

        Vector3 linear = velocity.linear * 50;
        Vector3 angular = velocity.angular * 50;

        // 速度をパブリッシャーのTwistMsgインスタンスにセット
        twistPublisher.SetTwistMsgValue(linear, angular);
    }

    private (Vector3 linear, Vector3 angular) CalculateVelocity(
        Transform currentTransform, Vector3 lastPos, Vector3 lastRot) {

        // 直進速度を計算
        var worldPosDiff = currentTransform.position - lastPos;
        var localPosDiff = currentTransform.InverseTransformDirection(worldPosDiff);

        // 角速度を計算
        var worldRotDiff = currentTransform.rotation.eulerAngles - lastRot;
        var localRotDiff = currentTransform.InverseTransformDirection(worldRotDiff);

        Vector3 linear = localPosDiff;
        Vector3 angular = localRotDiff * Mathf.Deg2Rad;

        (Vector3 linear, Vector3 angular) velocity = (new Vector3(), new Vector3());
        velocity.linear = linear;
        velocity.angular = angular;

        return velocity;
    }
}
Turtlesimオブジェクトのインスペクターは最終的に以下のようになります。
動作確認
UnityとROSで通信するために、ターミナルからros_tcp_endpointを起動しておきます。
$ ros2 run ros_tcp_endpoint default_server_endpoint --ros-args -p ROS_IP:=<your IP address>
Turtlebot3を起動します。ここはgazeboでもいいです。
$ ros2 launch turtlebot3_bringup robot.launch.py
この状態でシーンを実行して矢印キーを押すと、その方向にUnity内のロボットが移動するとともに、実機もそれに合わせて動きます。壁にぶつかって止まると、実機も止まります。
おわりに
これを使えば、マ○オカートを自作できる...!バーチャルとリアルで相互作用を生み出す系のものはいいぞ!!


