はじめに
PytorchでのBERTの分類モデル実装時に、コードの長さと使いまわしのしにくさを感じていたところ、Pytorch Lightningというフレームワークを知ったので実装してみました。
※Pytorch Lightningとは何か?については下記の記事が分かりやすく、参考にさせて頂きました。
[PyTorch 三国志(Ignite・Catalyst・Lightning)]
(https://qiita.com/fam_taro/items/c32e0a21cec5704d9a92)
Google Colaboratoryで実行できるnotebookもgitで公開していますので、よろしければ参考にして頂き、間違っている点などあれば是非ご指摘いただけますと幸いです。
[pytorch_lightning_text_classification.ipynb]
(https://github.com/tchih11/qiita/blob/main/notebooks/pytorch_lightning_text_classification/pytorch_lightning_text_classification.ipynb)
環境
Google Colaboratory
各種インポート
%%capture
!pip install transformers==3.5.1
!pip install fugashi
!pip install ipadic
!pip install pytorch-lightning==1.1.0
import os
import numpy as np
import pandas as pd
import pytorch_lightning as pl
import torch
import torch.optim as optim
from pytorch_lightning.callbacks import EarlyStopping, ModelCheckpoint
from sklearn.model_selection import train_test_split
from torch import nn
from torch.utils.data import DataLoader, Dataset
from transformers import BertModel
from transformers.tokenization_bert_japanese import BertJapaneseTokenizer
モデリング用データセットの前処理
BERTの分類モデルを作成する際には、前処理として文章をtokenizeしてDataLoaderにする必要があります。今回は自作DatasetとLightningDataModuleを継承したクラスを使用して前処理を行い、モデリングできる状態にしていきます。
classの定義
class CreateDataset(Dataset):
    """
    DataFrameを下記のitemを保持するDatasetに変換。
    text(原文)、input_ids(tokenizeされた文章)、attention_mask、labels(ラベル)
    """

    def __init__(self, data, tokenizer, max_token_len):
        self.data = data
        self.tokenizer = tokenizer
        self.max_token_len = max_token_len

    def __len__(self):
        return len(self.data)

    def __getitem__(self, index):
        data_row = self.data.iloc[index]
        text = data_row[TEXT_COLUMN]
        labels = data_row[LABEL_COLUMN]

        encoding = self.tokenizer.encode_plus(
            text,
            add_special_tokens=True,
            max_length=self.max_token_len,
            padding="max_length",
            truncation=True,
            return_attention_mask=True,
            return_tensors='pt',
        )

        return dict(
            text=text,
            input_ids=encoding["input_ids"].flatten(),
            attention_mask=encoding["attention_mask"].flatten(),
            labels=torch.tensor(labels)
        )

class CreateDataModule(pl.LightningDataModule):
    """
    DataFrameからモデリング時に使用するDataModuleを作成
    """
    def __init__(self, train_df, valid_df, test_df, batch_size=16, max_token_len=512,
                 pretrained_model='cl-tohoku/bert-base-japanese-char-whole-word-masking'):
        super().__init__()
        self.train_df = train_df
        self.valid_df = valid_df
        self.test_df = test_df
        self.batch_size = batch_size
        self.max_token_len = max_token_len
        self.tokenizer = BertJapaneseTokenizer.from_pretrained(pretrained_model)

    def setup(self):
        self.train_dataset = CreateDataset(self.train_df, self.tokenizer, self.max_token_len)
        self.vaild_dataset = CreateDataset(self.valid_df, self.tokenizer, self.max_token_len)
        self.test_dataset = CreateDataset(self.test_df, self.tokenizer, self.max_token_len)

    def train_dataloader(self):
        return DataLoader(self.train_dataset, batch_size=self.batch_size, shuffle=True, num_workers=os.cpu_count())

    def val_dataloader(self):
        return DataLoader(self.vaild_dataset, batch_size=self.batch_size, num_workers=os.cpu_count())

    def test_dataloader(self):
        return DataLoader(self.test_dataset, batch_size=self.batch_size, num_workers=os.cpu_count())
使い方
まずは文章とラベルから成るtrain_df、valid_df、test_df(全てDataFrame)を用意します。今回はcriterionにnn.CrossEntropyLossを使用するので、ラベルは数値型に変換しておきます。
# こんな感じ(データはlivedoorのニュースコーパス)
train_df.head(3)
# >   text	category
# > 0	スティーブン・...	1
# > 1	10月末、K-1イ ...	0
>#  2	今日は大みそか...	6
あとはDataFrameをCreateDataModuleに渡してsetup()すれば完成です。
# 用意したDataFrameの文章、ラベルのカラム名
TEXT_COLUMN = "text"
LABEL_COLUMN = "category"

# 作ったDataFrameを渡してsetup
data_module = CreateDataModule(train_df,valid_df,test_df)
data_module.setup()
setup後のdata_moduleの中身は下記のような形になっています。
# datasetへのアクセス
item = data_module.train_dataset[0]
print(item["input_ids"])
# > tensor([   2,   27,   26,   26,   70,   25,    6,  120,  356,  186,  337,    7,
# >         1266,  307,  163,  239,  181,    6,   93,   40,  123,   29,   14,   16,
# >          ・・・
# >         2690,   23,   19,  322,  197,   11, 1266,   87,  550,  181,    6,  466,
# >         1823,  577,  693,   11,  142,  125,   47,    3])

print(item["input_ids"].shape)
# > torch.Size([512])
# dataloaderのバッチの中身を確認
batch = next(iter(data_module.train_dataloader()))
print(batch["input_ids"])
# > tensor([[   2,   55,   28,  ...,   18,   19,    3],
# >         [   2,  569,   67,  ...,  145,  427,    3],
# >         ...,
# >         [   2,   45,   49,  ...,  163, 1143,    3],
# >         [   2,  672,   11,  ...,    8,  451,    3]])

print(batch["input_ids"].shape)
# > torch.Size([16, 512])
#  → batch_size × max_token_lenになっている
モデリングの実行 & 精度検証
クラスの定義
データの準備が整ったら、LightningModuleを継承してモデリング用クラスを作成します。
def xx_stepで、training/validation/testの各フェーズごとにミニバッチの処理を定義することができる点が特徴です。関数名をフックにして各フェーズで必要となる処理、例えばtraining時のmodel.train()やloss.backward()、validation時のmodel.valid()やtorch.no_grad()といった処理は内部的に行ってくれるため、記述は不要です。全フェーズで必要な.to(device)などの処理も内部的にやってくれます。
__init__、forwardを定義するところは普通にpytorchで実装する場合とほぼ変わりません。
class TextClassifier(pl.LightningModule):
    def __init__(self, n_classes: int, n_epochs=None,
                 pretrained_model='cl-tohoku/bert-base-japanese-char-whole-word-masking'):
        super().__init__()

        # モデルの構造
        self.bert = BertModel.from_pretrained(
            pretrained_model, return_dict=True)
        self.classifier = nn.Linear(self.bert.config.hidden_size, n_classes)
        self.n_epochs = n_epochs
        self.criterion = nn.CrossEntropyLoss()

        # BertLayerモジュールの最後を勾配計算ありに変更
        for param in self.bert.parameters():
            param.requires_grad = False
        for param in self.bert.encoder.layer[-1].parameters():
            param.requires_grad = True

    # 順伝搬
    def forward(self, input_ids, attention_mask, labels=None):
        output = self.bert(input_ids, attention_mask=attention_mask)
        preds = self.classifier(output.pooler_output)
        loss = 0
        if labels is not None:
            loss = self.criterion(preds, labels)
        return loss, preds

    # trainのミニバッチに対して行う処理
    def training_step(self, batch, batch_idx):
        loss, preds = self.forward(input_ids=batch["input_ids"],
                                    attention_mask=batch["attention_mask"],
                                    labels=batch["labels"])
        return {'loss': loss,
                'batch_preds': preds,
                'batch_labels': batch["labels"]}

    # validation、testでもtrain_stepと同じ処理を行う
    def validation_step(self, batch, batch_idx):
        loss, preds = self.forward(input_ids=batch["input_ids"],
                                    attention_mask=batch["attention_mask"],
                                    labels=batch["labels"])
        return {'loss': loss,
                'batch_preds': preds,
                'batch_labels': batch["labels"]}

    def test_step(self, batch, batch_idx):
        loss, preds = self.forward(input_ids=batch["input_ids"],
                                    attention_mask=batch["attention_mask"],
                                    labels=batch["labels"])
        return {'loss': loss,
                'batch_preds': preds,
                'batch_labels': batch["labels"]}

    # epoch終了時にvalidationのlossとaccuracyを記録
    def validation_epoch_end(self, outputs, mode="val"):
        # loss計算
        epoch_preds = torch.cat([x['batch_preds'] for x in outputs])
        epoch_labels = torch.cat([x['batch_labels'] for x in outputs])
        epoch_loss = self.criterion(epoch_preds, epoch_labels)
        self.log(f"{mode}_loss", epoch_loss, logger=True)

        # accuracy計算
        num_correct = (epoch_preds.argmax(dim=1) == epoch_labels).sum().item()
        epoch_accuracy = num_correct / len(epoch_labels)
        self.log(f"{mode}_accuracy", epoch_accuracy, logger=True)

    # testデータのlossとaccuracyを算出(validationの使いまわし)
    def test_epoch_end(self, outputs):
        return self.validation_epoch_end(outputs, "test")

    # optimizerの設定
    def configure_optimizers(self):
        # pretrainされているbert最終層のlrは小さめ、pretrainされていない分類層のlrは大きめに設定
        optimizer = optim.Adam([
            {'params': self.bert.encoder.layer[-1].parameters(), 'lr': 5e-5},
            {'params': self.classifier.parameters(), 'lr': 1e-4}
        ])

        return [optimizer]
使い方
インスタンスの作成、及び各種設定
クラスを使用してインスタンスを作成したら、EarlyStoppingとモデルの保存先の設定を行います。
# epoch数
N_EPOCHS = 10

# モデルインスタンスを作成
model = TextClassifier(n_classes=9,n_epochs=N_EPOCHS)

# EarlyStoppingの設定
# 3epochで'val_loss'が0.05以上減少しなければ学習をストップ
early_stop_callback = EarlyStopping(
    monitor='val_loss',
    min_delta=0.05,
    patience=3,
    mode='min')

# モデルの保存先
# epoch数に応じて、「epoch=0.ckpt」のような形で指定したディレクトリに保存される
checkpoint_callback = ModelCheckpoint(
    dirpath="./checkpoints",
    filename='{epoch}',
    verbose=True,
    monitor='val_loss',
    mode='min'
)

# Trainerに設定
trainer = pl.Trainer(max_epochs=N_EPOCHS,
                     gpus=1,
                     progress_bar_refresh_rate=30,
                     callbacks=[checkpoint_callback, early_stop_callback])
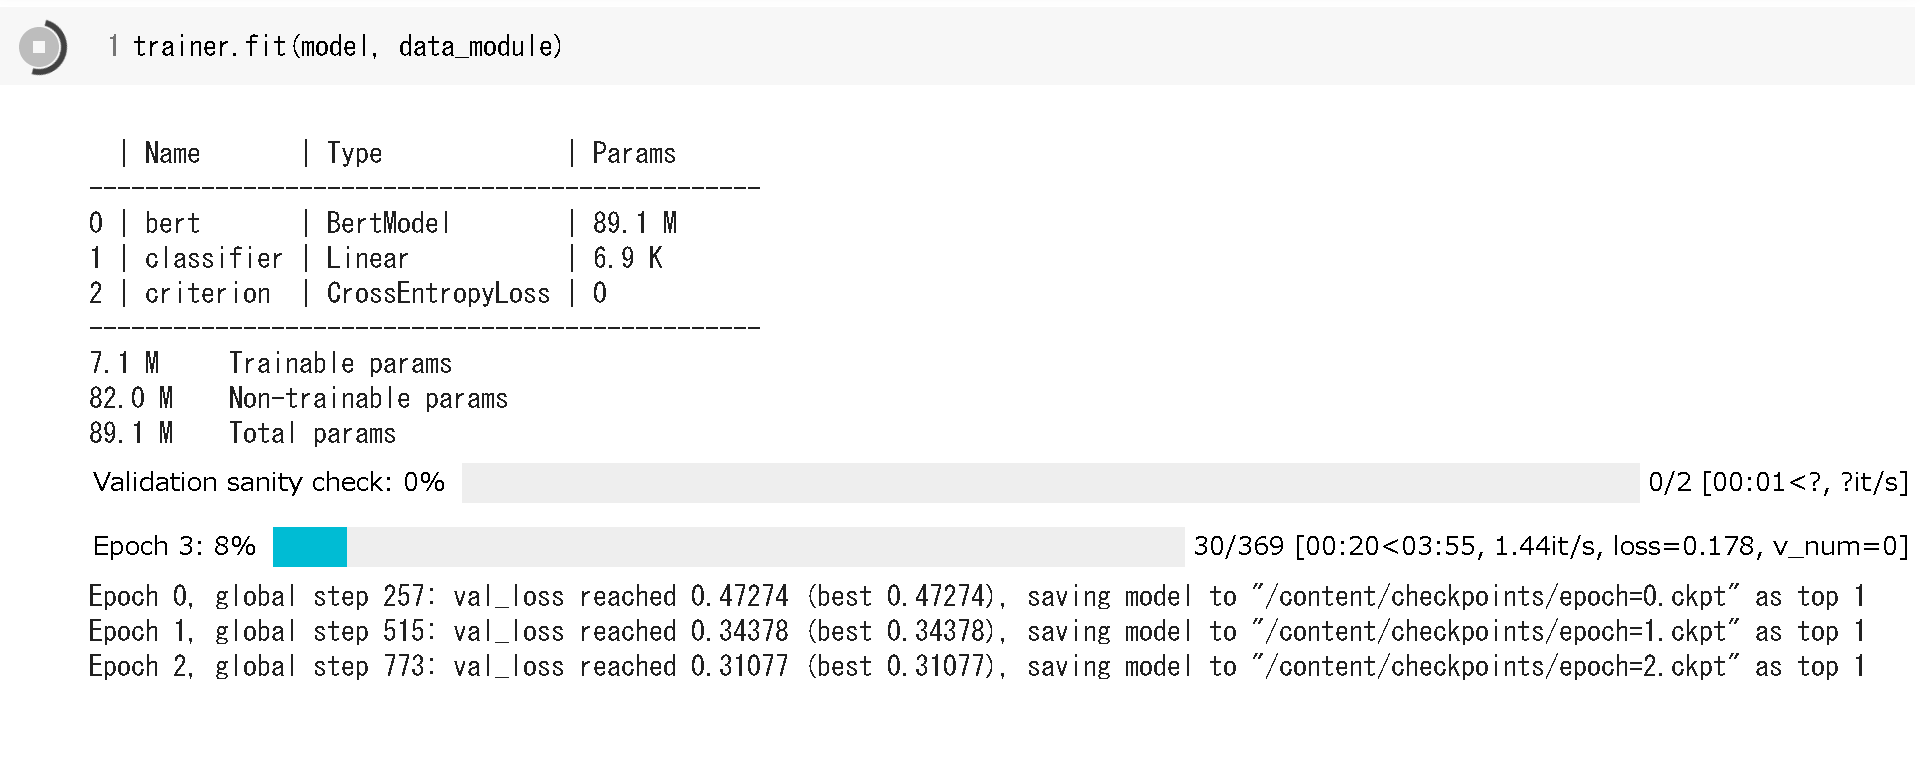
学習の実行
設定が終わったらいよいよ学習です。勝手にループしてくれるので、for文の記述は不要です。
# 学習
trainer.fit(model, data_module)
テストの実行
一番lossが少なかった時点のモデルを使用してtestデータへの当てはめを行います。
# テスト
result = trainer.test(ckpt_path=checkpoint_callback.best_model_path)
# > -----------------------------------------------------------
# > DATALOADER:0 TEST RESULTS
# > {'test_accuracy': 0.9170632222977566,
# >  'test_loss': tensor(0.2891, device='cuda:0'),
# >  'val_accuracy': 0.9196378041878891, ← この数値は最後のvalidation epochの結果(≠ 最良モデル)
# >  'val_loss': tensor(0.3031, device='cuda:0')}
# > -----------------------------------------------------------
TensorBoard
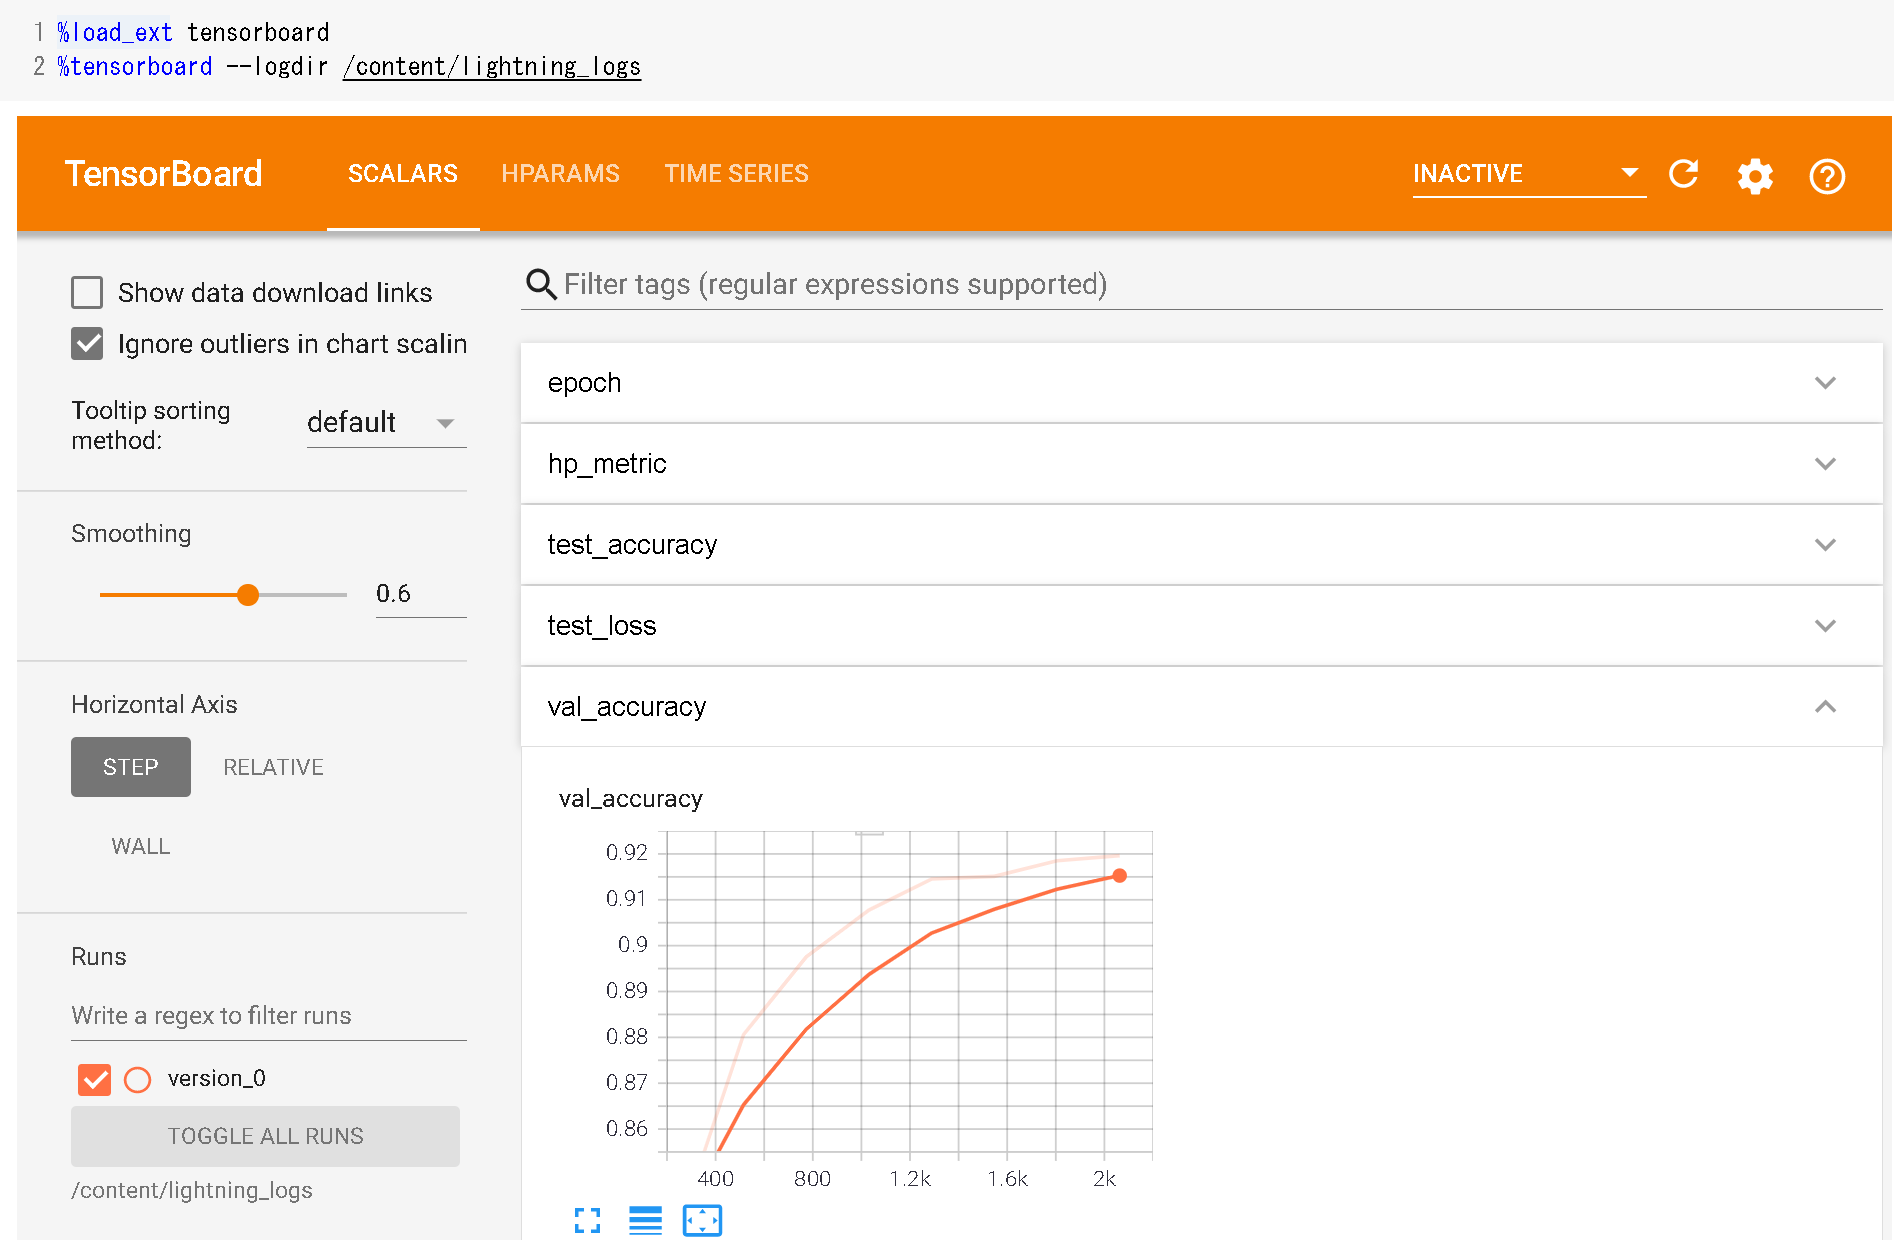
モデリング用クラス作成時にself.log()で定義した数値はTensorBoardでも確認可能です。
# Google Colaboratoryの場合
%load_ext tensorboard
%tensorboard --logdir /content/lightning_logs

checkpointからのモデルをロード
下記のような形で、checkpointを指定してモデルをロードすることも可能です。
# 指定したcheckpointのモデルをロード
trained_model = TextClassifier.load_from_checkpoint('./checkpoints/epoch=0.ckpt',n_classes=9)
感想
普通に実装するよりは格段にスッキリするし、使いまわしもしやすくなったと感じます。また、Early Stoppingなどを手軽に実装できるのも嬉しいですね。まだまだ未開拓な部分もたくさんあるので、徐々に開拓していきたいです。
参考
- 公式ドキュメント
[PYTORCH LIGHTNING DOCUMENTATION]
(https://pytorch-lightning.readthedocs.io/en/latest/) - Pytorch Lightningとは何か的なところ
[PyTorch 三国志(Ignite・Catalyst・Lightning)]
(https://qiita.com/fam_taro/items/c32e0a21cec5704d9a92) - 実装(記事)
[【実装解説】日本語版BERTでlivedoorニュース分類:Google Colaboratoryで(PyTorch)]
(https://qiita.com/sugulu_Ogawa_ISID/items/697bd03499c1de9cf082)
[速習 pytorch-lightning: 今すぐ機械学習の実験をしたいそこのキミへ]
(https://qiita.com/yamad07/items/d08098544ea5db9c9674)
[日本語BERTモデルをPyTorch用に変換してfine-tuningする with torchtext & pytorch-lightning]
(https://radiology-nlp.hatenablog.com/entry/2020/01/18/013039) - 実装(youtube動画、全部英語)
[PyTorch Lightning MasterClass]
(https://www.youtube.com/playlist?list=PLaMu-SDt_RB5NUm67hU2pdE75j6KaIOv2)←公式、再生リスト
[Fine-Tuning BERT with HuggingFace and PyTorch Lightning for Multilabel Text Classification | Dataset]
(https://www.youtube.com/watch?v=wG2J_MJEjSQ)
[Fine-Tuning BERT with HuggingFace and PyTorch Lightning for Multilabel Text Classification | Train]
(https://www.youtube.com/watch?v=UJGxCsZgalA&t=2777s)
