0. はじめに
Application Gateway へ https で接続するために、
Azure よりドメインを購入して、Let’s Encrypt によりワイルドカード証明書を作成した時の備忘メモです。
こちらは、ワイルドカード証明書の作成と、Application Gateway リスナーへの PFX 証明書ファイルの登録までをフォーカスしています。
そのため、Application Gateway の作成や設定等の詳細についてはスコープ外としています。
また、本記事の内用や実行結果等は、事執筆時点(2023/08/14)での情報となります。

- アイコンの引用
- Source: https://letsencrypt.org/
- Source: https://certbot.eff.org/
1. 実行環境
MacOS へ事前に以下をインストールしておきます。
Let's encryptを利用して ワイルドカード証明書を作成しますので、ACME クライアントとして Certbot を、また途中 Web サーバーを作成するために Azure CLIを、PKCS12(pfx) 形式ファイルの作成のために OpenSSL をインストールします。
それぞれのバージョンは以下の通りです。
- MacOS Monterey 12.6.8
- Certbot 2.1.0
- Azure CLI 2.44.1
- OpenSSL / LibreSSL 2.8.3
その他に、ワイルドカード証明書を登録する Azure Application Gateway は既に作成済みとします。(証明書の登録までフォーカス)
2. 事前準備
2.1. ドメインの購入
2.2. ACME HTTP-01 チャレンジ用 Web サーバーを用意
2.1. ドメインの購入

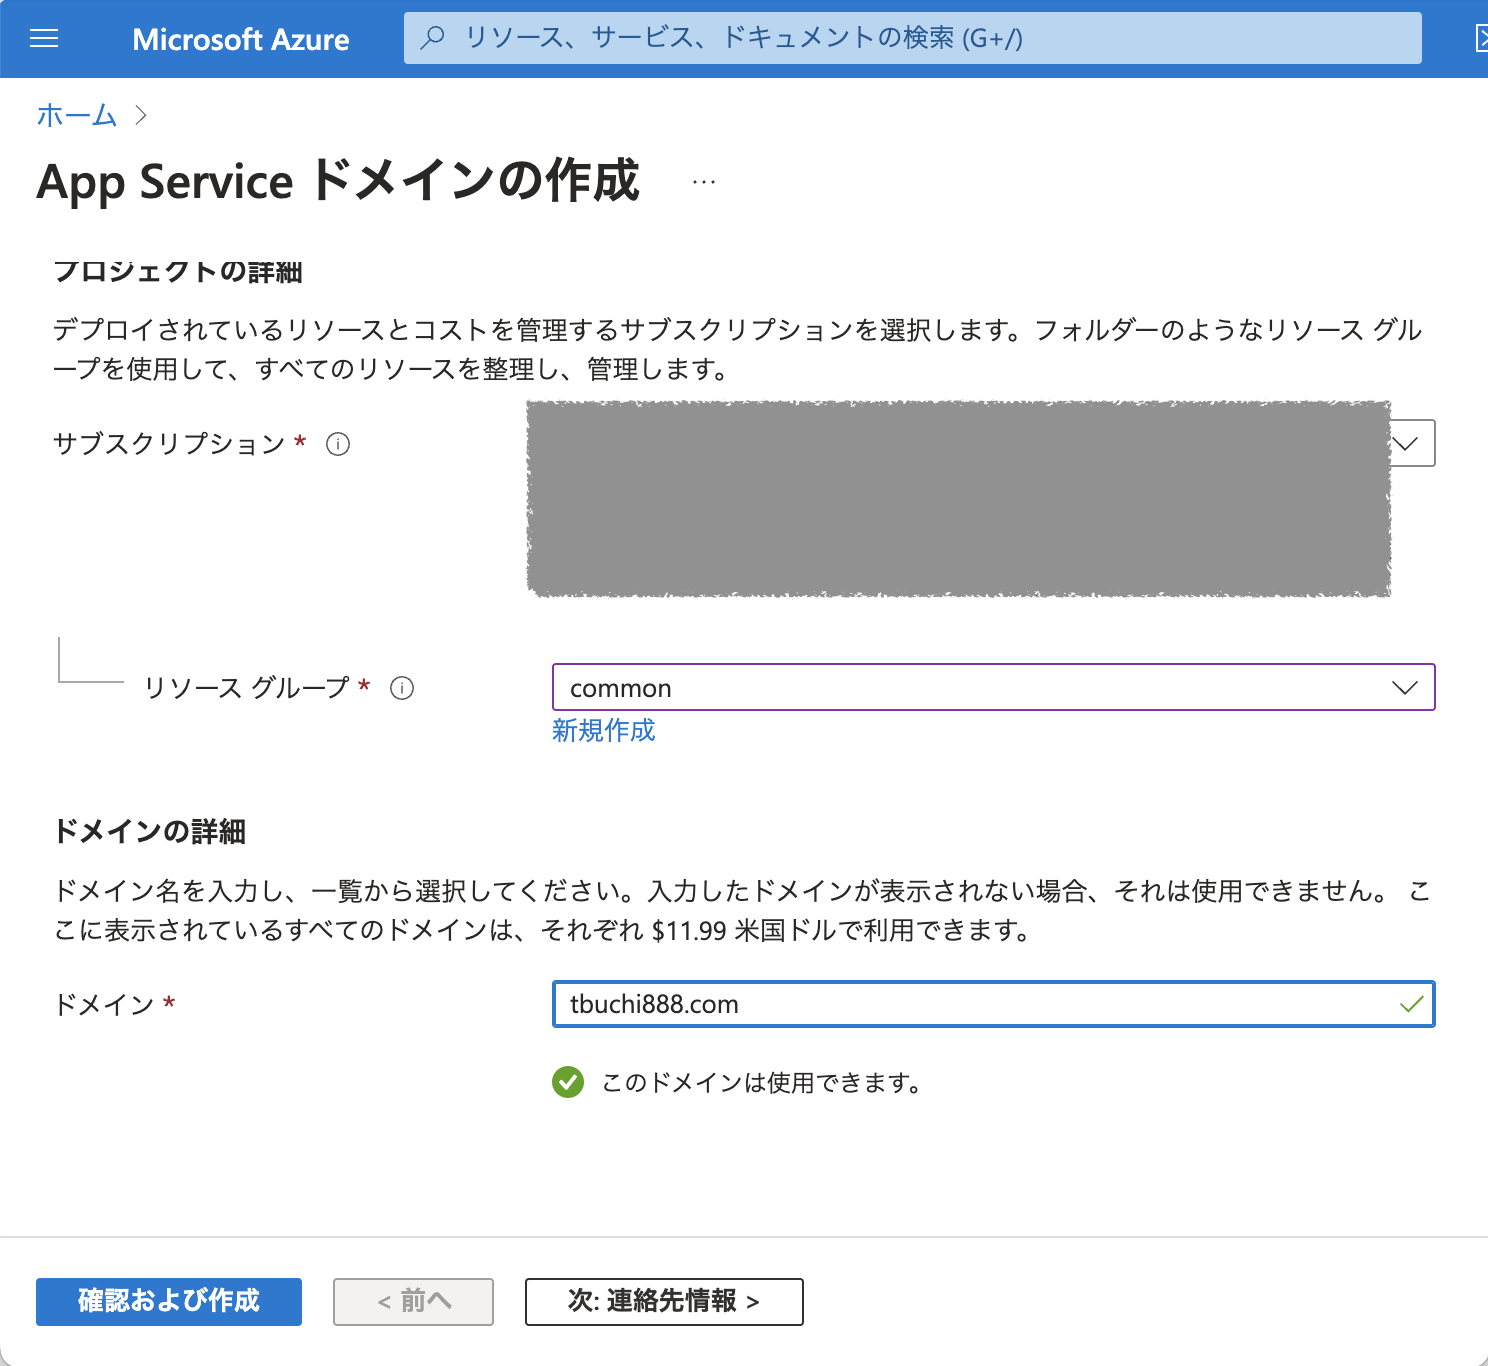
⓪事前準備ドメインを購入
App Service ドメインより、好きなドメインを購入します。
サービス名にApp Serviceとありますが、通常のドメインとして利用可能です。
App Service ドメインはGoDaddy と連携してドメインの登録を行います。
またドメイン登録後のホスト・管理に Azure DNS ゾーン を使用します。
-
App Service ドメインよりドメインを購入
-
登録完了後は
Azure DNS ゾーンを利用してドメインを管理

2.2. ACME HTTP-01 チャレンジ用 Web サーバーを用意
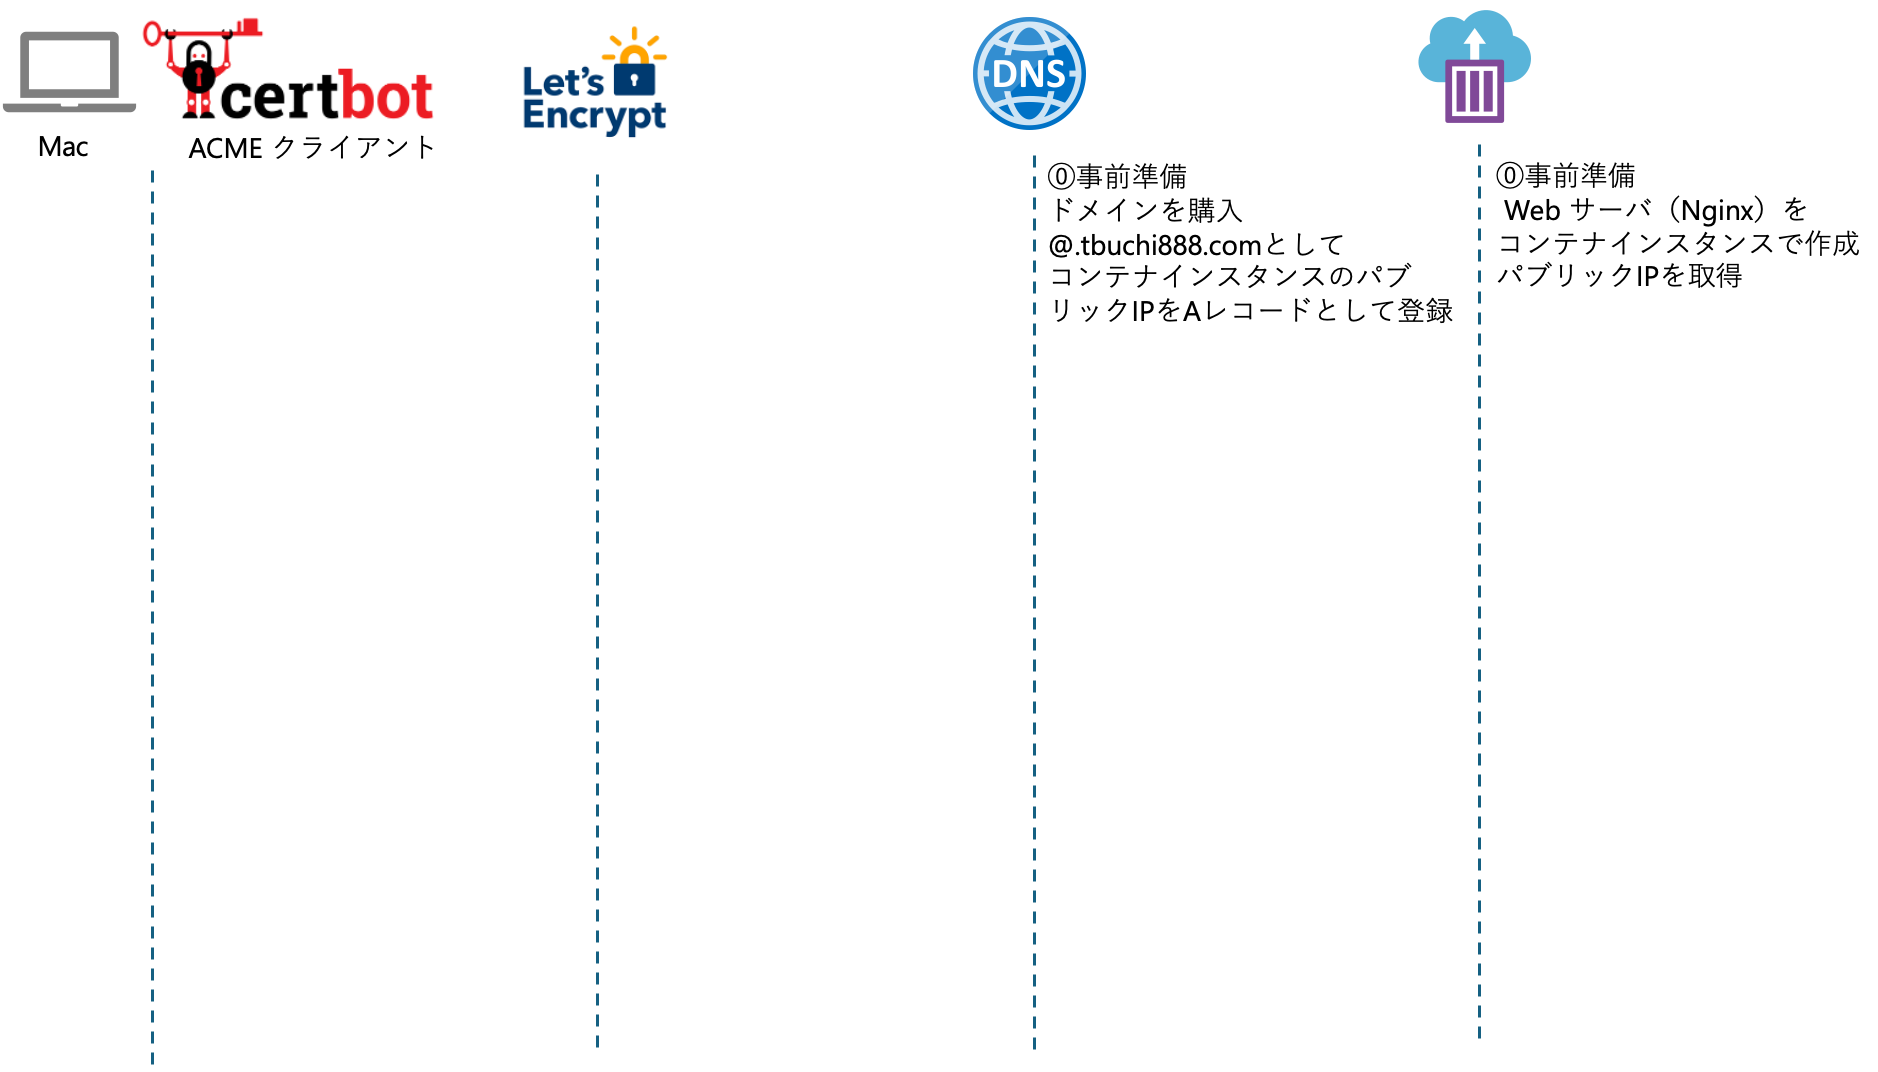
⓪事前準備 Web サーバ(Nginx)をコンテナインスタンスで作成、パブリックIPを取得
続いて ACME HTTP-01 チャレンジ 用 Webサーバを準備します。
証明書の取得には、自分が正規のドメイン所有者であることを証明する必要があるので、登録したいドメイン経由で http(port:80)インターネットアクセス可能な Web サーバを用意します。
Let’s Encrypt では ACME クライアントにトークンを発行し、ACME クライアントは Web サーバー上のhttp://[YOUR_DOMAIN]/.well-known/acme-challenge/[TOKEN]という場所に1つのTOKENファイルを設置し、インターネットからのパブリックアクセスにより、そのTOKENファイルを取得、検証チェックが完了した場合に証明書の発行に進むことができるような仕組みで、申請者が正規にドメインを管理していることを確認しています。
https://letsencrypt.org/docs/challenge-types/#http-01-challenge
Web サーバーは Azue VM 等でも構いませんが、今回は Azure Continaer Instance 上で コンテナとして Nginx を動かして対応します。
az group create --name <group-name> --location <regon>
az container create --resource-group <group-name> --name <aci-name> --image nginx:latest --dns-name-label <aci-name> --ports 80
実行結果
$ az container create --resource-group common --name myacme --image nginx:latest --dns-name-label myacme --ports 80
{
  "containers": [
〜〜中略〜〜〜
}
つづいて、パブリックIP と ProvisioningState を確認します。
$ az container show --resource-group common --name myacme --query "{IP:ipAddress.ip,ProvisioningState:provisioningState}" --out table
IP               ProvisioningState
---------------  -------------------
aaa.aaa.aaa.aaa  Succeeded
~ $
ブラウザより、パブリックIPの80番ポートhttp://aaa.aaa.aaa.aaaへアクセスできることを確認します。
⓪事前準備ドメインを購入@.tbuchi888.com としてコンテナインスタンスのパブリック IP を A レコードとして登録
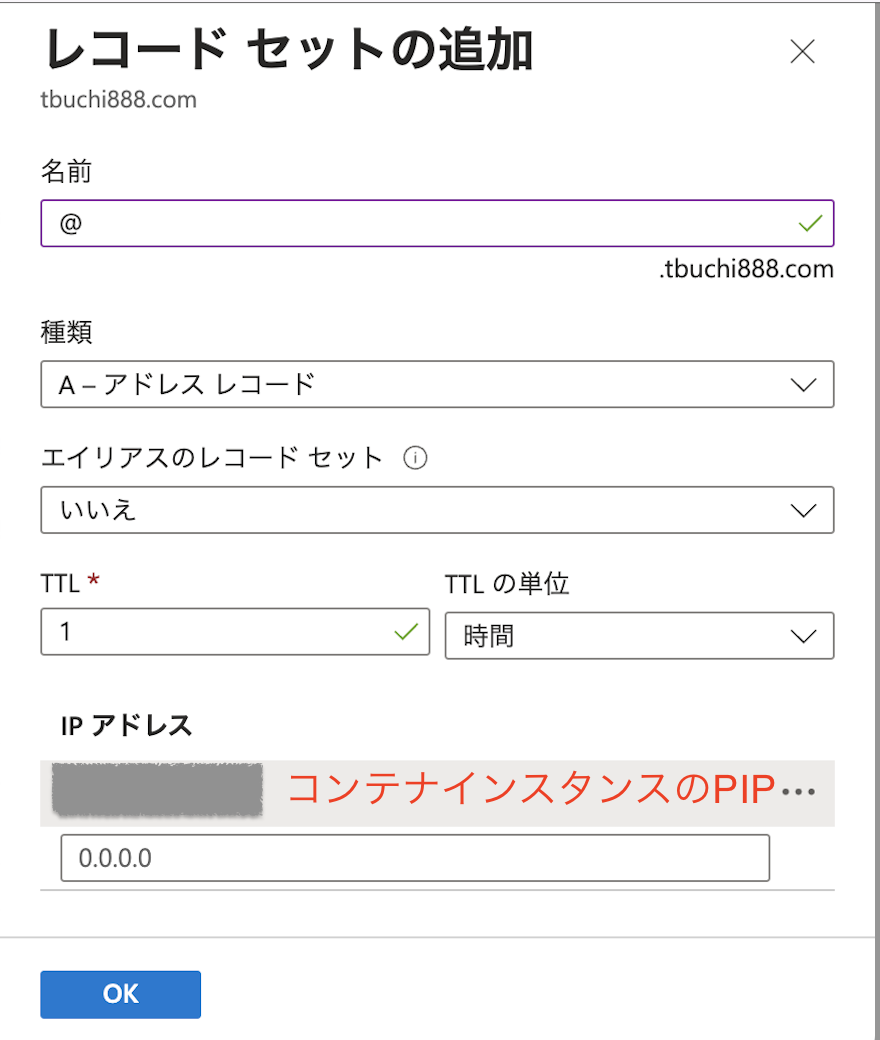
つづいて、Azure Portal のDNS ゾーン で
+ レコードセットより、以下レコードを登録します。
- 名前: @
- 種類: A
- IP アドレス: aaa.aaa.aaa.aaa(コンテナインスタンスのパブリック IP)
3. ワイルドカード証明書を作成する
certbot を利用して、以下で自分が正規のドメイン所有者であることを証明しワイルドカード証明書を作成します。
3.1. ACME dns-01 challenge
3.2. ACME http-01 challenge
3.1. ACME dns-01 challenge

① certbot から 証明書作成要求
準備が整ったので、certbot をインストールした Mac 端末で以下コマンドを実行します。
tbuchi888.comは取得済みドメイン名に置き換えてください。
sudo certbot certonly --manual \
-d "*.tbuchi888.com" -d "tbuchi888.com"
② ACME dns-01 challenge のTXT レコード登録要求
メールアドレスと、利用許諾、Electronic Frontier Foundation へのメールアドレスの共有可否を対話形式で入力すると、以下のように_acme-challenge.tbuchi888.com.へ DNS TXT レコードを登録するようにもとめられますので、Azure DNS ゾーン へ登録します。
$ sudo certbot certonly --manual \
-d "*.tbuchi888.com" -d "tbuchi888.com"
Password:
Saving debug log to /var/log/letsencrypt/letsencrypt.log
Enter email address (used for urgent renewal and security notices)
 (Enter 'c' to cancel): ****@*****

- - - - - - - - - - - - - - - - - - - - - - - - - - - - - - - - - - - - - - - -
Please read the Terms of Service at
https://letsencrypt.org/documents/LE-SA-v1.3-September-21-2022.pdf. You must
agree in order to register with the ACME server. Do you agree?
- - - - - - - - - - - - - - - - - - - - - - - - - - - - - - - - - - - - - - - -
(Y)es/(N)o: Y

- - - - - - - - - - - - - - - - - - - - - - - - - - - - - - - - - - - - - - - -
Would you be willing, once your first certificate is successfully issued, to
share your email address with the Electronic Frontier Foundation, a founding
partner of the Let's Encrypt project and the non-profit organization that
develops Certbot? We'd like to send you email about our work encrypting the web,
EFF news, campaigns, and ways to support digital freedom.
- - - - - - - - - - - - - - - - - - - - - - - - - - - - - - - - - - - - - - - -
(Y)es/(N)o: N
Requesting a certificate for *.tbuchi888.com and tbuchi888.com

- - - - - - - - - - - - - - - - - - - - - - - - - - - - - - - - - - - - - - - -
Please deploy a DNS TXT record under the name:

_acme-challenge.tbuchi888.com.

with the following value:

QDQReM0OzVxv5B2T4TUh4hz7dCG1UGKlPWM_3Lq23Ac

Before continuing, verify the TXT record has been deployed. Depending on the DNS
provider, this may take some time, from a few seconds to multiple minutes. You can
check if it has finished deploying with aid of online tools, such as the Google
Admin Toolbox: https://toolbox.googleapps.com/apps/dig/#TXT/_acme-challenge.tbuchi888.com.
Look for one or more bolded line(s) below the line ';ANSWER'. It should show the
value(s) you've just added.

- - - - - - - - - - - - - - - - - - - - - - - - - - - - - - - - - - - - - - - -
Press Enter to Continue
③_acme-challenge.tbuchi888.com: ACME dns-01 challenge のTXT レコード登録
つづいて、Azure Portal のDNS ゾーン で
+ レコードセットより、以下レコードを登録します。
- 名前: _acme-challenge
- 種類: TXT
- 値: certbot の value

④Enter(処理継続) ACME dns-01 challengeの TXT レコードの検証要求
レコードセットの登録が完了したら、再びcertbotの Terminal に戻り、Enterで続行します。
- - - - - - - - - - - - - - - - - - - - - - - - - - - - - - - - - - - - - - - -
Press Enter to Continue

- - - - - - - - - - - - - - - - - - - - - - - - - - - - - - - - - - - - - - - -
Create a file containing just this data:

[***TOKEN***].[***FINGERPRINT***]

And make it available on your web server at this URL:

http://tbuchi888.com/.well-known/acme-challenge/[***TOKEN***]

(This must be set up in addition to the previous challenges; do not remove,
replace, or undo the previous challenge tasks yet.)

- - - - - - - - - - - - - - - - - - - - - - - - - - - - - - - - - - - - - - - -
Press Enter to Continue
3.2. ACME http-01 challenge

⑥ ACME http-01 challengehttp://tbuchi888.com/.well-known/acme-challenge/[***TOKEN***]へ TOKEN ファイルの配置要求
すると、ACME HTTP-01 チャレンジ用 TOKEN ファイルの情報がcertbotより生成されるため
⑦ nginx のドキュメントルートから相対パスとして以下well-known/acme-challenge/[TOKEN]へTOKENファイルの配置
⓪事前準備で作成したコンテナインスタンスへaz container execコマンドでアクセスし、所定の位置で TOKEN ファイル作成します。
以下[***TOKEN***]および[***FINGERPRINT***]はcertbotより生成される値に書き換えます
az container exec --resource-group <group-name> --name <container-group-name> --exec-command "<command>"
# make the .well-known/acme-challenge directory with the -p option
mkdir -p /usr/share/nginx/html/.well-known/acme-challenge/
# create the verification file for the http-01-challenge
echo "[***TOKEN***].[***FINGERPRINT***]" > /usr/share/nginx/html/.well-known/acme-challenge/[certbotのファイル名(TOKEN)]
# check in the contents of the created file
cat /usr/share/nginx/html/.well-known/acme-challenge/[***TOKEN***]
以下実行結果の例
[***TOKEN***]および[***FINGERPRINT***]はcertbotより生成される値に書き換えてます
# nginx のコンテナインスタンスへaz container exec コマンドで接続
~ $ az container exec --resource-group common --name myacme --exec-command "/bin/bash"
root@SandboxHost-638275832285056138:/# # make the .well-known/acme-challenge directory with the -p option
root@SandboxHost-638275832285056138:/# mkdir -p /usr/share/nginx/html/.well-known/acme-challenge/
root@SandboxHost-638275832285056138:/# # create the verification file for the http-01-challenge
root@SandboxHost-638275832285056138:/# echo "[***TOKEN***].[***FINGERPRINT***]" > /usr/share/nginx/html/.well-known/acme-challenge/[***TOKEN***]
root@SandboxHost-638275832285056138:/# # check the contents of the created file
root@SandboxHost-638275832285056138:/# cat /usr/share/nginx/html/.well-known/acme-challenge/[***TOKEN***]
[***TOKEN***].[***FINGERPRINT***]
root@SandboxHost-638275832285056138:/# exit
#
⑧Enter(処理継続) ACME http-01 challenge の TOKEN ファイルの検証要求
ACME HTTP-01 チャレンジ用ファイルの配置が完了したため、再び、certbotの Terminal に戻り、Enterで続行します。
- - - - - - - - - - - - - - - - - - - - - - - - - - - - - - - - - - - - - - - -
Press Enter to Continue

Successfully received certificate.
Certificate is saved at: /etc/letsencrypt/live/tbuchi888.com/fullchain.pem
Key is saved at:         /etc/letsencrypt/live/tbuchi888.com/privkey.pem
This certificate expires on 2023-11-12.
These files will be updated when the certificate renews.

NEXT STEPS:
- This certificate will not be renewed automatically. Autorenewal of --manual certificates requires the use of an authentication hook script (--manual-auth-hook) but one was not provided. To renew this certificate, repeat this same certbot command before the certificate's expiry date.

- - - - - - - - - - - - - - - - - - - - - - - - - - - - - - - - - - - - - - - -
If you like Certbot, please consider supporting our work by:
 * Donating to ISRG / Let's Encrypt:   https://letsencrypt.org/donate
 * Donating to EFF:                    https://eff.org/donate-le
- - - - - - - - - - - - - - - - - - - - - - - - - - - - - - - - - - - - - - - -
$
⑨http://tbuchi888.com/.well-known/acme-challenge/[***TOKEN***]TOKENファイルの取得と検証
⑩証明書の発行
Successfully received certificate.というメッセージとともに
/etc/letsencrypt/live/[ドメイン名]配下へ各種証明書が作成されていることを確認します。
# `/etc/letsencrypt/live/[ドメイン名]`配下へ各種証明書が作成されていることを確認
$ sudo ls -alt /etc/letsencrypt/live/tbuchi888.com
total 8
-rw-r--r--  1 root  wheel  692  8 14 14:00 README
drwxr-xr-x  7 root  wheel  224  8 14 14:00 .
lrwxr-xr-x  1 root  wheel   42  8 14 14:00 fullchain.pem -> ../../archive/tbuchi888.com/fullchain1.pem
lrwxr-xr-x  1 root  wheel   38  8 14 14:00 chain.pem -> ../../archive/tbuchi888.com/chain1.pem
lrwxr-xr-x  1 root  wheel   40  8 14 14:00 privkey.pem -> ../../archive/tbuchi888.com/privkey1.pem
lrwxr-xr-x  1 root  wheel   37  8 14 14:00 cert.pem -> ../../archive/tbuchi888.com/cert1.pem
drwx------  5 root  wheel  160  8 14 14:00 ..
なお、証明書作成以降は、コンテナインスタンスは不要なので停止しておきます。
$ # コンテナインスタンスは不要なため停止
$ az container stop --resource-group common --name myacme
4. Azure Application Gateway へ SSL 証明書を登録する
ワイルドカード証明書の作成が完了したため、Azure Application Gateway へ登録します。
4.1. PKCS12(pfx) 形式ファイルの作成
4.2 Application Gateway へ SSL 証明書(PFX)を登録
4.1. PKCS12(pfx) 形式ファイルの作成
ワイルドカード証明書より、Azure Application Gateway で利用可能な PKCS#12(pfx) 形式の証明書を openssl コマンドで PFX ファイルを作成します。
# 作業ディレクトリへフォルダごとコピー
sudo cp -r /etc/letsencrypt/live/tbuchi888.com/ ./tbuchi888.com/
# コピーしたディレクトリへ移動
cd tbuchi888.com
# pkcs12 形式で作成
sudo openssl pkcs12 -export -inkey privkey.pem -in cert.pem -out tbuchi888biz.pfx
Export Passwordはのちほど、証明書登録時に必要なので控えておくこと。
$ # 作業ディレクトリへフォルダごとコピー
$ sudo cp -r /etc/letsencrypt/live/tbuchi888.com/ ./tbuchi888.com/
$ # コピーしたディレクトリへ移動
$ cd tbuchi888.com
Password:
$ # pkcs12 形式で作成
sudo openssl pkcs12 -export -inkey privkey.pem -in cert.pem -out tbuchi888biz.pfx
Enter Export Password:
Verifying - Enter Export Password:
$ # pfxファイルを確認
$ $ ls -alt
total 56
-rw-r--r--   1 root    staff  1590  8 14 15:04 tbuchi888biz.pfx
drwxr-xr-x   8 root    staff   256  8 14 15:04 .
-rw-r--r--   1 root    staff  5258  8 14 15:03 fullchain.pem
-rw-r--r--   1 root    staff   692  8 14 15:03 README
-rw-------   1 root    staff   241  8 14 15:03 privkey.pem
-rw-r--r--   1 root    staff  1509  8 14 15:03 cert.pem
-rw-r--r--   1 root    staff  3749  8 14 15:03 chain.pem
drwxr-xr-x  16 takuya  staff   512  8 14 15:03
4.2 Application Gateway へ 証明書(PFX)を登録
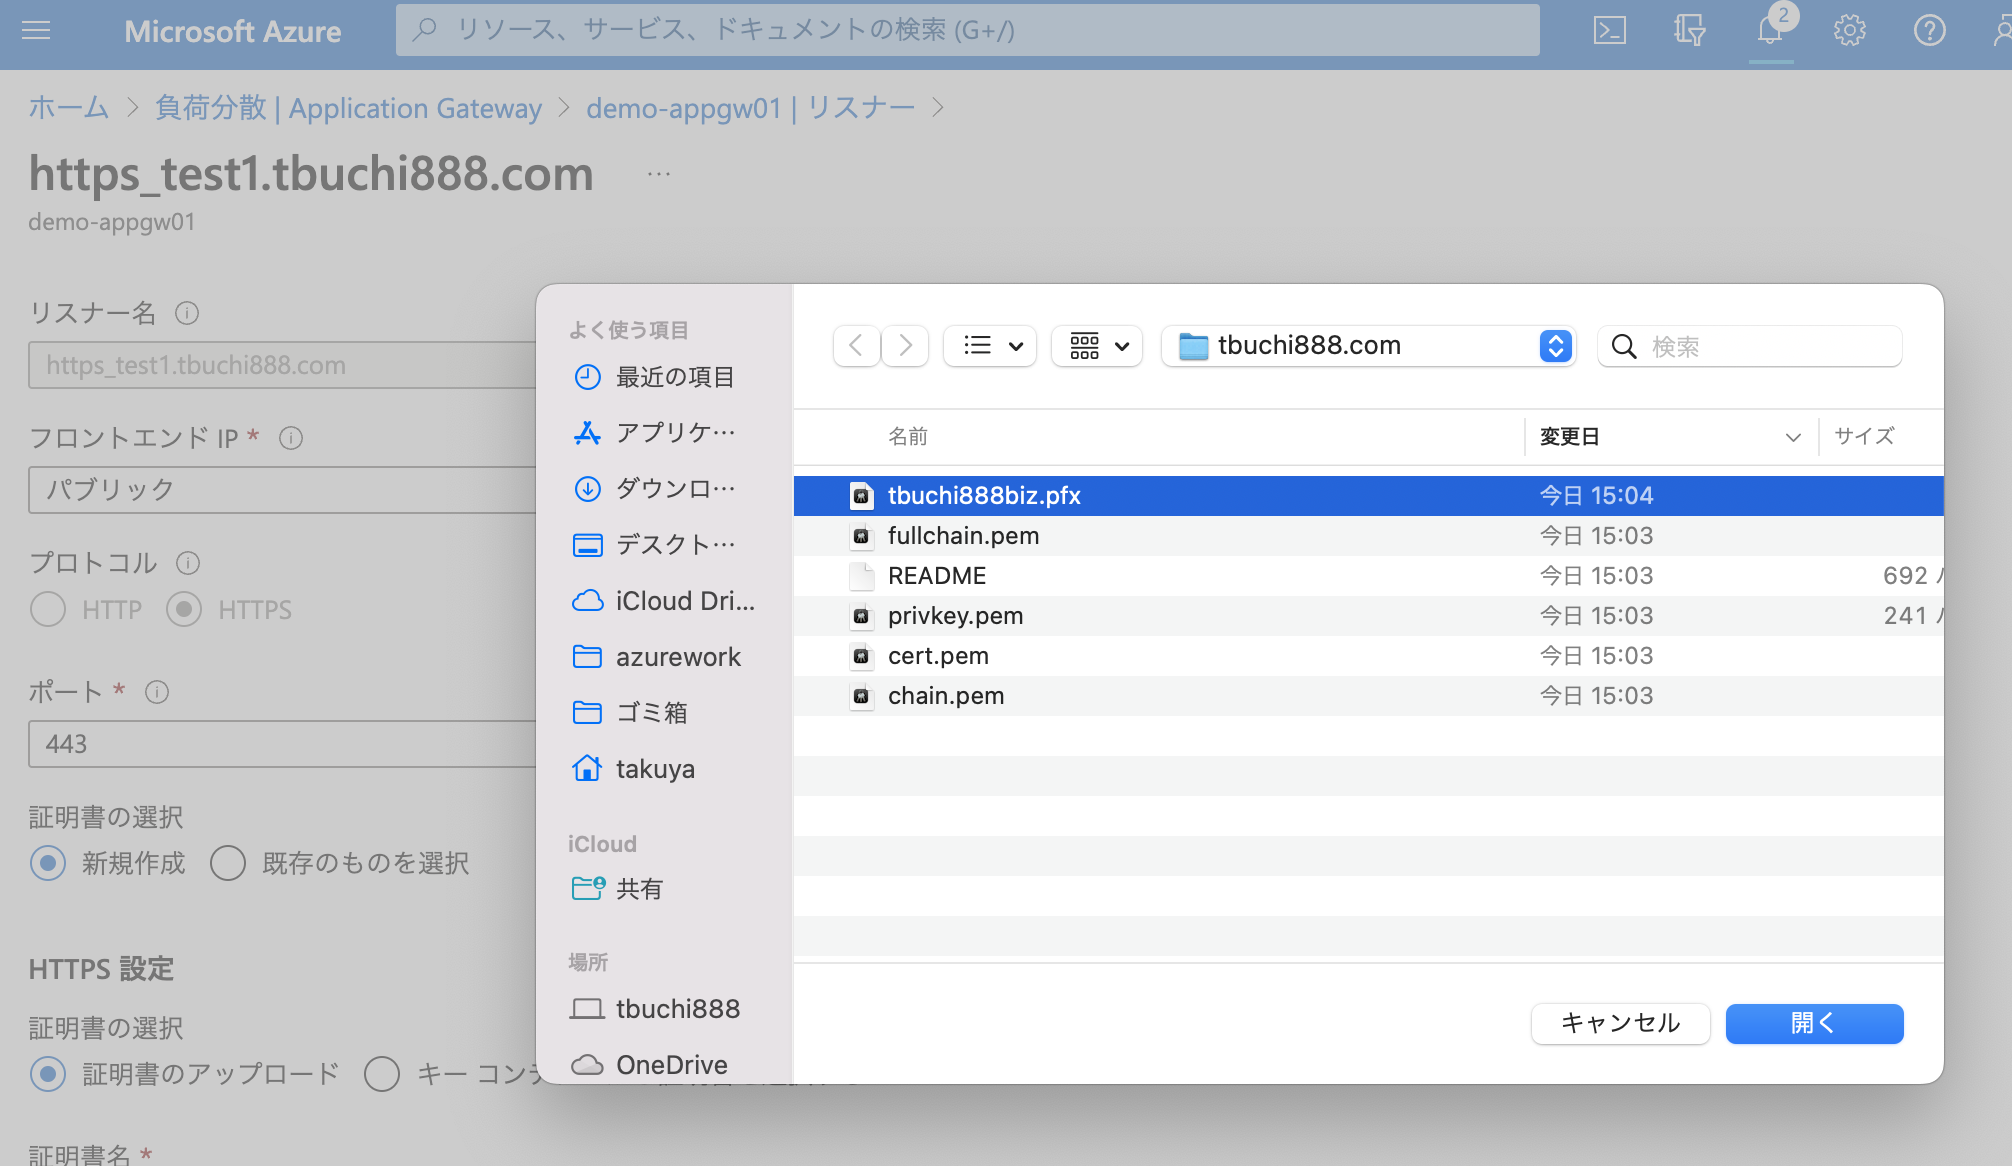
Azure Portal より、既に作成済みの Application Gateway を開き
https のリスナー登録画面で HTTPS 設定-
証明書の選択-証明書のアップロード-より、作成した PFX 証明書を選択し、パスワードへExport Passwordを入力します。
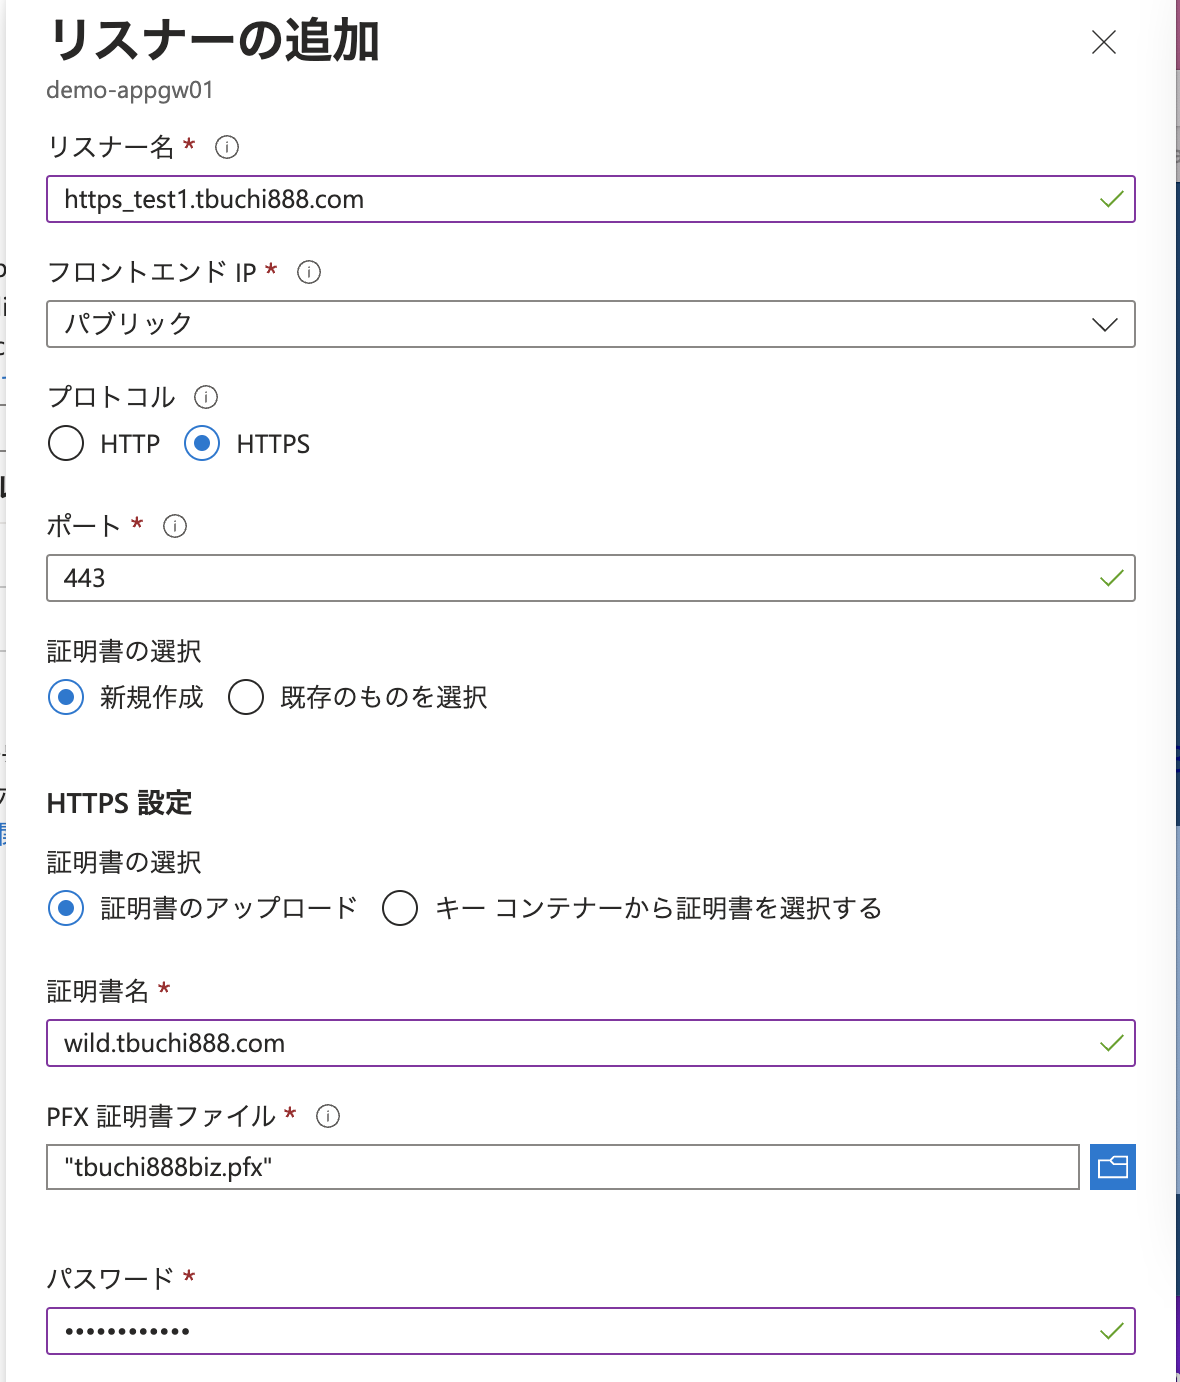
上記では、説明を簡易にするために、直接証明書をアップロードし登録していますが、通常は管理性の観点からキーコンテナー(Azure Key Vault)経由での利用を推奨します。
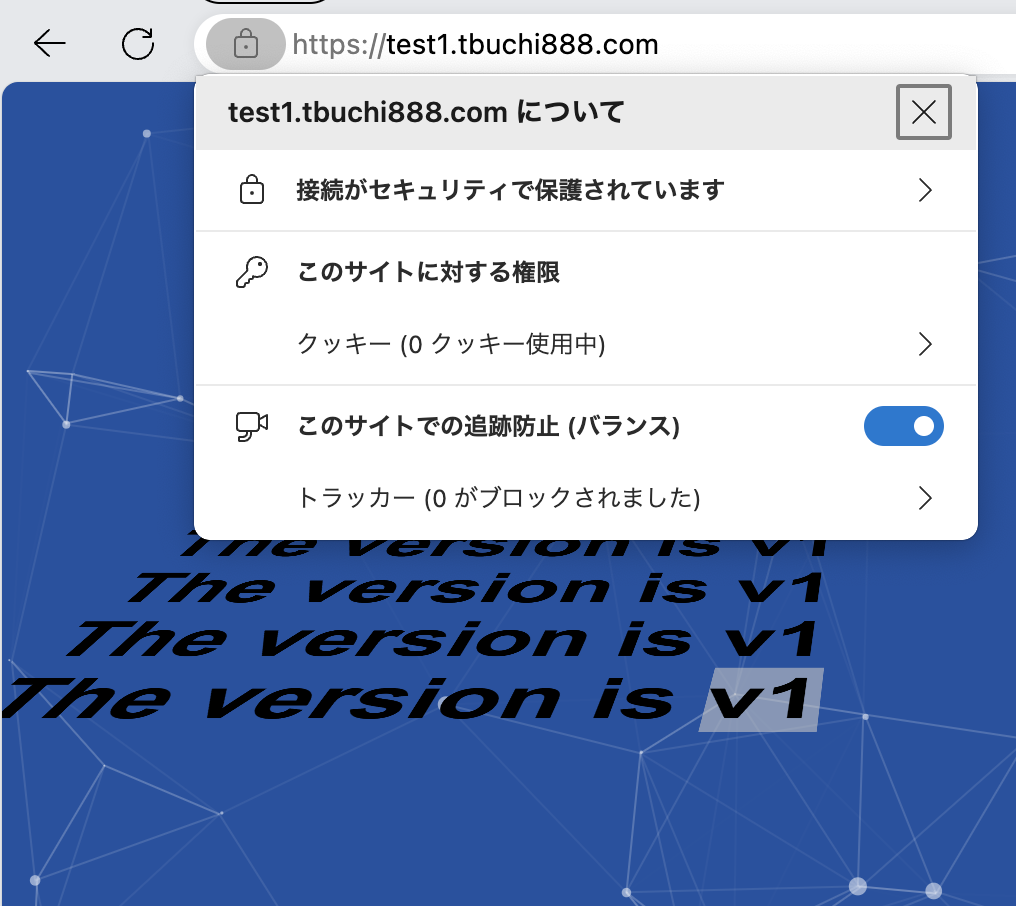
5. ワイルドカード証明書の動作確認
動作確認のため、https://test1.tbuchi888.comのアクセスをApplication Gateway とバックエンドの Web サーバとを紐付けます。
- Application Gateway で 上記のリスナーに対して ルール、バックエンドプール、バックエンドを設定
- DNS ゾーンで
test1.tbuchi888.comの A レコードとして Application Gateway のフロントエンドIP(パブリックIP)の登録
ワイルドカード証明書として登録しているため、以下の通り、ブラウザからのtest1.tbuchi888.com への https のアクセスに対して正常に証明書が機能していることが確認できます。
6. その他
Let's encrypt で作成した証明書の有効期限は3ヶ月(90日)です。
こちらの方法(--manual)で作成した証明書の有効期限が切れた場合は、certbot renewではなく、再度同じ手順で証明書の再作成が必要です。
https://community.letsencrypt.org/t/certbot-manual-renew/17789/4
$ sudo certbot renew --dry-run
Password:
Saving debug log to /var/log/letsencrypt/letsencrypt.log

- - - - - - - - - - - - - - - - - - - - - - - - - - - - - - - - - - - - - - - -
Processing /etc/letsencrypt/renewal/tbuchi888.com.conf
- - - - - - - - - - - - - - - - - - - - - - - - - - - - - - - - - - - - - - - -
Failed to renew certificate tbuchi888.com with error: The manual plugin is not working; there may be problems with your existing configuration.
The error was: PluginError('An authentication script must be provided with --manual-auth-hook when using the manual plugin non-interactively.')

- - - - - - - - - - - - - - - - - - - - - - - - - - - - - - - - - - - - - - - -
All simulated renewals failed. The following certificates could not be renewed:
  /etc/letsencrypt/live/tbuchi888.com/fullchain.pem (failure)
- - - - - - - - - - - - - - - - - - - - - - - - - - - - - - - - - - - - - - - -
1 renew failure(s), 0 parse failure(s)
Ask for help or search for solutions at https://community.letsencrypt.org. See the logfile /var/log/letsencrypt/letsencrypt.log or re-run Certbot with -v for more details.
7. 参考