0. はじめに
Azure Kubernetes Service (以降 AKS ) は
- クラスター内の Worker node 数( node pool )を、需要に応じて、設定範囲内で自動で増減可能なオートスケーラー機能に加えて
- クラスターの許容量を超える急なバーストトラフィック等への対応として、OSS の Kubernetes kubelet 実装である、CNCF の Virtual Kubelet を利用して、仮想ノードとして Azure Container Instances (以降 ACI )上に Pod をデプロイ可能です。
また、Kubernetes 及び AKS は
- Pod の水平自動スケーリング Horizontal Pod Autoscaler(以降 HPA ) をサポートしており、Pod の CPU 使用率などのメトリックに応じて、Deployment の Pod 数( Replicas )を自動で増減可能です。
今回、ACI 仮想ノード上への HPA について、まとまったドキュメント等が、あまり見当たらなかったので、ためしたことを記事にします。
なお、通常の AKS ノード( Virtual Machine Scale Sets による node pool )上の、HPA については、Kubernetes のスキルがあれば、特に問題なく利用できるのではと思います。
その他、本記事の内容は、2021 年 12 月 14 日時点の情報をもとに作成しています。
1. 実行環境について
本記事は、以下 AKS バージョンで試しています。
$ kubectl get node
NAME                                STATUS   ROLES   AGE   VERSION
aks-agentpool-11590259-vmss000000   Ready    agent   34d   v1.20.9
aks-agentpool-11590259-vmss000001   Ready    agent   34d   v1.20.9
aks-agentpool-11590259-vmss000002   Ready    agent   34d   v1.20.9
virtual-node-aci-linux              Ready    agent   34d   v1.19.10-vk-azure-aci-v1.4.1
2. 事前準備と下調べ
- AKS で仮想ノードを有効化します。
- 仮想ノードを有効化するには、AKS クラスタで
Azure CNIネットワーク プラグインを利用する必要があります。 - 本記事では有効化手順の説明をしませんが、詳細は以下を参考にしてください。
- az コマンドでの CLIでも可能ですが、Azure Portalより AKS クラスタ作成時に有効化する方法が楽だと思います。
- 仮想ノードを有効化するには、AKS クラスタで
- 仮想ノード使用にあたって
- 仮想ノード使用時の制限事項がある
- 通常の AKS ノードと比べて、仮想ノードを利用する場合、ACI での実装となるため、いくつか制限事項があります。この記事の中では触れませんが、仮想ノードを使用する前に、こちらのドキュメントを参照してください。
- 仮想ノード上へ Pod をデプロイするにはいくつか設定が必要(後述)
- 仮想ノード使用時の制限事項がある
3. 仮想ノード上へ Pod をデプロイするにはいくつか設定が必要
仮想ノードのサンプルアプリを確認すると、toleration とnodeSelector の定義がされていることが分かります。
- 仮想ノードへの Pod スケジューリングを許可するために、
tolerationsを設定する必要がある- 重要な Pod が意図せずに仮想ノードへスケジュールされないように 仮想ノードには Taints が設定されているため、
tolerationsにより回避する設定を追加します。
- 重要な Pod が意図せずに仮想ノードへスケジュールされないように 仮想ノードには Taints が設定されているため、
- さらに、
nodeSelectorを設定することで、仮想ノード上に限定して Pod を動かすことが可能です。- なお、このサンプルは動作確認テストのために、
nodeSelectorを使用していますが、今回のようにバースト時のみ、仮想ノードへ Pod をスケジューリングしたい場合は、nodeSelectorを敢えて定義しません
- なお、このサンプルは動作確認テストのために、
apiVersion: apps/v1
kind: Deployment
metadata:
  name: aci-helloworld
spec:
  replicas: 1
  selector:
    matchLabels:
      app: aci-helloworld
  template:
    metadata:
      labels:
        app: aci-helloworld
    spec:
      containers:
      - name: aci-helloworld
        image: mcr.microsoft.com/azuredocs/aci-helloworld
        ports:
        - containerPort: 80
      nodeSelector:
        kubernetes.io/role: agent
        beta.kubernetes.io/os: linux
        type: virtual-kubelet
      tolerations:
      - key: virtual-kubelet.io/provider
        operator: Exists
4. Horizontal Pod Autoscaler ( HPA ) の条件
AKS で HPA をするために、以下を参考にしていきます。
https://docs.microsoft.com/ja-jp/azure/aks/tutorial-kubernetes-scale?tabs=azure-cli#autoscale-pods
containers:
  - name: azure-vote-front
    image: mcr.microsoft.com/azuredocs/azure-vote-front:v1
    ports:
    - containerPort: 80
    resources:
      requests:
        cpu: 250m
      limits:
        cpu: 500m
AKS で HPA を使用するには、Pod 内のすべてのコンテナーで
最低限、resources の requests が定義されている必要があります。
なお、limits については、 ACI 仮想ノードでスケジューリングする場合のみ、limits =< requestsの制限があるようです。
limits > requests 設定は、通常の AKS ノードへのスケジューリングでは問題ありませんが、ACI 仮想ノードへスケジューリングされると、以下のように ProviderFailed とエラーなり Pod の起動に失敗するので注意が必要です。
https://github.com/virtual-kubelet/azure-aci/issues/17
Message: api call to https://management.azure.com/subscriptions/b31f2b6a-2572-4247-ac15-c8b21358c0b7/resourceGroups/MC_demo_aks_demo_aks_cluster01_japaneast/providers/Microsoft.ContainerInstance/containerGroups/default-nginx-aci-hpa-775bb7fd6-l2rhs?api-version=2018-10-01: got HTTP response status code 400 error code "ContainerLimitGreaterThanContainerGroupTotalRequest": The 'Cpu' limit '1' in container 'nginx-aci-hpa' is greater than the total request '0.5' of container group 'default-nginx-aci-hpa-775bb7fd6-l2rhs'
また、以下のように HPA する条件をkind: HorizontalPodAutoscalerとして事前に定義します。
apiVersion: autoscaling/v1
kind: HorizontalPodAutoscaler
metadata:
  name: azure-vote-back-hpa
spec:
  maxReplicas: 10 # define max replica count
  minReplicas: 3  # define min replica count
  scaleTargetRef:
    apiVersion: apps/v1
    kind: Deployment
    name: azure-vote-back
  targetCPUUtilizationPercentage: 50 # target CPU utilization
5. ACI 仮想ノードへ スケジューリング可能な Deployment と HPA の設定
いよいよ、前ステップを参考に、バースト時に ACI 仮想ノードへ Pod スケール可能な Deployment と HPA を以下のように設定しデプロイします。
apiVersion: apps/v1
kind: Deployment
metadata:
  name: nginx-aci-hpa
  labels:
    node: aci
    app: nginx-aci-hpa
spec:
  strategy:
    type: RollingUpdate
# As HPA, replicas are not set.
#  replicas: 4
  selector:
    matchLabels:
      node: aci
      app: nginx-aci-hpa
  template:
    metadata:
      name: nginx-aci-hpa
      labels:
        app: nginx-aci-hpa
        node: aci
    spec:
      containers:
      - image: docker.io/nginx:1.20
        name: nginx-aci-hpa
        ports:
        - containerPort: 80
# Set cpu requests for HPA
        resources:
          requests:
            cpu: 0.5
# you must limits =< total requests, only when scheduling on ACI virtual nodes
          limits:
            cpu: 0.5
# Set tolerations to allow pods to be scheduled on virtual nodes
      tolerations:
      - key: virtual-kubelet.io/provider
        operator: Exists
      - key: azure.com/aci
        effect: NoSchedule
---
apiVersion: autoscaling/v1
kind: HorizontalPodAutoscaler
metadata:
  name: nginx-aci-hpa
spec:
  maxReplicas: 10 # define max replica count
  minReplicas: 5  # define min replica count
  scaleTargetRef:
    apiVersion: apps/v1
    kind: Deployment
    name: nginx-aci-hpa
# target CPU utilization
# For this test, set an extremely low value
  targetCPUUtilizationPercentage: 5
以上で、ACI 仮想ノードへ、トラフィックバースト時に Pod をスケジューリングする準備が整いました。
kubectl コマンドで AKS へ apply します。
kubectl apply -f dp-aci-hpa.yml
状態を確認すると、HPA 及び、HPA の minReplicas: 5数分の Pod が通常の AKS ノードプールへ Pod がデプロイ(スケジューリング)されていることが分かります。
k$ kubectl get pod,hpa -o wide
NAME                                READY   STATUS    RESTARTS   AGE   IP             NODE                                NOMINATED NODE   READINESS GATES
pod/nginx-aci-hpa-ddb6f5448-54lgp   1/1     Running   0          34s   10.240.0.194   aks-agentpool-11590259-vmss000001   <none>           <none>
pod/nginx-aci-hpa-ddb6f5448-8dj84   1/1     Running   0          50s   10.240.1.64    aks-agentpool-11590259-vmss000002   <none>           <none>
pod/nginx-aci-hpa-ddb6f5448-pqwbl   1/1     Running   0          34s   10.240.0.30    aks-agentpool-11590259-vmss000000   <none>           <none>
pod/nginx-aci-hpa-ddb6f5448-qktr9   1/1     Running   0          34s   10.240.0.138   aks-agentpool-11590259-vmss000001   <none>           <none>
pod/nginx-aci-hpa-ddb6f5448-rg9q9   1/1     Running   0          34s   10.240.0.20    aks-agentpool-11590259-vmss000000   <none>           <none>

NAME                                                REFERENCE                  TARGETS        MINPODS   MAXPODS   REPLICAS   AGE
horizontalpodautoscaler.autoscaling/nginx-aci-hpa   Deployment/nginx-aci-hpa   <unknown>/5%   5         10        5          51s
6. HPA を発動
HPA の設定は、Pod の平均負荷が5%を超える場合に、maxReplicas: 10まで Pod 数を水平オートスケールします。
今回は、動作テストのために、一部の Pod へkubectl execコマンドで入り、Linux の負荷ツールであるstress-ngをインストールして、強制的に一定時間 CPU を負荷を与えて、HPA による Pod 数の増減を確認します。
$ kubectl exec -it pod/nginx-aci-hpa-ddb6f5448-rg9q9 bash
kubectl exec [POD] [COMMAND] is DEPRECATED and will be removed in a future version. Use kubectl exec [POD] -- [COMMAND] instead.
root@nginx-aci-hpa-ddb6f5448-rg9q9:/# apt update -y
Get:1 http://security.debian.org/debian-security bullseye-security InRelease [44.1 kB]
Get:2 http://security.debian.org/debian-security bullseye-security/main amd64 Packages [99.5 kB]
Get:3 http://deb.debian.org/debian bullseye InRelease [116 kB]
Get:4 http://deb.debian.org/debian bullseye-updates InRelease [39.4 kB]
Get:5 http://deb.debian.org/debian bullseye/main amd64 Packages [8180 kB]
Get:6 http://deb.debian.org/debian bullseye-updates/main amd64 Packages [2592 B]
Fetched 8481 kB in 2s (5336 kB/s)
Reading package lists... Done
Building dependency tree... Done
Reading state information... Done
All packages are up to date.
root@nginx-aci-hpa-ddb6f5448-rg9q9:/# apt install stress-ng
Reading package lists... Done
Building dependency tree... Done
Reading state information... Done
The following additional packages will be installed:
  libapparmor1 libipsec-mb0 libjudydebian1 libsctp1
Suggested packages:
  lksctp-tools
The following NEW packages will be installed:
  libapparmor1 libipsec-mb0 libjudydebian1 libsctp1 stress-ng
0 upgraded, 5 newly installed, 0 to remove and 0 not upgraded.
Need to get 2892 kB of archives.
After this operation, 31.5 MB of additional disk space will be used.
Do you want to continue? [Y/n] Y
Get:1 http://deb.debian.org/debian bullseye/main amd64 libapparmor1 amd64 2.13.6-10 [99.3 kB]
Get:2 http://deb.debian.org/debian bullseye/main amd64 libipsec-mb0 amd64 0.55-1 [834 kB]
Get:3 http://deb.debian.org/debian bullseye/main amd64 libjudydebian1 amd64 1.0.5-5+b2 [102 kB]
Get:4 http://deb.debian.org/debian bullseye/main amd64 libsctp1 amd64 1.0.18+dfsg-1 [28.3 kB]
Get:5 http://deb.debian.org/debian bullseye/main amd64 stress-ng amd64 0.12.06-1 [1829 kB]
Fetched 2892 kB in 0s (13.2 MB/s)
debconf: delaying package configuration, since apt-utils is not installed
Selecting previously unselected package libapparmor1:amd64.
(Reading database ... 7817 files and directories currently installed.)
Preparing to unpack .../libapparmor1_2.13.6-10_amd64.deb ...
Unpacking libapparmor1:amd64 (2.13.6-10) ...
Selecting previously unselected package libipsec-mb0.
Preparing to unpack .../libipsec-mb0_0.55-1_amd64.deb ...
Unpacking libipsec-mb0 (0.55-1) ...
Selecting previously unselected package libjudydebian1.
Preparing to unpack .../libjudydebian1_1.0.5-5+b2_amd64.deb ...
Unpacking libjudydebian1 (1.0.5-5+b2) ...
Selecting previously unselected package libsctp1:amd64.
Preparing to unpack .../libsctp1_1.0.18+dfsg-1_amd64.deb ...
Unpacking libsctp1:amd64 (1.0.18+dfsg-1) ...
Selecting previously unselected package stress-ng.
Preparing to unpack .../stress-ng_0.12.06-1_amd64.deb ...
Unpacking stress-ng (0.12.06-1) ...
Setting up libapparmor1:amd64 (2.13.6-10) ...
Setting up libjudydebian1 (1.0.5-5+b2) ...
Setting up libipsec-mb0 (0.55-1) ...
Setting up libsctp1:amd64 (1.0.18+dfsg-1) ...
Setting up stress-ng (0.12.06-1) ...
Processing triggers for libc-bin (2.31-13+deb11u2) ...
root@nginx-aci-hpa-ddb6f5448-rg9q9:/# stress-ng -c 1
stress-ng: info:  [352] defaulting to a 86400 second (1 day, 0.00 secs) run per stressor
stress-ng: info:  [352] dispatching hogs: 1 cpu
kubectl get hpa コマンドで状態を確認
$ kubectl get hpa nginx-aci-hpa --watchNAME            REFERENCE                  TARGETS   MINPODS   MAXPODS   REPLICAS   AGE
nginx-aci-hpa   Deployment/nginx-aci-hpa   0%/5%     5         10        5          71m
nginx-aci-hpa   Deployment/nginx-aci-hpa   20%/5%    5         10        5          72m
nginx-aci-hpa   Deployment/nginx-aci-hpa   20%/5%    5         10        10         72m
stress-ng での CPU 負荷により、Deployment 中のすべての Pod のリクエストの平均 CPU 利用率が、予め設定した HPA のターゲットである5%を超過しため、水平 Pod オートスケールが発動し、
さらにAKS ノード上( aks-agentpool-11590259-vmss000000 〜 aks-agentpool-11590259-vmss0000002 )へスケジュールできなかった(*1) Pod が仮想ノード上( virtual-node-aci-linux )
へデプロイされていることが確認できます。
*1: HPA 発動前に、Pod の resources requests の CPU 値及び Pod 数 を調整して AKS ノードプールにギリギリおさまるように HPA の minReplicas の値を設定しています。
$ kubectl get pod -o wide
NAME                            READY   STATUS    RESTARTS   AGE   IP             NODE                                NOMINATED NODE   READINESS GATES
nginx-aci-hpa-ddb6f5448-54lgp   1/1     Running   0          9h    10.240.0.194   aks-agentpool-11590259-vmss000001   <none>           <none>
nginx-aci-hpa-ddb6f5448-8dj84   1/1     Running   0          9h    10.240.1.64    aks-agentpool-11590259-vmss000002   <none>           <none>
nginx-aci-hpa-ddb6f5448-8dkfj   1/1     Running   0          16m   10.241.0.7     virtual-node-aci-linux              <none>           <none>
nginx-aci-hpa-ddb6f5448-d9l4h   1/1     Running   0          16m   10.241.0.4     virtual-node-aci-linux              <none>           <none>
nginx-aci-hpa-ddb6f5448-l4d65   1/1     Running   0          16m   10.241.0.5     virtual-node-aci-linux              <none>           <none>
nginx-aci-hpa-ddb6f5448-mrgtq   1/1     Running   0          16m   10.241.0.6     virtual-node-aci-linux              <none>           <none>
nginx-aci-hpa-ddb6f5448-pqwbl   1/1     Running   0          9h    10.240.0.30    aks-agentpool-11590259-vmss000000   <none>           <none>
nginx-aci-hpa-ddb6f5448-qktr9   1/1     Running   0          9h    10.240.0.138   aks-agentpool-11590259-vmss000001   <none>           <none>
nginx-aci-hpa-ddb6f5448-rg9q9   1/1     Running   0          9h    10.240.0.20    aks-agentpool-11590259-vmss000000   <none>           <none>
nginx-aci-hpa-ddb6f5448-xgfms   1/1     Running   0          16m   10.241.0.8     virtual-node-aci-linux              <none>           <none>
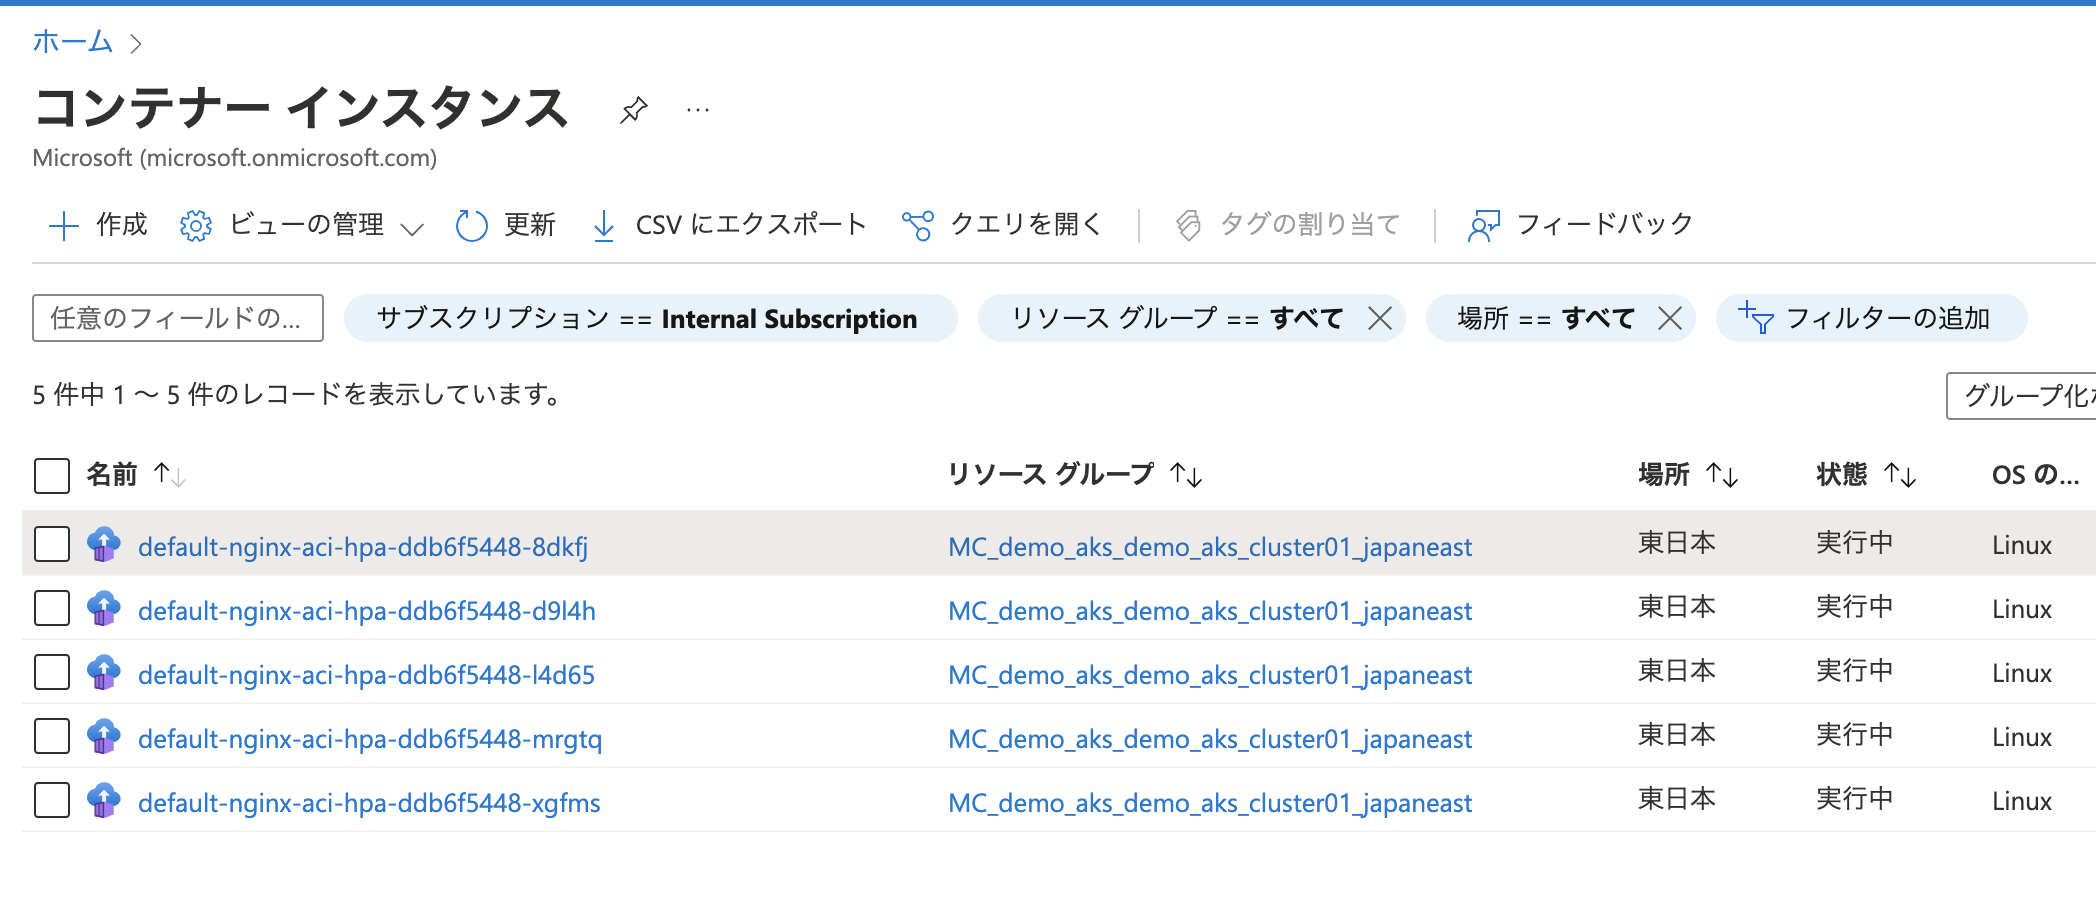
Azure Portal より ACI の状況を確認すると、仮想ノードへスケジューリングされた Pod が
以下のように、Kuberenetes の [ Namespace 名]-[ Pod 名] として、AKS クラスタ作成時に自動生成されるリソースグループ( MC_ からはじまる)内に、ACI のコンテナが5つ作成され、実行されていることが確認できます。

次に、stress-ng での CPU 負荷を停止し、しばらくすると Deployment 中のすべて Pod のリクエストの平均 CPU 利用率が、下がり、減少方向の水平 pod オートスケールが作動し、仮想ノード(virtual-node-aci-linux)へデプロイされていた Pod が、削除( Terminating )されて、HPA のminReplicas: 5まで Pod 数が減少していることが確認できます。
kubectl get hpa コマンドで状態を確認
$ kubectl get hpa nginx-aci-hpa --watchNAME            REFERENCE                  TARGETS   MINPODS   MAXPODS   REPLICAS   AGE
nginx-aci-hpa   Deployment/nginx-aci-hpa   20%/5%    5         10        10         72m
nginx-aci-hpa   Deployment/nginx-aci-hpa   17%/5%    5         10        10         73m
nginx-aci-hpa   Deployment/nginx-aci-hpa   12%/5%    5         10        10         74m
nginx-aci-hpa   Deployment/nginx-aci-hpa   12%/5%    5         10        10         76m
nginx-aci-hpa   Deployment/nginx-aci-hpa   12%/5%    5         10        10         77m
nginx-aci-hpa   Deployment/nginx-aci-hpa   12%/5%    5         10        10         78m
nginx-aci-hpa   Deployment/nginx-aci-hpa   0%/5%     5         10        10         79m
nginx-aci-hpa   Deployment/nginx-aci-hpa   0%/5%     5         10        10         80m
nginx-aci-hpa   Deployment/nginx-aci-hpa   0%/5%     5         10        10         84m
nginx-aci-hpa   Deployment/nginx-aci-hpa   0%/5%     5         10        10         85m
nginx-aci-hpa   Deployment/nginx-aci-hpa   0%/5%     5         10        5          85m
Pod の状況を確認
$ kubectl get pod -o wide -w
NAME                            READY   STATUS    RESTARTS   AGE   IP             NODE                                NOMINATED NODE   READINESS GATES
nginx-aci-hpa-ddb6f5448-54lgp   1/1     Running   0          9h    10.240.0.194   aks-agentpool-11590259-vmss000001   <none>           <none>
nginx-aci-hpa-ddb6f5448-8dj84   1/1     Running   0          9h    10.240.1.64    aks-agentpool-11590259-vmss000002   <none>           <none>
nginx-aci-hpa-ddb6f5448-8dkfj   1/1     Running   0          16m   10.241.0.7     virtual-node-aci-linux              <none>           <none>
nginx-aci-hpa-ddb6f5448-d9l4h   1/1     Running   0          16m   10.241.0.4     virtual-node-aci-linux              <none>           <none>
nginx-aci-hpa-ddb6f5448-l4d65   1/1     Running   0          16m   10.241.0.5     virtual-node-aci-linux              <none>           <none>
nginx-aci-hpa-ddb6f5448-mrgtq   1/1     Running   0          16m   10.241.0.6     virtual-node-aci-linux              <none>           <none>
nginx-aci-hpa-ddb6f5448-pqwbl   1/1     Running   0          9h    10.240.0.30    aks-agentpool-11590259-vmss000000   <none>           <none>
nginx-aci-hpa-ddb6f5448-qktr9   1/1     Running   0          9h    10.240.0.138   aks-agentpool-11590259-vmss000001   <none>           <none>
nginx-aci-hpa-ddb6f5448-rg9q9   1/1     Running   0          9h    10.240.0.20    aks-agentpool-11590259-vmss000000   <none>           <none>
nginx-aci-hpa-ddb6f5448-xgfms   1/1     Running   0          16m   10.241.0.8     virtual-node-aci-linux              <none>           <none>
nginx-aci-hpa-ddb6f5448-xgfms   1/1     Terminating   0          35m   10.241.0.8     virtual-node-aci-linux              <none>           <none>
nginx-aci-hpa-ddb6f5448-d9l4h   1/1     Terminating   0          35m   10.241.0.4     virtual-node-aci-linux              <none>           <none>
nginx-aci-hpa-ddb6f5448-mrgtq   1/1     Terminating   0          35m   10.241.0.6     virtual-node-aci-linux              <none>           <none>
nginx-aci-hpa-ddb6f5448-l4d65   1/1     Terminating   0          35m   10.241.0.5     virtual-node-aci-linux              <none>           <none>
nginx-aci-hpa-ddb6f5448-8dkfj   1/1     Terminating   0          35m   10.241.0.7     virtual-node-aci-linux              <none>           <none>
nginx-aci-hpa-ddb6f5448-8dkfj   0/1     Terminating   0          35m   10.241.0.7     virtual-node-aci-linux              <none>           <none>
nginx-aci-hpa-ddb6f5448-l4d65   0/1     Terminating   0          35m   10.241.0.5     virtual-node-aci-linux              <none>           <none>
nginx-aci-hpa-ddb6f5448-mrgtq   0/1     Terminating   0          35m   10.241.0.6     virtual-node-aci-linux              <none>           <none>
nginx-aci-hpa-ddb6f5448-d9l4h   0/1     Terminating   0          35m   10.241.0.4     virtual-node-aci-linux              <none>           <none>
nginx-aci-hpa-ddb6f5448-xgfms   0/1     Terminating   0          35m   10.241.0.8     virtual-node-aci-linux              <none>           <none>
nginx-aci-hpa-ddb6f5448-8dkfj   0/1     Terminating   0          36m   10.241.0.7     virtual-node-aci-linux              <none>           <none>
nginx-aci-hpa-ddb6f5448-l4d65   0/1     Terminating   0          36m   10.241.0.5     virtual-node-aci-linux              <none>           <none>
nginx-aci-hpa-ddb6f5448-8dkfj   0/1     Terminating   0          36m   10.241.0.7     virtual-node-aci-linux              <none>           <none>
nginx-aci-hpa-ddb6f5448-l4d65   0/1     Terminating   0          36m   10.241.0.5     virtual-node-aci-linux              <none>           <none>
nginx-aci-hpa-ddb6f5448-mrgtq   0/1     Terminating   0          36m   10.241.0.6     virtual-node-aci-linux              <none>           <none>
nginx-aci-hpa-ddb6f5448-mrgtq   0/1     Terminating   0          36m   10.241.0.6     virtual-node-aci-linux              <none>           <none>
nginx-aci-hpa-ddb6f5448-d9l4h   0/1     Terminating   0          36m   10.241.0.4     virtual-node-aci-linux              <none>           <none>
nginx-aci-hpa-ddb6f5448-d9l4h   0/1     Terminating   0          36m   10.241.0.4     virtual-node-aci-linux              <none>           <none>
nginx-aci-hpa-ddb6f5448-xgfms   0/1     Terminating   0          36m   10.241.0.8     virtual-node-aci-linux              <none>           <none>
nginx-aci-hpa-ddb6f5448-xgfms   0/1     Terminating   0          36m   10.241.0.8     virtual-node-aci-linux              <none>           <none>
$ kubectl get pod -o wide
NAME                            READY   STATUS    RESTARTS   AGE   IP             NODE                                NOMINATED NODE   READINESS GATES
nginx-aci-hpa-ddb6f5448-54lgp   1/1     Running   0          10h   10.240.0.194   aks-agentpool-11590259-vmss000001   <none>           <none>
nginx-aci-hpa-ddb6f5448-8dj84   1/1     Running   0          10h   10.240.1.64    aks-agentpool-11590259-vmss000002   <none>           <none>
nginx-aci-hpa-ddb6f5448-pqwbl   1/1     Running   0          10h   10.240.0.30    aks-agentpool-11590259-vmss000000   <none>           <none>
nginx-aci-hpa-ddb6f5448-qktr9   1/1     Running   0          10h   10.240.0.138   aks-agentpool-11590259-vmss000001   <none>           <none>
nginx-aci-hpa-ddb6f5448-rg9q9   1/1     Running   0          10h   10.240.0.20    aks-agentpool-11590259-vmss000000   <none>           <none>
$
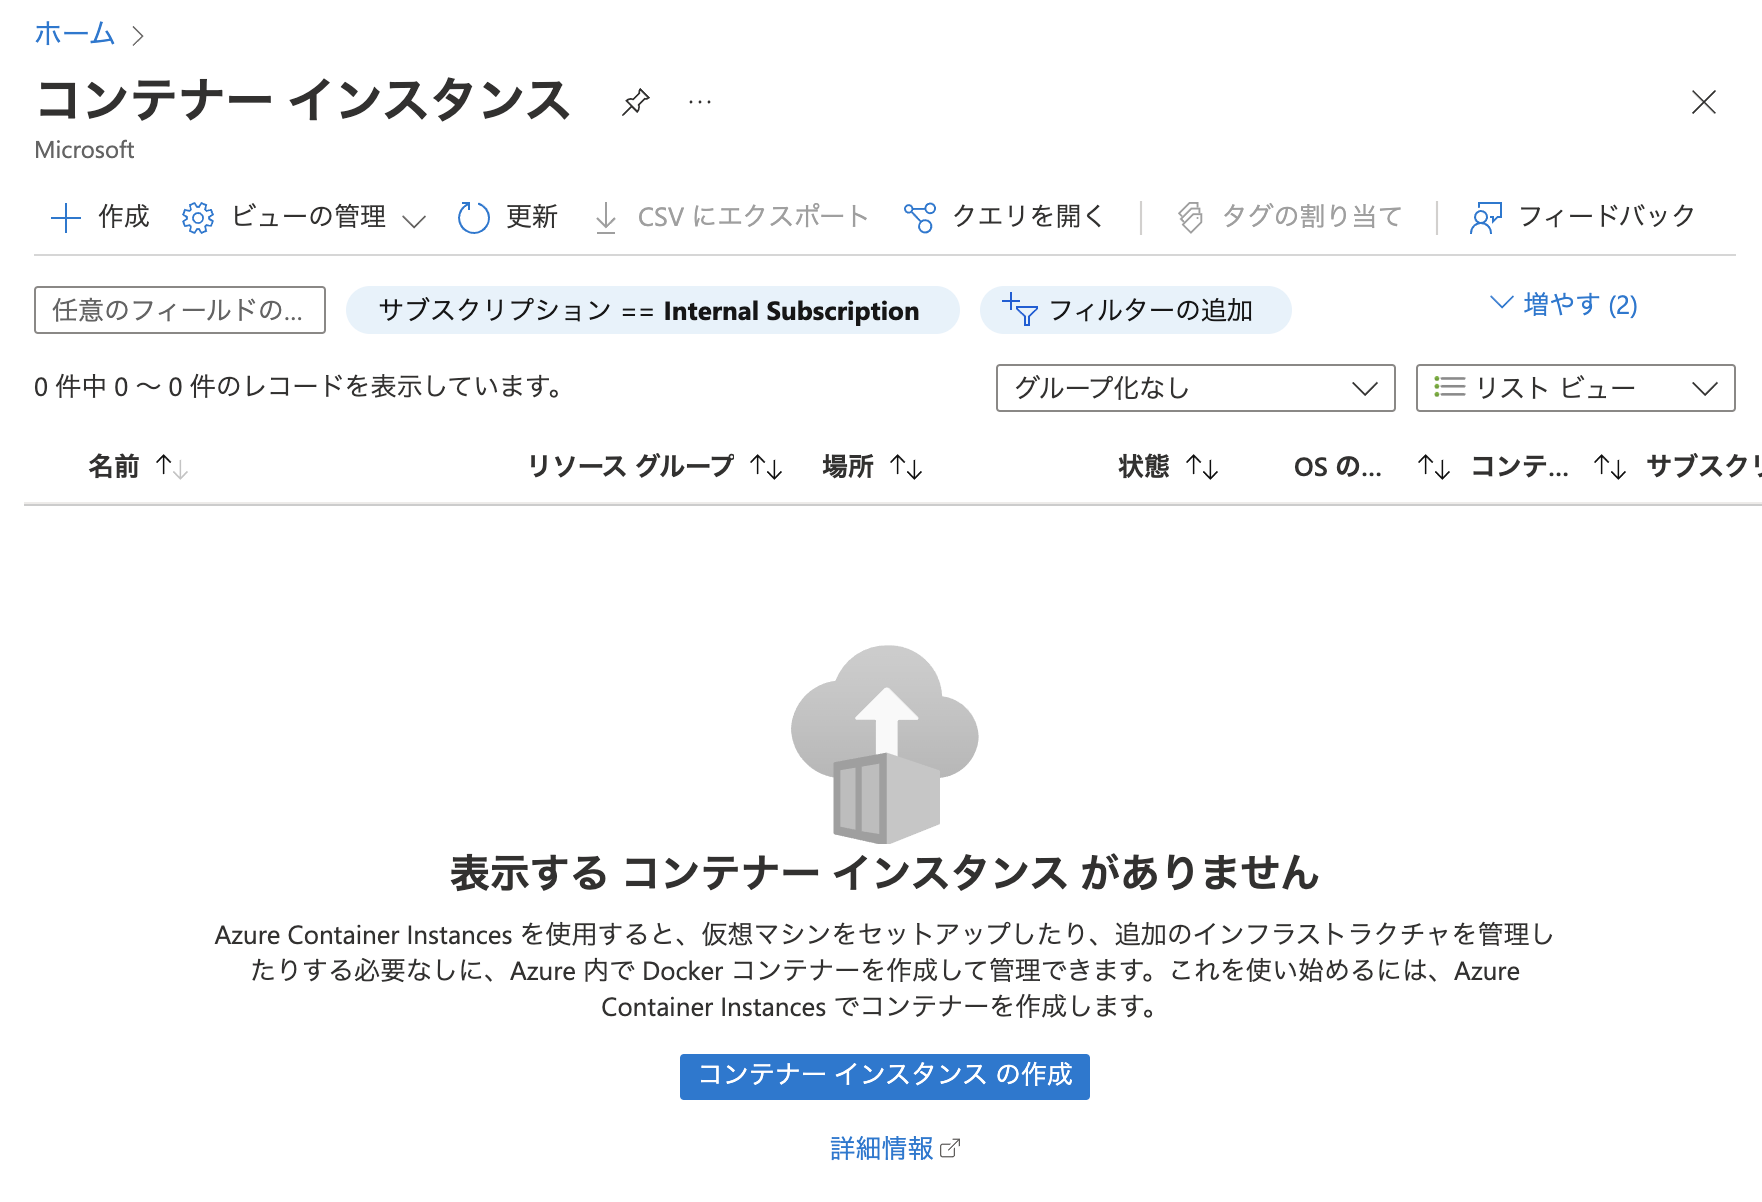
Azure Portal より ACI の状況を確認すると、 ACI 上のコンテナも削除されていることが確認できます。

7. まとめ
Pod を仮想ノード上で動かすために
- 仮想ノードには taints が設定されているため、toleration を Pod へ設定する必要があります。
- バースト時のみ、仮想ノードへ Pod をスケジューリングしたい場合は
nodeSelectorを定義しません。
HPA を有効にするために
- 対象の Pod 内のすべてのコンテナーで最低限、
resourcesのrequestsを定義します。 - なお、
resourcesのlimitsについて、設定は任意ですが、 ACI の仮想ノードへ Pod をスケジューリングする場合のみ、以下である必要があります。-
limits=<requests
-
- HPA にて、対象の Deployment や、Pod の最小数、最大数、ターゲットの CPU 利用率等を定義します。
apiVersion: apps/v1
kind: Deployment
・・・ デプロイメントからの抜粋 ・・・
  template:
    metadata:
      name: nginx-aci-hpa
      labels:
        app: nginx-aci-hpa
        node: aci
    spec:
      containers:
      - image: docker.io/nginx:1.20
        name: nginx-aci-hpa
        ports:
        - containerPort: 80
# Set CPU requests for HPA
        resources:
          requests:
            cpu: 0.5
# you must limits =< total requests, only when scheduling on ACI virtual nodes
          limits:
            cpu: 0.5
# Set tolerations to allow pods to be scheduled on virtual nodes
      tolerations:
      - key: virtual-kubelet.io/provider
        operator: Exists
      - key: azure.com/aci
        effect: NoSchedule
---
# HPA の定義
apiVersion: autoscaling/v1
kind: HorizontalPodAutoscaler
metadata:
  name: nginx-aci-hpa
spec:
  maxReplicas: 10 # define max replica count
  minReplicas: 5  # define min replica count
  scaleTargetRef:
    apiVersion: apps/v1
    kind: Deployment
    name: nginx-aci-hpa
# target CPU utilization
# For this test, set an extremely low value
  targetCPUUtilizationPercentage: 5
8. 参考
記事中でリンクしている物とほぼ同じですが
- https://docs.microsoft.com/ja-jp/azure/aks/virtual-nodes
- https://docs.microsoft.com/ja-jp/azure/aks/virtual-nodes-portal#deploy-a-sample-app
- https://docs.microsoft.com/ja-jp/azure/aks/tutorial-kubernetes-scale?tabs=azure-cli#autoscale-pods
- https://kubernetes.io/docs/concepts/scheduling-eviction/taint-and-toleration/
- https://kubernetes.io/docs/concepts/scheduling-eviction/assign-pod-node/
- https://kubernetes.io/docs/tasks/run-application/horizontal-pod-autoscale/
- https://github.com/virtual-kubelet/azure-aci/issues/17
9. さいごに
最後まで、閲覧ありがとうございます。
今後 ACI 仮想ノード上へ HPA をする際になどで参考になれば幸いです。