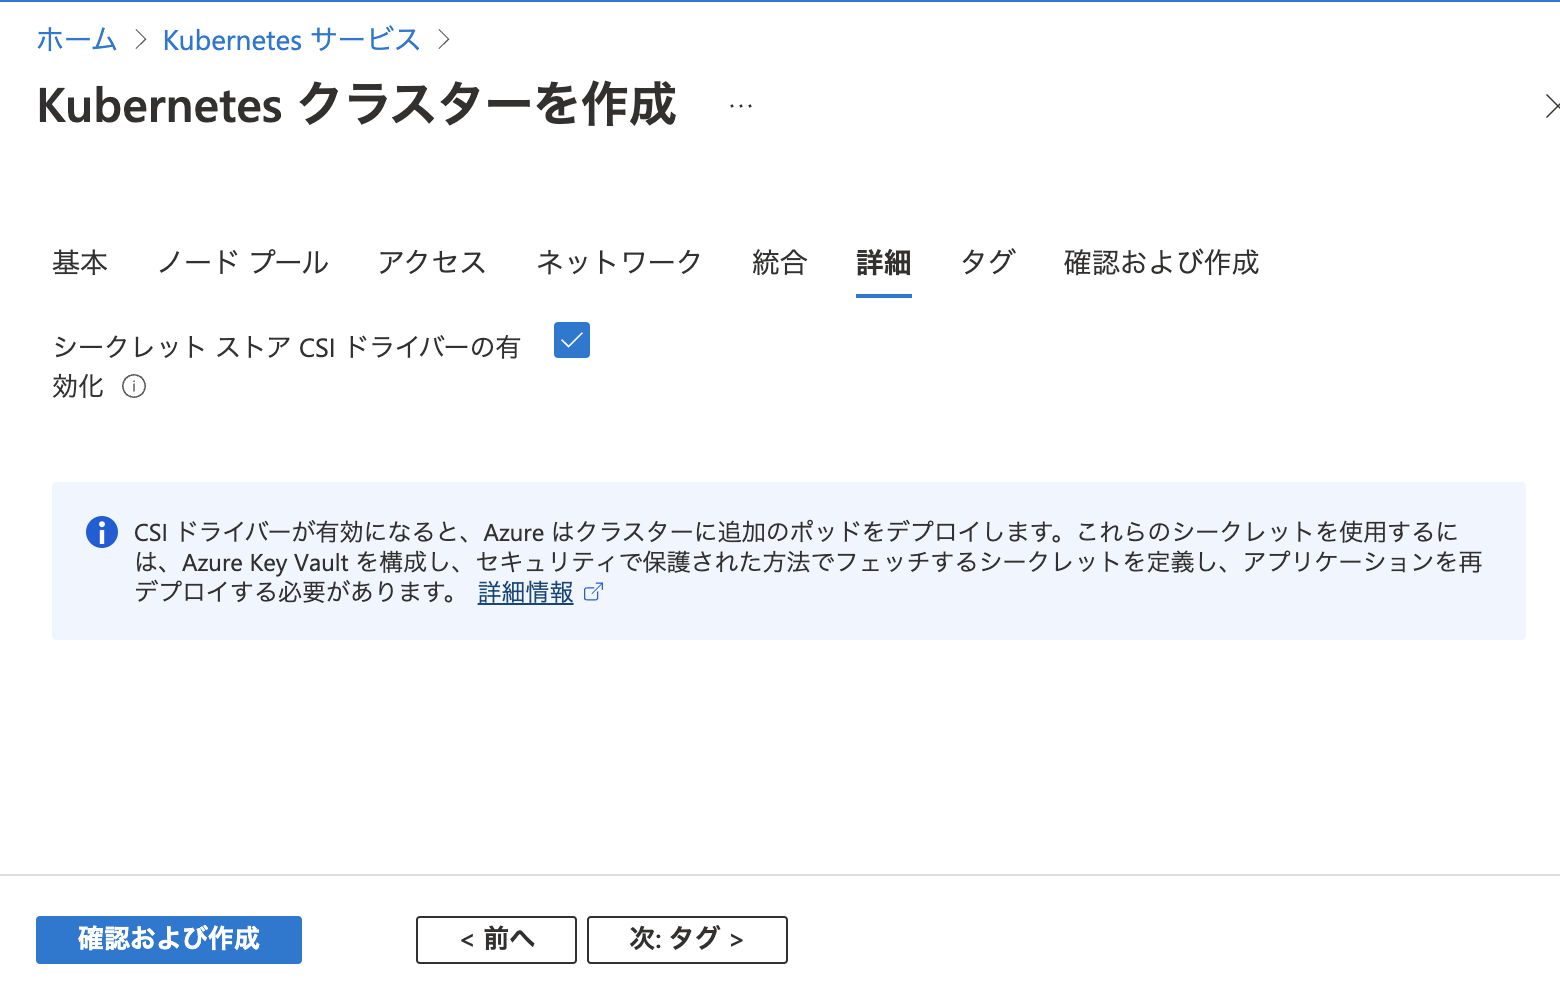
イメージとしては上のような感じです。(イメージなので厳密にはちがうかもしれません。。。)
-
Kubernetes を利用した CIOps や GitOps 等をいざ実践しようと思うと、証明書やアクセスキーやパスワードといった秘匿情報である Secret の管理をどうすればよいのか課題となってくると思います。
- 通常 Kubernetes の Secret を YAML ファイル等で定義する場合、秘匿情報部分については、暗号化ではなく、Base64 エンコードによる難読化のみのため、コードの管理については、何かしらの対策が必要となります。
- このような課題を解決する、各種 OSS や ソリューション はいくつかありますが、いずれも一長一短がある状況です。
-
Azure では Key Vault(キー コンテナー) という秘匿情報を管理するサービスがあり、 Key Vault より、秘匿情報を取得し、AKS( Kubernetes ) 上の Pod へ Secret として 受け渡すことが可能です。
- 今回は AKS シークレット ストア CSI ドライバーの Azure Key Vault プロバイダーを利用し、Service Principal よりも、セキュア( Client Secret が不要)な Azure Managed Identity によるアクセス認証のパターンを紹介します。
- なお、本記事は、主に以下公式ドキュメントの内容をベースにカスタマイズしたものとなります。
AKS (Azure Kubernetes Service) クラスタの準備
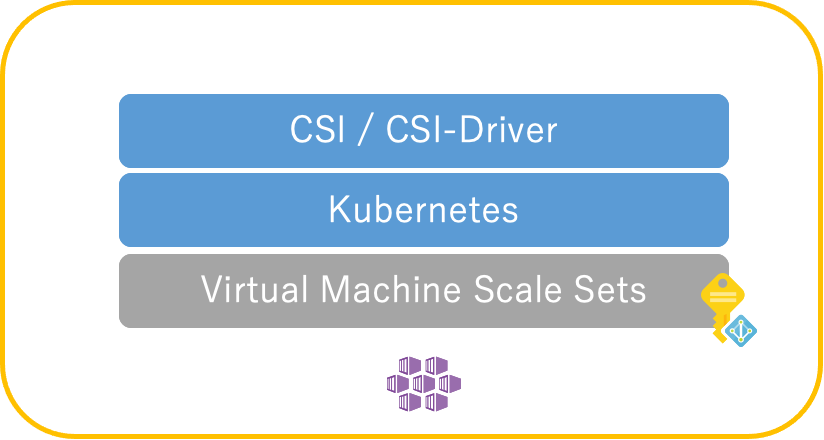

-
リソースグループ名: demo_aks_key_vault
-
クラスタ名: my-aks-key-vault01
-
Kuberenetes version 1.21.9
-
既存クラスタの有効化方法等については以下公式ドキュメントを参照ください。
AKS クラスタ作成後に kubeconfig のクレデンシャルを取得し
az aks get-credentials --resource-group [YOUR_RESOUCE_GROUP] --name [YOUR_AKS_CLUSTER]
以下コマンドで シークレット ストア CSI ドライバー が正常に有効化されていることを確認します。
kubectl get pods -n kube-system -l 'app in (secrets-store-csi-driver, secrets-store-provider-azure)'
aks-secrets-store-csi-driver 及び aks-secrets-store-provider-azureが以下のような感じで Pod が Running となっていることを確認( 以下はNode pool のvmssが1台の例)
$az aks get-credentials --resource-group demo_aks_key_vault --name my-aks-key-vault01
Merged "my-aks-key-vault01" as current context in /home/tbuchi888/.kube/config
$kubectl get pods -n kube-system -l 'app in (secrets-store-csi-driver, secrets-store-provider-azure)'
NAME                                     READY   STATUS    RESTARTS   AGE
aks-secrets-store-csi-driver-j25dd       3/3     Running   0          2d
aks-secrets-store-provider-azure-f85q8   1/1     Running   0          2d
Azure Key Vault (キー コンテナー)の準備
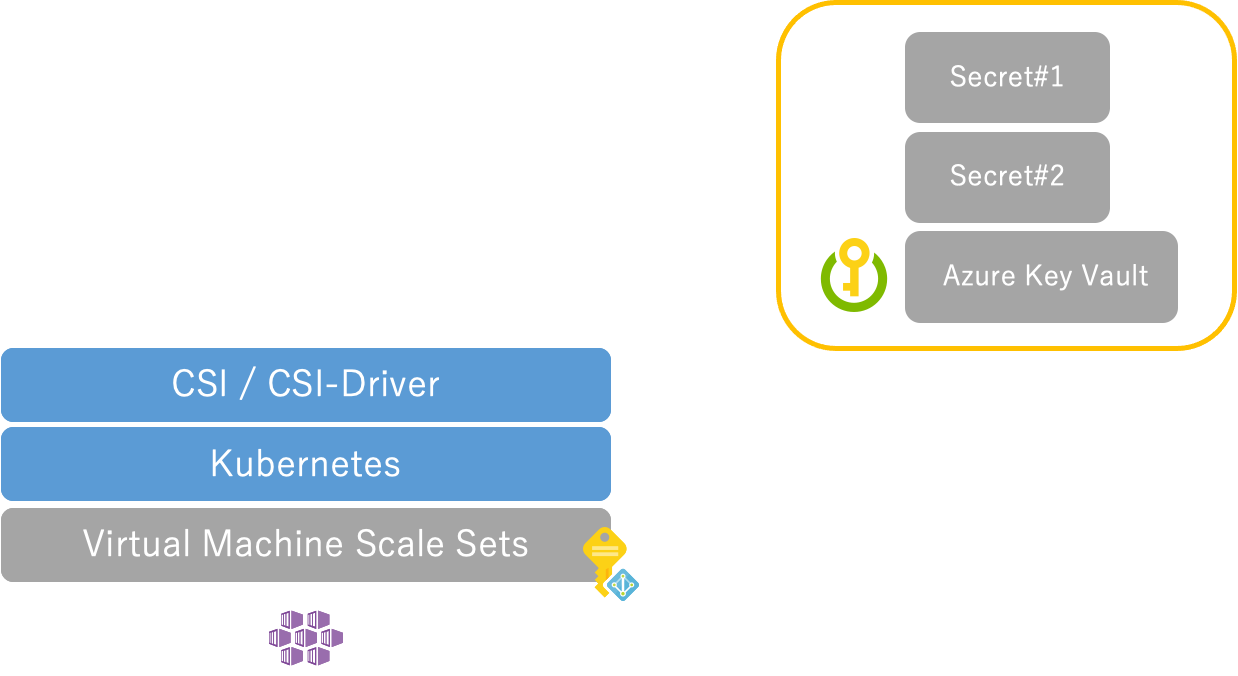

今回は、Azure Key Vault(キー コンテナー)を作成後に以下のような 秘匿情報を
キー コンテナー > シークレット > + 生成/インポートより、シークレットとして作成しておきます。
| キーコンテナー名 | シークレット名 | 値 |
|---|---|---|
| demo-csi-secret | demo-secret01 | This is the value of the secret "demo-secret01" included in the Azure key vault "demo-csi-secret". |
| demo-secret02 | This is the value of the secret "demo-secret02" included in the Azure key vault "demo-csi-secret". This is "demo-secret02". |


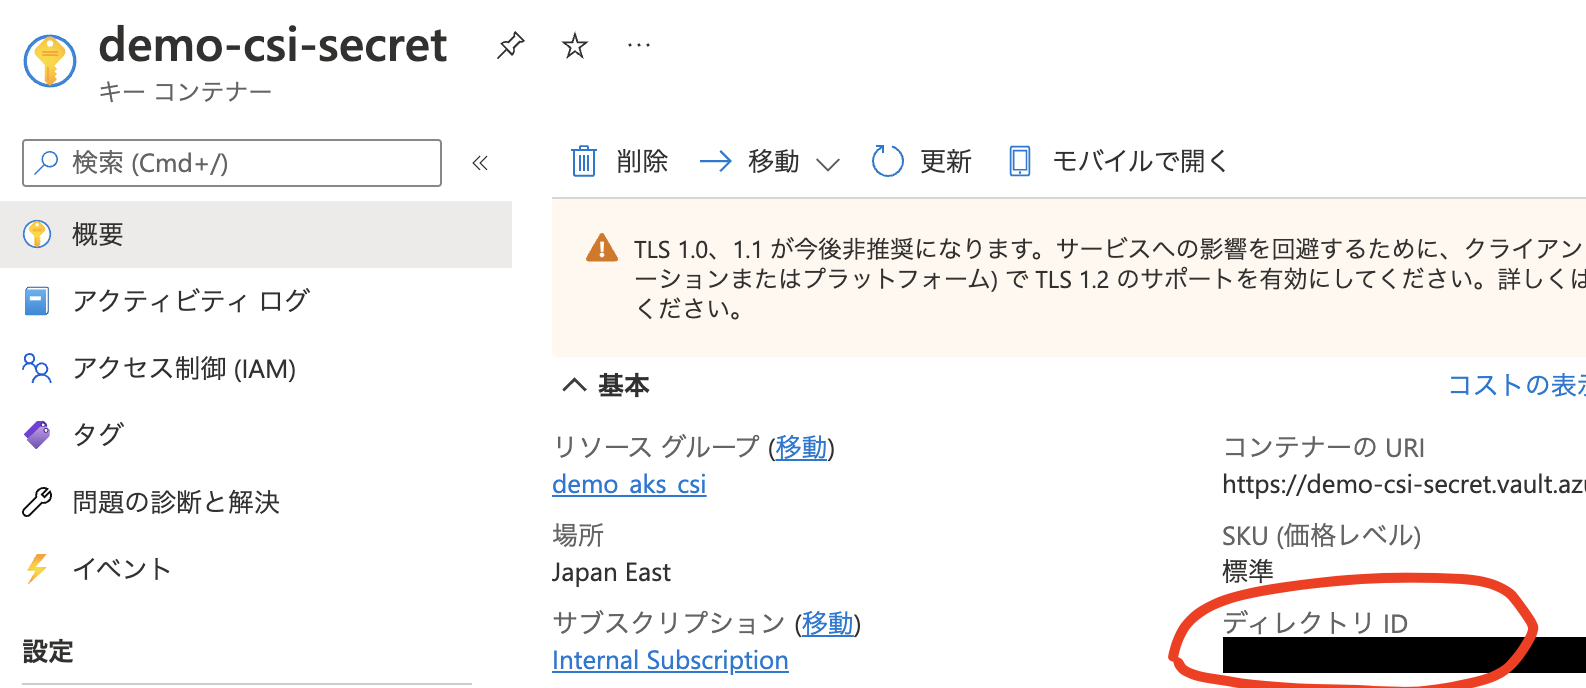
また、後ほど AKS 側作業で利用するため、概要より ディレクトリ ID(テナント ID)を控えておきます。
Azure Key Vault (キー コンテナー)のアクセスポリシーへ AKS の Managed Identity(マネージド ID) を設定する


Azure Key Vault (キー コンテナー)へのアクセスを許可するために、アクセスポリシーへマネージド IDを割り当てます。
割り当て可能な マネージド ID は、システムやユーザー定義など、いくつかありますが、今回はシークレット ストア CSI ドライバー の有効化の際に、自動的に作成され、AKSのノードプール(vmss/仮想マシンスケール セット)へ、ユーザー割り当て済みとして登録される マネージド ID azurekeyvaultsecretsprovider-*を流用します
その他の(システム割当 や ユーザー割り当て、Podなど )マネージド IDの設定方法については、以下公式ドキュメントを参照してください。
まずは、マネージド IDを確認します。
AKS 作成時に自動的作成される リソースグループ MC_[AKSリソースグループ名][AKSクラスタ名][リージョン名]
の中から、以下のような名称のマネージド IDが作成されていることを確認します。
azurekeyvaultsecretsprovider-[AKSクラスタ名]

次に、同じくMC_からはじまるリソースグループの中から、ノードプール( vmss /仮想マシンスケール セット)を選択し、
ID > ユーザー割り当て済み へ、マネージド IDが割り当てられていることを確認の上、
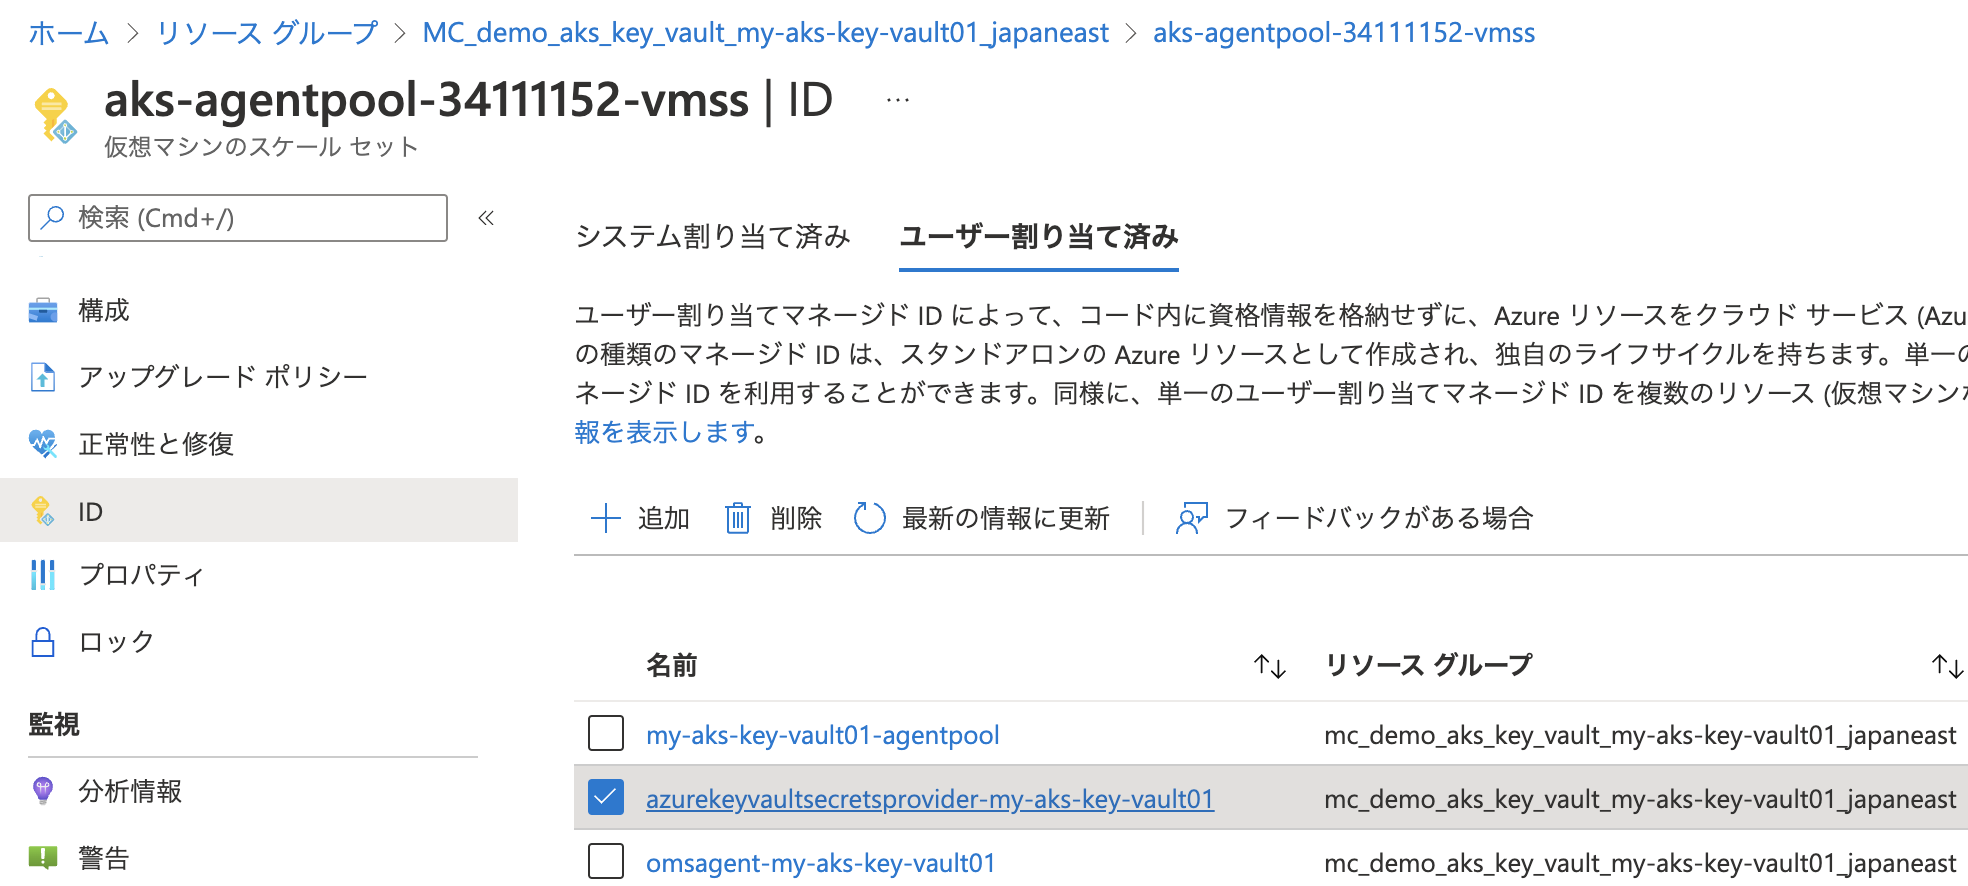
マネージド IDをクリックして詳細を表示します。
この後の作業で利用するため、以下を控えておきます。
- クライアント ID (*: AKS側作業で利用)
- オブジェクト (プリンシパル) ID

次に Portal より 先ほど作成した Azure Key Vault (キー コンテナー)を表示し、キー コンテナー > アクセス ポリシーより+ アクセス ポリシーの追加をクリックします。
- テンプレートからの構成
- プルダウンより
キー、シークレット、証明書の管理(用途にあったものを選択してください)
- プルダウンより
- プリンシパルの選択
-
選択されていませんをクリックし、右側のペインで、さきほど、確認したマネージド IDのオブジェクト (プリンシパル) IDを検索欄へ入力 - 検索結果の
マネージド IDをクリックして選択したアイテムへ表示されていることを確認後 -
選択ボタンを押下して、元(左)のペインのプリンシパルの選択へマネージド IDが反映されていることを確認後
-
- 最後に
追加ボタンをクリックします

- アクセス ポリシーの画面に戻り、画面上の
保存をクリックして、AKSへ割り当てられたマネージド IDへのアクセスポリシーが追加されたことを確認します。


これで、Azure Key Vault (キー コンテナー)へマネージド IDを利用してアクセス可能になりました。
UIの手順がやや複雑で、わかりにくいのですが、最後の保存まで行わないと、アクセス ポリシーに新規追加されませんので注意してください
AKS (Azure Kubernetes Service) 上で SecretProviderClass 及び Pod を作成


つづいて、AKSに戻ります。以下の YAML より Azure Key Vault (キー コンテナー)へアクセスするSecretProviderClassを作成します。
さきほど、控えたマネージド IDの以下情報を置き換えてください。
- クライアント ID : [CLIENT-ID-FOR-YOUR-MANAGED-ID]
以下も自身の Key Vault (キー コンテナー)の情報へ置き換えてください。
- keyvaultName: Key Vault (キー コンテナー)の名前
- tenantId: Key Vault (キー コンテナー)のディレクトリ ID[YOUR-TENANT-ID]
# This is a SecretProviderClass example using user-assigned identity to access your key vault
apiVersion: secrets-store.csi.x-k8s.io/v1
kind: SecretProviderClass
metadata:
  name: azure-kvname-user-msi
spec:
  provider: azure
  parameters:
    usePodIdentity: "false"
    useVMManagedIdentity: "true"    # Set to true for using managed identity
    # 今回はシステムではなくユーザー定義のマネージド ID を使うので、こちらへマネージド ID のクライアント ID を設定
    userAssignedIdentityID: "[CLIENT-ID-FOR-YOUR-MANAGED-ID]"     # If empty, then defaults to use the system assigned identity on the VM
    # Key Vault (キー コンテナー)の名前を設定
    keyvaultName: demo-csi-secret #
    cloudName: ""                   # [OPTIONAL for Azure] if not provided, the Azure environment defaults to AzurePublicCloud
    tenantId: "[YOUR-TENANT-ID]"      # The tenant ID of the key vault
    # Key Vault (キー コンテナー)の中から利用するシークレットを設定
    objects: |
      array:
        - |
          objectType: secret
          # Key Vault (キー コンテナー)の シークレット名
          objectName: demo-secret01
        - |
          objectType: secret
          # Key Vault (キー コンテナー)の シークレット名
          objectName: demo-secret02
  # 今回は env で Kubernetes Secret として利用するため、こちらを設定(ファイルをマウントするだけであれば以下不要)
  secretObjects:
    # Pod より参照させる Kubernetes Secret 名
    - secretName: test-secrets
      type: Opaque
      data:
        # Kubernetes Secret のキー名
        - key: k8s-secret-key1
          # Key Vault (キー コンテナー)の シークレット名
          objectName: demo-secret01
        # Kubernetes Secret のキー名
        - key: k8s-secret-key2
          # Key Vault (キー コンテナー)の シークレット名
          objectName: demo-secret02
    # Pod より参照させる Kubernetes Secret 名
    - secretName: test-secret1
      type: Opaque
      data:
        # Kubernetes Secret のキー名
        - key: k8s-secret-key1
          # Key Vault (キー コンテナー)の シークレット名
          objectName: demo-secret01
続いて、以下のような Secret を環境変数へ設定、ファイルマウントする Pod の YAML ファイルを用意します。
SecretProviderClass の仕組みを利用して、Key Vault (キー コンテナー)の情報を取得しているため、env など secret だけを使いたい場合でも、ボリュームマウントは必須(Pod 作成時に、Kubernetes secret も作成され、Pod 削除時に、Kubernetes secret も削除されるようなので)
# This is a sample pod definition for using SecretProviderClass and user-assigned identity to access your key vault
kind: Pod
apiVersion: v1
metadata:
  name: busybox-secrets-store-env-user-msi
spec:
  containers:
    - name: busybox
      image: k8s.gcr.io/e2e-test-images/busybox:1.29-1
      command:
        - "/bin/sleep"
        - "10000"
      # 環境変数を設定
      env:
      - name: ENV_KEY_VAULT1
        valueFrom:
          secretKeyRef:
            name: test-secret1
            key: k8s-secret-key1
      - name: ENV_KEY_VAULT2
        valueFrom:
          secretKeyRef:
            name: test-secrets
            key: k8s-secret-key2
 # ボリュームとしてマウント (必須)
      volumeMounts:
      - name: secrets-store01-inline
        mountPath: "/mnt/secrets-store"
        readOnly: true
 # ボリュームとして SecretProviderClass を設定 (必須)
  volumes:
    - name: secrets-store01-inline
      csi:
        driver: secrets-store.csi.k8s.io
        readOnly: true
        volumeAttributes:
          secretProviderClass: "azure-kvname-user-msi"
以上で準備が整いましたので
以下 kubectl コマンドにより、確認していきます。
# SecretProviderClass の適用と確認
kubectl apply -f csi-spc-user-msi.yml
kubectl get secretproviderclass
# secretを確認(この時点ではまだ作成されていない=Pod作成時に作成される)
kubectl get secret
# Pod の適用と確認
kubectl apply -f sample-pod.yml
kubectl get pod
# secretを確認(Podが作成されたので)
kubectl get secret
# pod の環境変数へKey Vault (キー コンテナー)の シークレットの値が反映されていることを確認
kubectl exec busybox-secrets-store-env-user-msi -- env
# pod へKey Vault (キー コンテナー)の シークレットがマウントされていることを確認
kubectl exec busybox-secrets-store-env-user-msi -- ls -al /mnt/secrets-store/
kubectl exec busybox-secrets-store-env-user-msi -- cat /mnt/secrets-store/demo-secret01
kubectl exec busybox-secrets-store-env-user-msi -- cat /mnt/secrets-store/demo-secret02
以下実行結果の例
$# SecretProviderClass の適用と確認
$kubectl apply -f csi-spc-user-msi.yml
secretproviderclass.secrets-store.csi.x-k8s.io/azure-kvname-user-msi created
$kubectl get secretproviderclass
NAME                    AGE
azure-kvname-user-msi   1s
$# secretを確認(この時点ではまだ作成されていない=Pod作成時に作成される)
$kubectl get secret
NAME                  TYPE                                  DATA   AGE
default-token-75xb6   kubernetes.io/service-account-token   3      2d
$# Pod の適用と確認
$kubectl apply -f sample-pod.yml
pod/busybox-secrets-store-env-user-msi created
$kubectl get pod
NAME                                 READY   STATUS              RESTARTS   AGE
busybox-secrets-store-env-user-msi   0/1     ContainerCreating   0          0s
$# secretを確認(Podが作成されたので)
$kubectl get secret
NAME                  TYPE                                  DATA   AGE
default-token-75xb6   kubernetes.io/service-account-token   3      2d
test-secret1          Opaque                                1      1s
test-secrets          Opaque                                2      1s
$# pod の環境変数へKey Vault (キー コンテナー)の シークレットの値が反映されていることを確認
$kubectl exec busybox-secrets-store-env-user-msi -- env
PATH=/usr/local/sbin:/usr/local/bin:/usr/sbin:/usr/bin:/sbin:/bin
HOSTNAME=busybox-secrets-store-env-user-msi
ENV_KEY_VAULT1=This is the value of the secret "demo-secret01" included in the Azure key vault "demo-csi-secret".
ENV_KEY_VAULT2=This is the value of the secret "demo-secret02" included in the Azure key vault "demo-csi-secret". This is "demo-secret02".
KUBERNETES_PORT_443_TCP=tcp://10.0.0.1:443
KUBERNETES_PORT_443_TCP_PROTO=tcp
KUBERNETES_PORT_443_TCP_PORT=443
KUBERNETES_PORT_443_TCP_ADDR=10.0.0.1
KUBERNETES_SERVICE_HOST=10.0.0.1
KUBERNETES_SERVICE_PORT=443
KUBERNETES_SERVICE_PORT_HTTPS=443
KUBERNETES_PORT=tcp://10.0.0.1:443
HOME=/root
$# pod へKey Vault (キー コンテナー)の シークレットがマウントされていることを確認
$kubectl exec busybox-secrets-store-env-user-msi -- ls -al /mnt/secrets-store/
total 4
drwxrwxrwt    3 root     root           120 Apr  8 08:55 .
drwxr-xr-x    3 root     root          4096 Apr  8 08:55 ..
drwxr-xr-x    2 root     root            80 Apr  8 08:55 ..2022_04_08_08_55_11.2856338384
lrwxrwxrwx    1 root     root            32 Apr  8 08:55 ..data -> ..2022_04_08_08_55_11.2856338384
lrwxrwxrwx    1 root     root            20 Apr  8 08:55 demo-secret01 -> ..data/demo-secret01
lrwxrwxrwx    1 root     root            20 Apr  8 08:55 demo-secret02 -> ..data/demo-secret02
$kubectl exec busybox-secrets-store-env-user-msi -- cat /mnt/secrets-store/demo-secret01
This is the value of the secret "demo-secret01" included in the Azure key vault "demo-csi-secret".$kubectl exec busybox-secrets-store-env-user-msi -- cat /mnt/secrets-store/demo-secret02
This is the value of the secret "demo-secret02" included in the Azure key vault "demo-csi-secret". This is "demo-secret02".$
Tips
-
Status Code = '400'. Response body: {"error":"invalid_request","error_description":"Identity not found"エラーで、以下のようにPodの作成に失敗する場合は、以下を確認してください。
$kubectl get pod
NAME                                 READY   STATUS              RESTARTS   AGE
busybox-secrets-store-env-user-msi   0/1     ContainerCreating   0          83m
$kubectl describe pod busybox-secrets-store-env-user-msi
Name:         busybox-secrets-store-env-user-msi
~~~~~~~~~~~~~~~~~~~~~~~~~~~~~~~~~~~~~~~~~~~~~~~~~~~~~~~~~~
中略
~~~~~~~~~~~~~~~~~~~~~~~~~~~~~~~~~~~~~~~~~~~~~~~~~~~~~~~~~~
Events:
  Type     Reason       Age                   From     Message
  ----     ------       ----                  ----     -------
  Warning  FailedMount  22m (x6 over 59m)     kubelet  Unable to attach or mount volumes: unmounted volumes=[secrets-store01-inline], unattached volumes=[kube-api-access-zkp5c secrets-store01-inline]: timed out waiting for the condition
  Warning  FailedMount  8m18s (x45 over 83m)  kubelet  MountVolume.SetUp failed for volume "secrets-store01-inline" : rpc error: code = Unknown desc = failed to mount secrets store objects for pod default/busybox-secrets-store-env-user-msi, err: rpc error: code = Unknown desc = failed to mount objects, error: failed to get objectType:secret, objectName:demo-secret01, objectVersion:: azure.BearerAuthorizer#WithAuthorization: Failed to refresh the Token for request to https://demo-csi-secret.vault.azure.net/secrets/demo-secret01/?api-version=2016-10-01: StatusCode=400 -- Original Error: adal: Refresh request failed. Status Code = '400'. Response body: {"error":"invalid_request","error_description":"Identity not found"} Endpoint http://169.254.169.254/metadata/identity/oauth2/token?api-version=2018-02-01&client_id=6c6a0e2c-0c7d-4430-baab-49129f45bc4d&resource=https%!!(MISSING)A(MISSING)%!!(MISSING)F(MISSING)%!!(MISSING)F(MISSING)vault.azure.net
  Warning  FailedMount  2m25s (x29 over 81m)  kubelet  Unable to attach or mount volumes: unmounted volumes=[secrets-store01-inline], unattached volumes=[secrets-store01-inline kube-api-access-zkp5c]: timed out waiting for the condition
~/azurework/csidemo $
- アクセスポリシーの設定があっているか?
- SecretProviderClass の設定があっているか?(とくに以下の設定)
- userAssignedIdentityID:
- tenantId:
- objects:
- 操作対象の AKS クラスタへちゃんと接続しているか?
- クラスタがいくつかあったり、クラスタ作成から時間が空いてしまう、
kubectl実行環境を変えたなどで、やりがちです。。。(今回の記事を書くときにハマりました)- 操作対象の AKS クラスタへコンテキストが設定されているか
kubectl config current-contextコマンド確認しましょう!
- 操作対象の AKS クラスタへコンテキストが設定されているか
- クラスタがいくつかあったり、クラスタ作成から時間が空いてしまう、
さいごに

- 事前準備は必要となりますが、Kubernetes のコードには、一切秘匿情報を利用せずに AKS シークレット ストア CSI ドライバーの Azure Key Vault プロバイダーの仕組みを利用し、さらにセキュアな Azure Managed Identity アクセス認証する例を確認できました。
- 公式ドキュメントについて、初見では分かりづらい部分も多々ありますので、こちらの記事を参考にいただけると幸いです。
本記事の実行結果等は執筆時点(2022年4月8日)での内容となります
以上です。
