こんにちは。最近担当した案件でソーシャルログインを実装した事例がありましたので、
おさらい程度にLINEログインの実装について書き留めておこうと思います。
必要なパッケージのインストール
まず、Laravel SocialiteとLINEプロバイダーをインストールします。
composer require laravel/socialite
composer require socialiteproviders/line
LINE Developersでアプリケーションを作成
- LINE Developersにアクセスしてログイン
- 新しいプロバイダーとチャンネルを作成
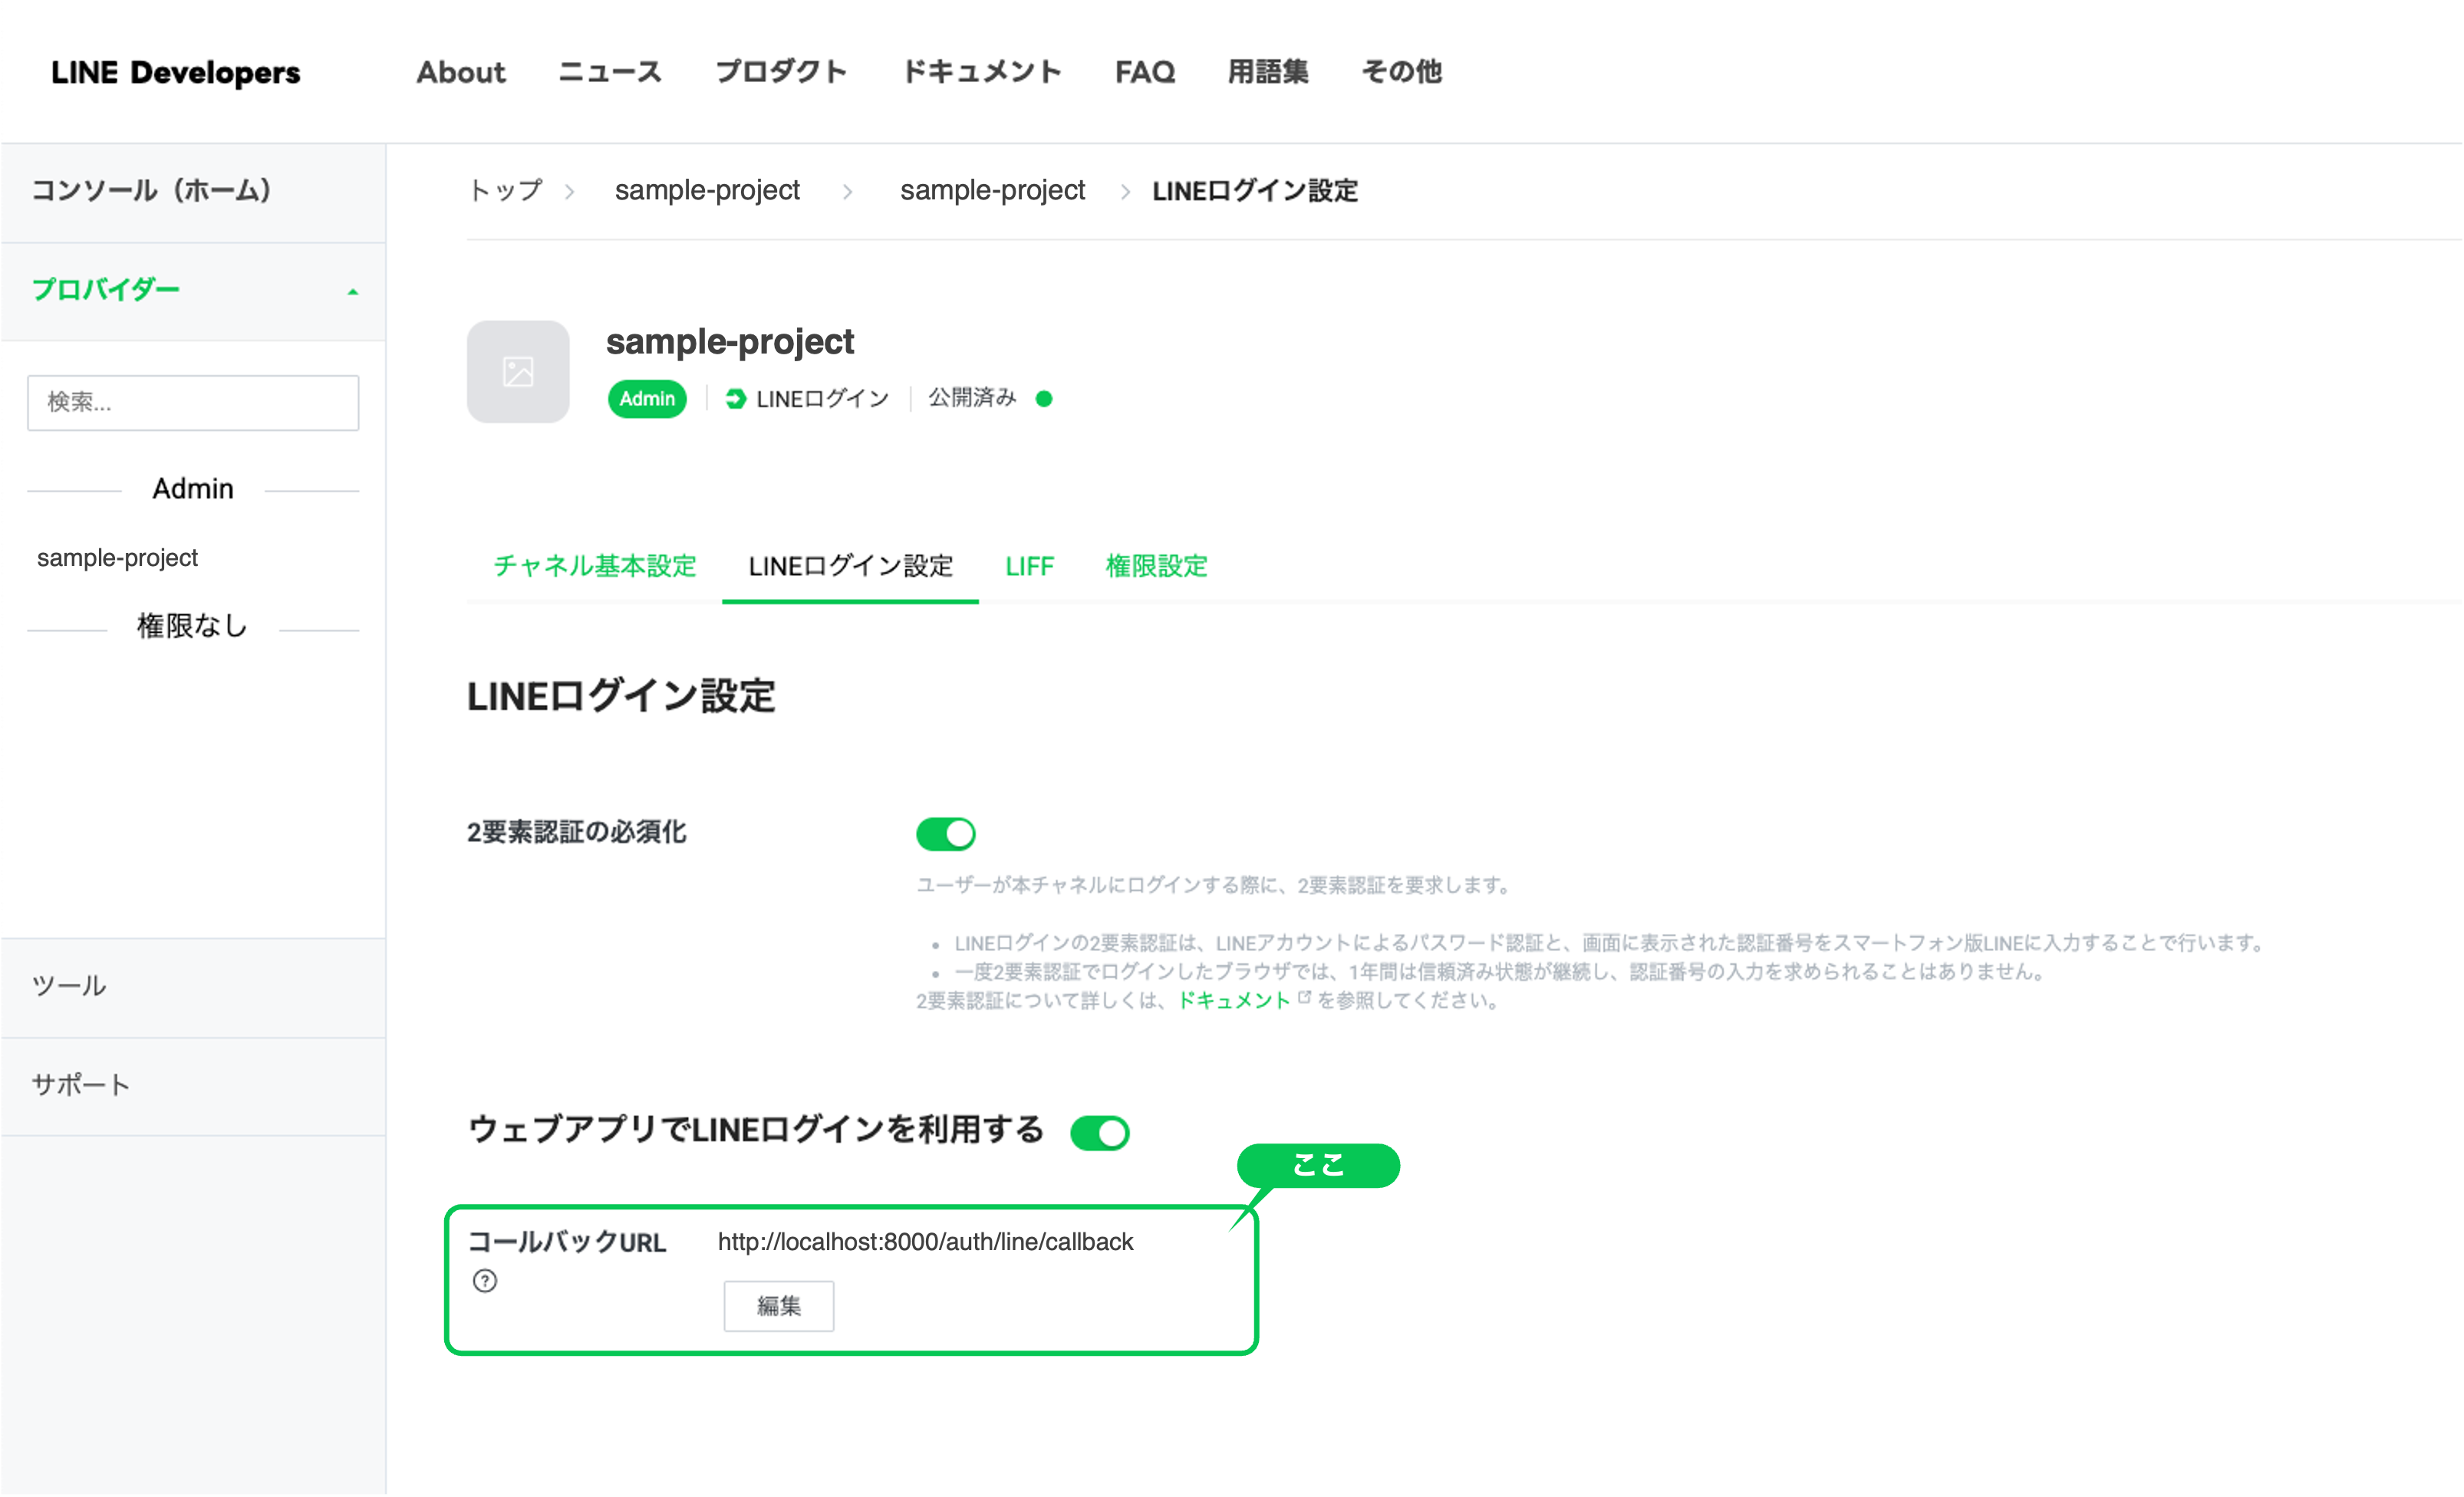
- LINEログインの設定で以下を設定:
- コールバックURL:
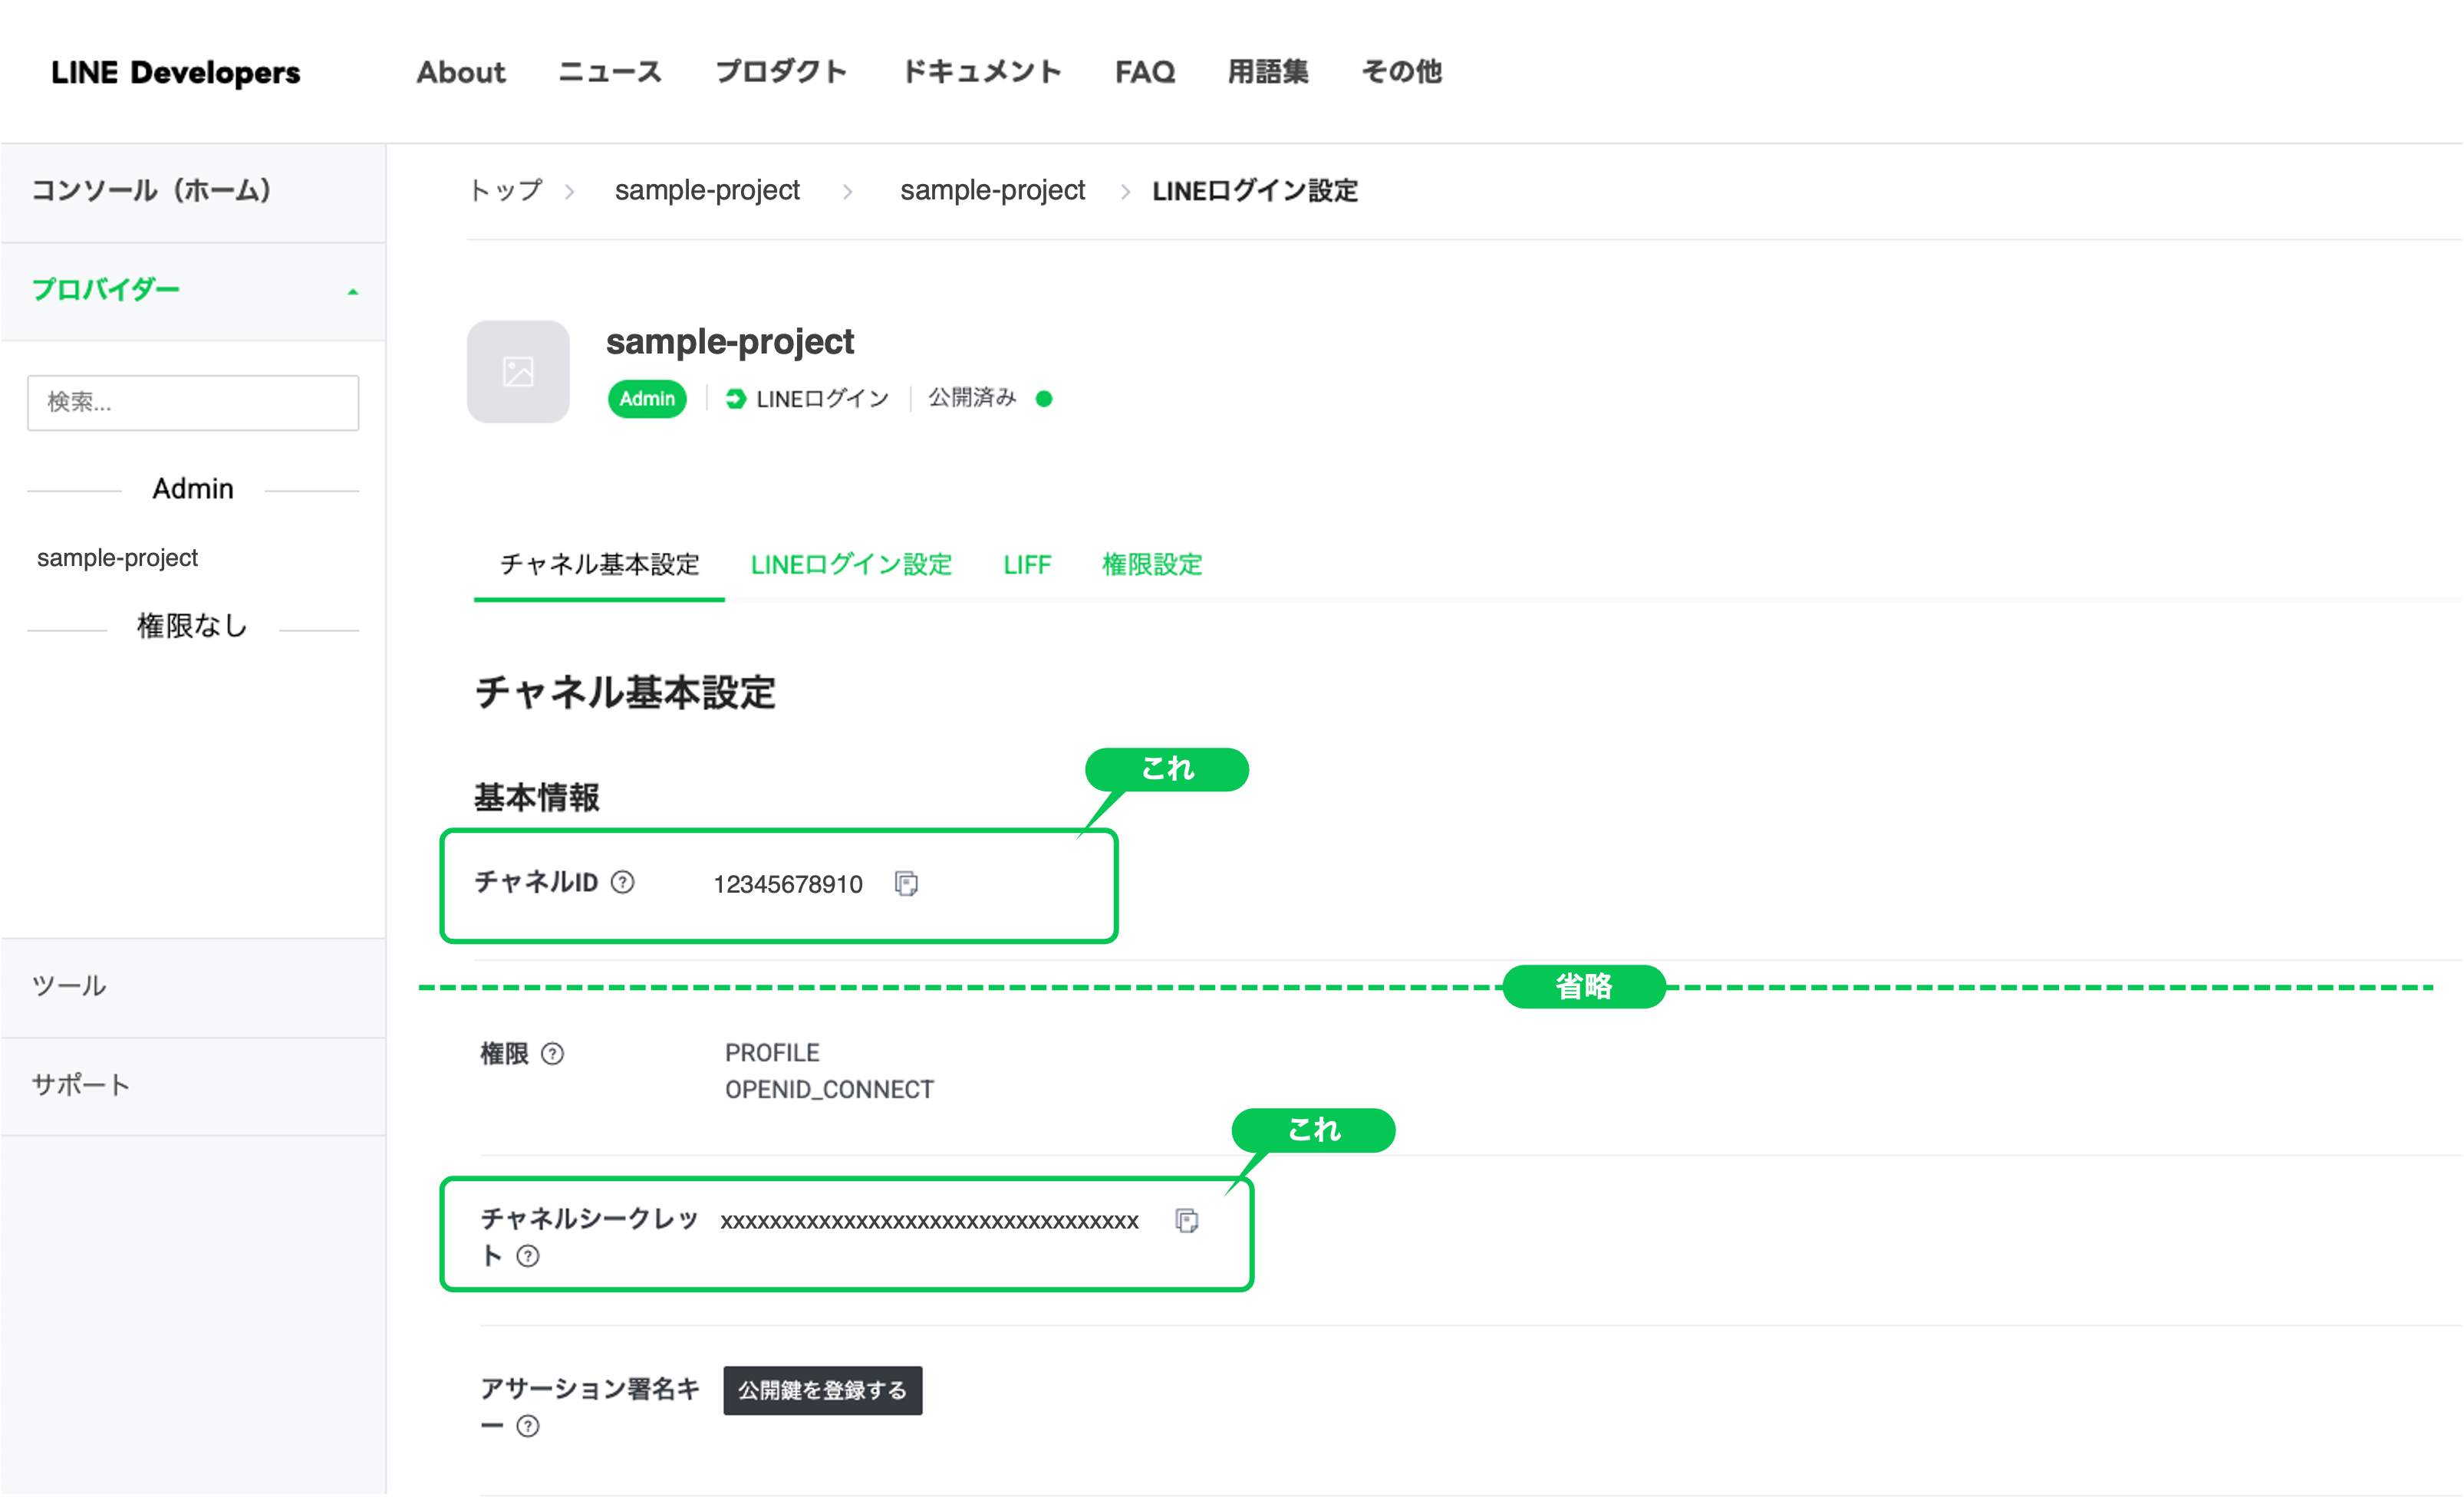
http://localhost:8000/auth/line/callback - チャネルID と チャネルシークレット をメモ
- コールバックURL:
環境変数の設定
.envファイルにLINEの認証情報を追加します。
LINE_CHANNEL_ID=your_channel_id
LINE_CHANNEL_SECRET=your_channel_secret
LINE_REDIRECT_URI=http://localhost:8000/auth/line/callback
設定ファイルの更新
config/services.phpにLINEの設定を追加します。
'line' => [
    'client_id' => env('LINE_CHANNEL_ID'),
    'client_secret' => env('LINE_CHANNEL_SECRET'),
    'redirect' => env('LINE_REDIRECT_URI'),
],
Socialiteプロバイダーの設定
config/app.phpのproviders配列に以下を追加します。
'providers' => [
    // 他のプロバイダー...
    \SocialiteProviders\Manager\ServiceProvider::class,
],
app/Providers/EventServiceProvider.phpでLINEプロバイダーを登録します。
<?php

namespace App\Providers;

use Illuminate\Foundation\Support\Providers\EventServiceProvider as ServiceProvider;
use SocialiteProviders\Manager\SocialiteWasCalled;

class EventServiceProvider extends ServiceProvider
{
    protected $listen = [
        SocialiteWasCalled::class => [
            'SocialiteProviders\\Line\\LineExtendSocialite@handle',
        ],
    ];
}
マイグレーションの作成
ユーザーテーブルにLINE関連のカラムを追加します。
php artisan make:migration add_line_fields_to_users_table
<?php

use Illuminate\Database\Migrations\Migration;
use Illuminate\Database\Schema\Blueprint;
use Illuminate\Support\Facades\Schema;

return new class extends Migration
{
    public function up()
    {
        Schema::table('users', function (Blueprint $table) {
            $table->string('line_id')->nullable()->unique();
            $table->string('avatar')->nullable();
            $table->timestamp('email_verified_at')->nullable()->change();
            $table->string('password')->nullable()->change();
        });
    }

    public function down()
    {
        Schema::table('users', function (Blueprint $table) {
            $table->dropColumn(['line_id', 'avatar']);
        });
    }
};
php artisan migrate
Userモデルの更新
app/Models/User.phpを更新します。
<?php

namespace App\Models;

use Illuminate\Foundation\Auth\User as Authenticatable;
use Illuminate\Notifications\Notifiable;

class User extends Authenticatable
{
    use Notifiable;

    protected $fillable = [
        'name',
        'email',
        'password',
        'line_id',
        'avatar',
    ];

    protected $hidden = [
        'password',
        'remember_token',
    ];

    protected function casts(): array
    {
        return [
            'email_verified_at' => 'datetime',
            'password' => 'hashed',
        ];
    }
}
ルートの設定
routes/web.phpにLINEログイン用のルートを追加します。
<?php

use Illuminate\Support\Facades\Route;
use App\Http\Controllers\LineLoginController;

// 通常のルート
Route::get('/', function () {
    return view('welcome');
});

// LINEログイン関連のルート
Route::get('/auth/line', [LineLoginController::class, 'redirectToLine'])->name('line.login');
Route::get('/auth/line/callback', [LineLoginController::class, 'handleLineCallback'])->name('line.callback');
Route::post('/logout', [LineLoginController::class, 'logout'])->name('logout');

// 認証が必要なルート
Route::middleware('auth')->group(function () {
    Route::get('/dashboard', function () {
        return view('dashboard');
    })->name('dashboard');
});
コントローラーの作成
LINEログイン用のコントローラーを作成します。
php artisan make:controller LineLoginController
LineLoginController
<?php

namespace App\Http\Controllers;

use App\Models\User;
use Illuminate\Http\Request;
use Illuminate\Support\Facades\Auth;
use Laravel\Socialite\Facades\Socialite;

class LineLoginController extends Controller
{
    /**
     * LINEログインページにリダイレクト
     */
    public function redirectToLine()
    {
        return Socialite::driver('line')->redirect();
    }

    /**
     * LINEからのコールバックを処理
     */
    public function handleLineCallback()
    {
        try {
            $lineUser = Socialite::driver('line')->user();

            // 既存のユーザーをLINE IDで検索
            $user = User::where('line_id', $lineUser->id)->first();

            if (!$user) {
                // メールアドレスで既存ユーザーを検索
                $user = User::where('email', $lineUser->email)->first();

                if ($user) {
                    // 既存ユーザーにLINE IDを追加
                    $user->update([
                        'line_id' => $lineUser->id,
                        'avatar' => $lineUser->avatar,
                    ]);
                } else {
                    // 新規ユーザーを作成
                    $user = User::create([
                        'name' => $lineUser->name,
                        'email' => $lineUser->email,
                        'line_id' => $lineUser->id,
                        'avatar' => $lineUser->avatar,
                        'email_verified_at' => now(),
                    ]);
                }
            } else {
                // 既存のLINEユーザーの情報を更新
                $user->update([
                    'name' => $lineUser->name,
                    'email' => $lineUser->email ?? $user->email,
                    'avatar' => $lineUser->avatar,
                ]);
            }

            // ユーザーをログイン状態にする
            Auth::login($user);

            return redirect()->intended('/dashboard');

        } catch (\Exception $e) {
            return redirect('/')->withErrors(['error' => 'ログインに失敗しました。']);
        }
    }

    /**
     * ログアウト
     */
    public function logout(Request $request)
    {
        Auth::logout();
        $request->session()->invalidate();
        $request->session()->regenerateToken();

        return redirect('/');
    }
}
ログイン前後の画面作成
welcome.blade.php
<!DOCTYPE html>
<html lang="ja">
<head>
    <meta charset="UTF-8">
    <meta name="viewport" content="width=device-width, initial-scale=1.0">
    <title>LINEログインデモ</title>
    <style>
        body {
            font-family: Arial, sans-serif;
            max-width: 600px;
            margin: 50px auto;
            padding: 20px;
            text-align: center;
        }
        .line-login-btn {
            background-color: #06C755;
            color: white;
            border: none;
            padding: 12px 24px;
            border-radius: 8px;
            text-decoration: none;
            display: inline-block;
            font-size: 16px;
            margin: 20px 0;
        }
        .line-login-btn:hover {
            background-color: #05B64A;
        }
        .error {
            color: #dc3545;
            margin: 10px 0;
        }
    </style>
</head>
<body>
    <h1>LINEログインデモ</h1>

    @if (session('error'))
        <div class="error">{{ session('error') }}</div>
    @endif

    @if ($errors->any())
        <div class="error">
            @foreach ($errors->all() as $error)
                <p>{{ $error }}</p>
            @endforeach
        </div>
    @endif

    @auth
        <p>ようこそ、{{ Auth::user()->name }}さん!</p>
        <a href="{{ route('dashboard') }}">ダッシュボードへ</a>
        <form method="POST" action="{{ route('logout') }}" style="display: inline;">
            @csrf
            <button type="submit" style="margin-left: 10px;">ログアウト</button>
        </form>
    @else
        <p>LINEアカウントでログインしてください。</p>
        <a href="{{ route('line.login') }}" class="line-login-btn">
            LINEでログイン
        </a>
    @endauth
</body>
</html>
dashboar.blade.php
<!DOCTYPE html>
<html lang="ja">
<head>
    <meta charset="UTF-8">
    <meta name="viewport" content="width=device-width, initial-scale=1.0">
    <title>ダッシュボード</title>
    <style>
        body {
            font-family: Arial, sans-serif;
            max-width: 600px;
            margin: 50px auto;
            padding: 20px;
        }
        .user-info {
            border: 1px solid #ddd;
            border-radius: 8px;
            padding: 20px;
            margin: 20px 0;
        }
        .avatar {
            width: 80px;
            height: 80px;
            border-radius: 50%;
            margin-bottom: 10px;
        }
        .logout-btn {
            background-color: #dc3545;
            color: white;
            border: none;
            padding: 10px 20px;
            border-radius: 5px;
            cursor: pointer;
        }
    </style>
</head>
<body>
    <h1>ダッシュボード</h1>

    <div class="user-info">
        <h2>ユーザー情報</h2>
        @if (Auth::user()->avatar)
            <img src="{{ Auth::user()->avatar }}" alt="アバター" class="avatar">
        @endif
        <p><strong>名前:</strong> {{ Auth::user()->name }}</p>
        <p><strong>メールアドレス:</strong> {{ Auth::user()->email ?? '未設定' }}</p>
        <p><strong>LINE ID:</strong> {{ Auth::user()->line_id }}</p>
        <p><strong>登録日:</strong> {{ Auth::user()->created_at->format('Y年m月d日') }}</p>
    </div>

    <form method="POST" action="{{ route('logout') }}">
        @csrf
        <button type="submit" class="logout-btn">ログアウト</button>
    </form>
</body>
</html>
まとめ
Laravel 12でLINEのソーシャルログインを実装する方法を紹介しました。Laravel Socialiteを使用することで、比較的簡単にLINEログイン機能を追加できます。
主なポイント:
- Laravel SocialiteとLINEプロバイダーのインストール
- LINE Developersでのアプリケーション設定
- データベースマイグレーションでのLINE関連カラムの追加
- ユーザー認証とデータの保存処理
- エラーハンドリングの実装
この実装により、ユーザーはLINEアカウントを使用して簡単にログインできるようになります。実際のプロダクションでは、セキュリティ面やエラーハンドリングをさらに強化することをお勧めします。
自社サーバ内で可能な限りユーザー情報を持たないというのは情報漏洩の観点でも有効です。皆さんも是非チャレンジしてみてください。