VRoid SDK を使えば、VRoid Hub に登録してあるキャラクターを選択するゲームやアプリケーションを作ることができます。 しかし、私の頭では公式サイトに書いてあることが理解できず、またVRoid SDK の情報はネットの中には少なくて、とても苦労しました。 自力で作ることはあきらめて、SDK付属のサンプルを使うことで、VRoid Hub のキャラクターを自分のUnity のプロジェクトに召喚することに成功しました。 もっといい方法があると思いますが、とりあえず何とかできたで、その手順を忘れないようにここに記します。
まず最初に
VRoid SDK を使うにはまず、ここを読みましょう。
まずは、Pixiv さんへ申請する必要があります。
https://github.com/pixiv/vroid-sdk-developers
アプリ使用の許可がおりたら、アプリの登録をします。
https://hub.vroid.com/oauth/applications
登録後、Application ID と Secret が発行されます。
Unity のプロジェクトに、VRoid SDK package をインポートし、
以下に、さきほどの Application ID と Secret を入力します。
Asset > VRoidSDK > Plugins > SDKConfigurations

今回やること
以下の動画のように、VRoid を選択し、他のシーンに登場させます。

シーンを追加
以下の2つのシーンを用意します。
-
VRoid を選ぶシーン
SDK付属のサンプルシーンを利用しました。
Asset > VroidSDK > Examples > Scene > Example -
選択したVRoidを使うシーン
適当に用意します。
ここでは、Unity のプロジェクトを作った時のデフォルトのシーンを利用しました。
Asset > Scenes > SampleScene
以上の2つのシーンをセットします。 File > Build Setting [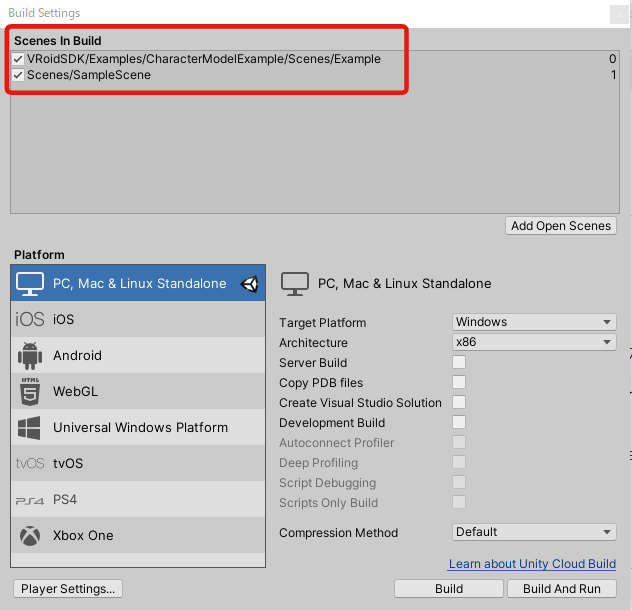](https://gyazo.com/0b59013f3d2e4e16c1ca6e3a6ffab7f7)
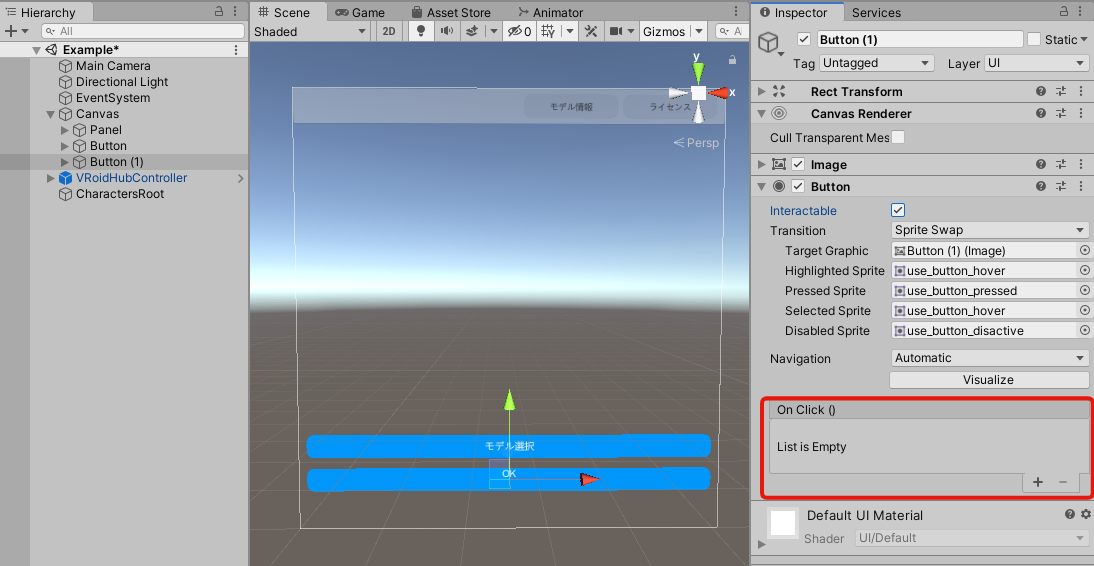
画面遷移用のボタンを追加
画面遷移するためのボタンを追加します。
既にある以下のボタンをコピペします。

コピペし、ボタンのテキストを「OK」にして位置を整えます。
(ボタンが1つ増えます)

画面遷移の設定
新しくできたButton(1)の Inspector の Button > On Click()の中身を消しておきます。(下画像のマイナスをクリック)

List is Empty になればOK
以下のスクリプトをButton(1) にアタッチします。

using System.Collections;
using System.Collections.Generic;
using UnityEngine;
using UnityEngine.SceneManagement;

public class ChangeScene : MonoBehaviour
{
    public void OnClickButton()
    {
        SceneManager.LoadScene("SampleScene"); //遷移後のシーン名
    }
}
Inspector に、スクリプト「Change Scene」が追加されてることを確認し、
On Click() の プラスマークをクリックします。

Hierarchy の Button(1) を Inspector の On Click() の「None(object)」にアタッチします。
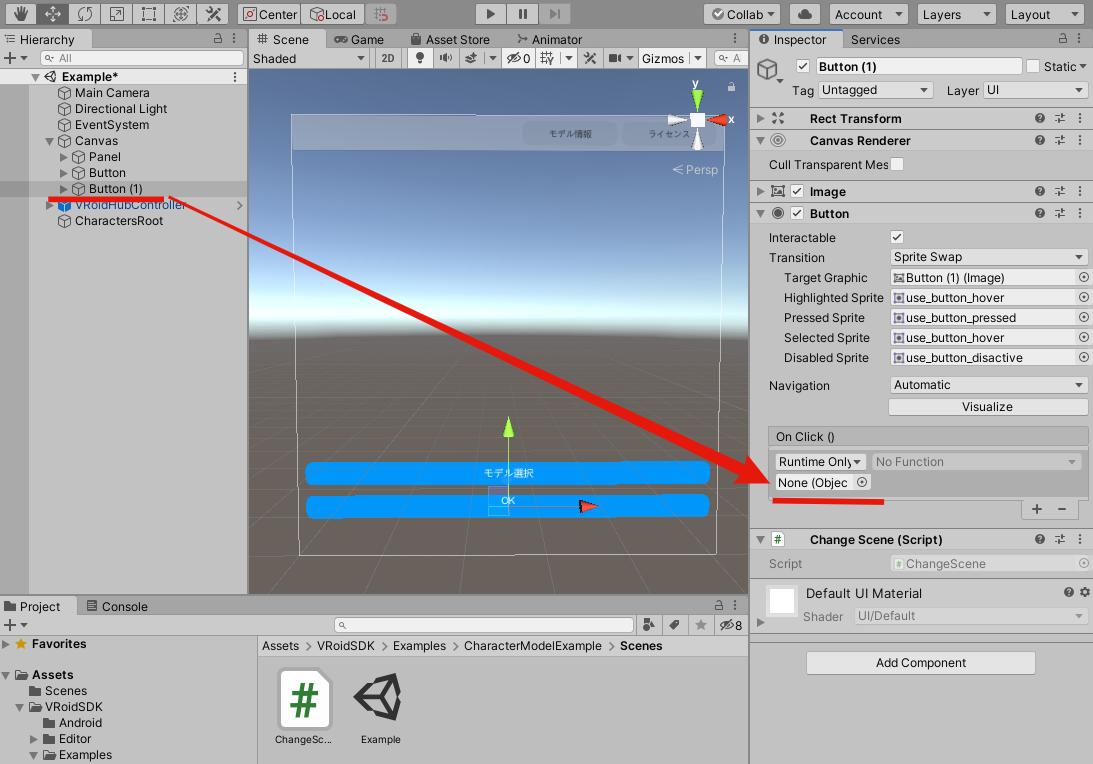
No Function > スクリプト名[ChangeScene] > 関数名[OnClickButton()]

これで、OKボタンを押すと SampleScene に画面遷移します。
VRoid を遷移後のシーンに持っていく
Hierarchy の CharactersRoot に以下のスクリプトをアタッチ
(選択したVRoidを遷移後のシーンで使えるようにするため)

using System.Collections;
using System.Collections.Generic;
using UnityEngine;

public class DontDestroy : MonoBehaviour
{
    void Awake()
    {
        DontDestroyOnLoad(gameObject);
    }
}
一応、遷移後のシーン(SampleScene)のMain Cameraの Position 、Rotation を遷移前の(Example)と揃えておきます。
揃えておかないと、遷移後に後ろ向きで登場します。

これで、VRoid を選び、OKボタンを押すと、選択したVRoidが遷移後のシーンで使用可能になります。

アニメーション設定
このままではT字型なので、
アニメーションを設定します。
アニメーションを用意します。
ここでは、Unity Asset Store にある「Unity-Chan!Model」のジャンプアニメーションを使用しました。
Unity-Chan!Model をインポートします。
Project のどこかに 新しい Animation Controller を作成
(Create > Animation Controller)
Create State > New State
New State の Inspector で モーションを選びます。
[
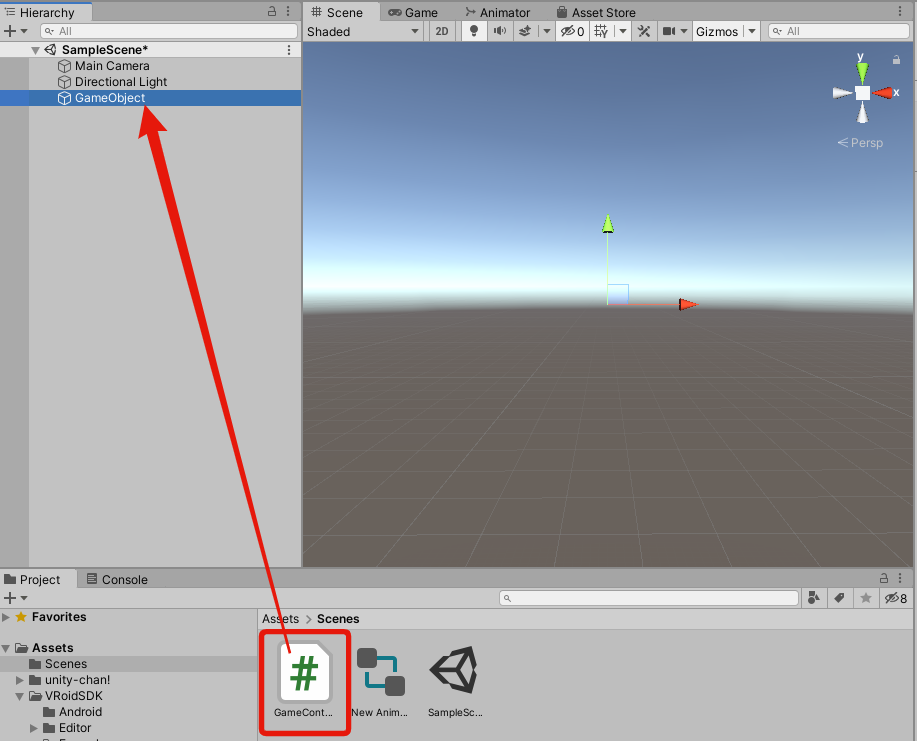
遷移先のシーン(Sample Scene) で、
空のオブジェクトを作ります。

その空のオブジェクトに以下のスクリプトをアタッチします。
新しいシーンに移動したVRMに さきほど作ったAnimation Controller をアタッチするスクリプトです。
using System.Collections;
using System.Collections.Generic;
using UnityEngine;

public class GameController : MonoBehaviour
{
    GameObject vrmObject;
    Animator animator;

    [SerializeField] RuntimeAnimatorController animeController;

    void Start()
    {
        vrmObject = GameObject.Find("VRM");

        animator = vrmObject.GetComponent<Animator>();

        animator.runtimeAnimatorController = animeController;
    }
}
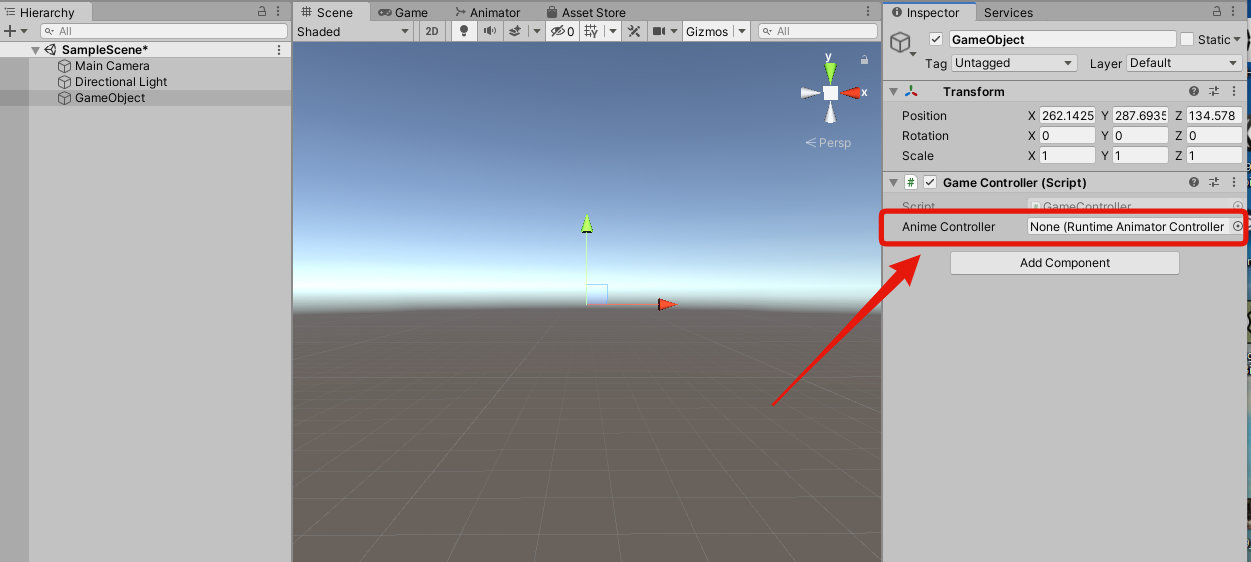
そのGameObject の Inspector のスクリプト Game Controller の Anime Controller で 先ほど作った Animation Controller を選択します。
これで、VRoid Hub のキャラクターを自分の Unity のプロジェクトへ持ってくることができました。
よーし、VRoid Hub のキャラクターを使ったゲームやアプリケーションを作るぞ!!