本記事について
本記事では Rails アプリケーションで DB/LDAP 認証と認可機能を実装する方法を記載します。
認証では ActiveRecord でアクセスできる DB 上のユーザと、LDAP でアクセスできる外部 DB ユーザの両方を探せるようにします。
LDAP 上のユーザは一般ユーザとして扱い、DB 上のユーザは LDAP 接続不可の場合に利用できる緊急用ユーザとして扱い、DB 上の 1 ユーザだけアプリケーションの管理ユーザとして扱うことにします。
認可は一般ユーザ、緊急用ユーザ、管理ユーザの3種類に対して、それぞれリソースに対して行える操作を制限することにします。
認証・認可のために devise, rolify, cancancan を用いることにします。
尚、devise を使って LDAP 認証を有効化する devise_ldap_authenticatable を使います。
(How To: Authenticate via LDAP に従って devise に strategy を追加することも可能ですが、LDAP による認証以外にもパスワード更新や LDAP 通信のログ出力等、LDAP を使うための機能が一通り揃っているため gem を使うことにしました)
前提となる Rails アプリケーション
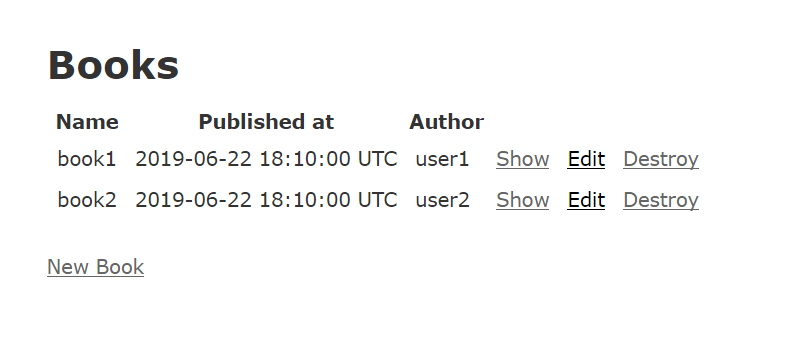
Rails アプリケーションは本の名前と作者を管理するアプリケーションとします。
2 つのモデル Book, Author が存在し、アプリケーションではそれぞれのモデルの CRUD が出来るものとします。
※ 前提とするアプリケーション(master branch)と認証・認可を実装した後のコード(authorization branch)は GitHub 上に公開しています。(rails_authorization_sample_app)
認証機能を実装する
まずは認証機能を実装することにします。
認証には devise gem を用います。
devise の README.md を参考にしながら作業を行いますが、以下の流れで作業を行います。
- devise gem をインストールする
- devise gem を初期化する
- devise 設定ファイル/i18nファイルを作成する
- User model を作成する
- ログイン画面を作成する
- devise gem を設定する
- リソースに認証要求する
devise gem をインストールする
devise gem をインストールするには Gemfile に gem devise を追加して bundle install します。
gem 'devise'
bundle install
devise gem を初期化する
rails generate devise:install
rails generate devise user
実行時のメッセージを見ればわかりますが、rails generate devise:install で devise 設定ファイルと i18n 用ファイルを作成します。
rails generate devise user で認証に用いる User モデルを作成します。
次に devise gem を設定します。
- ActionMailer設定
- ユーザ作成やパスワードリセットをする場合に必要ですが、今回ユーザ作成は行わないため設定不要です
- 必要な場合は
config/environments/development.rbのconfig.action_mailer.default_url_optionsを設定します
- root を設定する
- ログイン後に移動する先等として使われます。アプリケーションとしてデフォルトで表示するページへのパスを設定すればよいでしょう
- 今回は books#index を設定します。
- Flash メッセージを表示する
- devise 内での処理が失敗した場合、flash メッセージが設定されます。それらを表示したい場合は view に notice, alert を表示するよう設定します。
- ログインした後(又は devise 処理エラー)のメッセージを表示したい場合は設定するとよいでしょう。
- 今回は不要です
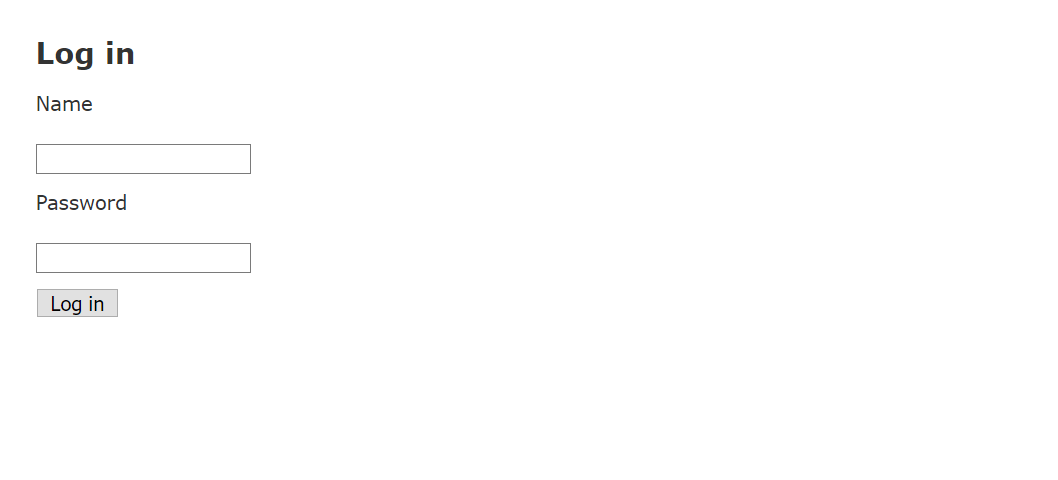
ログイン画面に表示する項目を email から name へ変更するためにカスタム view を作成します。
rails generate devise:views -v sessions
-v sessions は sessions 用の view のみ作成するよう指定しています。
例では、 app/views/devise/sessions/new.html.erb (と、その他共通で使う partial view) が作成されます。
<h2>Log in</h2>

<%= form_for(resource, as: resource_name, url: session_path(resource_name)) do |f| %>
  <div class="field">
    <%= f.label :name %><br />
    <%= f.text_field :name, autofocus: true, autocomplete: "name" %>
  </div>

  <div class="field">
    <%= f.label :password %><br />
    <%= f.password_field :password, autocomplete: "current-password" %>
  </div>

  <% if devise_mapping.rememberable? %>
    <div class="field">
      <%= f.check_box :remember_me %>
      <%= f.label :remember_me %>
    </div>
  <% end %>

  <div class="actions">
    <%= f.submit "Log in" %>
  </div>
<% end %>

<%= render "devise/shared/links" %>
devise gem を設定する
デフォルトでは認証のためのキーに email を使いますが、name を使うよう設定します。
また、パスワードリセットとログイン記憶(remember)機能は無効化します。
そのためには User モデルのマイグレーションファイルを変更し、その後にモデルを修正する必要があります。
# frozen_string_literal: true

class DeviseCreateUsers < ActiveRecord::Migration[5.2]
  def change
    create_table :users do |t|
      ## Database authenticatable
      # t.string :email,              null: false, default: ""
      t.string :name,               null: false, default: ""
      t.string :encrypted_password, null: false, default: ""

      ## Recoverable
      # t.string   :reset_password_token   # 不要なのでコメントアウト
      # t.datetime :reset_password_sent_at # 不要なのでコメントアウト

      ## Rememberable
      # t.datetime :remember_created_at # 不要なのでコメントアウト

      ## Trackable
      # t.integer  :sign_in_count, default: 0, null: false
      # t.datetime :current_sign_in_at
      # t.datetime :last_sign_in_at
      # t.string   :current_sign_in_ip
      # t.string   :last_sign_in_ip

      ## Confirmable
      # t.string   :confirmation_token
      # t.datetime :confirmed_at
      # t.datetime :confirmation_sent_at
      # t.string   :unconfirmed_email # Only if using reconfirmable

      ## Lockable
      # t.integer  :failed_attempts, default: 0, null: false # Only if lock strategy is :failed_attempts
      # t.string   :unlock_token # Only if unlock strategy is :email or :both
      # t.datetime :locked_at


      t.timestamps null: false
    end

    # add_index :users, :email,                unique: true
    add_index :users, :name,                 unique: true
    # add_index :users, :reset_password_token, unique: true # 不要なのでコメントアウト
    # add_index :users, :confirmation_token,   unique: true
    # add_index :users, :unlock_token,         unique: true
  end
end
migration ファイルの設定が終わったらマイグレーションを実行しておきます。
rake db:migrate
devise の設定では認証に使うキー(authentication_keys)を email から name へ変更し、その他 email 用に設定している項目をコメントアウトします。
# frozen_string_literal: true

# Use this hook to configure devise mailer, warden hooks and so forth.
# Many of these configuration options can be set straight in your model.
Devise.setup do |config|
  # The secret key used by Devise. Devise uses this key to generate
  # random tokens. Changing this key will render invalid all existing
  # confirmation, reset password and unlock tokens in the database.
  # Devise will use the `secret_key_base` as its `secret_key`
  # by default. You can change it below and use your own secret key.
  # config.secret_key = 'af0925fa548cf97d13453ee9a935e72fd9bf58ce9f85ac061ca1fb913f5c0dc5017c1a5389e0008aeb1a03718422e69a32f808e7425e70aa95d53b750b3cc0bb'

  # ==> Controller configuration
  # Configure the parent class to the devise controllers.
  # config.parent_controller = 'DeviseController'

  # ==> Mailer Configuration
  # Configure the e-mail address which will be shown in Devise::Mailer,
  # note that it will be overwritten if you use your own mailer class
  # with default "from" parameter.
  config.mailer_sender = 'please-change-me-at-config-initializers-devise@example.com'

  # Configure the class responsible to send e-mails.
  # config.mailer = 'Devise::Mailer'

  # Configure the parent class responsible to send e-mails.
  # config.parent_mailer = 'ActionMailer::Base'

  # ==> ORM configuration
  # Load and configure the ORM. Supports :active_record (default) and
  # :mongoid (bson_ext recommended) by default. Other ORMs may be
  # available as additional gems.
  require 'devise/orm/active_record'

  # ==> Configuration for any authentication mechanism
  # Configure which keys are used when authenticating a user. The default is
  # just :email. You can configure it to use [:username, :subdomain], so for
  # authenticating a user, both parameters are required. Remember that those
  # parameters are used only when authenticating and not when retrieving from
  # session. If you need permissions, you should implement that in a before filter.
  # You can also supply a hash where the value is a boolean determining whether
  # or not authentication should be aborted when the value is not present.
  config.authentication_keys = [:name]

  # Configure parameters from the request object used for authentication. Each entry
  # given should be a request method and it will automatically be passed to the
  # find_for_authentication method and considered in your model lookup. For instance,
  # if you set :request_keys to [:subdomain], :subdomain will be used on authentication.
  # The same considerations mentioned for authentication_keys also apply to request_keys.
  # config.request_keys = []

  # Configure which authentication keys should be case-insensitive.
  # These keys will be downcased upon creating or modifying a user and when used
  # to authenticate or find a user. Default is :email.
  # config.case_insensitive_keys = [:email] # 不要なのでコメントアウト

  # Configure which authentication keys should have whitespace stripped.
  # These keys will have whitespace before and after removed upon creating or
  # modifying a user and when used to authenticate or find a user. Default is :email.
  # config.strip_whitespace_keys = [:email] # 不要なのでコメントアウト

  # Tell if authentication through request.params is enabled. True by default.
  # It can be set to an array that will enable params authentication only for the
  # given strategies, for example, `config.params_authenticatable = [:database]` will
  # enable it only for database (email + password) authentication.
  # config.params_authenticatable = true

  # Tell if authentication through HTTP Auth is enabled. False by default.
  # It can be set to an array that will enable http authentication only for the
  # given strategies, for example, `config.http_authenticatable = [:database]` will
  # enable it only for database authentication. The supported strategies are:
  # :database      = Support basic authentication with authentication key + password
  # config.http_authenticatable = false

  # If 401 status code should be returned for AJAX requests. True by default.
  # config.http_authenticatable_on_xhr = true

  # The realm used in Http Basic Authentication. 'Application' by default.
  # config.http_authentication_realm = 'Application'

  # It will change confirmation, password recovery and other workflows
  # to behave the same regardless if the e-mail provided was right or wrong.
  # Does not affect registerable.
  # config.paranoid = true

  # By default Devise will store the user in session. You can skip storage for
  # particular strategies by setting this option.
  # Notice that if you are skipping storage for all authentication paths, you
  # may want to disable generating routes to Devise's sessions controller by
  # passing skip: :sessions to `devise_for` in your config/routes.rb
  config.skip_session_storage = [:http_auth]

  # By default, Devise cleans up the CSRF token on authentication to
  # avoid CSRF token fixation attacks. This means that, when using AJAX
  # requests for sign in and sign up, you need to get a new CSRF token
  # from the server. You can disable this option at your own risk.
  # config.clean_up_csrf_token_on_authentication = true

  # When false, Devise will not attempt to reload routes on eager load.
  # This can reduce the time taken to boot the app but if your application
  # requires the Devise mappings to be loaded during boot time the application
  # won't boot properly.
  # config.reload_routes = true

  # ==> Configuration for :database_authenticatable
  # For bcrypt, this is the cost for hashing the password and defaults to 11. If
  # using other algorithms, it sets how many times you want the password to be hashed.
  #
  # Limiting the stretches to just one in testing will increase the performance of
  # your test suite dramatically. However, it is STRONGLY RECOMMENDED to not use
  # a value less than 10 in other environments. Note that, for bcrypt (the default
  # algorithm), the cost increases exponentially with the number of stretches (e.g.
  # a value of 20 is already extremely slow: approx. 60 seconds for 1 calculation).
  config.stretches = Rails.env.test? ? 1 : 11

  # Set up a pepper to generate the hashed password.
  # config.pepper = 'f7f77dd0ac245a8c012b8c3a036a9add50d86a7f91387b0e1544576082b295ae8e8bcc945056b6312631e96af3bc962486a25f192629d557c68beb328df2fb6f'

  # Send a notification to the original email when the user's email is changed.
  # config.send_email_changed_notification = false

  # Send a notification email when the user's password is changed.
  # config.send_password_change_notification = false

  # ==> Configuration for :confirmable
  # A period that the user is allowed to access the website even without
  # confirming their account. For instance, if set to 2.days, the user will be
  # able to access the website for two days without confirming their account,
  # access will be blocked just in the third day.
  # You can also set it to nil, which will allow the user to access the website
  # without confirming their account.
  # Default is 0.days, meaning the user cannot access the website without
  # confirming their account.
  # config.allow_unconfirmed_access_for = 2.days

  # A period that the user is allowed to confirm their account before their
  # token becomes invalid. For example, if set to 3.days, the user can confirm
  # their account within 3 days after the mail was sent, but on the fourth day
  # their account can't be confirmed with the token any more.
  # Default is nil, meaning there is no restriction on how long a user can take
  # before confirming their account.
  # config.confirm_within = 3.days

  # If true, requires any email changes to be confirmed (exactly the same way as
  # initial account confirmation) to be applied. Requires additional unconfirmed_email
  # db field (see migrations). Until confirmed, new email is stored in
  # unconfirmed_email column, and copied to email column on successful confirmation.
  config.reconfirmable = true

  # Defines which key will be used when confirming an account
  # config.confirmation_keys = [:email]

  # ==> Configuration for :rememberable
  # The time the user will be remembered without asking for credentials again.
  # config.remember_for = 2.weeks

  # Invalidates all the remember me tokens when the user signs out.
  config.expire_all_remember_me_on_sign_out = true

  # If true, extends the user's remember period when remembered via cookie.
  # config.extend_remember_period = false

  # Options to be passed to the created cookie. For instance, you can set
  # secure: true in order to force SSL only cookies.
  # config.rememberable_options = {}

  # ==> Configuration for :validatable
  # Range for password length.
  config.password_length = 6..128

  # Email regex used to validate email formats. It simply asserts that
  # one (and only one) @ exists in the given string. This is mainly
  # to give user feedback and not to assert the e-mail validity.
  config.email_regexp = /\A[^@\s]+@[^@\s]+\z/

  # ==> Configuration for :timeoutable
  # The time you want to timeout the user session without activity. After this
  # time the user will be asked for credentials again. Default is 30 minutes.
  # config.timeout_in = 30.minutes

  # ==> Configuration for :lockable
  # Defines which strategy will be used to lock an account.
  # :failed_attempts = Locks an account after a number of failed attempts to sign in.
  # :none            = No lock strategy. You should handle locking by yourself.
  # config.lock_strategy = :failed_attempts

  # Defines which key will be used when locking and unlocking an account
  # config.unlock_keys = [:email]

  # Defines which strategy will be used to unlock an account.
  # :email = Sends an unlock link to the user email
  # :time  = Re-enables login after a certain amount of time (see :unlock_in below)
  # :both  = Enables both strategies
  # :none  = No unlock strategy. You should handle unlocking by yourself.
  # config.unlock_strategy = :both

  # Number of authentication tries before locking an account if lock_strategy
  # is failed attempts.
  # config.maximum_attempts = 20

  # Time interval to unlock the account if :time is enabled as unlock_strategy.
  # config.unlock_in = 1.hour

  # Warn on the last attempt before the account is locked.
  # config.last_attempt_warning = true

  # ==> Configuration for :recoverable
  #
  # Defines which key will be used when recovering the password for an account
  # config.reset_password_keys = [:email]

  # Time interval you can reset your password with a reset password key.
  # Don't put a too small interval or your users won't have the time to
  # change their passwords.
  config.reset_password_within = 6.hours

  # When set to false, does not sign a user in automatically after their password is
  # reset. Defaults to true, so a user is signed in automatically after a reset.
  # config.sign_in_after_reset_password = true

  # ==> Configuration for :encryptable
  # Allow you to use another hashing or encryption algorithm besides bcrypt (default).
  # You can use :sha1, :sha512 or algorithms from others authentication tools as
  # :clearance_sha1, :authlogic_sha512 (then you should set stretches above to 20
  # for default behavior) and :restful_authentication_sha1 (then you should set
  # stretches to 10, and copy REST_AUTH_SITE_KEY to pepper).
  #
  # Require the `devise-encryptable` gem when using anything other than bcrypt
  # config.encryptor = :sha512

  # ==> Scopes configuration
  # Turn scoped views on. Before rendering "sessions/new", it will first check for
  # "users/sessions/new". It's turned off by default because it's slower if you
  # are using only default views.
  # config.scoped_views = false

  # Configure the default scope given to Warden. By default it's the first
  # devise role declared in your routes (usually :user).
  # config.default_scope = :user

  # Set this configuration to false if you want /users/sign_out to sign out
  # only the current scope. By default, Devise signs out all scopes.
  # config.sign_out_all_scopes = true

  # ==> Navigation configuration
  # Lists the formats that should be treated as navigational. Formats like
  # :html, should redirect to the sign in page when the user does not have
  # access, but formats like :xml or :json, should return 401.
  #
  # If you have any extra navigational formats, like :iphone or :mobile, you
  # should add them to the navigational formats lists.
  #
  # The "*/*" below is required to match Internet Explorer requests.
  # config.navigational_formats = ['*/*', :html]

  # The default HTTP method used to sign out a resource. Default is :delete.
  config.sign_out_via = :delete

  # ==> OmniAuth
  # Add a new OmniAuth provider. Check the wiki for more information on setting
  # up on your models and hooks.
  # config.omniauth :github, 'APP_ID', 'APP_SECRET', scope: 'user,public_repo'

  # ==> Warden configuration
  # If you want to use other strategies, that are not supported by Devise, or
  # change the failure app, you can configure them inside the config.warden block.
  #
  # config.warden do |manager|
  #   manager.intercept_401 = false
  #   manager.default_strategies(scope: :user).unshift :some_external_strategy
  # end

  # ==> Mountable engine configurations
  # When using Devise inside an engine, let's call it `MyEngine`, and this engine
  # is mountable, there are some extra configurations to be taken into account.
  # The following options are available, assuming the engine is mounted as:
  #
  #     mount MyEngine, at: '/my_engine'
  #
  # The router that invoked `devise_for`, in the example above, would be:
  # config.router_name = :my_engine
  #
  # When using OmniAuth, Devise cannot automatically set OmniAuth path,
  # so you need to do it manually. For the users scope, it would be:
  # config.omniauth_path_prefix = '/my_engine/users/auth'

  # ==> Turbolinks configuration
  # If your app is using Turbolinks, Turbolinks::Controller needs to be included to make redirection work correctly:
  #
  # ActiveSupport.on_load(:devise_failure_app) do
  #   include Turbolinks::Controller
  # end

  # ==> Configuration for :registerable

  # When set to false, does not sign a user in automatically after their password is
  # changed. Defaults to true, so a user is signed in automatically after changing a password.
  # config.sign_in_after_change_password = true
end
User モデルには devise を設定します。
devise に与える引数として以下の中から選択します。
| オプション | 説明 |
|---|---|
| :database_authenticatable | DBユーザの認証機能を有効にする。bcrypt によりハッシュ化されたパスワードを encrypted_password に保存します。 |
| :registerable | ユーザの登録(作成)機能を有効にする。ユーザの編集と削除も含む。 |
| :recoverable | ユーザのパスワードリセット機能を有効にする |
| :rememberable | ログインの記憶機能を有効にする |
| :validatable | パスワードのバリデーションを有効にする |
| :confirmable | メールアドレスによるユーザ確認を有効にする。 |
| :lockable | locks an account after a specified number of failed sign-in attempts. Can unlock via email or after a specified time period. |
| :timeoutable | expires sessions that have not been active in a specified period of time. |
| :trackable | tracks sign in count, timestamps and IP address. |
| :omniauthable | OmniAuth (https://github.com/omniauth/omniauth) サポートを有効化する |
今回、第一歩として DB による認証を有効にするため :database_authenticatable を設定します。
class User < ApplicationRecord
  devise :database_authenticatable
end
これで User モデルで valid_password? 等の認証に必要なメソッドが追加されました。(参考)
Book, Author の CRUD 画面全てのページで認証が必要となるよう application_controller.rb にて before_action :authenticate_user! を設定します。
これで、ログインしないとどのパスにもアクセスできないようになりました。
最後にログイン用にユーザを作成します。
rails console で作成してもよいですが、開発環境で必ず必要なデータとなりますので seed として追加することにします。
User.find_or_initialize_by(name: 'admin') do |user|
  user.password = 'password'
  user.save!
end
seed が記述出来たら rails db:seed を実行してユーザを作成しましょう。
rails db:seed
以上でログイン認証機能実装は終わりです。
rails を起動させてどのパスでもよいのでアクセスしてみましょう。(例: /books)
ログインしていないため /users/sign_in へ redirect されます。
先ほど seed で作成したユーザ name: admin, password: password でログインしてみましょう。
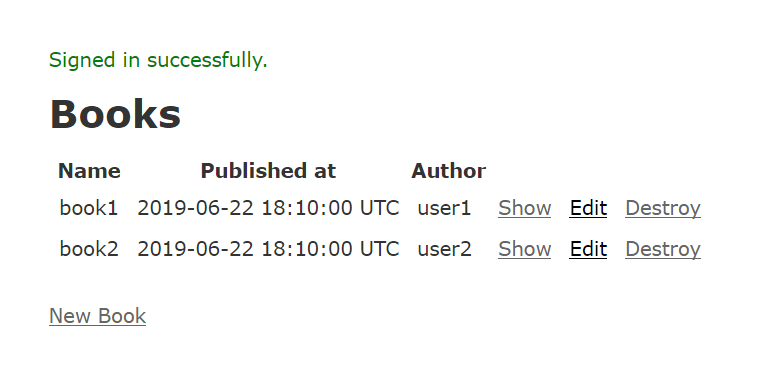
book 一覧画面が表示できれば成功です。
認可機能を実装する(ロール設定)
ユーザの認証が出来るようになりましたが、ユーザによって特定のパスを表示・リソース操作(作成・削除)出来るかどうかを制御できません。
このような場合、ユーザに対してロールを設定し、ロールに対して権限を設定すると楽です。
ロール設定するため rolify gem を使います。
rolify の README.md を参考にしながら作業を行いますが、以下の流れで作業を行います。
- rolify gem をインストールする
- rolify を初期化する
- Role モデルを作成する
rolify gem をインストールする
Gemfile に rolify を追加して bundle install するだけです。
gem 'rolify'
bundle install
rolify を初期化する
rolify 用の rails generate コマンドオプションが追加されます。
これを使って User モデルに関連付ける Role モデルを作成するマイグレーションファイルを作成します。
マイグレーションファイルを作成したら rails db:migrate コマンドを実行しておきます。
rails g rolify Role User
rake db:migrate
rails g rolify Role User コマンドにより、User モデルに rolify が追加されていることが分かります。
class User < ApplicationRecord
  rolify
  devise :database_authenticatable
end
これで add_role や has_role? 等のロールを管理するために必要なメソッドが User モデルに追加されます。
尚、User と Role モデルは多対多の関係で has_and_belongs_to_many が使われています。
Join 用のテーブルは users_roles として作成されます。
以上でロール管理をするための準備が整いました。
Rails console (--sandbox) で User モデルに対して role が追加できるようになっていることを確認してみるとよいでしょう。
irb(main):002:0> admin = User.first
  User Load (0.2ms)  SELECT  "users".* FROM "users" ORDER BY "users"."id" ASC LIMIT ?  [["LIMIT", 1]]
=> #<User id: 1, name: "admin", created_at: "2019-06-23 09:12:11", updated_at: "2019-06-23 09:12:11">

# admin ユーザのロールを取得する
irb(main):003:0> admin.roles
  Role Load (0.7ms)  SELECT  "roles".* FROM "roles" INNER JOIN "users_roles" ON "roles"."id" = "users_roles"."role_id" WHERE "users_roles"."user_id" = ? LIMIT ?  [["user_id", 1], ["LIMIT", 11]]
=> #<ActiveRecord::Associations::CollectionProxy []> # まだRoleは空

# admin ロールを追加する(admin ロールが Role に存在しなければ新規作成される)
irb(main):004:0> admin.add_role(:admin)
  Role Load (0.5ms)  SELECT  "roles".* FROM "roles" WHERE "roles"."name" = ? AND "roles"."resource_type" IS NULL AND "roles"."resource_id" IS NULL ORDER BY "roles"."id" ASC LIMIT ?  [["name", "admin"], ["LIMIT", 1]]
   (0.2ms)  SAVEPOINT active_record_1
  Role Create (12.7ms)  INSERT INTO "roles" ("name", "created_at", "updated_at") VALUES (?, ?, ?)  [["name", "admin"], ["created_at", "2019-06-23 12:31:19.601278"], ["updated_at", "2019-06-23 12:31:19.601278"]]
   (0.1ms)  RELEASE SAVEPOINT active_record_1
  Role Exists (0.5ms)  SELECT  1 AS one FROM "roles" INNER JOIN "users_roles" ON "roles"."id" = "users_roles"."role_id" WHERE "users_roles"."user_id" = ? AND "roles"."id" = ? LIMIT ?  [["user_id", 1], ["id", 1], ["LIMIT", 1]]
   (0.3ms)  SELECT "roles"."id" FROM "roles" INNER JOIN "users_roles" ON "roles"."id" = "users_roles"."role_id" WHERE "users_roles"."user_id" = ?  [["user_id", 1]]
  Role Load (0.2ms)  SELECT "roles".* FROM "roles" WHERE "roles"."id" = ?  [["id", 1]]
  Role Load (8.5ms)  SELECT "roles".* FROM "roles" INNER JOIN "users_roles" ON "roles"."id" = "users_roles"."role_id" WHERE "users_roles"."user_id" = ?  [["user_id", 1]]
   (0.2ms)  SAVEPOINT active_record_1
  User::HABTM_Roles Create (2.2ms)  INSERT INTO "users_roles" ("user_id", "role_id") VALUES (?, ?)  [["user_id", 1], ["role_id", 1]]
   (0.1ms)  RELEASE SAVEPOINT active_record_1
=> #<Role id: 1, name: "admin", resource_type: nil, resource_id: nil, created_at: "2019-06-23 12:31:19", updated_at: "2019-06-23 12:31:19">

# admin ロールが付与されたことを確認する
irb(main):006:0> admin.has_role?(:admin)
  Role Load (0.3ms)  SELECT "roles".* FROM "roles" INNER JOIN "users_roles" ON "roles"."id" = "users_roles"."role_id" WHERE "users_roles"."user_id" = ? AND (((roles.name = 'admin') AND (roles.resource_type IS NULL) AND (roles.resource_id IS NULL)))  [["user_id", 1]]
=> true
次にユーザにデフォルトロールを設定するためのメソッドと、管理ユーザ用の名前である場合は admin ロールを設定するメソッドを追加することにします。(admin ユーザ作成時に add_role してもよいと思います)
class User < ApplicationRecord
  rolify
  devise :database_authenticatable

  after_create :assign_admin_role
  after_create :assign_default_role

  def assign_default_role
    self.add_role(:guest) if self.roles.blank?
  end

  def assign_admin_role
    self.add_role(:admin) if self.name == 'admin'
  end
end
admin ユーザは既に seed を使って作成されてます。Rails console を使って手動で admin ロールを追加するか、一度 admin user を削除してから再度 rails db:seed によりユーザを作成する等してみて下さい。
次はロールに対して権限を設定していきます。
認可機能を実装する
ユーザに対して 2 つのロール(admin or guest) を設定しましたが、ロールによって画面を出しわける処理は行っていません。
ロールに権限を設定し、CRUD 画面を権限に応じて出しわけるようにします。
cancancan gem を使うことにします。
cancancan の README.md を参考にしながら作業を行いますが、以下の流れで作業を行います。
- cancancan gem をインストールする
- cancancan を初期化する
- Ability モデルを作成する
- Ability モデルにロールに対して認可を設定する
- 認可設定を行う
- 全パスに対して認可確認を必須にする
- 各 controller で認可設定を行う
cancancan gem をインストールする
Gemfile に cancancan を追加して bundle install するだけです。
gem 'cancancan'
bundle install
cancancan を初期化する
rails g cancan:ability
コマンドを実行すると app/models/ability.rb が作成されます。(ActiveRecordではない)
この Ability モデルの initialize(user) メソッドにロールに応じた権限を付与します。
cancancan ではモデル(やレコード)に対する権限を定義します。
権限には、既定の :create, :read, :update, :destroy があり、任意の名前を付けることも出来ます。(例: :upload)
また、全ての権限を持つ特殊な :manage 権限があります。(任意の名前で付けた権限も含まれる)
ロールを 2 種類設定しましたので、それぞれに対して権限を設定します。
# frozen_string_literal: true

class Ability
  include CanCan::Ability

  def initialize(user)
    # 全ての権限を剥奪
    cannot :manage, :all

    if user.has_role?(:guest)
      can :read, :all
    end

    if user.has_role?(:admin)
      can :manage, :all
    end
  end
end
can, cannot が権限を表し、文字通り can は操作の許可を表し、cannot は操作の拒否を表します。
設定内容は上から評価され、後で実行した内容で上書きされるため、まずは全ての権限が無い状態を明示的に示した後にロールに応じて権限を追加するとよいでしょう。
また、今回ユーザには 1 つのロールのみが追加されていることを想定としていますが、1ユーザに複数ロールを設定することが出来るため、例えば admin, guest の両方のロールを持つユーザであったとしてもより強い権限を持つ admin に対する権限設定処理を後ろに書くなど、順番も意識してみました。
guest ユーザは User, Role を除く全リソースの閲覧権限が与えられ、admin ユーザは全権限が与えられました。
認可設定を行う
まずはアプリケーションの全パスに対して認可設定が必須となるよう設定します。
そうすることで、うっかり認可設定をし忘れた場合にも表示してしまうことを防ぐことが出来ます。
application_controller.rb に check_authorization を設定すると、認可設定されていないパスを表示しようとすると以下のように例外が発生します。
CanCan::AuthorizationNotPerformed in BooksController#index
ここで、application_controller.rb に check_authorization を設定すると devise/sessions_controller.rb 等、ログイン画面を表示する際も認可設定が行われているかチェックすることになってしまいます。ログイン画面は全ユーザが見られるべきページなので devise_controller に関しては対象から除外することにします。
class ApplicationController < ActionController::Base
  before_action :authenticate_user!
  check_authorization unless: :skip_checking_authorzation?

  private

  def skip_checking_authorzation?
    devise_controller?
  end
end
次に Book, Author の controller にて、リソースへのアクセス権限があるかどうかチェックするコードを書きます。
action 毎にチェックする場合は authorize! メソッドを使って以下のように書くことが出来ます。(authorize! メソッドは権限が無いと Exception を raise する)
def show
  @book = Book.find(params[:id])
  authorize! :read, @book
end
controller が RESTful である場合には authorize_resource を使うことでアクションに対応したリソースに対して authorize! を実行してくれるため、今回はこれを使うことにします。
class BooksController < ApplicationController
  authorize_resource
  before_action :set_book, only: [:show, :edit, :update, :destroy]
    : <snip>
class AuthorsController < ApplicationController
  authorize_resource
  before_action :set_author, only: [:show, :edit, :update, :destroy]
    : <snip>
これで Book, Author の CRUD 操作は権限のあるユーザのみ操作できるようになりました。
権限のないユーザがアクセスした場合に Exception が発生するため rescue しない場合はエラー画面が表示されることになりますので、適切なページへ戻すよう処理することにしましょう。
class ApplicationController < ActionController::Base
  before_action :authenticate_user!

  check_authorization unless: :skip_checking_authorzation?

  rescue_from CanCan::AccessDenied, with: :handle_access_denied

  private

  def skip_checking_authorzation?
    devise_controller?
  end

  def handle_access_denied(exception)
    respond_to do |format|
      format.json { head :forbidden, content_type: 'text/html' }
      format.html { redirect_to main_app.root_url, notice: exception.message }
      format.js   { head :forbidden, content_type: 'text/html' }
    end
  end
end
以上で認可設定は終わりです。
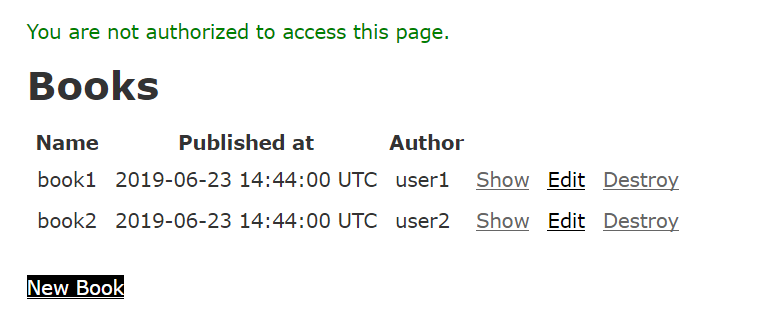
試しに guest ロールを持つユーザを作成して確認してみましょう。
Rails console で作成すればよいと思います。
# ゲストユーザを作成する
irb(main):008:0>
guest = User.create(name: 'guest1', password: 'password')
   (0.1ms)  begin transaction
  User Create (3.2ms)  INSERT INTO "users" ("name", "encrypted_password", "created_at", "updated_at") VALUES (?, ?, ?, ?)  [["name", "guest1"], ["encrypted_password", "$2a$11$1cU8jLGFkatOmh7p/h4I8e/bKKqTntsiBw9enqJNHRwMIg0q9pBmG"], ["created_at", "2019-06-23 15:07:52.144732"], ["updated_at", "2019-06-23 15:07:52.144732"]]
  Role Load (0.4ms)  SELECT "roles".* FROM "roles" INNER JOIN "users_roles" ON "roles"."id" = "users_roles"."role_id" WHERE "users_roles"."user_id" = ?  [["user_id", 8]]
  Role Load (0.4ms)  SELECT  "roles".* FROM "roles" WHERE "roles"."name" = ? AND "roles"."resource_type" IS NULL AND "roles"."resource_id" IS NULL ORDER BY "roles"."id" ASC LIMIT ?  [["name", "guest"], ["LIMIT", 1]]
  Role Load (0.3ms)  SELECT "roles".* FROM "roles" WHERE "roles"."id" = ?  [["id", 3]]
  User::HABTM_Roles Create (1.6ms)  INSERT INTO "users_roles" ("user_id", "role_id") VALUES (?, ?)  [["user_id", 8], ["role_id", 3]]
   (8.2ms)  commit transaction
=> #<User id: 8, name: "guest1", created_at: "2019-06-23 15:07:52", updated_at: "2019-06-23 15:07:52">

# guest role が割り当てられたことを確認する
irb(main):003:0> guest.has_role?(:guest)
  Role Load (1.4ms)  SELECT "roles".* FROM "roles" INNER JOIN "users_roles" ON "roles"."id" = "users_roles"."role_id" WHERE "users_roles"."user_id" = ? AND (((roles.name = 'guest') AND (roles.resource_type IS NULL) AND (roles.resource_id IS NULL)))  [["user_id", 8]]
=> true
作成したゲストユーザでログインした後、Books の New Book をクリックしてみましょう。
You are not authorized to access this page. と表示されたことが分かると思います。
Edit, Destroy をクリックしても同様で、Show だけは詳細ページが表示されることが分かると思います。
LDAP ユーザを認証・認可する
最後に LDAP でユーザを認証し、これまでに説明した認可を行います。
LDAP 認証には devise_ldap_authenticatable gem を使います。
devise_ldap_authenticatable の README.md に従って設定していきますが、今回は DB 認証と LDAP 認証を共存させるため、cschiewek/devise_ldap_authenticatable/issues/24 に紹介された方法を参考にして実装を進めます。
以下の流れで作業を行います。
- devise_ldap_authenticatable gem をインストールする
- devise_ldap_authenticatable を初期化する
- User モデルを修正する
- devise_ldap_authenticatable を設定する
- DB, LDAP 共存設定を行う
devise_ldap_authenticatable gem をインストールする
Gemfile に devise_ldap_authenticatable を追加して bundle install するだけです。
gem 'devise_ldap_authenticatable'
bundle install
devise_ldap_authenticatable を初期化する
rails generate devise_ldap_authenticatable:install
コマンドを実行すると app/models/user.rb に対して gsub 処理が行われたことが分かります。
User モデルを確認すると :database_authenticatable がなくなり :ldap_authenticatable が設定されていることが分かります。
class User < ApplicationRecord
  rolify
  devise :ldap_authenticatable
    : <snip>
このままでは DB 認証が出来ない状態となっていますが、まずは LDAP で接続が出来るようになるまで設定を進める事にします。
devise_ldap_authenticatable を設定する
次の 2 点を設定します。
- LDAP で認証するユーザは User モデルとして作成する必要がある
- devise_ldap_authenticatable の設定により、事前に User を作成するか(default)、認証した際に User を自動で作成するか選べます。
- 今回、認証した際に User を自動で作成する設定にします。
- LDAP パスワードを更新するか選べる
- devise にてパスワード変更は無効化しているため、パスワード変更時に LDAP パスワードを更新する設定は無効化します
# frozen_string_literal: true

# Use this hook to configure devise mailer, warden hooks and so forth.
# Many of these configuration options can be set straight in your model.
Devise.setup do |config|
  # ==> LDAP Configuration
  # config.ldap_logger = true
  config.ldap_create_user = true
  config.ldap_update_password = false
  # config.ldap_config = "#{Rails.root}/config/ldap.yml"
  # config.ldap_check_group_membership = false
  # config.ldap_check_group_membership_without_admin = false
  # config.ldap_check_attributes = false
  # config.ldap_check_attributes_presence = false
  # config.ldap_use_admin_to_bind = false
  # config.ldap_ad_group_check = false
    : <snip> # ここから上の行が devise_ldap_authenticatable により追加された設定
end
次に LDAP の設定を行います。適宜 LDAP サーバの設定に応じて変更してください。
  : <snip>
## Environment

development:
  host: localhost
  port: 389
  attribute: cn
  base: ou=people,dc=example,dc=org
  admin_user: cn=admin,dc=example,dc=org
  admin_password: admin
  ssl: false
  # <<: *AUTHORIZATIONS
    : <snip>
今回、docker で osixia/openldap を使って確認をしようと思います。
docker run -p 389:389 -p 636:636 --name my-openldap-container --detach osixia/openldap:1.2.4
ここでユーザは cn=${username},ou=people,dc=example,dc=org に登録されているものとします。
$ docker exec -it my-openldap-container bash
root@1ef1033cf553:/# cat > users.ldif
dn: ou=people,dc=example,dc=org
objectClass: organizationalRole
cn: People

dn: cn=ldap1,ou=people,dc=example,dc=org
objectClass: simpleSecurityObject
objectClass: organizationalRole
cn: ldap1
description: LDAP user
userPassword:: e1NTSEF9N0VzekFCRTBNbVpkQ0xnMXlSWE56ZDNkZTREU1JUWDg=

dn: cn=ldap2,ou=people,dc=example,dc=org
objectClass: simpleSecurityObject
objectClass: organizationalRole
cn: ldap2
description: LDAP user
userPassword:: e1NTSEF9N0VzekFCRTBNbVpkQ0xnMXlSWE56ZDNkZTREU1JUWDg=
root@1ef1033cf553:/# ldapadd -x -D "cn=admin,dc=example,dc=org" -w admin -f users.ldif -ZZ
adding new entry "ou=people,dc=example,dc=org"

adding new entry "cn=ldap1,ou=people,dc=example,dc=org"

adding new entry "cn=ldap2,ou=people,dc=example,dc=org"
以上で設定は完了です。
rails server を実行して ldap ユーザでログインできることを確認してみて下さい。
(ldap1, ldap2 共にパスワードは admin です)
DB, LDAP 共存設定を行う
DB, LDAP を共存させる設定を行います。
:devise_ldap_authenticatable は :database_authenticatable の動作を置き換える(LDAP認証失敗したら認証失敗となる)ものなので、少し工夫が必要です。
期待する動作としては、入力されたユーザ名に合致するユーザが DB に存在するか確認し、存在すれば DB 上のユーザモデルを使って認証を行い、存在しなければ LDAP サーバに問い合わせて認証を行うといったものです。
やることは次の 3 点です。
- User モデルに DB ユーザの認証を行うメソッドを実装するために
:database_authenticatableを追加する - User モデルに外部ユーザであるか判別するフラグ external を追加する
- LDAP 認証を行う前に DB 認証を行うよう devise を設定する
User モデルに DB ユーザの認証を行うメソッドを実装するために :database_authenticatable を追加する
User モデルに次のとおり :database_authenticatable を追加するだけです。
User モデルに外部ユーザであるか判別するフラグ external を追加する
bin/rails g migration AddExternalFlagToUser external:boolean
マイグレーションファイルを修正して external は default: false にしておきます。
class AddExternalFlagToUser < ActiveRecord::Migration[5.2]
  def change
    add_column :users, :external, :boolean, default: false
  end
end
bin/rails db:migrate
LDAP ユーザを作成する際に external フラグを true にし、ロール :user を設定するよう User モデルを修正します。
devise_ldap_authenticatable により LDAP ユーザを作成する前に呼び出される ldap_before_save メソッドを実装することにします。
class User < ApplicationRecord
  rolify
  devise :database_authenticatable, :ldap_authenticatable

  after_create :assign_admin_role
  after_create :assign_default_role

  def assign_default_role
    self.add_role(:guest) if self.roles.blank?
  end

  def assign_admin_role
    self.add_role(:admin) if self.name == 'admin'
  end

  def ldap_before_save
    self.external = true
    self.add_role(:user)
  end
end
追加したロール :user に対して権限を設定します。
# frozen_string_literal: true

class Ability
  include CanCan::Ability

  def initialize(user)
    # 全ての権限を剥奪
    cannot :manage, :all

    if user.has_role?(:guest)
      can :read, :all
    end

    if user.has_role?(:user)
      can :read, :all
      can :manage, Book
    end

    if user.has_role?(:admin)
      can :manage, :all
    end
  end
end
LDAP 認証を行う前に DB 認証を行うよう devise を設定する
cschiewek/devise_ldap_authenticatable/issues/24 に紹介された方法を参考にして実装を進めます。
ここでの方法は、Warden の Strategies として DB 認証を行うクラスを設定し、Devise による認証フェーズの最初に実行するよう設定するというものです。
require 'devise/strategies/database_authenticatable'

module Devise
  module Strategies
    class CustomDatabaseAuthenticatable < DatabaseAuthenticatable
      def valid?
        true
      end

      # ref: https://github.com/cschiewek/devise_ldap_authenticatable/issues/24#issuecomment-965648
      def authenticate!
        return fail(:invalid) unless valid_for_params_auth?

        # 内部で認証するユーザ一覧に存在すればパスワード認証を行う
        username = params_auth_hash[:name]
        password = params_auth_hash[:password]
        user = User.internals.find_by(name: username)
        if user&.valid_password?(password)
          success!(user)
        else
          fail(:not_found_in_database)
        end
      end
    end
  end
end

Warden::Strategies.add(:custom_database_authenticatable, Devise::Strategies::CustomDatabaseAuthenticatable)
ここで認証を行う対象は external フラグが false であるユーザのみなので、User モデルに internals を scope として設定しておきます。(使いませんが一応 externals も scope を設定しました)
class User < ApplicationRecord
  rolify
  devise :database_authenticatable, :ldap_authenticatable

  after_create :assign_admin_role
  after_create :assign_default_role

  scope :internals, -> { where(external: false) }
  scope :externals, -> { where(external: true)  }

  def assign_default_role
    self.add_role(:guest) if self.roles.blank?
  end

  def assign_admin_role
    self.add_role(:admin) if self.name == 'admin'
  end

  def ldap_before_save
    self.external = true
    self.add_role(:user)
  end
end
次に作成した Strategy を設定します。
  : <snip>
  config.warden do |manager|
    manager.intercept_401 = false
    manager.default_strategies(scope: :user).unshift :custom_database_authenticatable
  end
  : <snip>
以上で設定は終わりです。
ldap ユーザでログインし、Book は CRUD 操作できること、Author は Readonly となっていることを確認してみて下さい。