画像を量子空間で扱う
古典コンピュータ世界の画像を量子の世界で扱いたい場合、ピクセル値を量子ビットへエンコードする必要がある。
たくさんの方法が提唱されているが、よく利用されているのは、以下の二つのように思われる。
- FRQI (Flexible Representation of Quantum Images)
- 各ピクセルの位置と色の情報を量子状態にエンコード
- NEQR (Novel Enhanced Quantum Representation)
- ピクセルのビット列を直接量子ビットの状態にマッピング
どちらの手法も画像の各ピクセル値を量子状態に符号化する手法であり、それぞれ、量子状態を制御するサーキットの設計が異なるものの、概念的には大きな違いはないように思われる。
より詳しくは、このQiskitのテキストブックがよいリファレンスになると思われる。
以下、FRQIによる操作例を示す。サーキットの設定はいろいろあるので、あくまで、一例として。
動作環境
tensorflow-quantumのチュートリアルに倣う。
!pip install tensorflow==2.15.0
!pip install tensorflow-quantum==0.7.3
# Update package resources to account for version changes.
import importlib, pkg_resources
importlib.reload(pkg_resources)
FRQIによるエンコードとデコードの例(一部ChatGPT利用)
import tensorflow as tf
import tensorflow_quantum as tfq
import cirq
import numpy as np
from PIL import Image
import sympy

# visualization tools
%matplotlib inline
import matplotlib.pyplot as plt
from cirq.contrib.svg import SVGCircuit
# 画像データ (例として2x2のグレースケール画像)
# ピクセル値を8ビット(0~255の範囲)で表現
image = np.array([[100, 150],
                  [200, 50]])

# 量子ビットを用意
row = 2
col = 2
qubits = [cirq.GridQubit(i, j) for i in range(row) for j in range(col)]
qubits
# 量子回路の作成
circuit = cirq.Circuit()

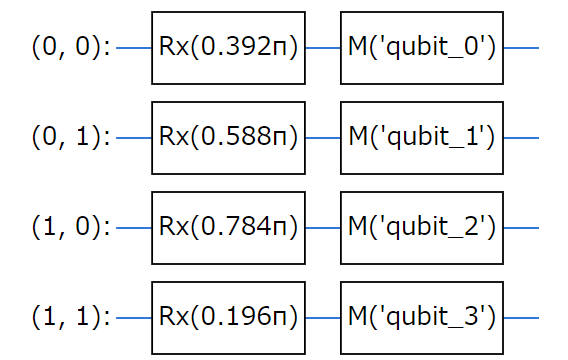
# ピクセル値を量子ビットにエンコード (RXゲートの回転角度としてピクセル値を使用)
for i in range(row):
    for j in range(col):
        pixel_value = image[i, j]
        qubit = qubits[i * row + j]
        #print(qubit)
        # ピクセル値を [0, 1] に正規化
        theta = (pixel_value / 255.0) * np.pi
        # RXゲートを適用
        circuit.append(cirq.rx(theta)(qubit))

for i in range(row):
    for j in range(col):
        # 量子ビットに測定を追加し、固有のキー(ラベル)を設定
        circuit.append(cirq.measure(qubits[i * row + j], key=f'qubit_{i * row + j}'))

SVGCircuit(circuit)
# シミュレータの準備
simulator = cirq.Simulator()

# シミュレーション実行
iteration = 1000
result = simulator.run(circuit, repetitions=iteration)

# 結果を表示
print("Results from measurement:")
print(result)
# 測定結果から角度を推定し、元のピクセル値にデコードする
decoded_image = np.zeros((row, col))
for i in range(row):
    for j in range(col):
        qubit_index = i * row + j
        # 測定結果から0/1の比率を取得
        counts = result.histogram(key=f'qubit_{qubit_index}')
        # 1の割合を使うパターン
        one_ratio = counts.get(1, 0) / iteration
        # # RXゲートの角度 theta を逆算(角度を推定)
        estimated_theta = np.arccos(1 - 2 * one_ratio)
        # 0の割合を使うパターン
        # zero_ratio = counts.get(0, 0) / iteration
        # RXゲートの角度 theta を逆算(角度を推定)
        # estimated_theta = 2 * np.arccos(np.sqrt(zero_ratio))
        # ピクセル値をデコード
        pixel_value = (estimated_theta / np.pi) * 255.0
        decoded_image[i, j] = pixel_value

# デコードされた画像
print("Decoded image:")
print(decoded_image)

# 結果の例
#Decoded image:
#[[102.08678151 146.67130168]
# [196.09135556  53.03871804]]
改定履歴
- 20240910 初版
References
- https://github.com/tensorflow/docs-l10n/blob/master/site/ja/quantum/tutorials/mnist.ipynb
- Le, P.Q., Dong, F. & Hirota, K. A flexible representation of quantum images for polynomial preparation, image compression, and processing operations. Quantum Inf Process 10, 63–84 (2011). https://doi.org/10.1007/s11128-010-0177-y
- Zhang, Y., Lu, K., Gao, Y. et al. NEQR: a novel enhanced quantum representation of digital images. Quantum Inf Process 12, 2833–2860 (2013). https://doi.org/10.1007/s11128-013-0567-z
- https://github.com/Qiskit/textbook/blob/main/notebooks/ch-applications/image-processing-frqi-neqr.ipynb
