環境
- Ubuntu 18.04
- Anaconda 1.9.6
- Tensorflow-gpu 1.12.0
- Keras-gpu 2.2.4
- GeForce GTX 1050 Ti(totalMemory: 3.95GiB freeMemory: 3.89GiB) + AkiTiONODE
必要なもの
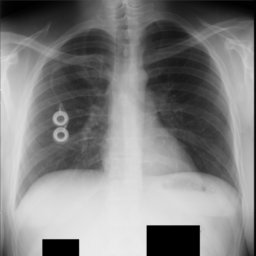
日本放射線技術学会「標準ディジタル画像データベース[胸部腫瘤陰影像]」SuperResolution01
http://imgcom.jsrt.or.jp/minijsrtdb/
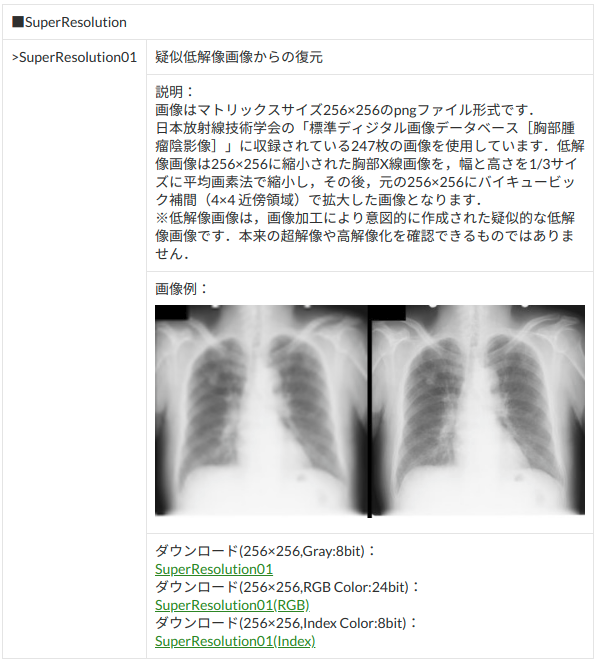
画像サイズ 256*256、色深度 Gray 8 bitのデータ(一番上のもの)を選択してダウンロード。
ダウンロードしたら解凍。ここではわかりやすくデスクトップへ。
SuperResolution01.zipをデスクトップに移動して、右クリックから「ここで展開」を実行。
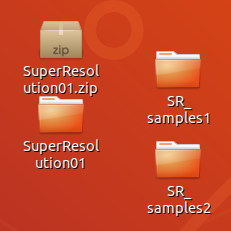
「SR_samples1」「SR_samples2」フォルダは空のフォルダ。あとで、結果を出力するためのもの。
やりたいこと
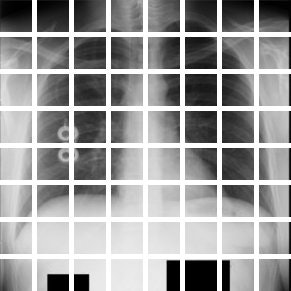
画像を小さいパッチで分けて、パッチごとに超解像を処理する。
これを、
こうして、
パッチ単位でCNNに流して、CNNにこのパッチ形状で予測を返させる。
パッチの画像はそれぞれこのようになっている。オーバーラップはない。

コード
'''
Created on 2019/05/05

設定
データを準備(今回は32*32パッチで)
モデルを構築
モデルを保存
モデルを評価

@author: tatsunidas
'''

import glob
import random
import numpy as np
from skimage.io import imread, imshow
import matplotlib.pyplot as plt
from PIL import Image
from keras import backend as K
from keras.models import Model, load_model
from keras.layers import Input, add
from keras.layers.core import Lambda
from keras.layers.convolutional import MaxPooling2D, UpSampling2D, Conv2D
from keras.optimizers import Adam
from keras.callbacks import EarlyStopping, ModelCheckpoint, ReduceLROnPlateau

# 設定をしておく
IMG_WIDTH = 256
IMG_HEIGHT = 256
IMG_CHANNELS = 1
PATCH_SIZE = 32

# ご自身の環境に合わせて下さい。
TRAIN_PATH = '/home/tatsunidas/デスクトップ/SuperResolution01/train/'
TEST_PATH = '/home/tatsunidas/デスクトップ/SuperResolution01/test/'

# sortすることでデータの順序が前後するのを防いでいるつもり。
train_orgs = sorted(glob.glob(TRAIN_PATH+'org/*.png'))
train_lows = sorted(glob.glob(TRAIN_PATH+'low/*.png'))
test_orgs = sorted(glob.glob(TEST_PATH+'org/*.png'))
test_lows = sorted(glob.glob(TEST_PATH+'low/*.png'))

# DDSRCNNのインプットの形状
shape = (PATCH_SIZE,PATCH_SIZE,IMG_HEIGHT)#(32,32,1)

# number of patch imgs, e.g 64
'''
今回はパッチをつくり、パッチ単位で学習させる。
例えば、256*256の画像からオーバーラップのない32*32パッチを作るとしたら、
64枚のパッチができる。
'''
num_of_patchs = (IMG_WIDTH//PATCH_SIZE) * (IMG_HEIGHT//PATCH_SIZE)

# 教師データを準備する。
# low resolution(noisy)
X_train = np.zeros((len(train_lows)*(PATCH_SIZE*2),PATCH_SIZE, PATCH_SIZE, IMG_CHANNELS), dtype=np.uint8)
# original
Y_train = np.zeros((len(train_orgs)*(PATCH_SIZE*2),PATCH_SIZE, PATCH_SIZE,IMG_CHANNELS), dtype=np.uint8)

index1 = 0
index2 = 0
for n in range(len(train_orgs)):
    low_train = imread(train_lows[n],as_gray=True)
    # オーバーラップのないパッチを作成
    h, w = low_train.shape
    low_patches = low_train.reshape(h//PATCH_SIZE, PATCH_SIZE, -1, PATCH_SIZE).swapaxes(1,2).reshape(-1, PATCH_SIZE, PATCH_SIZE)
    for i in range(len(low_patches)):
            X_train[index1] = (low_patches[i].reshape(PATCH_SIZE, PATCH_SIZE, IMG_CHANNELS))
            index1 += 1
    org_train = imread(train_orgs[n],as_gray=True)
    # オーバーラップのないパッチを作成
    h, w = org_train.shape
    org_patches = org_train.reshape(h//PATCH_SIZE, PATCH_SIZE, -1, PATCH_SIZE).swapaxes(1,2).reshape(-1, PATCH_SIZE, PATCH_SIZE)
    for i in range(len(org_patches)):
            Y_train[index2] = (org_patches[i].reshape(PATCH_SIZE, PATCH_SIZE, IMG_CHANNELS))
            index2 += 1

# 念のため、教師データがちゃんとペアになっているか確認
ix = random.randint(0, len(X_train))
imshow(X_train[ix].reshape(PATCH_SIZE, PATCH_SIZE),cmap='gray')
plt.show()
imshow(Y_train[ix].reshape(PATCH_SIZE, PATCH_SIZE),cmap='gray')
plt.show()

'''
評価指標にPSNRを加味したものを使う。
参考URLより。
'''
def PSNRLoss(y_true, y_pred):
    """
    PSNR is Peek Signal to Noise Ratio, which is similar to mean squared error.
    It can be calculated as
    PSNR = 20 * log10(MAXp) - 10 * log10(MSE)
    When providing an unscaled input, MAXp = 255. Therefore 20 * log10(255)== 48.1308036087.
    However, since we are scaling our input, MAXp = 1. Therefore 20 * log10(1) = 0.
    Thus we remove that component completely and only compute the remaining MSE component.
    """
    return -10. * K.log(K.mean(K.square(y_pred - y_true)))

# モデルの構築
# インプット形状の下準備
# 闇雲にBatchNormalizationを入れると精度が落ちる。
if K.image_dim_ordering() == "th":
    shape = (IMG_CHANNELS, PATCH_SIZE, PATCH_SIZE)
else:
    shape = (PATCH_SIZE, PATCH_SIZE, IMG_CHANNELS)

inputs = Input(shape=shape)
s = Lambda(lambda x: x / 255.) (inputs)
c1 = Conv2D(64, (3,3), kernel_initializer = "he_normal", activation='relu', padding='same')(s)
c1 = Conv2D(64, (3,3), kernel_initializer = "he_normal", activation='relu', padding='same')(c1)

x = MaxPooling2D(pool_size=(2, 2))(c1)

c2 = Conv2D(128, (3,3), kernel_initializer = "he_normal", activation='relu', padding='same')(x)
c2 = Conv2D(128, (3,3), kernel_initializer = "he_normal", activation='relu', padding='same')(c2)

x = MaxPooling2D(pool_size=(2, 2))(c2)

c3 = Conv2D(256, (3,3), kernel_initializer = "he_normal", activation='relu', padding='same')(x)

x = UpSampling2D()(c3)

c2_2 = Conv2D(128, (3,3), kernel_initializer = "he_normal", activation='relu', padding='same')(x)
c2_2 = Conv2D(128, (3,3), kernel_initializer = "he_normal", activation='relu', padding='same')(c2_2)

m1 = add([c2, c2_2])
m1 = UpSampling2D()(m1)

c1_2 = Conv2D(64, (3,3), kernel_initializer = "he_normal", activation='relu', padding='same')(m1)
c1_2 = Conv2D(64, (3,3), kernel_initializer = "he_normal", activation='relu', padding='same')(c1_2)

m2 = add([c1, c1_2])

decoded = Conv2D(IMG_CHANNELS, (5, 5), kernel_initializer = "he_normal", activation='linear', padding='same')(m2)

model = Model(inputs, decoded)

# 損失値はloss='mse', 評価は、metrics=[PSNRLoss]
model.compile(optimizer=Adam(lr=2e-5,amsgrad=True), loss='mse', metrics=[PSNRLoss])
model.summary()

# Fit model
# 損失値が下がらなくなっても何回がんばるか
earlystopper = EarlyStopping(patience=5, verbose=1)
# 一番いいときのモデルを保存する設定。ソースコードフォルダに「model-ddsrcnn.h5」を保存する。
checkpointer = ModelCheckpoint('model-ddsrcnn.h5', verbose=1, save_best_only=True)
reduceLr = ReduceLROnPlateau(monitor='val_PSNRLoss',factor=0.1,patience=3)
results = model.fit(X_train,
                    Y_train,
                    validation_split=0.2, # バリデーションを自動設定
                    batch_size=64,
                    epochs=100,
                    callbacks=[reduceLr, checkpointer])

"""
Evaluates the model
"""
# テスト画像の準備
# low resolution
X_test = np.zeros((len(test_lows)*(PATCH_SIZE*2),PATCH_SIZE, PATCH_SIZE, IMG_CHANNELS), dtype=np.uint8)
# original
Y_test = np.zeros((len(test_orgs)*(PATCH_SIZE*2),PATCH_SIZE, PATCH_SIZE,IMG_CHANNELS), dtype=np.uint8)

index1 = 0
index2 = 0
for n in range(len(test_orgs)):
    low_test = imread(test_lows[n],as_gray=True)
    h, w = low_test.shape
    low_patches = low_test.reshape(h//PATCH_SIZE, PATCH_SIZE, -1, PATCH_SIZE).swapaxes(1,2).reshape(-1, PATCH_SIZE, PATCH_SIZE)
    for i in range(len(low_patches)):
            X_test[index1] = (low_patches[i].reshape(PATCH_SIZE, PATCH_SIZE, IMG_CHANNELS))
            index1 += 1
    org_test = imread(test_orgs[n],as_gray=True)
    h, w = org_test.shape
    org_patches = org_test.reshape(h//PATCH_SIZE, PATCH_SIZE, -1, PATCH_SIZE).swapaxes(1,2).reshape(-1, PATCH_SIZE, PATCH_SIZE)
    for i in range(len(org_patches)):
            Y_test[index2] = (org_patches[i].reshape(PATCH_SIZE, PATCH_SIZE, IMG_CHANNELS))
            index2 += 1

# モデルの精度を確かめる
error = model.evaluate(X_test,Y_test)
print("Mean Squared Error : ", error[0])
print("Peak Signal to Noise Ratio : ", error[1])

# モデルに画像を作らせる
model = load_model('model-ddsrcnn.h5', custom_objects={'PSNRLoss': PSNRLoss})
preds_test = model.predict(X_test, verbose=1).astype(np.uint8)
# 適当にサンプリングして確認する
indices = [777,2034,3050]
result_imgs = Image.new('L', (PATCH_SIZE*len(indices), 32*3))
num = 0
for idx in indices:
    # low
    img_array1 = X_test[idx].reshape(PATCH_SIZE, PATCH_SIZE)
    pilImg1 = Image.fromarray(np.uint8(img_array1))
    result_imgs.paste(pilImg1, (PATCH_SIZE*num, 0))
    # original
    img_array2 = Y_test[idx].reshape(PATCH_SIZE, PATCH_SIZE)
    pilImg2 = Image.fromarray(np.uint8(img_array2))
    result_imgs.paste(pilImg2, (PATCH_SIZE*num, 32))
    # DDSRCNN
    img_array3 = preds_test[idx].reshape(PATCH_SIZE, PATCH_SIZE)
    pilImg3 = Image.fromarray(np.uint8(img_array3))
    result_imgs.paste(pilImg3, (PATCH_SIZE*num, 64))

    num += 1

# ソースコードのフォルダに'test.png'としてテスト結果を保存
result_imgs.save('test.png')#上段:ノイズ、中段:オリジナル、下段:DDSRCNN
# パッチを復元
# 結果
sample_save_to = '/home/tatsunidas/デスクトップ/SR_samples1/'
num = 0
for patch in preds_test[:64]:
    img = patch.reshape(PATCH_SIZE, PATCH_SIZE)
    img = Image.fromarray(np.uint8(img))
    img.save(sample_save_to+str(num)+'.png')
    num += 1
# 対象になったボケ画像
sample_save_to = '/home/tatsunidas/デスクトップ/SR_samples2/'
num = 0
for patch in X_test[:64]:
    img = patch.reshape(PATCH_SIZE, PATCH_SIZE)
    img = Image.fromarray(np.uint8(img))
    img.save(sample_save_to+str(num)+'.png')
    num += 1
結果
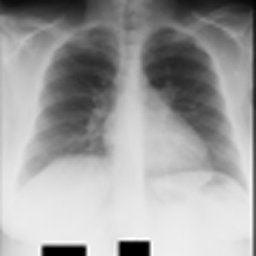
まだチューニングがうまくいかない。
ボケ画像がさらにボケた。難しい。
(Result)
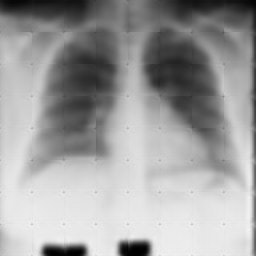
(参考までに以下が入力画像)
この記事を書いたモチベーション
備忘録として。勉強のために。
その他
コメント歓迎です。誤りなど修正致します。