pyradiomics
このような画像特徴を計算できます。
- First Order Statistics
- Shape-based (2D and 3D)
- Gray Level Cooccurence Matrix (GLCM)
- Gray Level Run Length Matrix (GLRLM)
- Gray Level Size Zone Matrix (GLSZM)
- Gray Level Dependece Matrix (GLDM)
- Neighboring Gray Tone Difference Matrix (NGTDM)
画像を対象として、一次元の定量値「first order」~~(でも一次元と解釈すべきか悩む特徴も含まれる)~~と、どれくらい丸いか、ギザギザかなどの形状を解析するShape、ピクセルの並び方のパターンを調べるGLCMなどの解析が行えるライブラリです。
GLCMなどの部分は、高速化のためにC言語で書かれており、これをPythonのオブジェクトとして参照することで、計算速度を高めています。
すぐに使える
研究者が作っているので非常にシンプルで、すぐにCSVテーブルにできるようになっています。
ここでは、計算結果を表示するところまで書きます。
環境
Google colaboratory
手順
まず、ライブラリを一時的にインストールします。
!pip install pyradiomics
こんな感じでインストールできます。
Collecting pyradiomics
  Downloading https://files.pythonhosted.org/packages/1d/6b/797d3fd59e16675f6d8fa3ad0f778a025e06bcb1fd595439d43aff0a522e/pyradiomics-2.2.0-cp36-cp36m-manylinux1_x86_64.whl (159kB)
     |████████████████████████████████| 163kB 2.8MB/s
Collecting pykwalify>=1.6.0
  Downloading https://files.pythonhosted.org/packages/36/9f/612de8ca540bd24d604f544248c4c46e9db76f6ea5eb75fb4244da6ebbf0/pykwalify-1.7.0-py2.py3-none-any.whl (40kB)
     |████████████████████████████████| 40kB 5.4MB/s
Requirement already satisfied: numpy>=1.9.2 in /usr/local/lib/python3.6/dist-packages (from pyradiomics) (1.17.3)
Collecting SimpleITK>=0.9.1
  Downloading https://files.pythonhosted.org/packages/bb/06/f3a67ef0e108d18840fd5e83f831d5ef1710ba46f05465fc50f9a505b518/SimpleITK-1.2.3-cp36-cp36m-manylinux1_x86_64.whl (42.5MB)
     |████████████████████████████████| 42.5MB 54kB/s
Requirement already satisfied: six>=1.10.0 in /usr/local/lib/python3.6/dist-packages (from pyradiomics) (1.12.0)
Collecting PyWavelets<=1.0.0,>=0.4.0
  Downloading https://files.pythonhosted.org/packages/90/d0/09b2bf3368d5bba6ee1a8868ce94eebbb105fc8bf89fa43c90348b21a7cb/PyWavelets-1.0.0-cp36-cp36m-manylinux1_x86_64.whl (4.4MB)
     |████████████████████████████████| 4.4MB 35.8MB/s
Requirement already satisfied: PyYAML>=3.11 in /usr/local/lib/python3.6/dist-packages (from pykwalify>=1.6.0->pyradiomics) (3.13)
Requirement already satisfied: docopt>=0.6.2 in /usr/local/lib/python3.6/dist-packages (from pykwalify>=1.6.0->pyradiomics) (0.6.2)
Requirement already satisfied: python-dateutil>=2.4.2 in /usr/local/lib/python3.6/dist-packages (from pykwalify>=1.6.0->pyradiomics) (2.6.1)
ERROR: albumentations 0.1.12 has requirement imgaug<0.2.7,>=0.2.5, but you'll have imgaug 0.2.9 which is incompatible.
Installing collected packages: pykwalify, SimpleITK, PyWavelets, pyradiomics
  Found existing installation: PyWavelets 1.1.1
    Uninstalling PyWavelets-1.1.1:
      Successfully uninstalled PyWavelets-1.1.1
Successfully installed PyWavelets-1.0.0 SimpleITK-1.2.3 pykwalify-1.7.0 pyradiomics-2.2.0
必要な関数をインポートしておきます。
import os  # needed navigate the system to get the input data
from radiomics import featureextractor  # This module is used for interaction with pyradiomics
import radiomics
from radiomics import firstorder, getTestCase, glcm, glrlm, glszm, imageoperations, shape, shape2D
import numpy as np
import six

#http://simpleitk.github.io/SimpleITK-Notebooks/01_Image_Basics.html
import SimpleITK as sitk
import matplotlib.pyplot as plt
pyradiomicsが用意してくれているテストデータを使っていきます。
画像の形式は3Dの画像処理界隈(3DSlicer)でよく使われるNrrd形式の画像になっています。
読み込みにはSimpleITKのライブラリを使えます。
いろいろな画像形式に対応できます。
Nrrdが用意できなくても、tiffやpngなどで代用が出来ます。(Dicomならpydicomで一旦NDArrayにしてからSimpleITKのImageとして変換できます)
(https://github.com/Radiomics/pyradiomics/issues/339)
「lung2」サンプルを使ってみます。
# brain1, brain2, breast1, lung1,lung2,(prostate_phantom)
imageName, maskName = getTestCase('lung2')
image = sitk.ReadImage(imageName)
mask = sitk.ReadImage(maskName)
一般的なフォーマットの画像(例えばtif)をColabノートにアップロードした場合は、このようにします。
# colabのFile内から呼び出す(親ディレクトリにあることを想定した例)。
# imagePath = os.path.join(os.getcwd(), "lung2" + "_image.tif")
# maskPath = os.path.join(os.getcwd(), "lung2" + "_label.tif")
# image = sitk.ReadImage(imagePath)
# mask = sitk.ReadImage(maskPath)
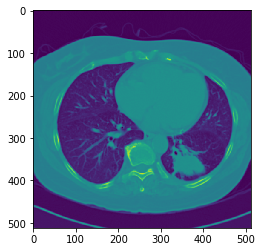
ちゃんとロードできているか確認します。
(スライシングは以下で良いが、ピクセルの並びはitkImage(x,y)に対してnumpy.adarray(h,w)になる)
ndImg = sitk.GetArrayFromImage(image)
ndLbl = sitk.GetArrayFromImage(mask)
plt.imshow(ndImg[24])
plt.show()
plt.imshow(ndLbl[24])
plt.show()

このデータは、3Dのデータになっています。2D画像がZ軸方向に並んでいるので。
pyradiomicsは最初から3Dの計算が想定されているところがすごいと、個人的には思います。
設定ファイルを作ります。
ここでは簡単ですがデフォルトで行きます。
settings = {}
settings['binWidth'] = 25
# If enabled, resample image (resampled image is automatically cropped.
settings['resampledPixelSpacing'] = None  # [3,3,3] is an example for defining resampling (voxels with size 3x3x3mm)
settings['interpolator'] = sitk.sitkBSpline
settings['label'] = 1 # マスク領域をピクセル値1(それ以外は0)としているので。
マスクの部分をクロップします。これで、腫瘍の部分のみの2D画像セットになります。(3Dボリュームです。)
#マスクの整合性チェックとbbox作成をします # 2020/1/23追記
bb, correctedMask = imageoperations.checkMask(image, mask)
if correctedMask is not None:
  mask = correctedMask
image, mask = imageoperations.cropToTumorMask(image, mask, bb)
以上で準備は完了です。
あとは計算を実行します。
まずは、クロップしたボリュームから一次元の特徴量を算出します。
種類や意味も出力します。
firstOrderFeatures = firstorder.RadiomicsFirstOrder(image, mask, **settings)
# firstOrderFeatures.enableFeatureByName('Mean', True)
firstOrderFeatures.enableAllFeatures()

print('Will calculate the following first order features: ')
for f in firstOrderFeatures.enabledFeatures.keys():
  print('  ', f)
  print(getattr(firstOrderFeatures, 'get%sFeatureValue' % f).__doc__)

print('Calculating first order features...')
results = firstOrderFeatures.execute()
print('done')

print('Calculated first order features: ')
for (key, val) in six.iteritems(results):
  print('  ', key, ':', val)
次は形状の特徴です。
shapeFeatures = shape.RadiomicsShape(image, mask, **settings)
shapeFeatures.enableAllFeatures()

print('Will calculate the following Shape features: ')
for f in shapeFeatures.enabledFeatures.keys():
  print('  ', f)
  print(getattr(shapeFeatures, 'get%sFeatureValue' % f).__doc__)

print('Calculating Shape features...')
results = shapeFeatures.execute()
print('done')

print('Calculated Shape features: ')
for (key, val) in six.iteritems(results):
  print('  ', key, ':', val)
ここから、GLCMなどの特徴を計算します。
# Show GLCM features
glcmFeatures = glcm.RadiomicsGLCM(image, mask, **settings)
glcmFeatures.enableAllFeatures()

print('Will calculate the following GLCM features: ')
for f in glcmFeatures.enabledFeatures.keys():
  print('  ', f)
  print(getattr(glcmFeatures, 'get%sFeatureValue' % f).__doc__)

print('Calculating GLCM features...')
results = glcmFeatures.execute()
print('done')

print('Calculated GLCM features: ')
for (key, val) in six.iteritems(results):
  print('  ', key, ':', val)

# Show GLRLM features
glrlmFeatures = glrlm.RadiomicsGLRLM(image, mask, **settings)
glrlmFeatures.enableAllFeatures()

print('Will calculate the following GLRLM features: ')
for f in glrlmFeatures.enabledFeatures.keys():
  print('  ', f)
  print(getattr(glrlmFeatures, 'get%sFeatureValue' % f).__doc__)

print('Calculating GLRLM features...')
results = glrlmFeatures.execute()
print('done')

print('Calculated GLRLM features: ')
for (key, val) in six.iteritems(results):
  print('  ', key, ':', val)

# Show GLSZM features
glszmFeatures = glszm.RadiomicsGLSZM(image, mask, **settings)
glszmFeatures.enableAllFeatures()

print('Will calculate the following GLSZM features: ')
for f in glszmFeatures.enabledFeatures.keys():
  print('  ', f)
  print(getattr(glszmFeatures, 'get%sFeatureValue' % f).__doc__)

print('Calculating GLSZM features...')
results = glszmFeatures.execute()
print('done')

print('Calculated GLSZM features: ')
for (key, val) in six.iteritems(results):
  print('  ', key, ':', val)

# この辺にしときます。
上記の処理は、入力に2D画像一枚を入力すれば、2Dの解析にもなりますが、最初から2Dの解析であることが分かっている場合には、次のようにして、入力には画像一枚のみを渡すようにします。
# choose 2D array
# メモリ参照されているので、念の為、もう一度呼び出し直す。
imageName, maskName = getTestCase('lung2')
imageStack = sitk.ReadImage(imageName)
maskSatck = sitk.ReadImage(maskName)

# パラメトリックな画像の計算などのためにadarrayとしてピクセルを取り出す(25スライス目を対象とした例)
ndimage = sitk.GetArrayFromImage(imageStack)[24]
ndmask = sitk.GetArrayFromImage(maskStack)[24]

# 基本的に、元々DICOM画像だったデータは、dimensionが3なので、エクスパンド。
ndimage = np.expand_dims(ndimage, axis=0)
ndmask = np.expand_dims(ndmask, axis=0)

print(ndimage.shape)# (1, 512, 512) force2Dでもshapeは必ず3次元にしなければなりません。
print(ndmask.shape)# (1, 512, 512)
いろいろな理由で計算した後に、ピクセルのndarrayをsitkのimageとして代入し直す場合はこのようにします。
image = sitk.GetImageFromArray(ndimage)
mask = sitk.GetImageFromArray(ndmask)
ピクセルサイズなどの情報をセットし直します。(2019/11/14追記、12/21追記)
# copy geometric/calibration info
image.CopyInformation(imageStack[:,:,24])
mask.CopyInformation(maskStack[:,:,24])

# または、元の画像がメタデータを持っており、かつ、マトリクスサイズ、オリジン、ピクセルスペーシングなどの幾何学的な情報に変更がない場合、元のデータからメタデータをコピーする。
# ただし、もしDICOMの場合(今回はtiffだけども)は、シリーズUIDや画像作成時間などの情報を更新した方がベター。

for i,key in enumerate(imageStack[:,:,24].GetMetaDataKeys()):
        image.SetMetaData(key, imageStack[:,:,24].GetMetaData(key))
for i,key in enumerate(maskStack[:,:,24].GetMetaDataKeys()):
        mask.SetMetaData(key, maskStack[:,:,24].GetMetaData(key))
設定で、force2Dを追加します。
settings = {}
settings['binWidth'] = 25
# If enabled, resample image (resampled image is automatically cropped.
settings['resampledPixelSpacing'] = None  # [3,3,3] is an example for defining resampling (voxels with size 3x3x3mm)
settings['interpolator'] = sitk.sitkBSpline
settings['label'] = 1
settings['force2D'] = True
settings['correctMask'] = True # もし解析対象画像とマスク画像とのオリジンなどの幾何学的情報が異なる場合、自動調整する
後の流れは同じなので、ファーストオーダのみ例を示します。
# Show the first order feature calculations
firstOrderFeatures = firstorder.RadiomicsFirstOrder(image, mask, **settings)
# firstOrderFeatures.enableFeatureByName('Mean', True) #特定の項目を指定する場合
firstOrderFeatures.enableAllFeatures()

# 重複するのでコメントアウトします。
# print('Will calculate the following first order features: ')
# for f in firstOrderFeatures.enabledFeatures.keys():
#   print('  ', f)
#   print(getattr(firstOrderFeatures, 'get%sFeatureValue' % f).__doc__)

print('Calculating first order features...')
results = firstOrderFeatures.execute()
print('done')

print('Calculated first order features: ')
for (key, val) in six.iteritems(results):
  print('  ', key, ':', val)
以上です。
VisionaryImagingServices, Inc.
Tatsuaki Kobayashi
#Reference