モチベーション
ググッときた。
この技術が発展するとどう嬉しいのか
- 画像確認レポートや、診断レポートのテンプレにできるかもしれない
- 仕事が忙しいときや、疲れているときにでも、気づきを与えてくれる可能性
アプローチ
今回は、Image To Textで、GITを利用する。
この他にも、大きなフレームワークとしては、次のようなものがある。
Text To Text
キーワードから、文章を予測させる試みなど。
例えば、MeSHのような、標準化された用語をいくつか入力すると、レポートの文章が自動で作られるようなアプローチ。
逆もありで、長文を要約するアプローチも可能。
BERT、GPT、T5などのモデルで検証可能。
Image To Text
画像を入力して、画像から直接、文章を予測させるアプローチ。
CNN+LSTM、CNN+GPT、GITモデルなどで検証可能。
Image To Text To Text
これは、私の妄想フレームワーク。
例えば、画像から、キーワードだけをいくつか予測させておき、このキーワードから、Text To Textで文章を作成させるアプローチ。
画像から精度の高い文章が予測させられないケースでは有用になるのではないか。
データセット
Chest X-rays (Indiana University)
Open-i dataset taken from openi.nlm.nih.gov
https://www.kaggle.com/datasets/raddar/chest-xrays-indiana-university
モデル
GIT
@article{wang2022git, title={GIT: A Generative Image-to-text Transformer for Vision and Language}, author={Wang, Jianfeng and Yang, Zhengyuan and Hu, Xiaowei and Li, Linjie and Lin, Kevin and Gan, Zhe and Liu, Zicheng and Liu, Ce and Wang, Lijuan}, journal={arXiv preprint arXiv:2205.14100}, year={2022} }
コードを書いていく
必要なライブラリを用意する。
# !pip install torch torchvision
# !pip install transformers datasets evaluate -q
# !pip install jiwer -q # いらないかも
# !pip install nltk
ダウンロードしたデータセットを解凍する。
# !unzip archive.zip
パッケージ等のインポート
import pandas as pd
import numpy as np
import os, time, copy, re, html, string

from PIL import Image
import matplotlib.pyplot as plt

from sklearn.model_selection import train_test_split
import warnings
warnings.filterwarnings('ignore')
import torch
from torch.utils.data import Dataset, DataLoader
from torchvision import transforms
from transformers import AdamW
デバイスの識別:cpu or gpu
if torch.cuda.is_available():
    device = torch.device("cuda")
    print(f"Using GPU: {torch.cuda.get_device_name(0)}")
else:
    device = torch.device("cpu")
    print("Using CPU")
画像パス、画像の属性、および、レポートファイルを読み込んでいく。
img_base_dir = 'images/images_normalized/'
reports_df = pd.read_csv('indiana_reports.csv')
reports_df.head()
projections_df = pd.read_csv('indiana_projections.csv')
projections_df.head()
サイズを確認する。
#images 7470
#reports (3851, 8)
#projections (7466, 3)
print('images',len(os.listdir(img_base_dir)))
print('reports', reports_df.shape)
print('projections', projections_df.shape)
CSVをマージする。
'''
merge
'''
import math
def merge_df(reports, projections):
    images_captions_df = pd.DataFrame()
    for i in range(len(projections)):
        uid = projections.iloc[i]['uid']
        img = projections.iloc[i]['filename']
        proj = projections.iloc[i]['projection']
        label = reports[reports['uid']==uid]
        mesh = label['MeSH'].values[0]
        # Problems	image	indication	comparison	findings	impression
        problem = label['Problems'].values[0]
        img_attr = label['image'].values[0]
        indication = label['indication'].values[0]
        comparison = label['comparison'].values[0]
        findings = label['findings'].values[0]
        impression = label['impression'].values[0]
#         if findings is np.nan:
#             continue
        row = {
            'uid':[uid],
            'filename':[img],
            'projection':[proj],
            'MeSH':[mesh],
            'Problems':[problem],
            'image':[img_attr],
            'indication':[indication],
            'comparison':[comparison],
            'findings':[findings],
            'impression':[impression],
        }
        row_df = pd.DataFrame(row)
        images_captions_df = pd.concat([images_captions_df, row_df], ignore_index=True)

    return images_captions_df
df = merge_df(reports_df, projections_df)
キャプションとして扱いたい項目(ラベルとする文章)を指定して、NaNをDropする。
def select_df(df_merged, text_col):
    df_ = df_merged.dropna(subset=[text_col])
    return df_
'''
caption対象からNaNを落とす
'''
df_s = select_df(df, 'findings')
サイズ確認
print(df_s.shape)
print(df_s['findings'].isnull().values.sum()) # 0 なので、NaNは綺麗になくなった
サンプルを表示する。(正面のみと、正面・側面がある場合がある)
findingsも出力。(ここでは画像のみ表示した例)
def display_sample(uid, img_base_dir, df_merged):
    plt.figure(figsize=(10, 5))
    print("UID:", uid)
    samples = df_merged[df_merged['uid']==uid]
    findings = samples.iloc[0]['findings']
    for i in range(samples.shape[0]):
        filepath = img_base_dir + samples.iloc[i]['filename']
        proj = samples.iloc[i]['projection']
        plt.subplot(1, samples.shape[0], i+1)
        img = Image.open(filepath)
        rgb = img.convert('RGB')
        plt.title(proj)
        plt.imshow(rgb)
    plt.show()
    print("Findings:", findings)
display_sample(1, img_base_dir,df)

画像のファイル名(filename)を相対パスに変換する。
df_s['filename'] = img_base_dir + df_s['filename']
テキストの前処理
'''
text preprocessing
'''
from nltk.stem import PorterStemmer, WordNetLemmatizer
from nltk.tokenize import word_tokenize

def remove_chars(text):
    '''
    for html, xml
    '''
    re1 = re.compile(r'  +')
    x1 = text.lower().replace('#39;', "'").replace('amp;', '&').replace('#146;', "'").replace(
        'nbsp;', ' ').replace('#36;', '$').replace('\\n', "\n").replace('quot;', "'").replace(
        '<br />', "\n").replace('\\"', '"').replace('<unk>', 'u_n').replace(' @.@ ', '.').replace(
        ' @-@ ', '-').replace('\\', ' \\ ')
    return re1.sub(' ', html.unescape(x1))


def remove_non_ascii(text):
    '''
    remove euro accent, unicode(partial), emoji.
    '''
    return re.sub(r'[^\x00-\x7F]+', '', text)


def to_lowercase(text):
    return text.lower()


def remove_punctuation(text):
    '''
    remove: !"#$%&'()*+,-./:;<=>?@[\]^_`{|}~
    '''
    translator = str.maketrans('', '', string.punctuation)
    return text.translate(translator)


def replace_numbers(text):
    return re.sub(r'\d+', '', text)


def remove_start_end_whitespaces(text):
    '''
    "   Hello, world!   " to "Hello, world!"
    '''
    return text.strip()


def remove_stopwords(words, stop_words):
    return [word for word in words if word not in stop_words]


def stem_words(words):
    '''
    running: run
    ran: ran
    runs: run
    runner: runner
    easily: easili
    fairly: fairli
    fairness: fair
    '''
    stemmer = PorterStemmer()
    return [stemmer.stem(word) for word in words]


def text2words(text):
    '''
    This is an example to ['This', 'is', 'an', 'example']
    '''
    return word_tokenize(text)


def lemmatize_words(words):
    lemmatizer = WordNetLemmatizer()
    return [lemmatizer.lemmatize(word) for word in words]


def lemmatize_verbs(words):
    lemmatizer = WordNetLemmatizer()
    return ' '.join([lemmatizer.lemmatize(word, pos='v') for word in words])


def normalize_text(text):
    text = remove_chars(text)
    text = remove_non_ascii(text)
    text = remove_punctuation(text)
    text = to_lowercase(text)
    text = replace_numbers(text)
    text = remove_start_end_whitespaces(text)
    words = text2words(text)
    words = remove_stopwords(words, stop_words=['xxxx'])
    #words = stem_words(words)# Either stem ovocar lemmatize
    words = lemmatize_words(words)
#     words = lemmatize_verbs(words)
    return ' '.join(words)
sample
'''
text preprocess sample
'''
for txt in df_s.iloc[:5]['findings']:
    print(txt)
    print()
    print("\033[32m"+normalize_text(txt)+"\033[0m")
    print()
The cardiac silhouette and mediastinum size are within normal limits. There is no pulmonary edema. There is no focal consolidation. There are no XXXX of a pleural effusion. There is no evidence of pneumothorax.

the cardiac silhouette and mediastinum size are within normal limit there is no pulmonary edema there is no focal consolidation there are no of a pleural effusion there is no evidence of pneumothorax

Borderline cardiomegaly. Midline sternotomy XXXX. Enlarged pulmonary arteries. Clear lungs. Inferior XXXX XXXX XXXX.

borderline cardiomegaly midline sternotomy enlarged pulmonary artery clear lung inferior

Borderline cardiomegaly. Midline sternotomy XXXX. Enlarged pulmonary arteries. Clear lungs. Inferior XXXX XXXX XXXX.

borderline cardiomegaly midline sternotomy enlarged pulmonary artery clear lung inferior

There are diffuse bilateral interstitial and alveolar opacities consistent with chronic obstructive lung disease and bullous emphysema. There are irregular opacities in the left lung apex, that could represent a cavitary lesion in the left lung apex.There are streaky opacities in the right upper lobe, XXXX scarring. The cardiomediastinal silhouette is normal in size and contour. There is no pneumothorax or large pleural effusion.

there are diffuse bilateral interstitial and alveolar opacity consistent with chronic obstructive lung disease and bullous emphysema there are irregular opacity in the left lung apex that could represent a cavitary lesion in the left lung apexthere are streaky opacity in the right upper lobe scarring the cardiomediastinal silhouette is normal in size and contour there is no pneumothorax or large pleural effusion
ちょっと力技だけど、先にキャプションを前処理して置き換える。
findings = []
for i in range(df_s.shape[0]):
    txt = df_s.iloc[i]['findings']
    findings.append(normalize_text(txt))
df_s['findings'] = findings
データセットの分割
from sklearn.model_selection import GroupShuffleSplit
gss_t = GroupShuffleSplit(n_splits=1, test_size=0.2, random_state=None)
gss_v = GroupShuffleSplit(n_splits=1, test_size=0.1, random_state=None)
train_index, test_index = next(iter(gss_t.split(df_s, None, df_s['uid'])))
train_index, val_index = next(iter(gss_v.split(df_s.iloc[train_index], None, df_s.iloc[train_index]['uid'])))

train_df = df_s.iloc[train_index]
val_df = df_s.iloc[val_index]
test_df = df_s.iloc[test_index]
print(train_df.shape) # (4656, 10)
print(val_df.shape) # (520, 10)
print(test_df.shape) # (1293, 10)
GITのプロセッサーをロード。
from transformers import AutoProcessor

# GIT (GenerativeImage2Text), base-sized
checkpoint = "microsoft/git-base"
processor = AutoProcessor.from_pretrained(checkpoint)# transformers.models.git.processing_git.GitProcessor
カスタムデータセットを定義。
class CustomImageTextDataset(Dataset):
    def __init__(self, image_paths, texts, processor):
        self.image_paths = image_paths.values
        self.texts = texts.values
        self.processor = processor
        # ここは必要
        self.transform = transforms.Compose([
            transforms.Resize((224, 224)),
            transforms.ToTensor()])

    def __len__(self):
        return len(self.image_paths)

    def __getitem__(self, idx):
        image = Image.open(self.image_paths[idx]).convert("RGB")
        image = self.transform(image)
        text = self.texts[idx]
        return image, text
モデルの精度評価用に、単語誤り率を利用。
from evaluate import load

# 単語誤り率(単語を対象とした[1-正解率])
wer = load("wer")

def compute_metrics(logits, labels):
    '''
    Word Error Rate
    '''
    predicted = logits.argmax(-1)
    decoded_labels = processor.batch_decode(labels, skip_special_tokens=True)
    decoded_predictions = processor.batch_decode(predicted, skip_special_tokens=True)
    wer_score = wer.compute(predictions=decoded_predictions, references=decoded_labels)
    return wer_score
バッチサイズを決める。
'''
BATCH SIZE
※ over 8 slices, will occur out of memory...
'''
batch_size = 8
データローダを定義。
train_dataset = CustomImageTextDataset(train_df['filename'], train_df['findings'], processor)
train_loader = DataLoader(train_dataset, batch_size=batch_size, shuffle=True)
val_dataset = CustomImageTextDataset(val_df['filename'], val_df['findings'], processor)
val_loader = DataLoader(val_dataset, batch_size=batch_size, shuffle=True)
test_dataset = CustomImageTextDataset(test_df['filename'], test_df['findings'], processor)
test_loader = DataLoader(test_dataset, batch_size=batch_size, shuffle=False)
訓練のコードを書く
def train_model(model,
                device,
                optimizer,
                train_loader,
                val_loader,
                scheduler,
                num_epochs=25,
                early_stop=5):
    since = time.time()
    model.to(device)
    best_model_wts = copy.deepcopy(model.state_dict())
    # 学習状況を記録するためのリスト
    train_loss_list = []
    train_wer_list = []
    val_loss_list = []
    val_wer_list = []

    # 最小の損失とその時のモデルを記録する変数
    min_loss = float('inf')
    best_wer = float('inf')
    patience = early_stop  # 検証の損失が改善するまで許容するエポック数
    early_stop_counter = 0

    for epoch in range(num_epochs):
        print('Epoch {}/{}'.format(epoch+1, num_epochs))
        print('-' * 10)

        # 各エポックには訓練フェーズと検証フェーズがあります
        for phase in ['train', 'val']:
            if phase == 'train':
                model.train()  # モデルを訓練モードに設定します
                dataloader = train_loader
            else:
                model.eval()   # モデルを評価モードに設定します(dropoutやbatch normのため)
                dataloader = val_loader

            running_loss = 0.0
            running_wers = 0
            samples = 0

            for images, texts in dataloader:
                inputs = processor(text=texts,
                                   images=images,
                                   return_tensors='pt',
                                   padding=True,       # パディングを有効にする
                                   #truncation=True,    # トランケーションを有効にする
                                   #max_length=709 #512      # 必要に応じて最大長を指定
                                  )

                images = inputs['pixel_values'].to(device)
                texts = inputs['input_ids'].to(device)
                attention_masks = inputs['attention_mask'].to(device)
                labels = torch.tensor(texts, device=device)

                optimizer.zero_grad()

                # 順伝播
                # 訓練の時だけ、勾配を計算します
                with torch.set_grad_enabled(phase == 'train'):
                    outputs = model(input_ids=texts,
                                    attention_mask=attention_masks,
                                    pixel_values=images,
                                    labels=labels)
                    loss = outputs.loss # returned when labels is provided
                    wer_in_batch = compute_metrics(outputs.logits, labels)

                    # 訓練の時だけ逆伝播+最適化関数による更新を行います
                    if phase == 'train':
                        loss.backward()
                        optimizer.step()

                # 損失を計算します
                running_loss += loss.item()  # lossはバッチ単位で計算
                running_wers += wer_in_batch # バッチ単位のWER
                samples += len(images)

            epoch_loss = running_loss / samples
            epoch_wer = running_wers / samples

            if phase == 'train':
                train_loss_list.append(epoch_loss)
                train_wer_list.append(epoch_wer)
            else:
                scheduler.step(epoch_loss)
                val_loss_list.append(epoch_loss)
                val_wer_list.append(epoch_wer)

            print('{} Loss: {:.4f} WER: {:.4f}'.format(phase, epoch_loss, epoch_wer))

            # モデルをディープ・コピーします
            if phase == 'val' and epoch_loss < min_loss:
                min_loss = epoch_loss
                early_stop_counter = 0  # カウンターをリセット
                if epoch_wer <= best_wer:
                    best_wer = epoch_wer
                    best_model_wts = copy.deepcopy(model.state_dict())
            else:
                if phase == 'val':
                    early_stop_counter += 1

        # Early Stoppingのチェック
        if early_stop_counter >= patience:
            print()
            print(f'Early stopping at epoch {epoch+1}')
            break

        print()

    time_elapsed = time.time() - since
    print('Training complete in {:.0f}m {:.0f}s'.format(
        time_elapsed // 60, time_elapsed % 60))
    print('Best val Loss: {:.4f} WER: {:.4f}'.format(min_loss, best_wer))
    print()
    # AccuracyとLossの可視化
    plt.figure(figsize=(10, 5))
    plt.subplot(1, 2, 1)
    plt.plot(train_loss_list, label='Training Loss')
    plt.plot(val_loss_list, label='Val Loss')
    plt.xlabel('Epoch')
    plt.ylabel('Loss')
    plt.legend()
    plt.subplot(1, 2, 2)
    plt.plot(train_wer_list, label='Training WER')
    plt.plot(val_wer_list, label='Val WER')
    plt.xlabel('Epoch')
    plt.ylabel('WER')
    plt.legend()
    plt.show()

    # ベストモデルの重みをロードします
    model.load_state_dict(best_model_wts)
    return model
訓練済みGITモデルをロードして、転移学習。
from transformers import AutoModelForCausalLM
model = None
model = AutoModelForCausalLM.from_pretrained(checkpoint)

model_id = '5e-5'

learning_rate = 5e-5 # keep small (1e-3 was failed in my experience)
num_epochs = 30
# Define the optimizer
optimizer = AdamW(model.parameters(), lr=learning_rate)

# 学習中、損失が改善しなくなったら、自動的に学習率を0.3倍するようにスケジュールします。
from torch.optim import lr_scheduler
scheduler = lr_scheduler.ReduceLROnPlateau(optimizer, mode='min', factor=0.3, patience=2, min_lr=1e-6)

GIT_Che = train_model(model,
                      device,
                      optimizer,
                      train_loader,
                      val_loader,
                      scheduler,
                      num_epochs=num_epochs,
                      early_stop=5)

↑werのカーブが0.8前後で動かなくなってしまっているが、学習を何回か試すと、WERが下に綺麗に下がることもある。
モデルを保存
model_name = model_id+'_'+'model_weights.pth'
torch.save(GIT_Che.state_dict(), model_name)
ロードしたいときはこのようにする。
# load example
test_model = AutoModelForCausalLM.from_pretrained(checkpoint)
test_model.load_state_dict(torch.load(model_name))
テストのためのコードを書く。
'''
TEST
'''
def test(model,
         device,
         test_loader):
    since = time.time()
    model.to(device)

    model.eval()   # モデルを評価モードに設定します(dropoutやbatch normのため)
    dataloader = test_loader
    running_loss = 0.0
    running_wers = 0
    samples = 0

    for images, texts in dataloader:
        inputs = processor(text=texts,
                           images=images,
                           return_tensors='pt',
                           padding=True,       # パディングを有効にする
                           #truncation=True,    # トランケーションを有効にする
                           # max_length=709 #512      # 必要に応じて最大長を指定
                           )

        images = inputs['pixel_values'].to(device)
        texts = inputs['input_ids'].to(device)
        attention_masks = inputs['attention_mask'].to(device)
        labels = torch.tensor(texts, device=device)
        optimizer.zero_grad()

        with torch.set_grad_enabled(False):
            outputs = model(input_ids=texts,
                            attention_mask=attention_masks,
                            pixel_values=images,
                            labels=labels)
            loss = outputs.loss # returned when labels is provided
            wer_in_batch = compute_metrics(outputs.logits, labels)
            # 損失を計算します
            running_loss += loss.item()  # バッチ単位のロス
            running_wers += wer_in_batch # バッチ単位のWER
            samples += len(images)

    loss = running_loss / samples
    wer = running_wers / samples

    print('{} Loss: {:.4f} WER: {:.4f}'.format('TEST', loss, wer))

    time_elapsed = time.time() - since
    print('Test complete in {:.0f}m {:.0f}s'.format(
        time_elapsed // 60, time_elapsed % 60))
    print()
テスト時のlossとwerを確認する。これが小さくなるほど良い。
test(test_model,
     device,
     test_loader)
TEST Loss: 0.0435 WER: 0.8338
Test complete in 1m 16s
バッチでなく、1例ずつテストしたいときはこのようにもできる。
def test_sample(index, df_s, model, processor, device):
    ```
    indexはdf_sの行番号
    ```
    sample = df_s.iloc[index,]
    print("UID:", sample.uid)
    findings = sample['findings']
    filepath = sample['filename']
    proj = sample['projection']
    img = Image.open(filepath)
    rgb = img.convert('RGB')
    plt.title(proj)
    plt.imshow(rgb)
    plt.show()
    plt.pause(0.01)
    model.to(device)
    model.eval()

    transform = transforms.Compose([transforms.Resize((224, 224)),
                                    transforms.ToTensor()])

    image_tensor = transform(img).unsqueeze(0).to(device)

    pixel_values = processor(images=img, return_tensors="pt").pixel_values.to(device)
    with torch.no_grad():
        generated_ids = model.generate(pixel_values=pixel_values, max_length=50)
        generated_caption = processor.batch_decode(generated_ids, skip_special_tokens=True)[0]
        print('='*50)
        print("Findings:\n", findings)
        print('='*50)
        print('Prediction:')
        print("\033[34m"+generated_caption+"\033[0m")
test_sample(5000, df_s, test_model, processor, device)
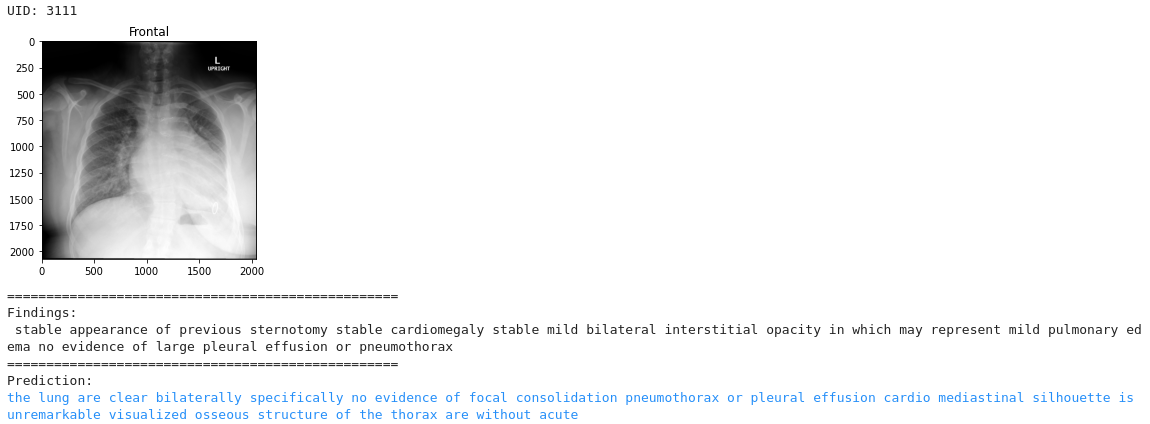
Findings:
 stable appearance of previous sternotomy stable cardiomegaly stable mild bilateral interstitial opacity in which may represent mild pulmonary edema no evidence of large pleural effusion or pneumothorax
 (肺は両側とも明瞭であり、特に局所的な圧密気胸や胸水貯留の所見はない。 胸郭の骨格構造も視認され、縦隔シルエットに異常はない。)
Prediction:
the lung are clear bilaterally specifically no evidence of focal consolidation pneumothorax or pleural effusion cardio mediastinal silhouette is unremarkable visualized osseous structure of the thorax are without acute
(安定した心肥大 安定した軽度の両側間質性混濁 軽度の肺水腫の可能性あり 大きな胸水や気胸の所見なし)
どのようなトークン(学習させた文字)が注目されたかを知るには、attention mapを使う。
def calc_attention_map(index, df_s, model, processor, device):
    sample = df_s.iloc[index,]
    filepath = sample['filename']
    img = Image.open(filepath)
    text = sample['findings']

    inputs = processor(text=text, images=img, return_tensors='pt',padding="max_length")
    images = inputs['pixel_values'].to(device)
    texts = inputs['input_ids'].to(device)

    pixel_values = processor(images=img, return_tensors="pt").pixel_values.to(device)
    outputs = model(input_ids=texts, pixel_values=pixel_values, output_attentions=True)
    # Extract attention weights
    attentions = outputs.attentions
    '''
     attentions: [layer](batch_size, num_heads, sequence_length, sequence_length).
    '''
    # print(len(attentions)) # 6 layers
    # Example: Plot attention map for layer 0, head 0
    plot_attention_map(attentions, layer=0, head=0)

def plot_attention_map(attentions, layer, head):
    '''
    token to token visualization map
    e.g, https://captum.ai/tutorials/Bert_SQUAD_Interpret2

    layer: 0 to 5
    batch: バッチ次元
    head: 0 to 11 (マルチヘッドアテンション(multi-head attention)のヘッド)
    sequence_length: モデルが処理するトークン(単語やサブワードなど)の数
    '''
    attn_at_layer = attentions[layer]
    # torch.Size([1, 12, 709, 709])
    # print(attn_at_layer.shape) # batch, heads, sequence_length, sequence_length
    attention = attn_at_layer[0, head].detach().cpu().numpy()
    fig, ax = plt.subplots(figsize=(10, 10))
    cax = ax.matshow(attention, cmap='viridis')
    # fig.colorbar(cax)
    plt.title(f"Layer {layer+1}, Head {head+1}")
    plt.show()
calc_attention_map(5000, df_s, test_model, processor, device)

確認したい層やヘッドは適宜変える。
おわり
これを、CTやMRIなどに応用すれば良い。
References
- https://www.kaggle.com/datasets/raddar/chest-xrays-indiana-university
- https://github.com/microsoft/GenerativeImage2Text/blob/main/generativeimage2text/train.py#L209
- https://huggingface.co/docs/transformers/main/en/tasks/image_captioning https://huggingface.co/docs/transformers/model_doc/git#transformers.GitModel
stay visionary