はじめに
Next.jsでClaudeのArtifactsのような機能を実装してみました。
開発環境
- OS: Windows11
- 言語: TypeScript
- フレームワーク: Next.js 14.2.4
-
ライブラリ:
- axios
- @anthropic-ai/sdk
実装
1. プロジェクトのセットアップ
まず、Next.jsプロジェクトを作成し、必要なライブラリをインストールします。
npx create-next-app@latest artifacts-app --typescript
cd artifacts-app
npm install axios @anthropic-ai/sdk
2. 環境変数の設定
Anthropic APIキーを設定するために、.env.localファイルを作成します。キーはご自身のものを入れてください。
.env.local
ANTHROPIC_API_KEY=your_api_key_here
3. APIルートの作成
app/page/api/chat/route.tsファイルを作成し、Claudeとの通信を処理するAPIエンドポイントを実装します。
import { NextRequest, NextResponse } from 'next/server'
import Anthropic from '@anthropic-ai/sdk'

const anthropic = new Anthropic({
  apiKey: process.env.ANTHROPIC_API_KEY,
})

export async function POST(request: NextRequest) {
  try {
    const { messages } = await request.json()

    messages[messages.length - 1].content += "(システム指示:Webページのコードを出力する場合は、静的なHTML5とCSSのみで完結できるコードを生成してください。JavaScriptは使用せず、単純なHTML5とCSSで実装してください。コードは一括で間に余計な文言を出力せずそのままHTMLファイルに張り付けて表示できる形にしてください。なお、コードは、Webページ内の50%の領域のiFrame内に表示してプレビューのために使用されます。前提として理解してコードを出力してください。)"

    const response = await anthropic.messages.create({
      model: "claude-3-opus-20240229",
      max_tokens: 4096,
      messages: messages,
    })

    const botMessage = response.content[0].type === 'text'
      ? response.content[0].text
      : 'Sorry, I could not generate a response.'

    let code = ""
    if (botMessage.includes("```html")) {
      const codeBlocks = botMessage.split("```html")
      code = codeBlocks[1].split("```")[0]
    }

    return NextResponse.json({ message: botMessage, code: code })
  } catch (error) {
    console.error('Error:', error)
    return NextResponse.json({ error: 'An error occurred while processing your request.' }, { status: 500 })
  }
}
4. チャットコンポーネントの作成
components/ChatWithExecutor.tsxファイルを作成し、チャットインターフェースとコード実行機能を実装します。
"use client";
import React, { useState, useEffect, useRef } from 'react'
import axios from 'axios'

interface Message {
  text: string
  sender: 'user' | 'bot'
  isCode?: boolean
}

export default function ChatWithExecutor() {
  const [messages, setMessages] = useState<Message[]>([])
  const [input, setInput] = useState('')
  const [content, setContent] = useState('<h1>Welcome! Start chatting to see content here.</h1>')
  const [isLoading, setIsLoading] = useState(false)
  const [viewMode, setViewMode] = useState<'preview' | 'code'>('preview')
  const iframeRef = useRef<HTMLIFrameElement>(null)
  const messagesEndRef = useRef<HTMLDivElement>(null)

  useEffect(() => {
    if (viewMode === 'preview') {
      updateIframeContent(content)
    }
  }, [content, viewMode])

  useEffect(() => {
    scrollToBottom()
  }, [messages])

  const scrollToBottom = () => {
    messagesEndRef.current?.scrollIntoView({ behavior: 'smooth' })
  }

  const sendMessage = async (message: string = input) => {
    if (message.trim() === '') return

    const newMessage: Message = { text: message, sender: 'user' }
    setMessages(prevMessages => [...prevMessages, newMessage])
    setInput('')
    setIsLoading(true)

    try {
      const chatHistory = messages.slice(-18).map(msg => ({
        role: msg.sender === 'user' ? 'user' : 'assistant',
        content: msg.text
      }))
      chatHistory.push({ role: 'user', content: message })

      const response = await axios.post('/api/chat', { messages: chatHistory })
      const botMessage: Message = { text: response.data.message, sender: 'bot', isCode: !!response.data.code }
      setMessages(prevMessages => [...prevMessages, botMessage])

      if (response.data.code) {
        setContent(response.data.code)
        updateIframeContent(response.data.code)
      } else {
        setContent(`<div>${response.data.message}</div>`)
        updateIframeContent(`<div>${response.data.message}</div>`)
      }
    } catch (error) {
      console.error('エラー:', error)
      setContent('<h1>コンテンツの読み込み中にエラーが発生しました。もう一度お試しください。</h1>')
      updateIframeContent('<h1>コンテンツの読み込み中にエラーが発生しました。もう一度お試しください。</h1>')
    } finally {
      setIsLoading(false)
    }
  }

  const updateIframeContent = (content: string) => {
    if (iframeRef.current) {
      const iframeDoc = iframeRef.current.contentDocument
      iframeDoc?.open()
      iframeDoc?.write(`
        <html>
          <head>
            <style>
              body { margin: 0; padding: 0; font-family: Arial, sans-serif; }
            </style>
          </head>
          <body>${content}</body>
          <script>
            (function() {
              ${extractScriptContent(content)}
            })();
          </script>
        </html>
      `)
      iframeDoc?.close()
    }
  }

  const extractScriptContent = (html: string) => {
    const scriptMatch = html.match(/<script>([\s\S]*?)<\/script>/);
    return scriptMatch ? scriptMatch[1] : '';
  };


  return (
    <div className="chat-executor-container">
      <div className="chat-container">
        <div className="chat-messages">
          {messages.map((message, index) => (
            <div key={index} className={`message ${message.sender}`}>
              {message.isCode ? (
                <div className="code-message">
                  <div>💻</div>
                  <div>コードが含まれています。プレビューを確認してください。</div>
                </div>
              ) : (
                message.text
              )}
            </div>
          ))}
          <div ref={messagesEndRef} />
        </div>
        <div className="chat-input">
          <input
            type="text"
            value={input}
            onChange={(e) => setInput(e.target.value)}
            onKeyPress={(e) => e.key === 'Enter' && sendMessage()}
            placeholder="Reply to Claude..."
          />
          <button onClick={() => sendMessage()} disabled={isLoading}>
            {isLoading ? '...' : 'Send'}
          </button>
        </div>
      </div>
      <div className="react-executor">
        <div className="view-mode-buttons">
          <button onClick={() => setViewMode('code')} className={viewMode === 'code' ? 'active' : ''}>Code</button>
          <button onClick={() => setViewMode('preview')} className={viewMode === 'preview' ? 'active' : ''}>Preview</button>
        </div>
        {viewMode === 'preview' ? (
          <iframe
            ref={iframeRef}
            title="Preview"
          />
        ) : (
          <pre>
            <code>{content}</code>
          </pre>
        )}
      </div>
    </div>
  )
}
5. メインページの作成
page.tsxファイルを作成し、チャットコンポーネントを表示します。
import ChatWithExecutor from '../components/ChatWithExecutor'

export default function Home() {
  return <ChatWithExecutor />
}
6. スタイルの適用
globals.cssファイルにスタイルを追加して、アプリケーションの見た目を整えます。
body {
  margin: 0;
  padding: 0;
  font-family: Arial, sans-serif;
}

.chat-executor-container {
  display: flex;
  height: 100vh;
  width: 100vw;
  background-color: #FCF3E9;
}

.chat-container, .react-executor {
  flex: 1;
  display: flex;
  flex-direction: column;
  height: 90%;
  margin: 20px;
  background-color: #FCF3E9;
  border-radius: 10px;
  box-shadow: 0 0 10px rgba(0,0,0,0.1);
}

.chat-messages {
  flex: 1;
  overflow-y: auto;
  padding: 20px;
}

.message {
  margin-bottom: 10px;
  padding: 10px;
  border-radius: 5px;
}

.message.user {
  background-color: #E5D8C9;
}

.message.bot {
  background-color: #FBF7F2;
}

.code-message {
  display: flex;
  align-items: center;
  background-color: #f0f0f0;
  padding: 10px;
  border-radius: 5px;
  border: 1px solid #ccc;
}

.code-message > div:first-child {
  margin-right: 10px;
}

.chat-input {
  padding: 20px;
  border-top: 1px solid #e0e0e0;
}

.chat-input input {
  width: calc(100% - 70px);
  margin-right: 10px;
  padding: 10px;
  border-radius: 5px;
  border: 1px solid #ccc;
}

.chat-input button {
  width: 60px;
  padding: 10px;
  border-radius: 5px;
  background-color: #4CAF50;
  color: white;
  border: none;
}

.view-mode-buttons {
  display: flex;
  justify-content: flex-end;
  padding: 10px 20px;
  border-bottom: 1px solid #e0e0e0;
}

.view-mode-buttons button {
  margin-left: 10px;
  padding: 5px 10px;
  border: none;
  border-radius: 5px;
  background-color: #f0f0f0;
  color: black;
}

.view-mode-buttons button.active {
  background-color: #4CAF50;
  color: white;
}

iframe {
  width: 100%;
  height: 100%;
  border: none;
}

pre {
  flex: 1;
  overflow: auto;
  margin: 0;
  padding: 20px;
  background-color: #282c34;
  color: #abb2bf;
  font-size: 14px;
  line-height: 1.5;
}
実行結果
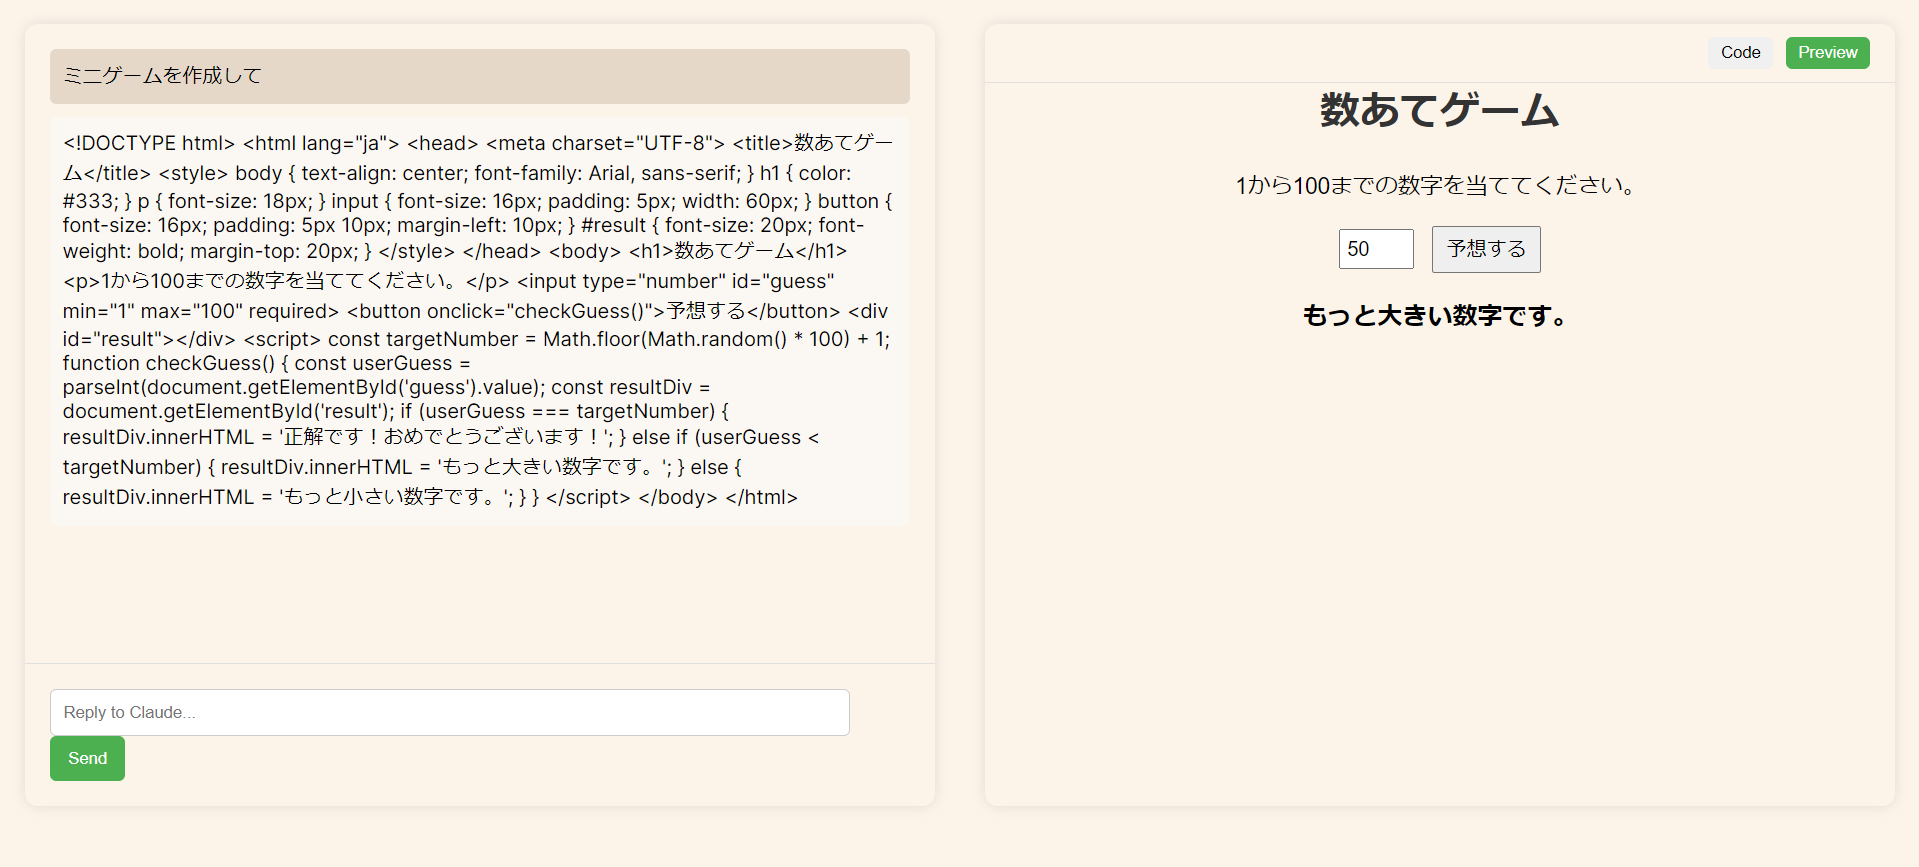
npm run dev でアプリケーションを実行すると、以下のような画面が表示されます。
Preview画面
Code画面

ユーザーがClaudeとチャットを行い、生成されたHTMLコードをリアルタイムでプレビューすることができます。
以上です!
最後まで読んでいただき、ありがとうございました!
参考資料