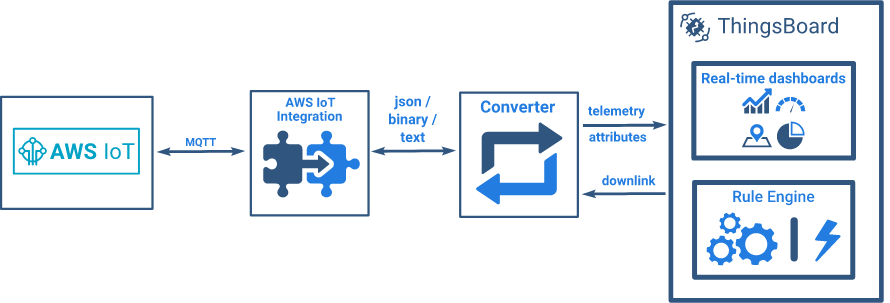
ThingsBoard
IoT向けのオープンソースのデバイス管理、可視化プラットフォームです。
機能はかなり多岐にわたるため、完全に使いこなすのは大変かもしれませんが、MQTT接続で、データを取得してリアルタイムで地図やグラフの描画などができます。
サイトはシズル感があり、試してみたくなります。
https://thingsboard.io/
ThingsBoard PE(Professional Edition) だと、AWS IoT Integrationが簡単にできるので、それを試してみます。
基本的な手順はこちらにあります。
https://thingsboard.io/docs/user-guide/integrations/aws-iot/
AMIの起動
若干お金はかかってしまうのですが、 aws marketplace にThingsBoardのAMIがあります。
https://aws.amazon.com/marketplace/pp/B07MLRVF3Q?qid=1559900650987&sr=0-1&ref_=srh_res_product_title
ライセンス条件を確認の上で、こちらを利用していきます。

東京リージョンのMicroインスタンスなら 1時間0.014ドル、年間100ドルです。(EC2利用料は別)
Accept Termsのボタンをおし、右上の Continue to Configuration を押します。
Regionを選択後に、Continue to Launch を押します。
この後は、他のAMIの設定と同様にVPC, Subnet, Security Group, Key Pair などを作成して Launch を押します。これでEC2のインスタンスが起動し、すぐにThingsBoardが利用可能になります。
EC2のサービスで、Instancesを選択し、Public DNSをコピペし、ブラウザで表示します。
ThingsBoard上でのアカウント作成
MarketplaceのUsage Instruction を見ると
- Once the instance is running, enter http://instance-public-ip-or-dns into your browser. You will then see the ThingsBoard login page, you can use default sysadmin credentials: 'sysadmin@thingsboard.org' as username and the instance-id as the password. You can also access your instance via SSH using the username 'ubuntu' and your Amazon private key.
とのことなので、このID/パスワードでログイン。
このアカウントは、AWSで言うところのルートアカウントのようなものなので、実際の操作はテナントを作成し、そこにアカウントを1つ払い出して、そのアカウントで行う。
-
左側にあるメニューから、TENANTSを選択し、その後右下の Add new tenant ボタンを押す。
-
- 適当な名前でTenantを作成したら、作成されたTenantを押し、さらにManage tenant adminを押す。
-
右下にある、Add new user ボタンを押して、適当なメアドを入れる。
-
User activation linkをクリックし、パスワードを設定すると完成。
-
左側のメニュー項目に、いろいろ追加されたはず。
AWS IoT との連携
このYouTubeの説明が詳しいです。(この動画をスロー再生しながら設定を行いました。)
https://youtu.be/udkuOUrNzWk
これに従い、証明書の設定、AWS IoTのポリシーの作成およびアタッチ、ThingsBoard側でのデータの変換などを行います。この動画の後半で、テスト用のMQTTのPublishに、mosquitto_pubを使っていますが、インストールしていない人は、AWS IoT CoreのTest機能で事足ります。(後述)
動画の補足
途中、Converterを作成するところで、動画にあるCustomという選択肢がありません。ここは Uplink で進めます。

Converter の実装は以下のようになりました。
// decode payload to JSON
var data = decodeToJson(payload);

// Result object with device attributes/telemetry data
var result = {};

var topic = metadata['topic'].split('/');

result.deviceName = topic[1];

if (topic[2] == 'temperature') {
    result.telemetry = {
        temperature: data.value
    };
    result.deviceType = 'thermostat';
} else if (topic[2] == 'humidity') {
    result.telemetry = {
        humidity: data.value
    };
    result.deviceType = 'humidity sensor'

}
result.attributes = {
    integrationName: metadata['integrationName']
}

/** Helper functions **/

function decodeToString(payload) {
    return String.fromCharCode.apply(String, payload);
}

function decodeToJson(payload) {
    // covert payload to string.
    var str = decodeToString(payload);

    // parse string to JSON
    var data = JSON.parse(str);
    return data;
}

return result;
AWS IoT CoreからPublish
IoT CoreのメニューからTestを選択肢、Publishの項目で、TopicとMessageを記入し、Publish to topicを押します。

グラフでリアルタイム描画
作成したら、 Device Group → All → Deviceを選択 → Current bundleでCharts(Flot)を選択 → Add to dashboard
先程作成したダッシュボードに追加します。
ダッシュボードを表示します。All→ダッシュボード選択→Open Dashboard
この時点ではまだデータは表示されてません。データをAWS IoTから流してみます。Valueを変えてPublishすると、グラフが変化することが確認できます。
まとめ
ちょっとリアルタイムでIoTデータを表示させるのに、ThingsBoardも使えそうです。グラフのテンプレートが結構揃っているのでそれっぽい描画ができます。


