概要
オンプレ環境のJenkinsでクライアントアプリのビルドを行っていたが、
Bowerやnode.jsなどのバージョンアップに追従することが必要だった。
ただ、その度にライブラリに関係するアプリのビルド時に問題が発生することがあり
面倒くさいと思っていた。
そこで、Dockerコンテナ内でビルドしてやれば、Jenkinsサーバを汚さずに
クリーンな環境でのビルドもできて、良いこと尽くめじゃんということになり
構築してみたというお話。
どうせDevOpsっぽいことやるなら、これまでGUIでポチポチ設定してきたJenkinsの設定も
Jenkinsfileにして、構成管理するようにしてみた。
前提
| OS | Amazon Linux 2(ami-a9d09ed1) |
| Jenkins | jenkins.noarch-2.121.2-1.1 |
| Docker | docker-ce-18.06.0 |
Jenkinsのインストールは完了しているものとする。
Amazon Linux2にDockerをインストール
普通にインストールを行おうとすると以下のエラーが出て yum installは失敗する。
Error: Package: docker-ce-18.06.0.ce-3.el7.x86_64 (docker-ce-stable)
           Requires: container-selinux >= 2.9
失敗する手順と、解消方法を合わせて以下に記載する。
[ec2-user@ip-xxx-xx-xx-xxx ~]$ sudo yum install -y yum-utils device-mapper-persi stent-data lvm2
[ec2-user@ip-xxx-xx-xx-xxx ~]$ sudo yum-config-manager --add-repo https://downlo ad.docker.com/linux/centos/docker-ce.repo
[ec2-user@ip-xxx-xx-xx-xxx ~]$ sudo yum list docker-ce --showduplicates | sort - r
Loaded plugins: extras_suggestions, langpacks, priorities, update-motd
docker-ce.x86_64            18.06.0.ce-3.el7                    docker-ce-stable
docker-ce.x86_64            18.03.1.ce-1.el7.centos             docker-ce-stable
docker-ce.x86_64            18.03.0.ce-1.el7.centos             docker-ce-stable
docker-ce.x86_64            17.12.1.ce-1.el7.centos             docker-ce-stable
docker-ce.x86_64            17.12.0.ce-1.el7.centos             docker-ce-stable
docker-ce.x86_64            17.09.1.ce-1.el7.centos             docker-ce-stable
docker-ce.x86_64            17.09.0.ce-1.el7.centos             docker-ce-stable
docker-ce.x86_64            17.06.2.ce-1.el7.centos             docker-ce-stable
docker-ce.x86_64            17.06.1.ce-1.el7.centos             docker-ce-stable
docker-ce.x86_64            17.06.0.ce-1.el7.centos             docker-ce-stable
docker-ce.x86_64            17.03.2.ce-1.el7.centos             docker-ce-stable
docker-ce.x86_64            17.03.1.ce-1.el7.centos             docker-ce-stable
docker-ce.x86_64            17.03.0.ce-1.el7.centos             docker-ce-stable
Available Packages
[ec2-user@ip-xxx-xx-xx-xxx ~]$ sudo yum install docker-ce
・・・・(中略)
Error: Package: docker-ce-18.06.0.ce-3.el7.x86_64 (docker-ce-stable)
           Requires: container-selinux >= 2.9
 You could try using --skip-broken to work around the problem
 You could try running: rpm -Va --nofiles --nodigest
★ここでエラーが発生する。★
[ec2-user@ip-xxx-xx-xx-xxx ~]$ sudo yum makecache fast
[ec2-user@ip-xxx-xx-xx-xxx ~]$ sudo yum install -y http://mirror.centos.org/cent os/7/extras/x86_64/Packages/container-selinux-2.42-1.gitad8f0f7.el7.noarch.rpm
[ec2-user@ip-xxx-xx-xx-xxx ~]$ sudo yum -y install docker-ce
[ec2-user@ip-xxx-xx-xx-xxx ~]$
Dockerをec2userの所属するグループに追加
[ec2-user@ip-xxx-xx-xx-xxx ~]$ sudo service docker start
Redirecting to /bin/systemctl start docker.service
[ec2-user@ip-xxx-xx-xx-xxx ~]$ sudo usermod -a -G docker ec2-user
[ec2-user@ip-xxx-xx-xx-xxx ~]$ sudo systemctl enable docker
Created symlink from /etc/systemd/system/multi-user.target.wants/docker.service to /usr/lib/systemd/system/docker.service.
[ec2-user@ip-xxx-xx-xx-xxx ~]$ exit
logout

★一旦ログアウト★

[ec2-user@ip-xxx-xx-xx-xxx ~]$ docker ps
CONTAINER ID        IMAGE               COMMAND             CREATED             STATUS              PORTS               NAMES
[ec2-user@ip-xxx-xx-xx-xxx ~]$ docker -v
Docker version 18.06.0-ce, build 0ffa825
[ec2-user@ip-xxx-xx-xx-xxx ~]$ docker run hello-world
Unable to find image 'hello-world:latest' locally
latest: Pulling from library/hello-world

9db2ca6ccae0: Pulling fs layer 985B9db2ca6ccae0: Pull complete Digest: sha256:4b8ff392a12ed9ea17784bd3c9a8b1fa3299cac44aca35a85c90c5e3c7afacdc
Status: Downloaded newer image for hello-world:latest

Hello from Docker!
This message shows that your installation appears to be working correctly.

To generate this message, Docker took the following steps:
 1. The Docker client contacted the Docker daemon.
 2. The Docker daemon pulled the "hello-world" image from the Docker Hub.
    (amd64)
 3. The Docker daemon created a new container from that image which runs the
    executable that produces the output you are currently reading.
 4. The Docker daemon streamed that output to the Docker client, which sent it
    to your terminal.

To try something more ambitious, you can run an Ubuntu container with:
 $ docker run -it ubuntu bash

Share images, automate workflows, and more with a free Docker ID:
 https://hub.docker.com/

For more examples and ideas, visit:
 https://docs.docker.com/engine/userguide/

[ec2-user@ip-xxx-xx-xx-xxx ~]$
JenkinsユーザをDockerグループに追加
[ec2-user@ip-xxx-xx-xx-xxx ~]$ sudo gpasswd -a jenkins docker
Adding user jenkins to group docker
[ec2-user@ip-xxx-xx-xx-xxx ~]$ sudo systemctl restart jenkins
JenkinsジョブからDocker実行
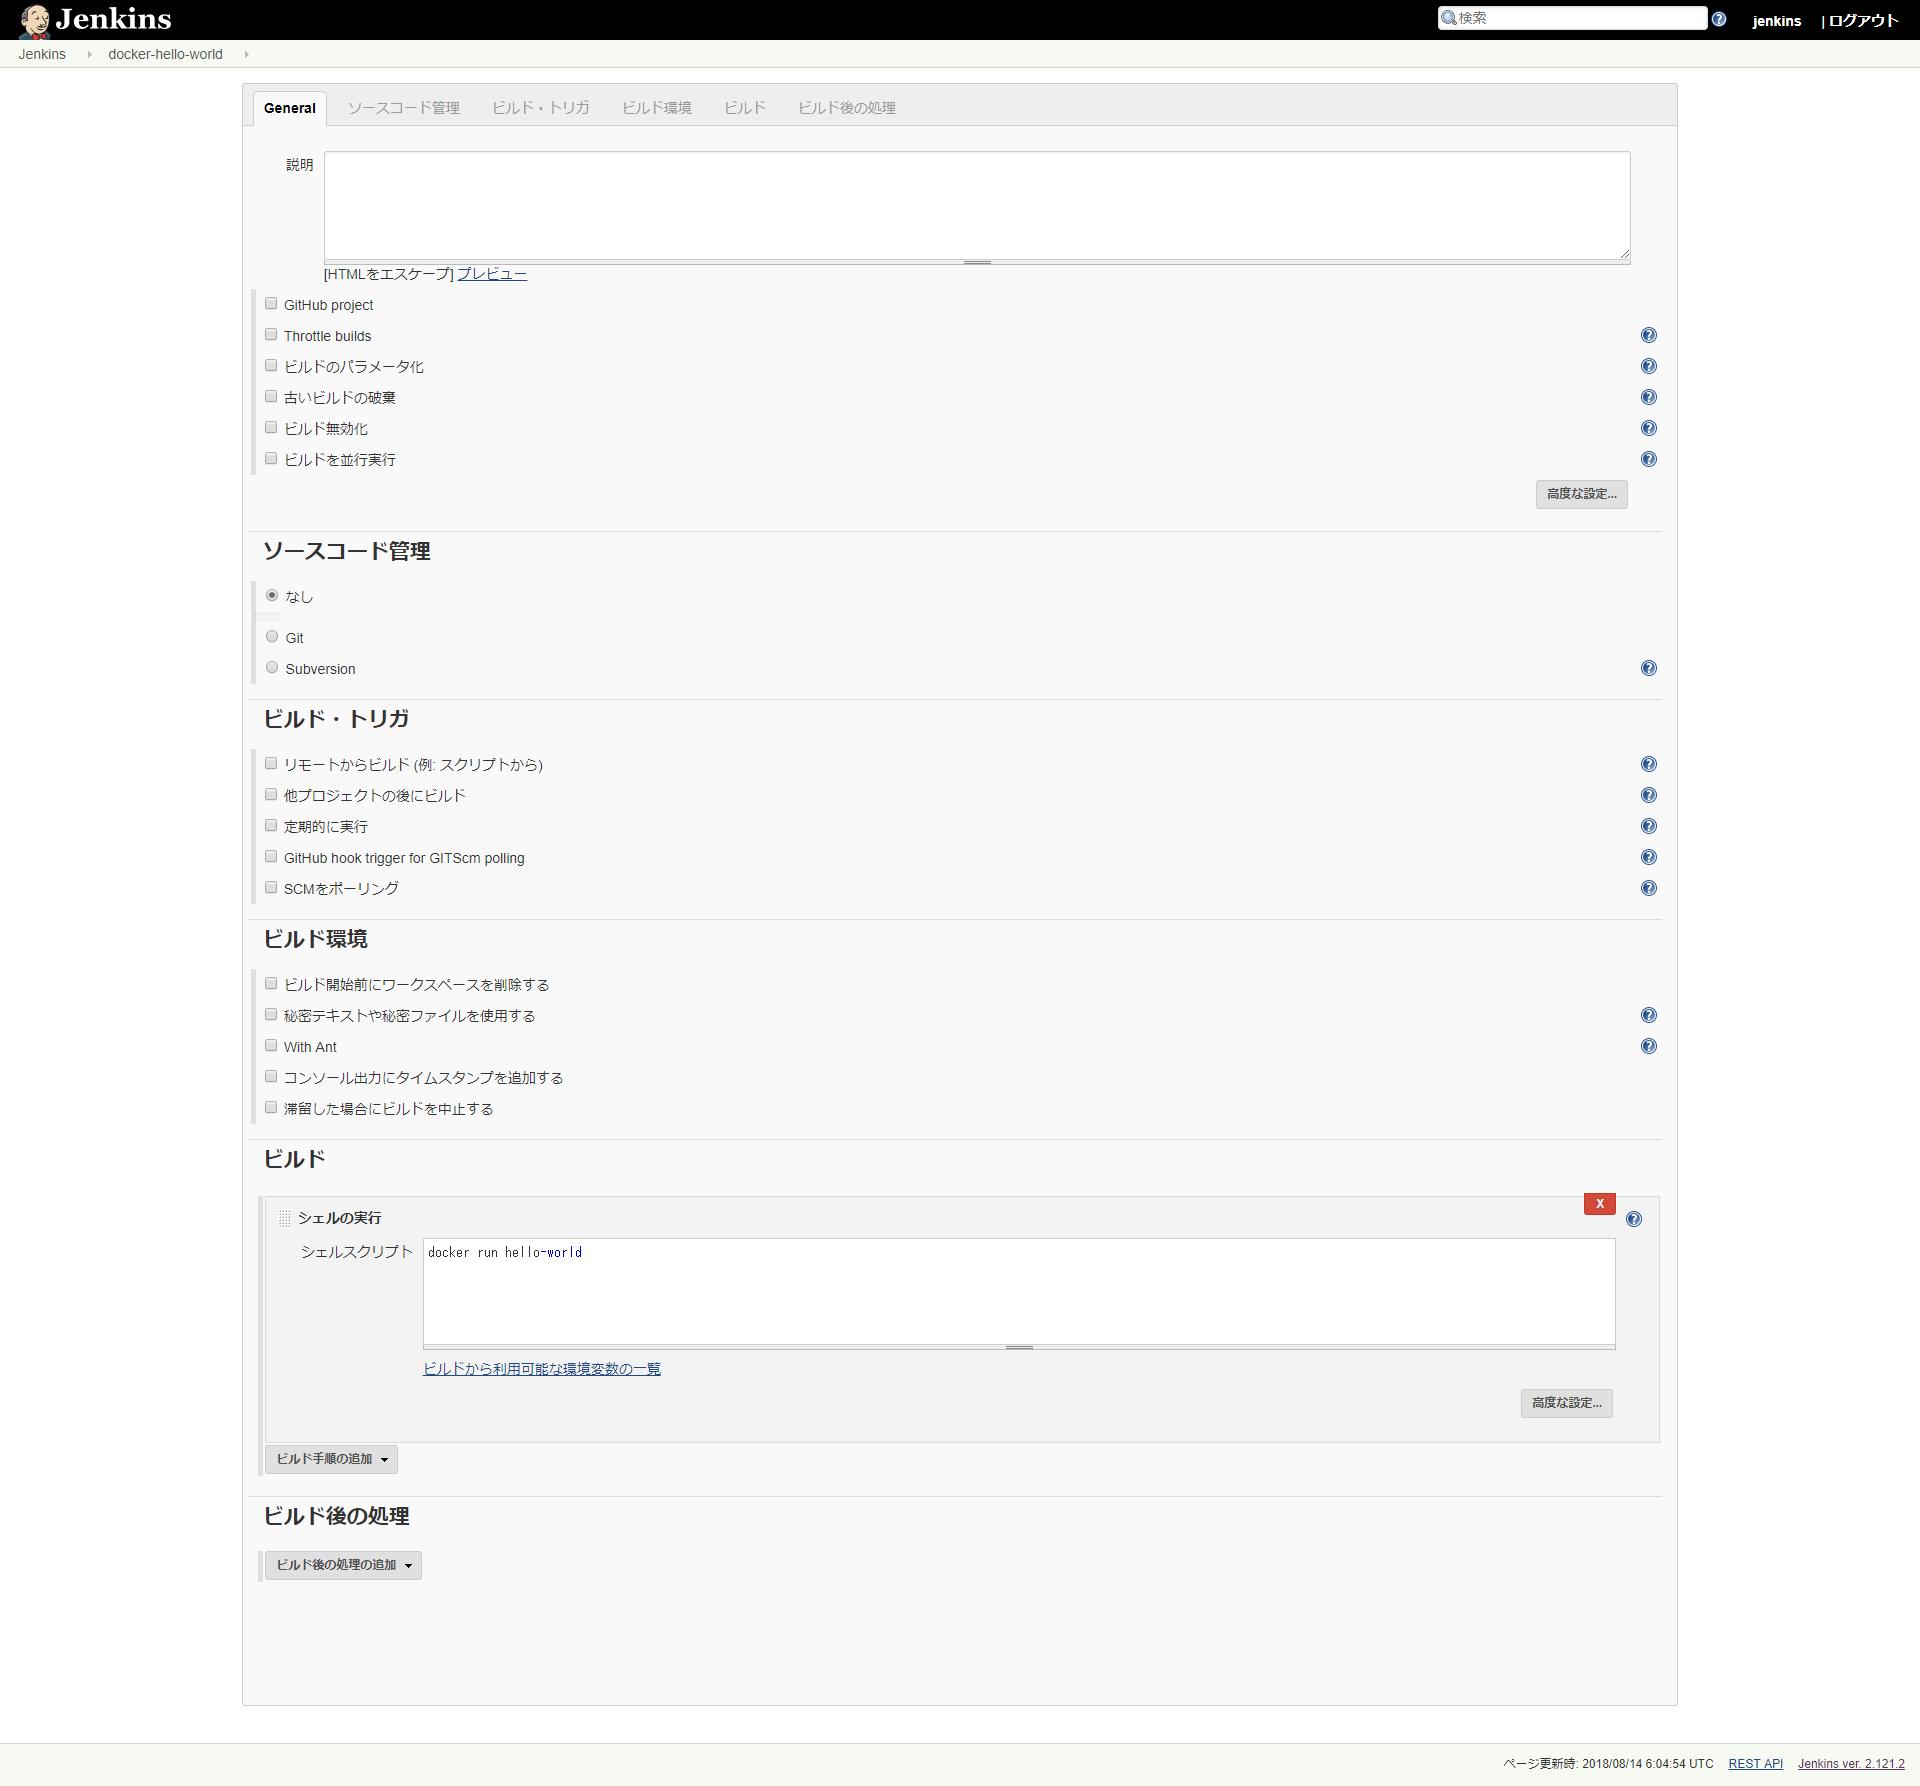
Jenkinsジョブの設定からHelloWorldが動作するかどうか確認する。
設定を保存して、Jenkinsジョブを実行すると成功する。
Started by user jenkins
Building in workspace /var/lib/jenkins/workspace/docker-hello-world
[docker-hello-world] $ /bin/sh -xe /tmp/jenkins4477945998331500442.sh
+ docker run hello-world
Unable to find image 'hello-world:latest' locally
latest: Pulling from library/hello-world
9db2ca6ccae0: Pulling fs layer
9db2ca6ccae0: Verifying Checksum
9db2ca6ccae0: Download complete
9db2ca6ccae0: Pull complete
Digest: sha256:4b8ff392a12ed9ea17784bd3c9a8b1fa3299cac44aca35a85c90c5e3c7afacdc
Status: Downloaded newer image for hello-world:latest

Hello from Docker!
This message shows that your installation appears to be working correctly.

To generate this message, Docker took the following steps:
 1. The Docker client contacted the Docker daemon.
 2. The Docker daemon pulled the "hello-world" image from the Docker Hub.
    (amd64)
 3. The Docker daemon created a new container from that image which runs the
    executable that produces the output you are currently reading.
 4. The Docker daemon streamed that output to the Docker client, which sent it
    to your terminal.

To try something more ambitious, you can run an Ubuntu container with:
 $ docker run -it ubuntu bash

Share images, automate workflows, and more with a free Docker ID:
 https://hub.docker.com/

For more examples and ideas, visit:
 https://docs.docker.com/engine/userguide/

Finished: SUCCESS
gitインストール
[ec2-user@ip-xxx-xx-xx-xxx ~]$ sudo yum -y install curl-devel expat-devel gettex t-devel openssl-devel zlib-devel perl-ExtUtils-MakeMaker autoconf gcc cc
[ec2-user@ip-xxx-xx-xx-xxx ~]$ cd /usr/local/src
[ec2-user@ip-xxx-xx-xx-xxx src]$ sudo wget https://www.kernel.org/pub/software/s cm/git/git-2.9.5.tar.gz
[ec2-user@ip-xxx-xx-xx-xxx src]$ sudo tar vfx git-2.9.5.tar.gz > /dev/null
[ec2-user@ip-xxx-xx-xx-xxx src]$ cd git-2.9.5
[ec2-user@ip-xxx-xx-xx-xxx git-2.9.5]$ sudo make configure
[ec2-user@ip-xxx-xx-xx-xxx git-2.9.5]$ sudo ./configure --prefix=/usr/local
[ec2-user@ip-xxx-xx-xx-xxx git-2.9.5]$ sudo make all
[ec2-user@ip-xxx-xx-xx-xxx git-2.9.5]$ sudo make install
[ec2-user@ip-xxx-xx-xx-xxx git-2.9.5]$ git --versonion
git version 2.9.5
[ec2-user@ip-xxx-xx-xx-xxx git-2.9.5]$
Angular6ビルドの準備
これでJenkinsからDockerを動かせるようになったから、ようやく本題のAngular6ビルドに入れると思いきや。。。
JenkinsユーザのユーザIDとグループIDをまず調べる。
これは、Dockerコンテナ内でjenkinsを作成し、ホスト側のJenkinsユーザIDおよびグループIDと同じでないと動作しないというおまじないみたいなことを設定することが必要となるため。
[ec2-user@ip-xxx-xx-xx-xxx ~]$ id jenkins
uid=997(jenkins) gid=995(jenkins) groups=995(jenkins),993(docker)
[ec2-user@ip-xxx-xx-xx-xxx ~]$
サンプルをフォーク
今回、ビルドサンプルとして利用させてもらうのはこちら。
https://github.com/gothinkster/angular-realworld-example-app
そして、それをフォークした内容がこちらです。
https://github.com/tatsuakimitani/angular-realworld-example-app
Dockerfile
これはもっとスマートな方法をご存知の方は教えていただきたいです。。。
FROM centos:7

# Install Python and Node.js
RUN yum install -y https://centos7.iuscommunity.org/ius-release.rpm epel-release
RUN yum install -y wget unzip
RUN curl --silent --location https://rpm.nodesource.com/setup_8.x | bash -
RUN yum -y install nodejs sudo
RUN sed -i -e 's/^#\s%wheel\s*ALL=(ALL)\s*ALL$/%wheel\tALL=(ALL)\tALL/g' /etc/sudoers
RUN sed -i -e 's/^#\s%wheel\s*ALL=(ALL)\s*NOPASSWD: ALL$/jenkins\tALL=(ALL)\tNOPASSWD: ALL/g' /etc/sudoers
RUN groupadd -g 995 jenkins # ★gidを一致させる★
RUN useradd -u 997 -g 995 jenkins # ★uid & gidを一致させる★
RUN usermod -aG wheel jenkins # ★jenkinsユーザにwheelグループ所属させ、パスワードなしでグローバル設定を可能にする。★

USER jenkins # jenkinsユーザに切り替え

ENV EXEC_ENV=TEXT
Jenkinsfile
pipeline {

    environment {
        docker_image_name = "angular6-build"
    }

    agent {
        dockerfile {
            filename 'Dockerfile.build'
            dir '.'
            label env.docker_image_name
        }
    }

    stages {

        stage('Pre-Build') {
            steps {
                script{
                    dir('.'){
                        sh 'npm --version'
                        sh 'sudo npm i -g  @angular/cli' // グローバルインストールが必要
                        sh 'npm install'
                    }
                }
            }
        }

        stage('Build') {
            steps {
                script {
                    dir('.') {
                        sh 'ng build'
                    }
                }
                script {
                    dir('dist') { // ビルド成果物をtar.gzにまとめる
                        sh 'tar -cvzf voting-client.tar.gz *'
                    }
                }
                archiveArtifacts 'dist/voting-client.tar.gz'
            }
        }

    }
}
Jenkinsジョブの設定
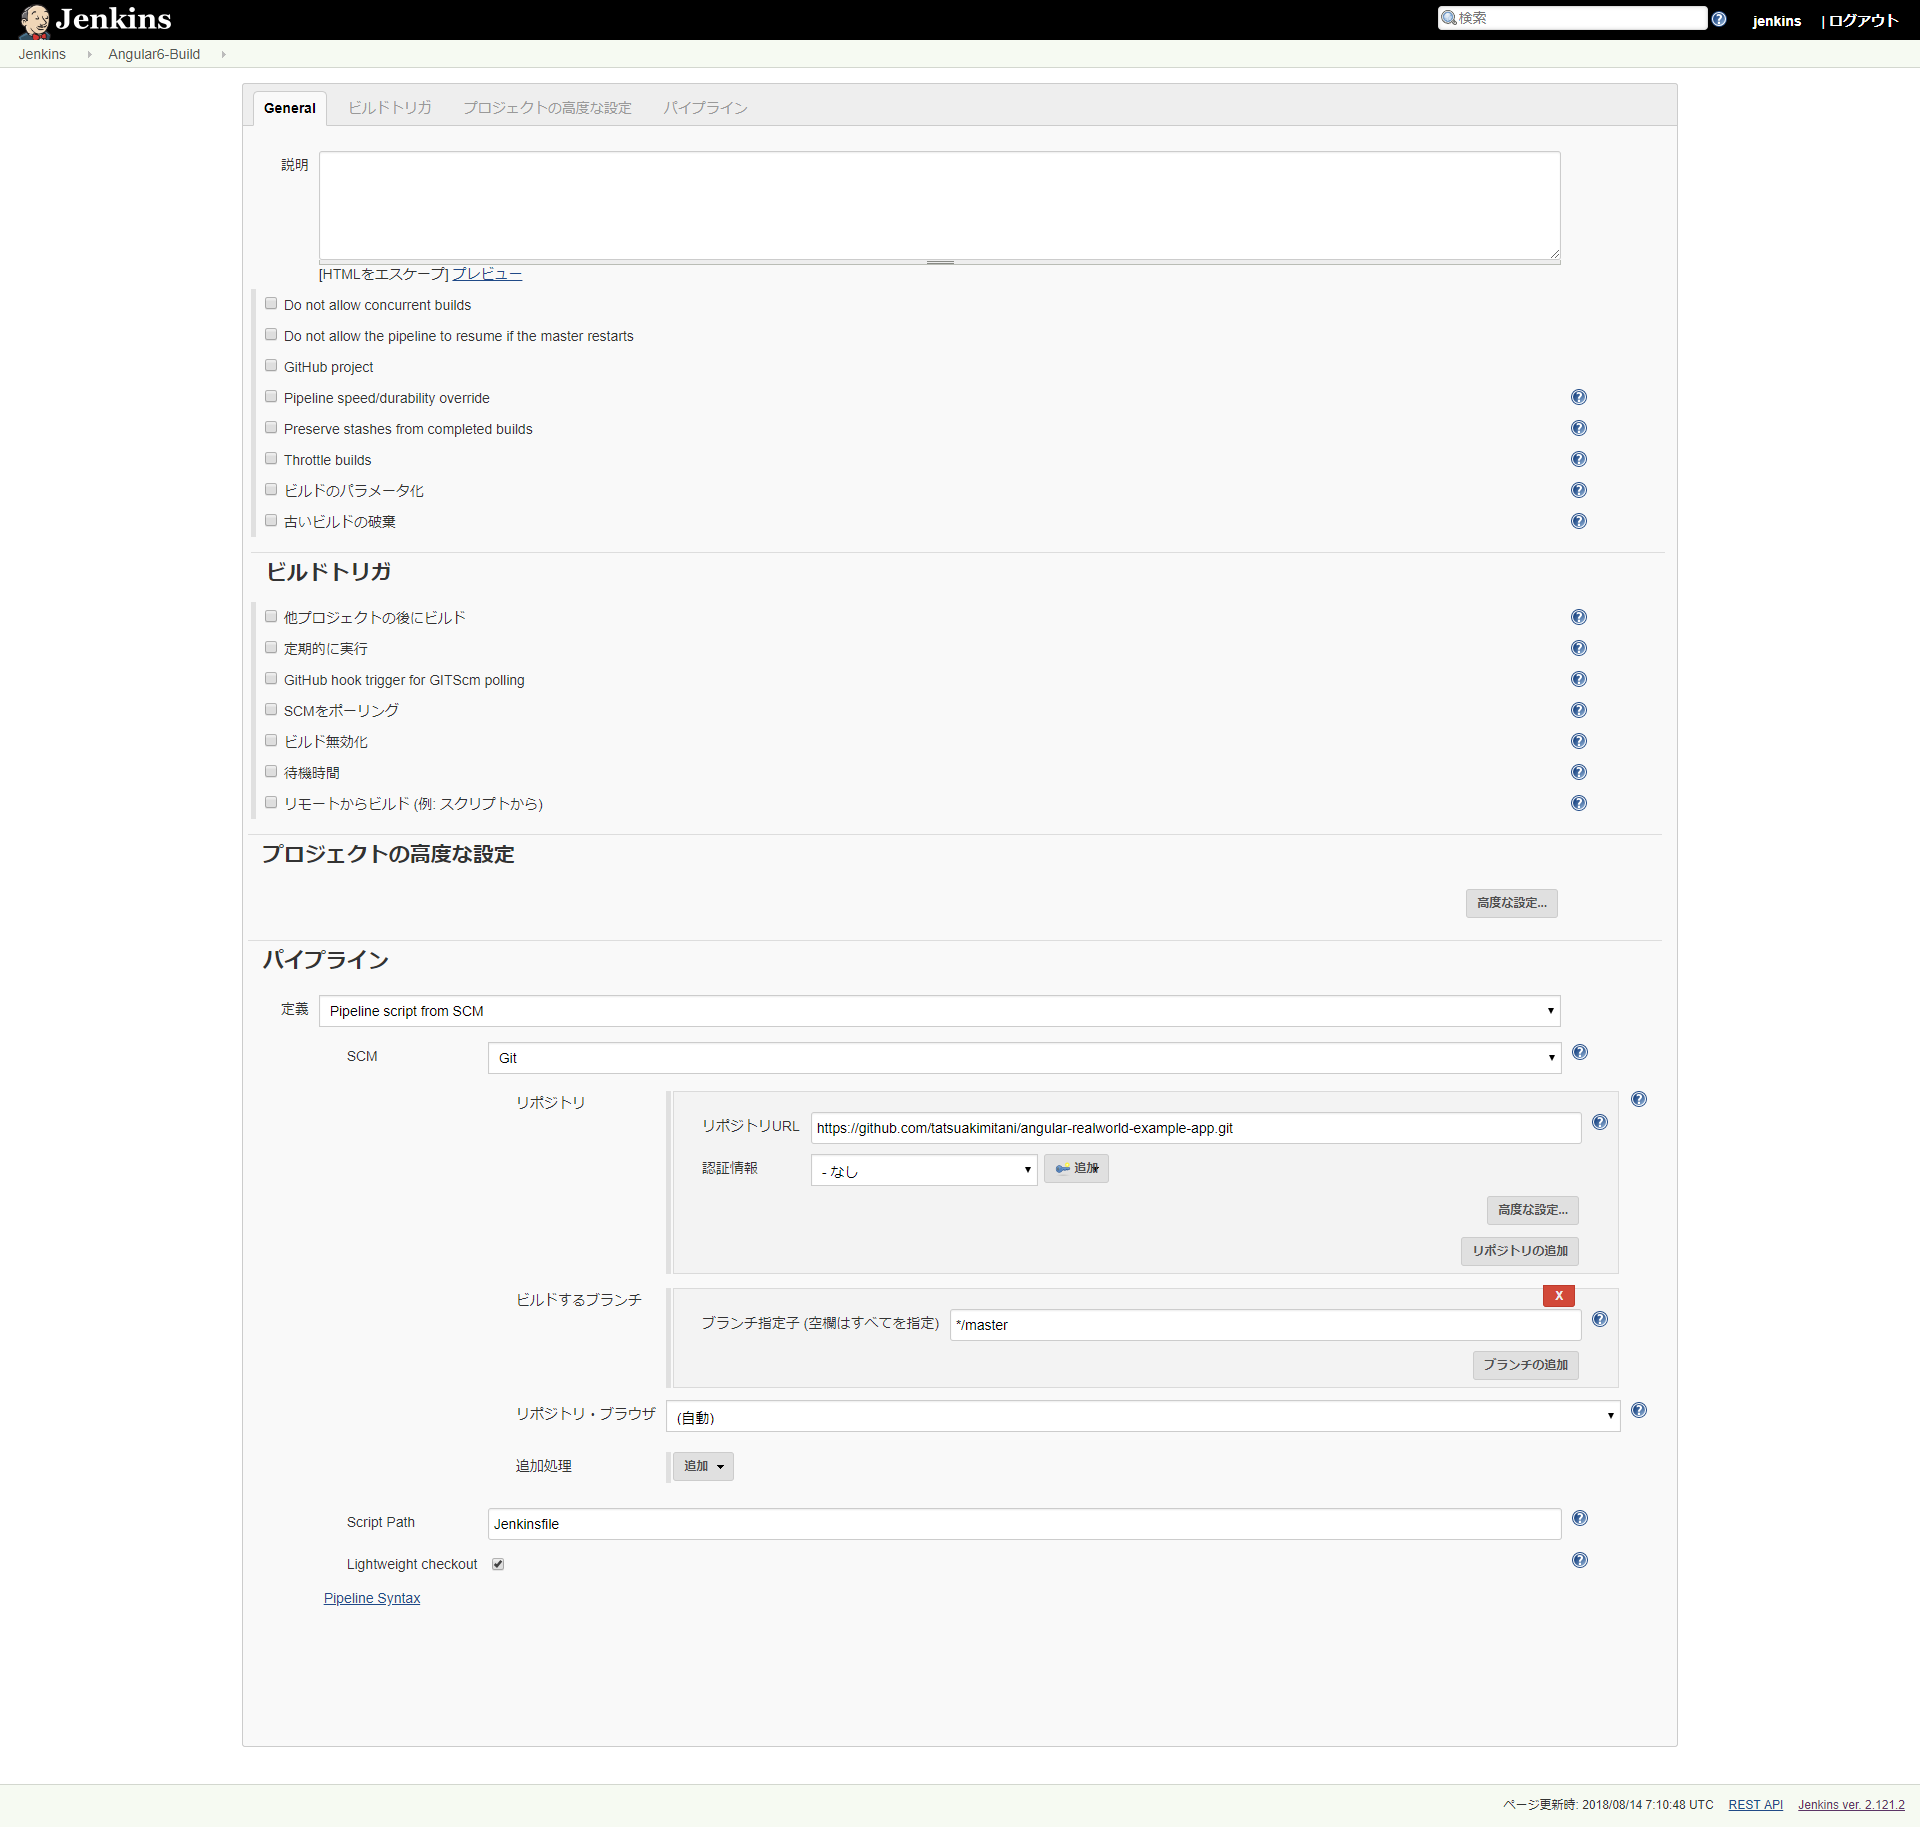
パイプライン設定で、[Pipeline script from SCM]⇒[Git]⇒[]を入力して、「完了」ボタンをクリック
Jenkinsジョブ実行
ジョブ実行を行い成功すると以下のようにパイプライン結果が出力される。
![FireShot Capture 059 - Angular6-Build [Jenkins] - http___52.12.207.44_8080_job_Angular6-Build_.png](https://qiita-user-contents.imgix.net/https%3A%2F%2Fqiita-image-store.s3.amazonaws.com%2F0%2F61103%2F9701b9c2-fce2-8339-85f4-197680aa11f4.png?ixlib=rb-4.0.0&auto=format&gif-q=60&q=75&s=03357dc8dafb15a9aa4b60d6e2df7d21)
今後やること
クライアントのテストや静的解析をかけていないので、その結果出力をしたい。
あとは、AWSへの自動デプロイをする設定について書きたい。
おしまい。
![FireShot Capture 051 - 新規ジョブ作成 [Jenkins] - http___52.12.207.44_8080_newJob.png](https://qiita-user-contents.imgix.net/https%3A%2F%2Fqiita-image-store.s3.amazonaws.com%2F0%2F61103%2F9fbf8d85-b956-c764-7431-a5daccaca45f.png?ixlib=rb-4.0.0&auto=format&gif-q=60&q=75&s=eb8bda4bf5f9a482ce0b74241eae6674)

![FireShot Capture 053 - 新規ジョブ作成 [Jenkins] - http___52.12.207.44_8080_view_all_newJob.png](https://qiita-user-contents.imgix.net/https%3A%2F%2Fqiita-image-store.s3.amazonaws.com%2F0%2F61103%2F9946d5b1-a36b-6c2c-ae52-6b32186990f7.png?ixlib=rb-4.0.0&auto=format&gif-q=60&q=75&s=939aab9827e1fd2f7b375039c379abac)
