Microsoft Build(2021年5月26日(水)–28日(金)[日本時間])も近いので、Project Reunion 0.5.7を使ってWinUI3.0を試してみました。
WinUIとは
TODO: 力尽きてなかったらふわっと書く
Project Reunionとは
TODO: 力尽きてなかったらふわっと書く
開発環境を設定する
基本的には、こちらのサイトに書かれている通りです。
Project Reunionのインストールについては2021年3月(Project Reunion 0.5.0)時点での説明なのでいろいろ書かれてますが、現時点(Project Reunion 0.5.7)でのインストールは、
Visual Studio 2019 で、 [拡張機能] > [拡張機能の管理] をクリックし、 [Project Reunion] を探して、Project Reunion 拡張機能をインストールします。
の一択で構わないようです。(最新版を入れればよい)
Project Reunion を使用して新しいプロジェクトを作成する
プロジェクトテンプレートからBlank App, Packaged (WinUI 3 in Desktop)を選びます。

プロジェクト名を入力したら、バージョンを選択します。

ビルドすると、WinRTのランタイムバージョンが古いといわれます。(Preview版のVisualStudio2019は大丈夫です。)

制限事項と既知の問題にあるとおり、現時点(.NET5.0.203)ではプロジェクトファイル(.csproj)に以下を追記して.NET SDKのバージョンを明示的に設定する必要があります。
<!--- Target Windows SDK Build Number}の部分にターゲット番号を入れる。 --->
<ItemGroup>
    <FrameworkReference Update="Microsoft.Windows.SDK.NET.Ref" RuntimeFrameworkVersion="10.0.{Target Windows SDK Build Number}.16" />
    <FrameworkReference Update="Microsoft.Windows.SDK.NET.Ref" TargetingPackVersion="10.0.{Target Windows SDK Build Number}.16" />
</ItemGroup>
ビルドが通ったら無事に実行することができました。開発者モードがオフだとアプリの実行時に設定アプリが開いてオンにするように促されます。

MVVMで実装する
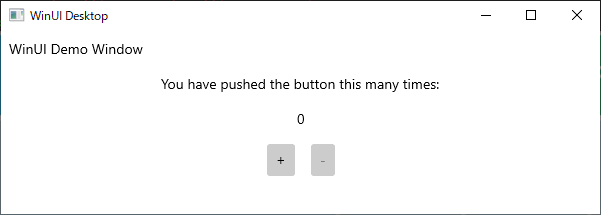
せっかくなので、以下のようにFlutterのサンプルアプリっぽく改造しながらMVVMの実装を確認してみます。
ViewModelベースクラスはSystem.ComponentModel.INotifyPropertyChangedを実装します。
using System.ComponentModel;
using System.Runtime.CompilerServices;

namespace WinUISampleApp.ViewModels
{
    public class ViewModel : INotifyPropertyChanged
    {
ActionCommandクラスはSystem.Windows.Input.ICommandを実装します。
using System;
using System.Windows.Input;

# nullable enable
namespace WinUISampleApp.ViewModels
{
    public class ActionCommand : ICommand
    {
一応、カウンタ用のModelクラスも用意しました。(int型プロパティのrefを回避するために、ちょっとヘンテコになってしまいました。)
namespace WinUISampleApp.Models
{
    public class Counter
    {
        public Counter(int count)
        {
            Count = count;
        }

        public int Count { get; set; }
    }
}
MainWindow用のViewModelクラスを作成し、コードビハインドでプロパティとしてインスタンスを用意しておきます。
using WinUISampleApp.Models;

namespace WinUISampleApp.ViewModels
{
    public class MainWindowViewModel : ViewModel
    {
        private Counter _counter = new(0);

        public MainWindowViewModel()
        {
            IncrementCommand = new ActionCommand(Increment);
            DecrementCommand = new ActionCommand(Decrement, CanDecrement);
        }

        public ActionCommand IncrementCommand { get; set; }

        public ActionCommand DecrementCommand { get; set; }

        public int Count
        {
            get => _counter.Count;
            set
            {
                if (_counter.Count == value) return;
                var oldValue = _counter.Count;
                SetProperty(ref _counter, new Counter(value));
                if (oldValue == 0 || value == 0) DecrementCommand.RaiseCanExecuteChanged();
            }
        }

        public void Increment(object _) => ++Count;

        public void Decrement(object _) => --Count;

        public bool CanDecrement(object _) => Count > 0;
    }
}
public MainWindowViewModel ViewModel { get; } = new();
あとは、XAMLでx:Bindを使ってバインドします。
                <Button Command="{x:Bind ViewModel.IncrementCommand}"
                        Content="+" Margin="8" HorizontalAlignment="Center" />
                <Button Command="{x:Bind ViewModel.DecrementCommand}"
                        Content="-" Margin="8" HorizontalAlignment="Center" />
x:BindのBindingModeはデフォルトでOneTimeになっています。
<TextBlock Text="{x:Bind ViewModel.Count, Mode=OneWay}" Margin="8" HorizontalAlignment="Center" />
過去にちょっとだけWPFをかじった程度ですが、とくに問題なくMVVMで教科書的に実装することができました。
ソースをここに置いておきます。
https://github.com/tatsu/WinUISampleApp
参照
https://zenn.dev/okazuki/articles/project-reunion-was-released