コンター図をパラパラ漫画みたいにしたGIF動画を作ったので備忘録。
環境はPython 3.6.8
matplotlib.animation
matplotlib.animationで動くグラフは作れるみたい。
GIFファイルとして保存するにはwriterにimagemagickを使うのが普通の様子。
imagemagick
windowsにインストールする場合、ちょっと面倒な様子。
インストールしようとして参考にさせていただいたページ。
https://higuma.github.io/2016/08/31/imagemagick-1/
PythonのライブラリPillow
Pillowについて参考にさせていただいたサイト。
インストールとか
https://note.nkmk.me/python-pillow-basic/
GIFの作り方
https://note.nkmk.me/python-pillow-gif/
作ってみる
import_lib.py
import pandas as pd
import numpy as np
import matplotlib.pyplot as plt
import os
from PIL import Image, ImageDraw
こんな感じのデータを用意する。
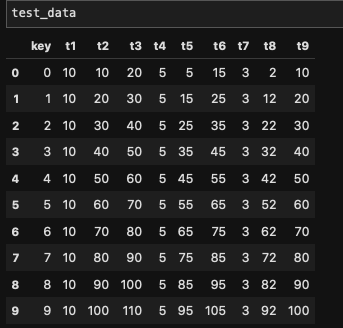
座標はこんな感じを想定

test_data.py
test_data = pd.DataFrame({'key':range(10),
                          't1': [10] * 10,
                          't2': [i * 10 + 10 for i in range(10)],
                          't3': [i * 10 + 20 for i in range(10)],
                          't4': [5] * 10,
                          't5': [i * 10 + 5 for i in range(10)],
                          't6': [i * 10 + 15 for i in range(10)],
                          't7': [3] * 10,
                          't8': [i * 10 + 2 for i in range(10)],
                          't9': [i * 10 + 10 for i in range(10)]})

t = ['t' + str(int(i)) for i in range(1, 10)]
x = [i * 10 for i in range(1, 4)] * 3
y = [10] * 3 + [20] * 3 + [30] * 3
コンター図を作る用のデータ抽出関数を作っておく
create_function.py
def f_contour_data(df, timing):
    # コンター図を描きたいタイミングの行のデータを抽出
    df0 = df[df['key'] == timing].copy()
    # 抽出したデータを使いやすいようにindexを0にしておく
    df0.reset_index(drop = True, inplace = True)

    x = [10, 20, 30] # コンター図のx軸
    y = [10, 20, 30] # コンター図のy軸

    # 番号のリストを作る
    # [[t1, t2, t3], [t4, t5, t6], [t7, t8, t9]]
    # これをつくる
    l_T = []
    for i in range(len(y)):
        T = ['t' + str(int(j + i * 3)) for j in range(1, 4)]
        l_T.append(T)

    # x軸の2darrayをつくる
    x0 = np.empty((0, len(y))) # 空のndarrayをつくる
    for i in range(len(y)):
        x0 = np.append(x0, np.array([x]), axis = 0) # xをndarrayに換えてx0に追加
    # y軸の2darrayをつくる
    y0 = np.empty((0, len(y)))
    for i in range(len(y)):
        y0 = np.append(y0, np.array([[y[i]] * 3]), axis = 0)

    # z軸の2darrayをつくる
    z0 = np.empty((0, len(y)))
    for i in range(len(y)):
        temp = []
        T = l_T[i]
        for s in T:
            temp.append(df0[s][0])
        z0 = np.append(z0, np.array([temp]), axis = 0)
    return x0, y0, z0, l_T # l_Tは確認用 削除してもOK
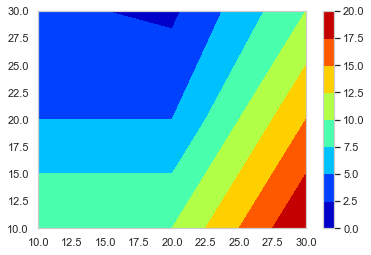
これを使ってコンター図をテキトーに描くとこんな感じになる。
create_contour.py
x0, y0, z0, l_t = f_contour_data(df = test_data, timing = 0)

plt.figure()
p = plt.contourf(x0, y0, z0, cmap = 'jet')
cbar = plt.colorbar(p)
あとはこれをループでどんどん作って保存していく。
loop.py
l_img = [] # コンター図の.pngのpathをいれるようのリスト
os.makedirs('Contour_gif/', exist_ok = True) # グラフ保存用のフォルダ―を作る
lv = [i * 10 for i in range(14)]
for i in range(10):
x0, y0, z0, l_tc = f_contour_data(df = test_data, timing = i)
plt.figure()
p = plt.contourf(x0, y0, z0, lv, 
cmap = 'jet')
cbar = plt.colorbar(p)
plt.title('key = ' + str(int(i)))
save_path = 'Contour_gif/key_' + str(int(i)) + '.png'
plt.savefig(save_path, bbox_inches="tight") # 作ったグラフを保存
l_img.append(save_path) # コンター図の順番を確実に維持したいのでココでリストに追加しておく
images = [] # 開いたpngを入れておくよう。
# 別にl_imgの範囲は指定しなくてもOK 画像の容量によっては怒られるけど。。。
for s in l_img[0:151]:
im = Image.open(s)
images.append(im)
# images[0]を起点に残りをつなげる durationで切り替わりの時間(msec) loop = 0 で無限ループ
images[0].save('test.gif',
save_all = True, append_images = images[1: len(images)],
duration = 500, loop = 0, optimaize = False)
こんな感じのGIFファイルができる。
