はじめに
この記事は React Native Advent Calendar 2018 21日目の記事です。
Expo v31でBabel7がサポートされたことに伴って、TypeScriptもサポートされることになりました。
これによりExpo+TypeScriptが楽にできるようになったので、その入門記事です。
対象読者としては、今までExpoで軽く開発してたけどTypeScriptも使ってみたくなった初心者 (つまりちょっと前の私) みたいな人に向けて書いてます。
この記事を読めばなんとなくExpo+TSの概要は掴めるかな? という感じ。
Expo+TSの導入記事は既にたくさんあるので詳細はそちらを参考にしていただけると。
Expoの動きについては11日目のゆうさんの記事とか
TypeScript
とりあえず入れておきましょう
$ npm install -g typescript
概要
- Microsoftが開発したAltJS (みんな大好きVSCodeと相性がいいよ!)
- 静的型付けとクラスベースのオブジェクト指向
- JSの大規模開発に対応するために設計
- JSのスーパーセット(上位互換)で コンパイルすることでJSにトランスパイルできる
何が嬉しいのか
- コンパイルで事前に怒られるのでエラーが一目瞭然 (JSのエラー追うの辛い)
- コードの影響範囲の抽出が容易なため変更に強い
- 型が付くことでメソッド・変数の意図がわかりやすい
- 型と付くことと、自然と行儀の良いコードになることで可読性向上
- エディタの補完機能が強い (VSCode)
- 型推論によって初期値の型を採用してくれるため慣れてなくても書きやすい
基本の型
公式:Basic Types
// Boolean
let isDone: boolean = false;
// Number
let decimal: number = 6;
let hex: number = 0xf00d;
// String
let color: string = "blue";
color = 'red';
// Array
let list: number[] = [1, 2, 3];
let list: Array<number> = [1, 2, 3]; // generic
// Tuple
let x: [string, number];
x = ["hello", 10]; // OK
x = [10, "hello"]; // Error
// Enum
enum Color {Red, Green, Blue}
let c: Color = Color.Green;
// Any
let notSure: any = 4;
notSure = "maybe a string instead";
notSure = false;
// Void
function warnUser(): void {
    console.log("This is my warning message");
}
interface
公式:Interfaces
// 基本はこんな感じ
interface Person {
    firstName: string;
    lastName: string;
}

function greeter(person: Person) {
    return "Hello, " + person.firstName + " " + person.lastName;
}

let user = { firstName: "Jane", lastName: "User" };

// 任意のプロパティには?
interface SquareConfig {
    color?: string;
    width?: number;
}

// 読み込み専用
interface Point {
    readonly x: number;
    readonly y: number;
}

// Function (string型の引数を二つとってbooleanを返す関数)
interface SearchFunc {
    (source: string, subString: string): boolean;
}

// Class
interface ClockInterface {
    currentTime: Date;
}

class Clock implements ClockInterface {
    currentTime: Date;
    constructor(h: number, m: number) { }
}

// interfaceの拡張
interface Shape {
    color: string;
}

interface Square extends Shape {
    sideLength: number;
}

let square = <Square>{};
square.color = "blue";
square.sideLength = 10;
TypeScript with React Native
概要
- 最初はとりあえずBasic Typesとinterfaceがわかっていれば大丈夫そう
- propsやstateをinterfaceとして定義しておくイメージ
-
npm installで出てくる@types/hogeというのはhogeパッケージの型定義ファイル - Microsoft/TypeScript-React-Native-Starterをさらっと見ておけばなんとなく掴めそう
import React from "react"
import { Button, StyleSheet, Text, View } from "react-native"

export interface Props {
  name: string
  enthusiasmLevel?: number
}

interface State {
  enthusiasmLevel: number
}

export class Hello extends React.Component<Props, State> {
  constructor(props: Props) {
    super(props)

    if ((props.enthusiasmLevel || 0) <= 0) {
      throw new Error("You could be a little more enthusiastic. :D")
    }

    this.state = {
      enthusiasmLevel: props.enthusiasmLevel || 1
    }
  }

  onIncrement = () => this.setState({ enthusiasmLevel: this.state.enthusiasmLevel + 1 });
  onDecrement = () => this.setState({ enthusiasmLevel: this.state.enthusiasmLevel - 1 });
  getExclamationMarks = (numChars: number) => Array(numChars + 1).join("!")

  render() {
    return (
      <View style={styles.root}>
        <Text style={styles.greeting}>
          Hello {this.props.name + this.getExclamationMarks(this.state.enthusiasmLevel)}
        </Text>

        <View style={styles.buttons}>
          <View style={styles.button}>
            <Button
              title="-"
              onPress={this.onDecrement}
              accessibilityLabel="decrement"
              color="red"
            />
          </View>

          <View style={styles.button}>
            <Button
              title="+"
              onPress={this.onIncrement}
              accessibilityLabel="increment"
              color="blue"
            />
          </View>
        </View>
      </View>
    )
  }
}

// styles割愛
TSが絡む部分のざっくりとした説明としては、
-
Helloコンポーネントは、interfaceで定義されたstring型のnameとnumber型の任意のenthusiasmLevelというpropsとnumber型のenthusiasmLevelというstateを持つ -
getExclamationMarksという関数はnumber型のnumCharsという引数を持つ
実際に導入してみる
普通のExpoアプリを作る
$ expo init my-ts-app
$ cd my-ts-app
$ npm start

いつもの画面ですね
TypeScriptを導入
サポートされているのでnpmで入れるだけです。
$ npm install --save-dev typescript

// tsconfig.jsonの作成
$ tsc --init

// とりあえずtsxにしてみる
$ mv App.js App.tsx
$ expo start
ちゃんと動いてるっぽいので色々入れていきます。
型定義ファイルとか
$ npm install --save-dev @types/react @types/react-native @types/expo
こんなことを言われるのでtsconfig.jsonを編集。
元々設定が書いてあると思うので、そのコメントアウトを外します。
tsconfig.json
- //"jsx": "preserve",
+ "jsx": "preserve",
TypeScriptで書いてみる
せっかくなので、先程のMicrosoft/TypeScript-React-Native-Starterっぽいものを書いて動かしてみます。
App.tsx
import React from 'react';
import { StyleSheet, Text, View } from 'react-native';
import Hello from "./Hello"

type Props = {};

export default class App extends React.Component<Props> {
  render() {
    return (
      <View style={styles.container}>
        <Text>My Expo + TypeScript App!</Text>
        <Hello name="Expo" enthusiasmLevel={10} />
      </View>
    );
  }
}

const styles = StyleSheet.create({
  container: {
    flex: 1,
    backgroundColor: '#fff',
    alignItems: 'center',
    justifyContent: 'center',
  },
});
Hello.tsx
import React from "react";
import { Button, StyleSheet, Text, View } from "react-native";

interface Props {
  name: string;
  enthusiasmLevel?: number;
}

interface State {
  enthusiasmLevel: number;
}

class Hello extends React.Component<Props, State> {
  constructor(props: Props) {
    super(props);

    if ((props.enthusiasmLevel || 0) <= 0) {
      throw new Error("You could be a little more enthusiastic. :D");
    }

    this.state = {
      enthusiasmLevel: props.enthusiasmLevel || 1
    };
  }

  onIncrement = () =>
    this.setState({ enthusiasmLevel: this.state.enthusiasmLevel + 1 });
  onDecrement = () =>
    this.setState({ enthusiasmLevel: this.state.enthusiasmLevel - 1 });
  getExclamationMarks = (numChars: number) => Array(numChars + 1).join("!");

  render() {
    return (
      <View style={styles.root}>
        <Text style={styles.greeting}>
          Hello{" "}
          {this.props.name +
            this.getExclamationMarks(this.state.enthusiasmLevel)}
        </Text>

        <View style={styles.buttons}>
          <Button title="decrement" onPress={this.onDecrement} color="red" />
          <Button title="increment" onPress={this.onIncrement} color="blue" />
        </View>
      </View>
    );
  }
}

export default Hello;

const styles = StyleSheet.create({
  root: {
    alignItems: "center",
    alignSelf: "center"
  },
  buttons: {
    flexDirection: "row",
    alignItems: "center"
  },
  button: {
    fontSize: 20
  },
  greeting: {
    color: "gray",
    fontWeight: "bold",
    fontSize: 30
  }
});
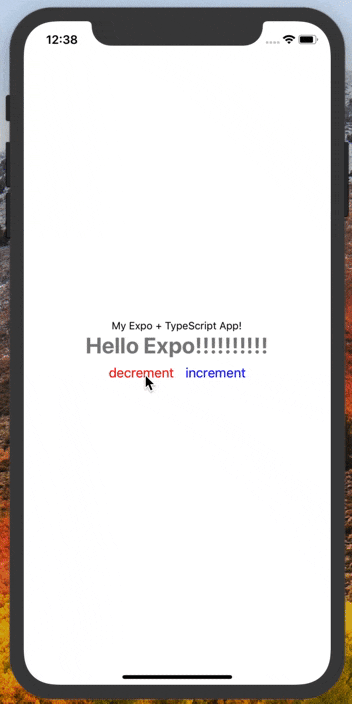
無事動きました!!!
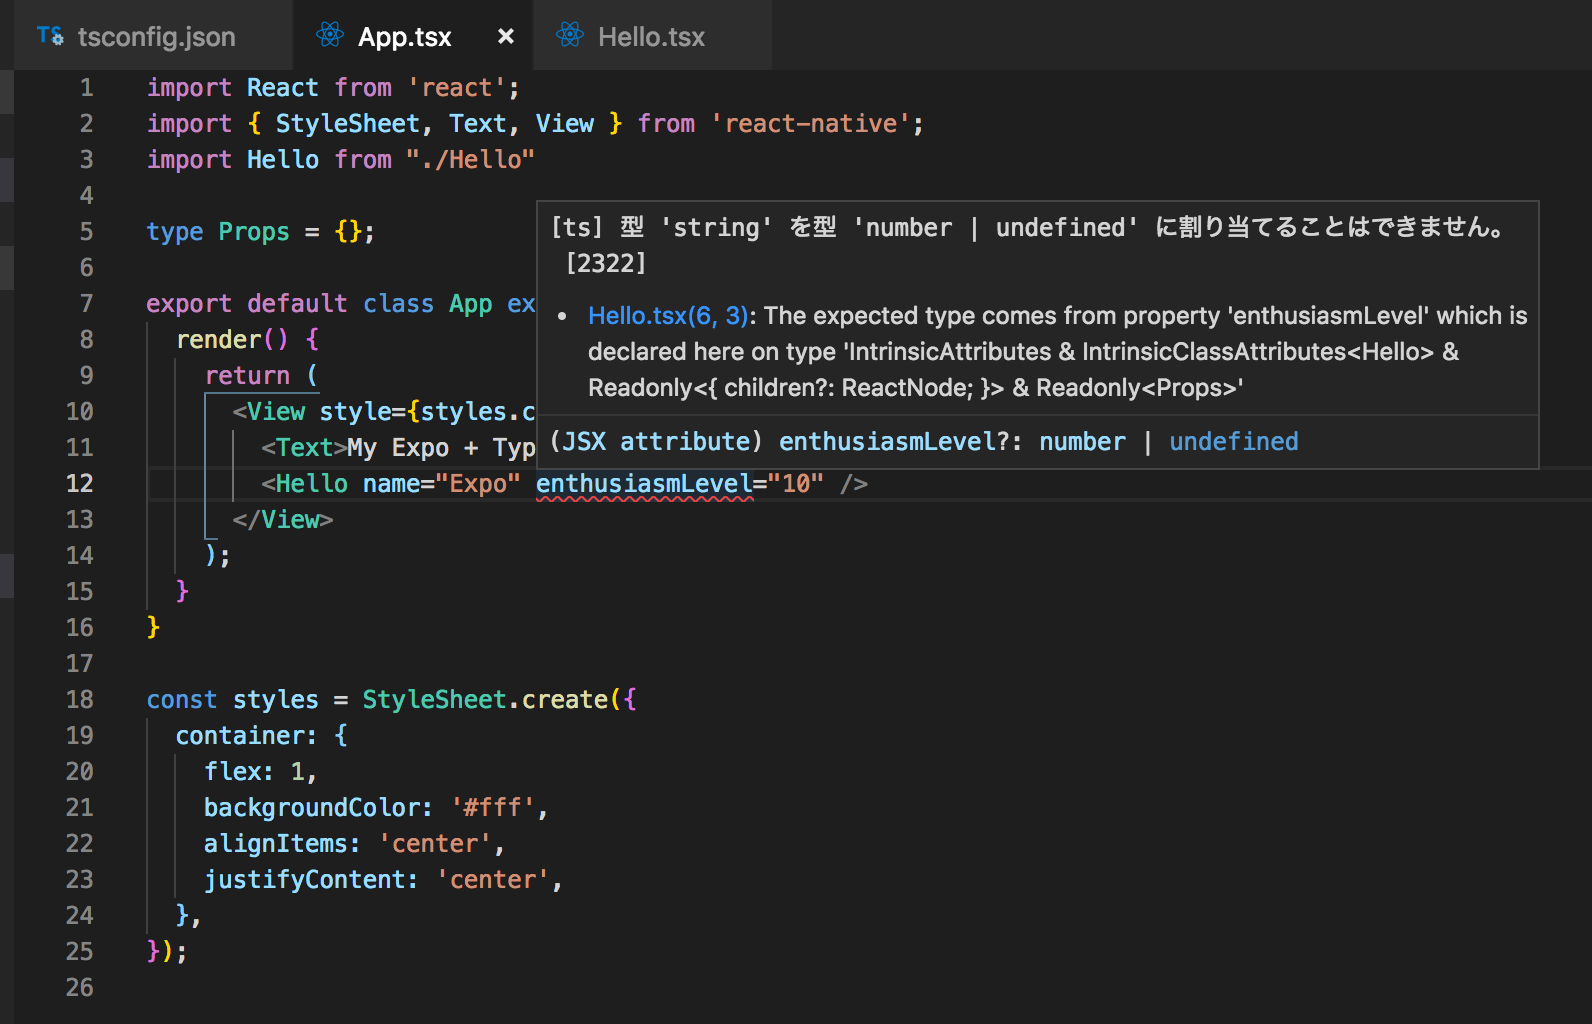
ちなみにpropsの型を間違えるとちゃんと怒ってくれます。
あとは環境に合わせてtsconfig.jsonを設定したりしながらExpo+TypeScriptで開発しましょう!