内容一覧
- 自己紹介
- 本全体の内容
- ざっくりと全体の内容をさらいます。
- 高速化やってみた その1
- 超簡単なコードで高速化を試し、効果を比較しました。
- 高速化やってみた その2
- もう少し実用的なコードで試してみました。
- まとめ+α
自己紹介
名前:たみや(@tatamiya)
経歴:
- ~2018年3月 北海道大学大学院
- 研究テーマは生物物理(タンパク質1分子実験データの解析と数理モデル化)
- 2018年4月~ 都内のデータ分析ベンチャー企業
- システムデザイン部(+データアナリティクス部)
使用言語:Python, 昔はC言語, Fortran
現在やっていること:データ変換・整形、予測モデル構築
最近の興味:ライブラリ実装、分析基盤構築
全体の内容
7~9章までの構成
7章 Cにコンパイルする
Pythonコードを他言語でコンパイルする、他言語で作成したライブラリを取り込む手法
8章 並行処理 → 今回は省略
I/O待ちの無駄時間を有効活用する非同期手法が、Webクローリングを例に書かれています。
9章 multiprocessingモジュール
並列処理の手法が詳述されています。単純な並列化から、プロセス間情報共有まで。
そもそもなぜPythonは遅いのか?
- 動的型付
- メモリ配置
- 永遠のシングルスレッド(GILの呪い)
→ 他言語で頭を悩ませる問題を隠蔽し扱いやすくした結果の裏返し
解決方法 … 部分的に他言語を取り込む、専用のライブラリを使う
7章の内容
C言語へのコンパイル(7.4~7.8)
Cython, Shed Skin (C++)
その他の高速化方法(7.9~7.12)
Numba, Pythran, PyPy
他言語ライブラリの読み込み(7.13)
ctypes, f2py, CPython API
7章の内容(総論)
→ 7.12 各技術をいつ使うのか?
ビルドの手間はかかるが、Cythonは効率がいい。
9章の内容
multiprocessingモジュールを使った単純並列化(9.2~9.4)
独立な内容(embarrassingly parallel problem)を同時に処理する
プロセス間通信(9.5~9.7)
同時に走らせている処理プロセス間で情報を共有
→ 難しいしI/O待ちがネックになり、意外と効率よくない。
… 有効な使いどころも思いつかなかったので割愛。
そんじゃ、とりあえず使ってみよう
高速化やってみた
その1 とりあえず簡単なやつ
- 整数を片っ端からどんどん足してく
その2 ちょっと実用的なやつ
- 2分割線形フィットによる変化点検出
高速化やってみた その1
超簡単なアルゴリズムを高速化・比較
扱うアルゴリズム
- 1~Nまでの和を計算する(
sum_from_one(N)) - それぞれのN(1~10000)での値を出す
def sum_from_one(N):
    sum = 0
    for i in range(1, N+1):
        sum += i

    return sum
比較する実装
- 素のPython
- Cython
- 並列化
- multiprocessing
- joblib
- Cython + 並列化
- OpenMP
Cythonの導入
Linux系の場合
pip install cython
... 必要ならapt-getやyumでCのコンパイラも入れる
Windowsの場合
cythonのimportに加えて、
Visual C++をMicrosoftのHPからインストールして、Pythonのsetup.pyにコンパイラのPATHを通して…
... 死ぬほどメンドクサイ
→ Qiita記事書きました https://qiita.com/tatamiya/items/510752d0d7eac5b71ceb
Cython
def sum_from_one_cython(int N):
    cdef unsigned int sum
    cdef unsigned int i

    sum = 0

    for i in range(1, N+1):
        sum += i

    return sum
変更点:sumとiの型を定義した。
Cython
コンパイル方法
from distutils.core import setup
from distutils.extension import Extension
from Cython.Distutils import build_ext

setup(
    cmdclass={'build_ext': build_ext},
    ext_modules=[Extension("calculate", ["cython_function.pyx"]
)
# python setup.py build_ext --inplace
こうすることで、.soファイル(Windowsなら.ファイル)ができる。
※以上のコンパイル作業は、.pyxファイルを書き換える都度行う。
Cython
実行方法
先ほど生成された.soファイルをimportして使う。
import numpy as np
from modules import calculate

if __name__ == "__main__":
    sum_list = []
    repeat_list = np.random.permutation(np.arange(1, 100001))
    for i in repeat_list:
        sum_list.append(calculate.sum_from_one_cython(i))
In [1] %run -t simple_sum_cython.py
IPython CPU timings (estimated):
  User   :       0.48 s.
  System :       0.00 s.
Wall time:       0.48 s.
並列化(multiprocessing)
from multiprocessing import Pool
import multiprocessing as multi
import numpy as np
from modules import function

if __name__ == "__main__":

    repeat_list = np.random.permutation(np.arange(1, 100001))

    p = Pool(multi.cpu_count())
    p.map(function.sum_from_one, repeat_list)
    p.close()
実行時間:
In [1]: %run -t simple_sum_multiprocess.py

IPython CPU timings (estimated):
  User   :       0.99 s.
  System :       0.06 s.
Wall time:     299.23 s.
並列化(joblib)
joblibとは?
ハイパフォーマンスPython 9.4節末尾(9.4.1)
joblibはmultiprocessingを使って軽量なパイプラインを実現したもので、簡単な並列インターフェース、結果を保持するキャッシュ、デバッグ機能を備えています。
scikit-learnの実装でも使われていたから試してみた。
並列化(joblib)
from joblib import Parallel, delayed
import numpy as np
from modules import function

if __name__ == "__main__":

    repeat_list = np.random.permutation(np.arange(1, 100001))

    r = Parallel(n_jobs=-1)([delayed(function.sum_from_one)(i) for i in repeat_list])
実行時間:
In [3]: %run -t simple_sum_joblib.py

IPython CPU timings (estimated):
  User   :      14.53 s.
  System :       0.38 s.
Wall time:     296.49 s.
Cython + 並列化(OpenMP)
for文部分で、rangeの代わりにprangeを使う
#cython: boundscheck=False
from cython.parallel import prange

def sum_from_one(int N):
    cdef unsigned int sum
    cdef unsigned int i

    sum = 0
    for i in prange(1, N+1, nogil=True):
        sum += i

    return sum
OpenMPによる並列化: ビルド
setupファイルのext_modulesにextra_compile_args=['-fopenmp'], extra_link_args=['-fopenmp']を加える
from distutils.core import setup
from distutils.extension import Extension
from Cython.Distutils import build_ext
import numpy

setup(
    cmdclass={'build_ext': build_ext},
    ext_modules=[Extension("calculate", ["cython_openmp_test.pyx"], extra_compile_args=[
                           '-fopenmp'], extra_link_args=['-fopenmp'])], include_dirs = [numpy.get_include()]
)
python setup_openmp.py build_ext --inplace
OpenMPによる並列化: 実行
import numpy as np
import calculate

if __name__ == "__main__":
    sum_list = []
    repeat_list = np.random.permutation(np.arange(1, 100001))
    for i in repeat_list:
        sum_list.append(calculate.sum_from_one(i))
実行時間:
In [1]: %run -t simple_sum_openmp.py

IPython CPU timings (estimated):
  User   :       5.38 s.
  System :       0.93 s.
Wall time:       1.61 s.
とりあえず簡単なやつ 高速化まとめ
| 実装内容 | 実行時間 | 扱いやすさ |
|---|---|---|
| Python | 1178s | 普通に書くだけ |
| Cython(型定義) | 0.48s | ビルドの手間がかかる |
| 並列化(multiprocessing) | 299s | 少し書き換える |
| 並列化(joblib) | 296s | 少し書き換える |
| Cython + 並列化(OpenMP) | 1.61s | ビルドの手間がかかる |
手軽にやるならjoblib、少し手を加えていいから速くしたいならCython。
OpenMPはなぜ単純Cythonより遅い?
どこかしらでオーバーヘッドがかかっている。(I/O待ち?)
試しに$N$を$10^5$以外で見てみた。
| 繰り返し回数 | 単純Cython | OpenMP |
|---|---|---|
| $10^4$ | 0.02s | 0.13s |
| $10^5$ | 0.48s | 1.61s |
| $10^6$ | 43.95s | 46.69s |
→ 各並列ブロックの処理内容が大きいほど並列化の効果が出る。
高速化やってみた その2
2分割線形フィットによる変化点検知アルゴリズム
方法
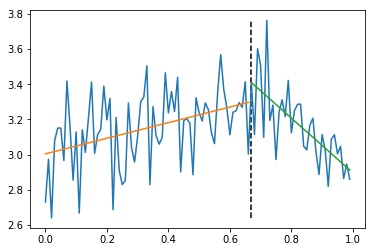
- 時系列断片を適当な時刻で2分割する
- それぞれの断片を、別々の直線でフィット
- 分割点を動かし、誤差が最小になる点を探す
2分割線形フィット 基本実装
def detect_a_cp(x, y):
    data_len = len(x)

    results_dict = {}
    error_sum_list = []
    for division_point in range(2, data_len-2):
        left_slope, _, left_r2error = linear_fit(x[0:division_point + 1], y[0:division_point + 1])
        right_slope, _, right_r2error = linear_fit(x[division_point:], y[division_point:])

        results_dict[division_point] = ((left_slope, right_slope), (left_r2error, right_r2error))
        error_sum_list.append(left_r2error + right_r2error)

    optimal_index = np.argmin(error_sum_list)+2
    fit_results = results_dict[optimal_index]

    return optimal_index, fit_results
linear_fitは、numpyで作ったフィット関数
2分割線形フィット 高速化
指針
最適分割点探索部分を並列化させる
... 現状はfor文で逐次処理
比較する実装
- joblibライブラリによる並列化
- やりやすい
- OpenMPを使ったCコンパイル並列化
- 同じ並列化ならこっちの方が速いはず
- Cython(今回は時間切れ)
- 処理量が小さければこっちで十分速さが出るはず
joblibライブラリによる並列化
import numpy as np
from my_modules import linear_fit
from joblib import Parallel, delayed
from functools import partial

def piece_wise_linear_fit(x, y, division_point):
    left_slope, _, left_r2error = linear_fit(x[0:division_point + 1], y[0:division_point + 1])
    right_slope, _, right_r2error = linear_fit(x[division_point:], y[division_point:])

    return left_slope, left_r2error, right_slope, right_r2error

def detect_a_cp_joblib(x, y):
    data_len = len(x)

    pwl_partial = partial(piece_wise_linear_fit, x, y)
    results_list = Parallel(n_jobs=-1)([delayed(pwl_partial)(i) for i in range(2, data_len-2)])

    results_array = np.array(results_list)
    error_sums = results_array[:, 1] + results_array[:, 3]
    optimal_arg = np.argmin(error_sums)

    optimal_results = results_array[optimal_arg]

    return optimal_arg+2, optimal_results
joblibライブラリによる並列化
実行結果(before):
In [1]: %timeit cpa_comparison.detect_a_cp(x,y)
7.41 s ± 167 ms per loop (mean ± std. dev. of 7 runs, 1 loop each)
実行結果(after):
In [1]: %timeit cpa_comparison.detect_a_cp_joblib(x,y)
2.97 s ± 201 ms per loop (mean ± std. dev. of 7 runs, 1 loop each)
二分割線形フィット OpenMPによる並列化
cimport numpy as np
from cython.parallel import prange


def run(np.ndarray[double, ndim=1] x, np.ndarray[double, ndim=1] y):
    cdef int data_len = len(x)
    cdef int i
    cdef double[data_len][:] results_list = np.empty((data_len, 5))
    cdef double[3] left_result = np.empty(3)
    cdef double[3] right_result = np.empty(3)

    for i in prange(2, data_len-2, nogil=True):

        left_result = linear_fit(x[0:i + 1], y[0:i + 1])
        right_result = linear_fit(x[i:], y[i:])

        results_list[i] = [left_result[2]+right_result[5], left_result, right_result]

    optimal_arg = np.argmin(results_list[:, 0])

    return optimal_arg, results_list[optimal_arg]
OpenMPによる並列化
実行結果:
linear_plot_cython.pyx:36:8: Memoryview slices can only be shared in parallel sections
Error compiling Cython file:

for i in prange(0, data_len-4, nogil=True):
    division_point = 2 + i

    left_fit_result = linear_fit(x[0:division_point + 1], y[0:division_point + 1])
    right_fit_result = linear_fit(x[division_point:], y[division_point:])
   ^
!?!?!?!?
OpenMPによる並列化がうまくいかない理由
prange内は表記の制約が強い。
P. 147
GILを無効にする場合は、リストなどの通常のPythonオブジェクトを操作してはいけません。基本データ型と、memoryviewのインターフェースをサポートしているオブジェクトのみを操作できます。
まとめ
まとめ
- Cythonを使えば、型指定だけでも2000倍以上速くなる場合がある
- ただし、ビルドの手数は増える。
- 並列化したいなら、まずはjoblibがおすすめ
- ただし、プロセス当たりの処理の粒度には気を付ける必要がある。
- CythonのOpenMPは速いが扱いが難しい。
参考文献
-
中久喜 健司, 科学技術計算のためのPython入門 ――開発基礎、必須ライブラリ、高速化, 技術評論社(2016)
- 悪く言うとオライリー系の本の寄せ集めだが、少し高度なトピックのさわりの部分が幅広くコンパクトにまとまっている。
-
Kurt W. Smith, Cython: A Guide for Python Programmers, O'Reilly(2015)
- 日本語訳あり。が、英語Kindle版の方が安い&日本語の電子版はPDF形式で扱いにくい。
おまけ
おまけ:GPUについて
- 変化が速いから本書ではあまり推奨されていない(7.12.2)
- DeepLearningではGPU用の実装が存在する
- 例:tensorflow-gpu
- 一応ライブラリとしてはあるらしい
- NumbaPro
- CuPy
- 本当はこの辺りまで試したかった…(NVIDIA GeForce GTX 1050Tiの出番)
おまけというかもはや余談:GPUについて
- GPU目当てでWindowsのPC買ったけどあまり出番なし
- あったところで、最近のDLはラップトップ程度じゃ手に負えない
- それ以上に、環境構築が死ぬほどメンドクサイ
- 最近はDockerで開発用のLinuxコンテナ作って作業している
- てか、cloud使えばいいじゃん