はじめに
本記事は、筆者が実現しようとしてハマった「WPFでコントロールの周りに同じ幅でドロップシャドウ(影)を付ける方法」をまとめます。
WPFでコントロールの周りに同じ幅でドロップシャドウ(影)を付ける方法
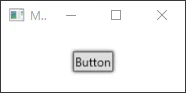
以下の画像のようなに周辺に同じ幅でドロップシャドウ(影)が付いたボタンコントロールを作ることを考えます。
これを実現するには、以下のようなxamlの記載が必要です。
<Window x:Class="DropShadowSample.MainWindow"
        xmlns="http://schemas.microsoft.com/winfx/2006/xaml/presentation"
        xmlns:x="http://schemas.microsoft.com/winfx/2006/xaml"
        xmlns:d="http://schemas.microsoft.com/expression/blend/2008"
        xmlns:mc="http://schemas.openxmlformats.org/markup-compatibility/2006"
        mc:Ignorable="d"
        Title="MainWindow" Height="100" Width="200">
    <Grid>
        <Button VerticalAlignment="Center" HorizontalAlignment="Center" Content="Button">
            <Button.Effect>
                <!-- ドロップシャドウを付けるためのエフェクト -->
                <DropShadowEffect BlurRadius="5" ShadowDepth="0"/>
            </Button.Effect>
        </Button>
    </Grid>
</Window>
ポイントはShadowDepthプロパティを0にしていることです。ShadowDepthプロパティを0にすることでコントロールの真上から光が当たっているように影ができ、周辺に同じ幅の影ができます。ShadowDepthプロパティの規定値は5であるため、周辺に同じ幅で影を作る際には、明示的にShadowDepthプロパティを0に設定する必要があります。