はじめに
今作ろうと思ってるアプリがあって最近Flutterを勉強しているのですが、その中でリストを生成する必要があるので、やり方を勉強しようと思います。
環境
Android Studio
Flutter 1.0
とりあえずベース部分を作る
State<T>前まで一気に作ってしまいます。
import 'package:flutter/material.dart';

void main() => runApp(RootWidget());

class RootWidget extends StatelessWidget {
  @override
  Widget build(BuildContext context) {
    return MaterialApp(
      home: HomeWidget(),
    );
  }
}

class HomeWidget extends StatefulWidget {
  @override
  State<StatefulWidget> createState() {
    return ListState();
  }
}
簡単なリストを作成してみる
リストにはListView.builderがあり、これを実装すればとりあえずリストになってくれます。
プロパティのitemBuilderでIndexedWidgetBuilder = Widget Function(BuildContext context, int index);となるよう実装すれば良いようです。
とりあえずindexがそのまま使えそうなので、それを表示するリストをまず作成します。
class ListState extends State<HomeWidget> {
  @override
  Widget build(BuildContext context) {
    return Scaffold(
      appBar: AppBar(title: Text("List Test"),),
      body: ListView.builder(
          itemBuilder: (BuildContext context, int index) {
            return Text(index.toString());
          }),
    );
  }
}
すごくしょっぱいですが、これでindexの文字列がリストとなってくれました。
しかし、スクロールすると分かるのですが、永遠とスクロールできてしまいます。
リストの数を制限する
ListView.builderにはitemCountプロパティがあり、これを指定することでリストの数を制限することができます。
ここでは固定の数字を与えて動作を確認してみたいと思います。
class ListState extends State<HomeWidget> {
  @override
  Widget build(BuildContext context) {
    return Scaffold(
      appBar: AppBar(title: Text("List Test"),),
      body: ListView.builder(
          itemBuilder: (BuildContext context, int index) {
            return Text(index.toString());
          },
          itemCount: 10,),
    );
  }
}
これで無事10個だけのリストが出来ました。
Listを変数で表示してみる
状態を変化したときには変数で制御することになるので、DartのList<E>を使用してテキストを表示させるように変更してみます。
returnしているWidgetをリストから取り出すように変更しただけです。
class ListState extends State<HomeWidget> {
  var listItem = ["one", "two", "three"];

  @override
  Widget build(BuildContext context) {
    return Scaffold(
      appBar: AppBar(title: Text('List Test'),),
      body: ListView.builder(
          itemBuilder: (BuildContext context, int index) {
            return Text(listItem[index]);
          },
          itemCount: listItem.length,),
    );
  }
}
これでList<String>からリストを生成することができました。
流石にもうちょっと見た目をなんとかしたい
このリストを表示するだけでは流石に見た目が悲しいので、もう少し見た目をまともにします。
こういう場合はWidget Catalogを見て勉強するのでしょうが、数が多すぎて何が何だか分からないので、色んなサンプルを見ながら使ってみて実際の動きを見るのが一番早いと思います。
とりあえずリストといえば、1つ1つのアイテムの境目が分からないと苦しいです。
タップしてもらうのにも、そもそも視認性もわかれていないと見辛いです。
その際に使えそうなWidgetを調べてみました。
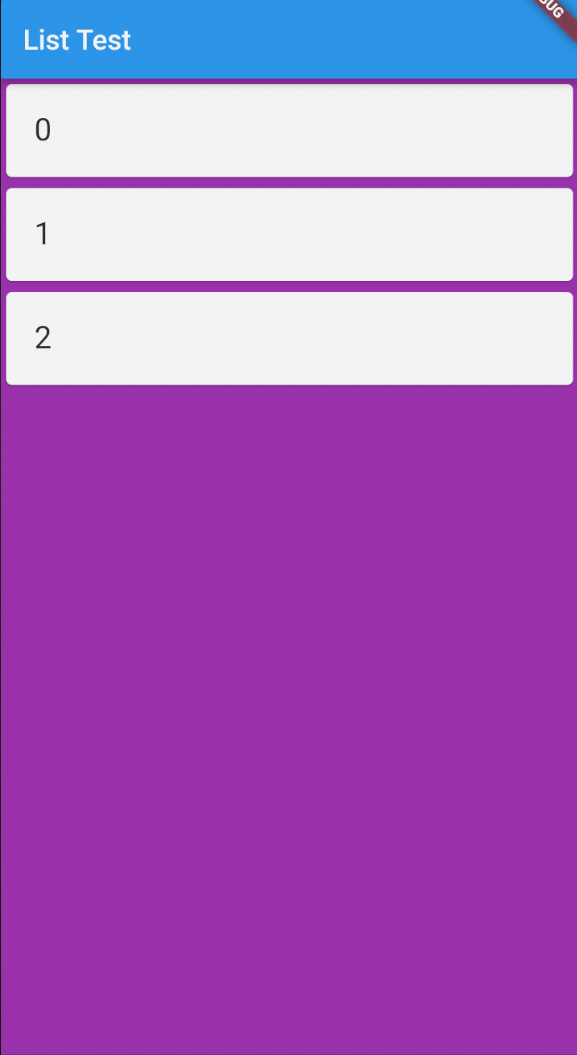
1つはCardクラスです。
class ListState extends State<HomeWidget> {
  @override
  Widget build(BuildContext context) {
    return Scaffold(
      appBar: AppBar(title: Text('List Test')),
      body: ListView.builder(
        itemBuilder: (BuildContext context, int index) {
          return Card(
              child: Padding(
                  child: Text('$index', style: TextStyle(fontSize: 22.0),),
                  padding: EdgeInsets.all(20.0),),
          );},
        itemCount: listItem.length,
      ),
    );
  }
}

Themeの問題でみづらいですが、1つ1つのアイテムの境目が出来ました。
プラスしてPaddingしたりしないと見た目が残念すぎて使い物にならないのですが、ベースのWidgetとして使えます。
もう1つはListTileクラスです。
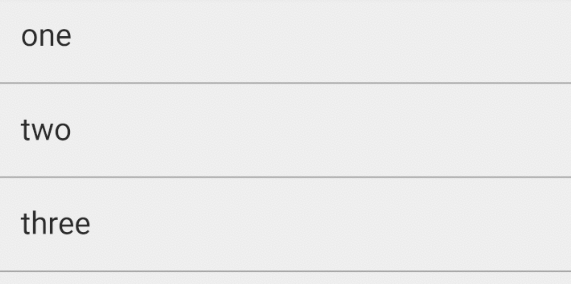
こちらはList用のタイルになっており、よくあるリストの見た目としたい場合はこちらを使う方が良いです。

きちんとリストぽくするのに苦戦しましたが、よくあるリストを生成することができました。
何もしないとListTileはListの枠線が表示されないため、Containerのdecorationを使用して枠線を表示しています。
ここらへんは大体セットで覚えておいた方が良さそうです。
class ListState extends State<HomeWidget> {
  var listItem = ['one', 'two', 'three'];

  @override
  Widget build(BuildContext context) {
    return Scaffold(
      appBar: AppBar(title: Text('List Test'),),
      body: ListView.builder(
        itemBuilder: (BuildContext context, int index) {
          return Container(
              decoration: BoxDecoration(
                border: Border(
                  bottom: BorderSide(color: Colors.black38),
                ),
              ),
              child: ListTile(
                leading: const Icon(Icons.flight_land),
                title: Text('$index'),
                subtitle: Text('&listItem'),
                onTap: () { /* react to the tile being tapped */ },
            ));},
        itemCount: listItem.length,
      ),
    );
  }
}
ちなみにScaffoldのbackgroundColorとListViewの色は独立しているので、裏の色とList内の色を変えるのは簡単に出来ます。
class ListState extends State<HomeWidget> {
  @override
  Widget build(BuildContext context) {
    return Scaffold(
      appBar: AppBar(title: Text('List Test')),
      backgroundColor: Colors.purple,
      body: ListView.builder(
        itemBuilder: (BuildContext context, int index) {
          return Card(
              child: Padding(
                  child: Text('$index', style: TextStyle(fontSize: 22.0),),
                  padding: EdgeInsets.all(20.0),),
          );},
        itemCount: listItem.length,
      ),
    );
  }
}
ListViewを使わないでリストを作る
使い所は分かりませんが、Columnを使って実現することも可能です。
流石にColumnを全部書くのは長かったので、別functionに切り出してList<Widget>を作成するようにしています。
この中にあるMediaQuery.of(context)は端末情報が取れるようなので、これで端末の横幅を取得してそれをColumnの横幅に指定することでいい感じにしています。
ないと文字幅くらいまでしかWidgetが生成されないので、リストっぽくなりません。
class ListState extends State<HomeWidget> {
  var listItem = ['one', 'two', 'three'];

  @override
  Widget build(BuildContext context) {
    return Scaffold(
      appBar: AppBar(title: Text('List Test'),),
      body: Column(
        children: createList(),
      ),
    );
  }

  List<Widget> createList() {
    final size = MediaQuery.of(context).size;
    return listItem.map((item) => Container (
      width: size.width,
      decoration: BoxDecoration(
        border: Border(
          bottom: BorderSide(color: Colors.black38),
        ),
      ),
      child: Padding(
        child: Text('$item', style: TextStyle(fontSize: 22.0),),
        padding: EdgeInsets.all(20.0),),
    )).toList();
  }
}
リストでPull to refreshを実現する
リストといったらPull to refreshだよねということで実現してみました。
Pull to refreshは簡単に実現できて、RefreshIndicatorをListViewの親として実現すればOKです。
RefreshIndicatorはプロパティとしてonRefreshが指定可能となっているため、ここにFuture<void>を戻り値としてFutureを実装し、その中でsetStateしてあげればいい感じにrefreshしてくれます。
class ListState extends State<HomeWidget> {
  var listItem = [1, 2, 3];

  Future<void> _refresh() {
    return Future.sync(() {
      setState(() {
        listItem = listItem.map((item) => item + 1).toList();
      });
    });
  }

  @override
  Widget build(BuildContext context) {
    return Scaffold(
      appBar: AppBar(title: Text('List Test')),
      backgroundColor: Colors.purple,
      body: RefreshIndicator(
        child: ListView.builder(
          itemBuilder: (BuildContext context, int index) {
            return Card(
              child: Padding(
                child: Text(listItem[index].toString(), style: TextStyle(fontSize: 22.0),),
                padding: EdgeInsets.all(20.0),),
            );},
          itemCount: listItem.length,
        ),
        onRefresh: _refresh,
      ),
    );
  }
}
Futureは非同期処理にすることもでき、その場合はaync/awaitで簡単に非同期処理とすることができます。
packageで非同期用のmoduleを取り込まないといけないと思いきや、Futureであればいらないようです。
書き方は簡単でメソッドをaync付きで宣言して待ち合わせたい処理をawaitに続いてFutureを実装すれば良いです。
あとはその下に非同期処理が完了したあとの処理を書きます。
asyncにするとreturnがいらなくなるので、消してしまってOKです。
今回は簡単なサンプルというコードで3秒待ってから状態を変化させるように変更してみます。
  Future<void> _refresh() async {
    await Future.delayed(Duration(seconds: 3));

    setState(() {
      listItem = listItem.map((item) => item + 1).toList();
    });
  }
ListTileからModalを出してみる
Modal自体はshowDialogを使用すれば簡単に実現可能となっています。
Modal内にListの情報を渡す方法については以下のような感じでするかしかないかなと思います。
トリガー自体はonTapなんかがありますが、引数がvoidでなければならないので、上手く情報を引き渡すことが出来ませんでした。
AlertDialog周りは専用のClassにしてしまえば情報引き渡せるので、共有のレイアウトを組むみたいなことは出来るので、そんなに困ることはないと思いますが、showDialogを共通化とまではいきませんでした。
  Widget _getCardChild() {
    if(station == null) {
      return Center(
        child: CircularProgressIndicator(),
      );
    } else {
      return ListView.builder(
        itemBuilder: (BuildContext context, int index) {
          return Container(
            decoration: BoxDecoration(
              border: Border(
                bottom: BorderSide(color: Colors.black38),
              ),
            ),
            child: ListTile(
              title: Text(station.line[index].lineCd.toString()),
              subtitle: Text(station.line[index].lineName),
              onTap: () {
                showDialog(
                    context: context,
                    builder: (BuildContext context) {
                      return AlertDialog(
                        title: Text(station.line[index].lineCd.toString()),
                        content:  Text(station.line[index].lineName),
                        actions: <Widget>[
                          FlatButton(
                            child: Text("Close"),
                            onPressed: () {
                              Navigator.of(context).pop();
                            },
                          ),
                        ],
                      );
                    }
                );

              },
            ),
          );},
        itemCount: station.line.length,
      );
    }
  }
おわりに
リストに関して色々見て来ました。
リストの中身を書き換えたいのあれば普通にトリガー作ってsetStateするだけなので割愛しています。
やり始めた頃はわけがわからなかったのですが、進めて行くとFlutterの思想が見えてきて楽しくなってきました。
引き続き勉強していきたいです。

