はじめに
この記事は Qt Advent Calendar 2021 3日目の記事です。
昨日は、@phyblas さんの PyQtのドラッグ&ドロップの使い方 という大作でした。様々な形で使うことができるんですね。
今日は QOI について書きたいと思います。
Quite OK Image とは
11/24 に発表された、なぜか速い画像の可逆圧縮コードです。
日本語はこちらがわかりやすいです。
Qt で対応している画像の形式
Qt では標準で以下の画像の形式に対応しています。
| Format | Description | Qt's support |
|---|---|---|
| BMP | Windows Bitmap | Read/write |
| GIF | Graphic Interchange Format (optional) | Read |
| JPG | Joint Photographic Experts Group | Read/write |
| JPEG | Joint Photographic Experts Group | Read/write |
| PNG | Portable Network Graphics | Read/write |
| PBM | Portable Bitmap | Read |
| PGM | Portable Graymap | Read |
| PPM | Portable Pixmap | Read/write |
| XBM | X11 Bitmap | Read/write |
| XPM | X11 Pixmap | Read/write |
ドキュメント: Reading and Writing Image Files
それから、Qt SVG モジュールを利用することで、SVG 形式の画像を扱うことができます。
さらに、Qt Image Format というアドオンのモジュールを利用することで、以下の画像形式にも対応可能です。
| Format | Description | Support | 3rd Party Codec |
|---|---|---|---|
| ICNS | Apple Icon Image | Read/write | No |
| JP2 | Joint Photographic Experts Group 2000 | Read/write | Yes (Not bundled) |
| MNG | Multiple-image Network Graphics | Read | Yes (Not bundled) |
| TGA | Truevision Graphics Adapter | Read | No |
| TIFF | Tagged Image File Format | Read/write | Yes (bundled) |
| WBMP | Wireless Bitmap | Read/write | No |
| WEBP | WebP | Read/write | Yes (bundled) |
ドキュメント: The Image I/O Plugins
Qt で画像の形式を追加する方法
Qt では画像の形式を プラグイン で実装しており、独自の拡張も簡単になっています。
実際には QImageIOPlugin に対応したプラグインを作成する必要があります。
QtQOIImagePlugin の作成
プロジェクトファイル
TEMPLATE = lib
QT = gui
CONFIG += plugin
DEFINES += QOI_NO_STDIO

SOURCES += \
    qqoiimageioplugin.cpp

HEADERS += \
    qqoiimageioplugin.h \
    qio.h

DISTFILES += QtQOIImagePlugin.json

# Default rules for deployment.
unix {
    target.path = $$[QT_INSTALL_PLUGINS]/imageformats
}
!isEmpty(target.path): INSTALLS += target
Qt Creator でプラグインを作成し、適当にアップデートしました。
JSON ファイル
{
    "Keys" : [ "qoi" ]
}
これもまぁテンプレですね。
ヘッダファイル
# ifndef QQOIIMAGEIOPLUGIN_H
# define QQOIIMAGEIOPLUGIN_H

# include <QtGui/QImageIOPlugin>

class QQOIImageIOPlugin : public QImageIOPlugin
{
    Q_OBJECT
    Q_PLUGIN_METADATA(IID QImageIOHandlerFactoryInterface_iid FILE "QtQOIImagePlugin.json")

public:
    explicit QQOIImageIOPlugin(QObject *parent = nullptr);

    QImageIOPlugin::Capabilities capabilities(QIODevice *device, const QByteArray &format) const override;
    QImageIOHandler *create(QIODevice *device, const QByteArray &format) const override;
};

# endif // QQOIIMAGEIOPLUGIN_H
これも、シンプルに QImageIOPlugin のサブクラスを作成し、必要なメソッドをオーバーライドしています。
qio.h
e9069e11a43d779b418679c7a50b2ec14f652085 のものを利用しました。
ソースファイル
# include "qqoiimageioplugin.h"

# define QOI_IMPLEMENTATION
# define QOI_MALLOC(sz) (unsigned char *)malloc(sz)
# define QOI_FREE(p)    (unsigned char *)free(p)

# include "qio.h"

# include <QtCore/QDebug>

class QQOIImageIOHandler : public QImageIOHandler
{
public:
    bool canRead() const override;
    bool read(QImage *image) override;
};

bool QQOIImageIOHandler::canRead() const
{
    if (!device())
        return false;
    return device()->bytesAvailable() > 0;
}

bool QQOIImageIOHandler::read(QImage *image)
{
    auto data = device()->readAll();
    int size = data.length();
    qoi_desc spec {};
    void *decoded = qoi_decode(data.constData(), size, &spec, 4);
    if (!decoded)
        return false;

    *image = QImage(spec.width, spec.height, QImage::Format_ARGB32);

    auto p = static_cast<unsigned char *>(decoded);
    for (unsigned int y = 0; y < spec.height; y++) {
        auto *l = reinterpret_cast<unsigned int *>(image->scanLine(y));
        for (unsigned int x = 0; x < spec.width; x++) {
            const auto r = *p++;
            const auto g = *p++;
            const auto b = *p++;
            const auto a = *p++;
            *l++ = qRgba(r, g, b, a);
        }
    }
    free(decoded);
    return true;
}

QQOIImageIOPlugin::QQOIImageIOPlugin(QObject *parent)
    : QImageIOPlugin(parent)
{}

QImageIOPlugin::Capabilities QQOIImageIOPlugin::capabilities(QIODevice *device, const QByteArray &format) const
{
    QImageIOPlugin::Capabilities ret;
    if (format == "qoi") {
        if (device) {
            if (device->isReadable())
                ret |= QImageIOPlugin::CanRead;
        } else {
            ret |= QImageIOPlugin::CanRead;
        }
    }
    return ret;
}

QImageIOHandler *QQOIImageIOPlugin::create(QIODevice *device, const QByteArray &format) const
{
    auto ret = new QQOIImageIOHandler;
    ret->setDevice(device);
    ret->setFormat(format);
    return ret;
}
特に、説明するような凝ったことはしていなくて、
QOI 向けの QImageIOHandler のサブクラスを実装し、QImagePlugin の create 関数で返しています。
実行
Qt で画像を表示するさいに、QGraphicsView を利用する方が結構多いみたいですが、
シンプルなケースでは、QLabel で十分です。
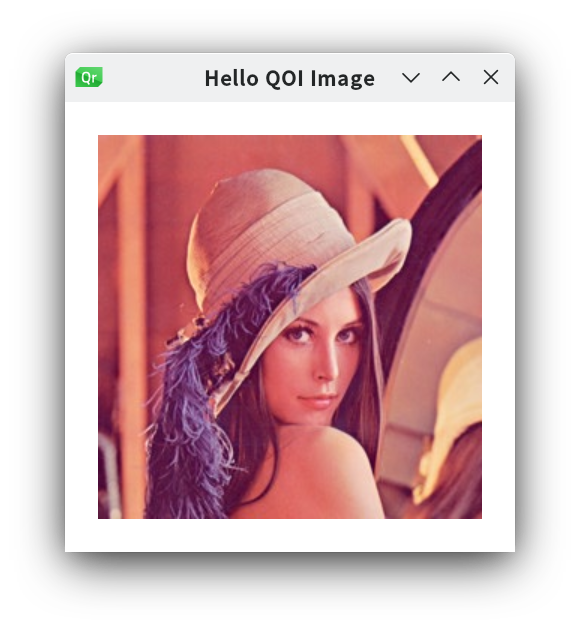
今回は Qt Quick で画像を表示してみましょう。
import QtQuick
import QtQuick.Window

Window {
    width: 300
    height: 300
    visible: true
    title: qsTr("Hello QOI Image")

    Image {
        anchors.centerIn: parent
        source: 'len_std.qoi'
    }
}
おわりに
今回のソースコードは https://github.com/task-jp/qtqoiimageplugin で公開しています。
ぜひお試しください!
明日は @task-jp さんの「Qt にバグ報告をして直してもらった感じのことを書きます」です。お楽しみに!
