Rust Advent Calendar 2023 の12日目の記事です.
Rust で動くクロスプラットフォームの GUI フレームワーク Slint の紹介と、簡単なチュートリアルを試した結果を共有します。
Slint とは
Slint は、ドイツのブランデンブルク州ホーエン・ノイエンドルフにある SixtyFPS GmbH 社が開発している、Rust 向けの GUI フレームワークです。
Qt の QML に似た、宣言的な方法で GUI が記述でき、Rust だけではなく、C++ や JavaScript からも利用が可能になっています。
Slint という名前は、Slint が目指す以下の言葉の頭文字をとったものとなっています。
- Scalable
- Lightweight
- Intuitive
- Native
(最後の t は Xt や Qt と同様にツールキットを表すのかもしれない)
プラットフォームの対応状況
2023年12月時点の 対応状況 は以下のとおりです。
- 組み込み機器: 対応済. Slint は Linux 及び Windows を利用した組み込み機器での製品開発に利用されています。Slint は 300KiB 以下の RAM 容量でも動作し、ARM Cortex M、 ESP32、STM32 といった MCU や、ARM Cortex A、Intel x86 といった MPU での動作をサポートしています。
- デスクトップ: 対応中. Slint は Windows や Linux、Mac で動作していて、プラットフォームの対応を順次改善しているところです。
- ウェブブラウザ: 対応中. Slint のコードは WebAssembly へのコンパイルが可能で、ウェブブラウザ上で動作します。ウェブ向けののフレームワークは多数存在するため、ウェブブラウザは Slint のメインのターゲットではありません。現在の対応は主にデモ向けとなります。
-
モバイル
- Android: 対応中. https://github.com/slint-ui/slint/issues/46 で対応中です。
- iOS: 未対応. Android の初期対応が完了した後に、iOS の対応を行う予定です。
組み込み向けのボードの対応状況は以下を参照してください。
動作デモ
組み込み向けのデモは Youtube で見ることができます。
また、WebAssembly でも Slint のデモを見ることができます。
さらに見たい方は以下のサイトを参照してください。
ライセンス体系
以下の3つの中から好きなものを選択することが可能です
※選択の指針は FAQ をご覧ください。
Slint をはじめよう
Slint は、GUI を .slint と呼ばれる言語で記述し、Slint の実行 API(Rust, C++, JavaScript) を利用して実行します。
ドキュメント
.slint で遊んでみよう
最終的にはローカルのプロジェクトに置くべき .slint ファイルですが、
ウェブブラウザ上で .slint ファイルの記述やプレビューを行うことができるようになっています。
まずは、この SlintPad 上で .slint での GUI の記述に慣れてみましょう。
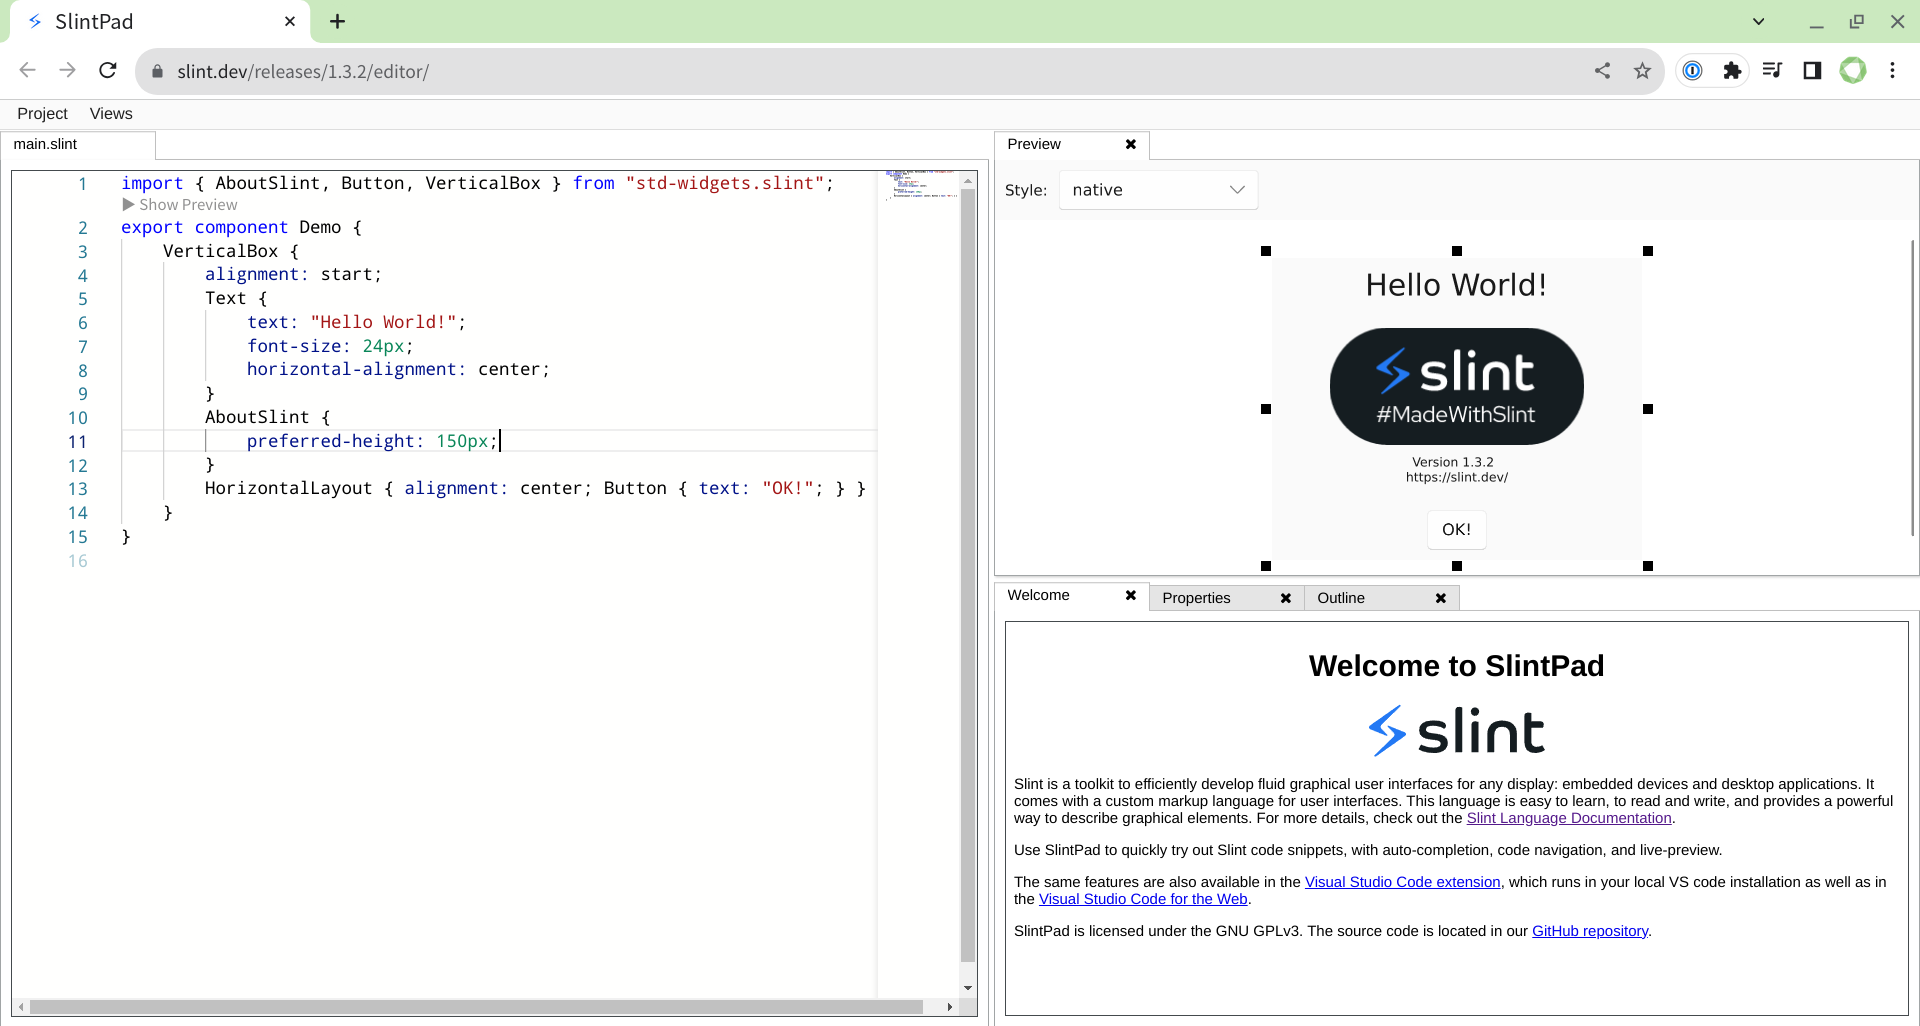
左側が .slint のコードを記述するエディタです。
右上が記述した .slint の GUI のプレビューです。
右下に、選択中のエレメントのプロパティの一覧や、アウトライン表示用のタブがあります。
Hello World
export component App {
    Text { text: "Hello World"; }
}

App というコンポーネントを作成し、内部に Slint にビルトインされている(= 無条件で利用可能な) Text エレメントを1つ生成します。
ボタンの追加と配置
次に、ボタンを追加してみます。
Slint では、Button エレメントはビルトインではなく、標準ウィジェット という位置づけで提供されます。
この標準ウィジェットには、Button や ComboBox などが含まれ、プラットフォームやテーマに応じた スタイル で表示することが可能です。
標準ウィジェットが提供するエレメントを利用するには、以下のように import 文を記述する必要があります。
import { Button } from "std-widgets.slint";

export component App {
    Text { text: "Hello World"; }
    Button { text: 'yay'; }
}
また、Text と Button 2つのエレメントを上下に配置するために、VerticalBox を利用します。
import { Button, VerticalBox } from "std-widgets.slint";

export component App {
    VerticalBox {
        Text { text: "Hello World"; }
        Button { text: "yay"; }
    }
}
独自プロパティの作成と、ボタンの処理
App に、int 型の counter プロパティを作成します。
import { Button, VerticalBox } from "std-widgets.slint";

export component App {
    property <int> counter: 1; // ここを追加
    VerticalBox {
        Text { text: "Hello World"; }
        Button { text: "yay"; }
    }
}
次に、Text に、その値を表示します。
import { Button, VerticalBox } from "std-widgets.slint";

export component App {
    property <int> counter: 1;
    VerticalBox {
        Text { text: "Hello World" + counter; } // ここを変更
        Button { text: "yay"; }
    }
}
ボタンが押された時の処理は、以下のように記述することが可能です。
import { Button, VerticalBox } from "std-widgets.slint";

export component App {
    property <int> counter: 1;
    VerticalBox {
        Text { text: "Hello World" + counter; }
        Button { text: "yay"; clicked => { counter+=1; } } // ここを変更
    }
}
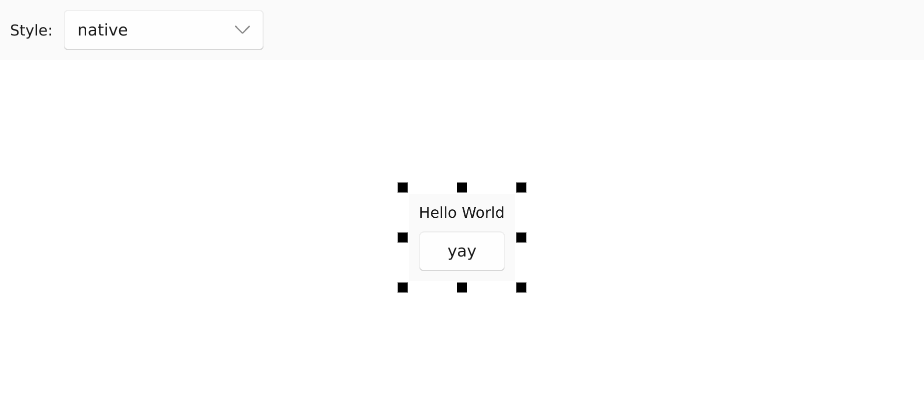
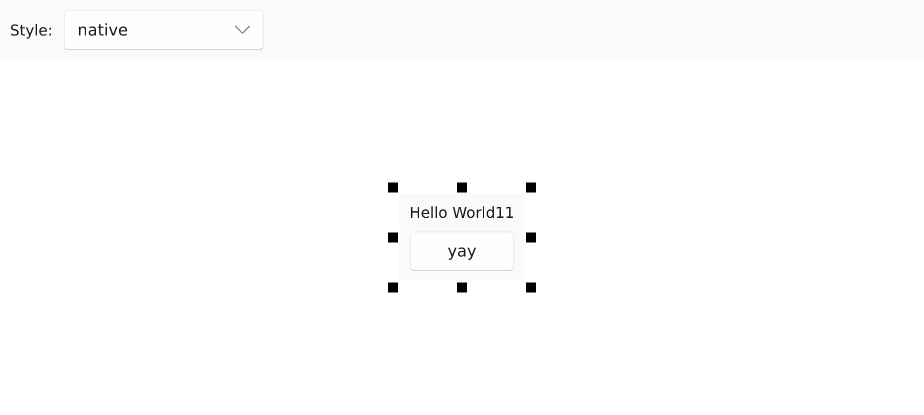
プレビューで yay ボタンをクリックするごとに、counter プロパティの値が1づつ増加し、Hello World の横に表示される数値の表示も自動で更新されます。
Rust から .slint を利用してみよう
プロジェクトの作成
cargo new calc
cd calc
slint のクレートを追加します
cargo add slint
Visual Studio Code をお使いの方は、以下の拡張を入れておくと作業が捗ります。
.slint の組み込み
slint::slint! マクロを利用して、.rs ファイルに .slint のコードを埋め込むことが可能です。
slint::slint! {
    import { Button, VerticalBox } from "std-widgets.slint";

    export component App {
        property <int> counter: 1;
        VerticalBox {
            Text { text: "Hello World" + counter; }
            Button { text: "yay"; clicked => { counter+=1; } }
        }
    }
}

fn main() {
    println!("Hello, world!");
}

Visual Studio Code では、 .slint のコード内に表示される「▶ Show Preview」をクリックすることで、プレビューが表示されるようになります。
このプレビューでは、.slint のコードが実行されているため、ボタンなどの動作を確認することができます。
また、.slint のコードを変更すると、即時プレビューにも反映されるため、プレビューを見ながら効率よく GUI のコードの開発を行うことができるようになっています。
Rust から実行する
.slint のコードは、コンパイル時に Rust のコードに変換され、Rust のコードから利用可能になります。
slint::slint! {
import { Button, VerticalBox } from "std-widgets.slint";
export component App {
property <int> counter: 1;
VerticalBox {
Text { text: "Hello World" + counter; }
Button { text: "yay"; clicked => { counter+=1; } }
}
}
}
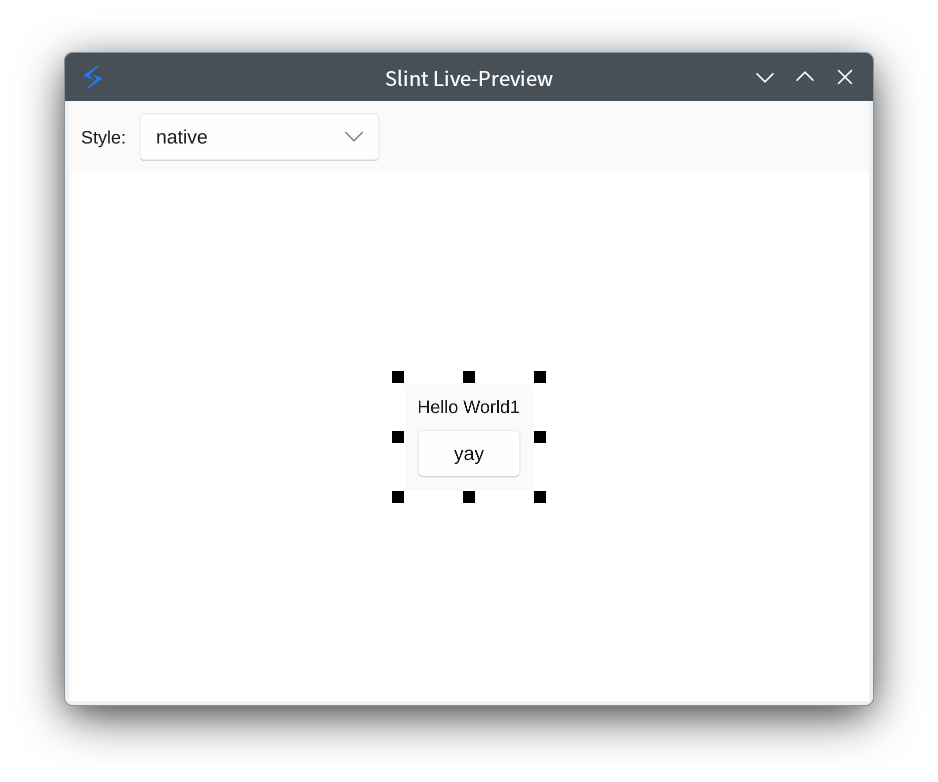
fn main() {
App::new().unwrap().run().unwrap(); // ここを変更
}
実行すると、以下のような画面が現れます。

ボタンが押されたときの処理を Rust 側で行う
まず、.slint 側で、以下の変更を行います。
-
counterプロパティを外部からアクセスできるようにする -
clickedという コールバック を生成し、外部からイベントの処理をできるようにする -
Buttonにbtnという名前(id, 変数名)をつける -
btnのclickedを、Appのclickedに結びつける
slint::slint! {
    import { Button, VerticalBox } from "std-widgets.slint";

    export component App {
        in property <int> counter: 1; // 1
        callback clicked <=> btn.clicked; // 2, 4
        VerticalBox {
            Text { text: "Hello World" + counter; }
            btn := Button { text: "yay"; } // 3
        }
    }
}
.slint は GUI を記述するための独自の DSL のため、最初は見慣れないと感じるかもしれません。
Rust 側のコードを以下のように変更することで、.slint 側のコールバックやプロパティを利用したアプリケーションの開発が可能になります。
fn main() {
    let app = App::new().unwrap();
    let weak = app.as_weak();
    app.on_clicked(move || {
        let app = weak.upgrade().unwrap();
        app.set_counter(app.get_counter() + 2);
    });
    app.run().unwrap();
}
独自エレメントの作成と高度な連携
電卓を開発しながら、さらに高度な Slint の使い方を学びましょう。
電卓の UI を作る
slint::slint! {
    import { Button } from "std-widgets.slint";

    export component App {
        in property <int> value: 0;
        GridLayout {
            padding: 10px;
            spacing: 5px;
            Text { text: value; colspan: 3; }
            Row {
                Button { text: "1"; }
                Button { text: "2"; }
                Button { text: "3"; }
            }
            Row {
                Button { text: "4"; }
                Button { text: "5"; }
                Button { text: "6"; }
            }
            Row {
                Button { text: "7"; }
                Button { text: "8"; }
                Button { text: "9"; }
            }
            Row {
                Button { text: "0"; col: 1; }
            }
        }
    }
}
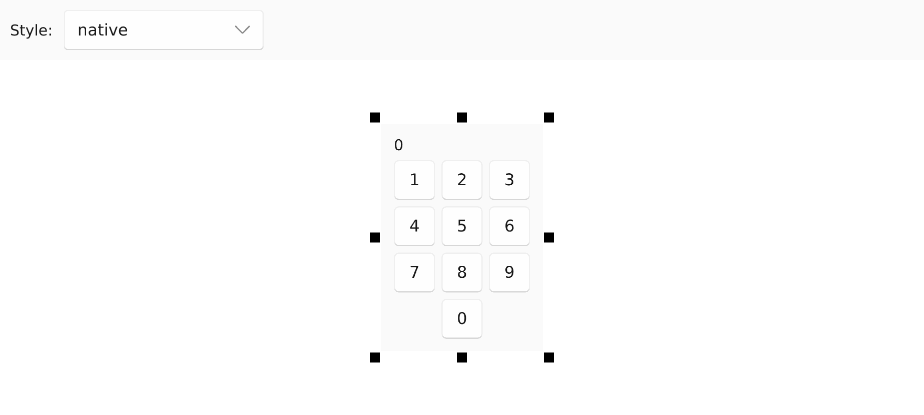
ビルトインエレメントの GridLayout を利用してボタンを配置しました。
独自エレメント(ボタン)の作成
標準で提供されている Button の代わりに、自前で Button というエレメントを作成してみましょう。
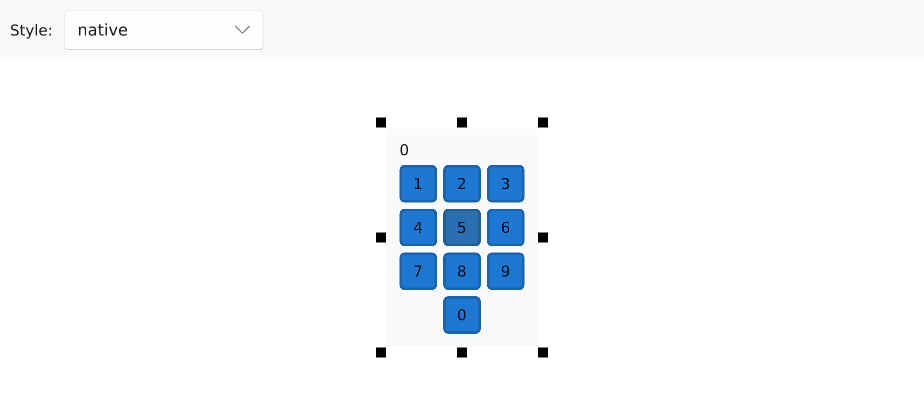
slint::slint! {
    component Button inherits Rectangle {
        min-width: 30px;
        min-height: 30px;
        in property <string> text;
        background: ta.pressed ? red : ta.has-hover ? #2b6fb3 : #1d78d3;
        animate background { duration: 100ms; }
        border-radius: 4px;
        border-width: 2px;
        border-color: self.background.darker(20%);
        Text { text: root.text; }
        ta := TouchArea {}
    }

    export component App {
        ...
    }
}
標準ウィジェットは利用しないので、先頭の import 文は削除しました。
Rectangle をベースに新たな Button エレメントを作成し、数字を表示するための Text と、マウス操作に反応する TouchArea を配置しています。
マウスの操作の状態に応じて、背景色(background)と境界色(border-color)を変えています。
Rust と .slint 間で共有するグローバルオブジェクトの作成
App を直接利用するのではなく、グローバルなオブジェクトを通して連携をしてみます。
slint::slint! {
    export global CalcLogic {
        callback button-pressed(string);
    }

    component Button inherits Rectangle {
        ...
        ta := TouchArea {
            clicked => { CalcLogic.button-pressed(root.text); }
        }
    }
...
}
グローバルな CalcLogic オブジェクトをエクスポートし、ボタンが押された際に、ボタン自体がそのコールバックを呼び出すようにしています。
fn main() {
    let app = App::new().unwrap();
    let weak = app.as_weak();
    app.global::<CalcLogic>().on_button_pressed(move |value| {
        let app = weak.upgrade().unwrap();
        let current = app.get_value();
        app.set_value(current * 10 + value.parse::<i32>().unwrap());
    });
    app.run().unwrap();
}
main 関数ですが、今度はグローバルな CalcLogic に定義されている button-pressed コールバックに対応するハンドラ on_button_pressed の中で数字を増やす処理をするようにしました。
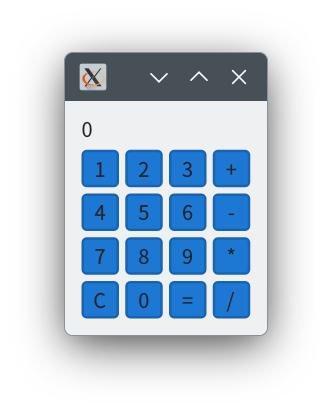
四則演算などの簡易実装
use std::{cell::RefCell, rc::Rc};

slint::slint! {
    export global CalcLogic {
        callback button-pressed(string);
    }

    component Button inherits Rectangle {
        min-width: 30px;
        min-height: 30px;
        in property <string> text;
        background: ta.pressed ? red : ta.has-hover ? #2b6fb3 : #1d78d3;
        animate background { duration: 100ms; }
        border-radius: 4px;
        border-width: 2px;
        border-color: self.background.darker(20%);
        Text { text: root.text; }
        ta := TouchArea {
            clicked => { CalcLogic.button-pressed(root.text); }
        }
    }

    export component App {
        in property <int> value: 0;
        GridLayout {
            padding: 10px;
            spacing: 5px;
            Text { text: value; colspan: 4; }
            Row {
                Button { text: "1"; }
                Button { text: "2"; }
                Button { text: "3"; }
                Button { text: "+"; }
            }
            Row {
                Button { text: "4"; }
                Button { text: "5"; }
                Button { text: "6"; }
                Button { text: "-"; }
            }
            Row {
                Button { text: "7"; }
                Button { text: "8"; }
                Button { text: "9"; }
                Button { text: "*"; }
            }
            Row {
                Button { text: "C"; }
                Button { text: "0"; }
                Button { text: "="; }
                Button { text: "/"; }
            }
        }
    }
}

#[derive(Default)]
struct CalcState {
    prev_value: i32,
    current_value: i32,
    operator: slint::SharedString,
}

fn main() {
    let app = App::new().unwrap();
    let weak = app.as_weak();
    let state: Rc<RefCell<CalcState>> = Rc::new(RefCell::new(CalcState::default()));
    app.global::<CalcLogic>().on_button_pressed(move |value| {
        let app = weak.upgrade().unwrap();
        let mut state = state.borrow_mut();
        if let Ok(val) = value.parse::<i32>() {
            state.current_value *= 10;
            state.current_value += val;
            app.set_value(state.current_value);
            return;
        }
        match value.as_str() {
            "C" => {
                state.prev_value = 0;
                state.current_value = 0;
                state.operator = "".into();
                app.set_value(state.current_value);
            }
            "+" => {
                state.prev_value = state.current_value;
                state.current_value = 0;
                state.operator = "+".into();
            }
            "-" => {
                state.prev_value = state.current_value;
                state.current_value = 0;
                state.operator = "-".into();
            }
            "*" => {
                state.prev_value = state.current_value;
                state.current_value = 0;
                state.operator = "*".into();
            }
            "/" => {
                state.prev_value = state.current_value;
                state.current_value = 0;
                state.operator = "/".into();
            }
            "=" => {
                match state.operator.as_str() {
                    "+" => state.current_value = state.prev_value + state.current_value,
                    "-" => state.current_value = state.prev_value - state.current_value,
                    "*" => state.current_value = state.prev_value * state.current_value,
                    "/" => state.current_value = state.prev_value / state.current_value,
                    _ => {}
                }
                app.set_value(state.current_value);
            }
            _ => {}
        }
    });
    app.run().unwrap();
}
四則演算とクリア用のボタンを UI に追加し、雑で不完全ですが、大まかな実装を行いました。
終わりに
今回の記事では、クロスプラットフォームの GUI フレームワーク Slint の紹介と、Rust から使う方法を公式の Youtube のチュートリアルをベースに紹介しました。
興味がある方は、ぜひご覧ください。
おまけ
今回作成した電卓のアプリを、Raspberry Pi Pico で、ベアメタルで動かしてみました。
液晶は Raspberry Pi Pico用 2.8インチ タッチディスプレイ 320×240 を利用しています。
一部コードの変更を行っていますが、こんなに簡単に Raspberry Pi Pico でも GUI の開発ができ、しかもサクサク動くんですね。素晴らしい!
ソースコードは以下にあげましたので、眺めてみてください。
