はじめに
この記事は Slint Advent Calendar 2024 18日目の記事です。
昨日は @hermit4 さんが Slint言語入門ービルトイン機能 という記事を書いてくれました。
.slint ファイルの中で、import なしで使えるビルトインの機能が日本語で一通り紹介されていてとても便利ですね。
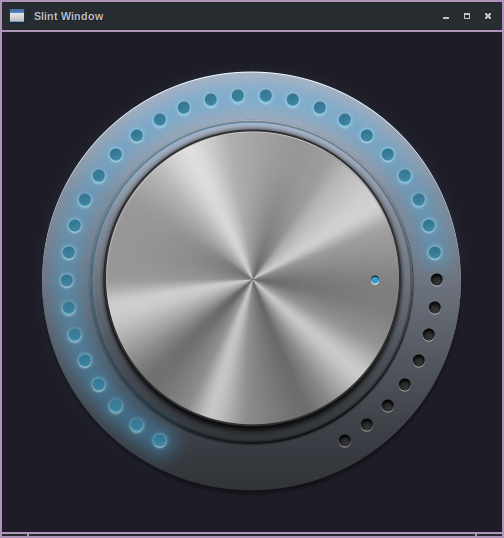
今日は、Slint のサンプルアプリの中から今年の9月に追加された Slint dial example のコードを読んでみたいと思います。
サンプルコードの解説
ベースのデザイン
export component AppWindow inherits Window {
    preferred-width: 500px;
    preferred-height: 500px;
    background: #1e1d27;

    Rectangle {
        width: 425px;
        height: 427px;
        background: #1e1d27;
        knob := Rectangle {
            base := Image {
                source: @image-url("images/dial-frame.png");
            }
        }

        Rectangle {
            width: 1px;
            height: 1px;
            x: 212px;
            y: 210px;

            metalKnob := Image {
                source: @image-url("images/metal-dial.png");
            }

            Image {
                source: @image-url("images/metal-lights.png");
            }

            Image {
                x: 0px;
                y: 120px;
                source: @image-url("images/indicator.png");
            }

            Image {
                source: @image-url("images/dial-trim.png");
            }
        }
    }
}
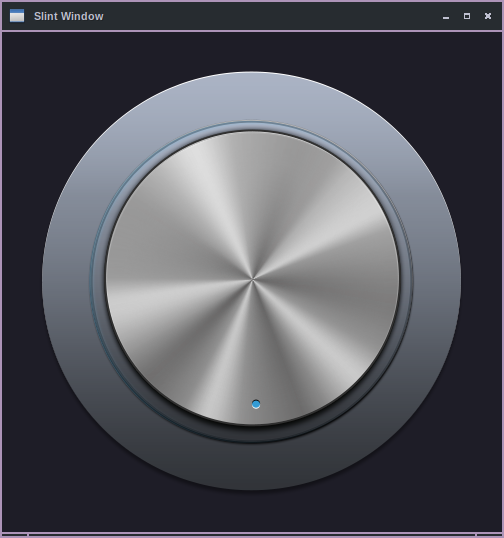
上記がダイアルのベースのデザインで、5つの画像を利用しています。
ロジックの追加
次に、回転操作などを扱うグローバルシングルトンのロジックを追加します。
export global AppState {
    // 目盛の総数
    out property <int> totalLights: 35;

    // 目盛を配置する角度の合計
    property <angle> degreesFilledWithLights: 360deg - (startAngle - endAngle);

    // 現在の値(目盛を光らせる数)
    in-out property <int> volume: (normalizeAngle(angle - startAngle) / degreesFilledWithLights) * totalLights;

    // 最小値の時の角度
    out property <angle> startAngle: 120deg;

    // 最大値の時の角度
    out property <angle> endAngle: 60deg;

    // 現在の角度(初期値は最小値)
    in-out property <angle> angle: startAngle;

    // 目盛の中心からの距離
    in-out property <length> elementRadius: 185px;

    // 角度を正規化する関数
    pure public function normalizeAngle(angle: angle) -> angle {
        return (angle + 360deg).mod(360deg);
    }
}
上記でやりたいことは主に以下の2つです。
- 目盛をループで配置するための情報を定義する
- 現在の角度を保持し、目盛を何個光らせるかを計算する
目盛の追加
目盛に利用するコンポーネントは以下のように定義しています。
export component Light {
    in property <int> index;
    property <angle> gap: (360deg - (AppState.startAngle - AppState.endAngle)) / AppState.totalLights;
    property <angle> angle: (index * gap) + AppState.startAngle;
    property <bool> lightOn: index <= AppState.volume;

    x: AppState.elementRadius * angle.cos();
    y: AppState.elementRadius * angle.sin();
    width: 0;
    height: 0;

    states [
        lightOff when !root.lightOn: {
            blueLed.opacity: 0;
        }
        lightOn when root.lightOn: {
            blueLed.opacity: 0.6;
            in {
                animate blueLed.opacity {
                    duration: 100ms;
                    easing: ease-in-sine;
                }
            }
            out {
                animate blueLed.opacity {
                    duration: 600ms;
                    easing: ease-out-sine;
                }
            }
        }
    ]
    Rectangle {
        Image {
            source: @image-url("images/light-hole.png");
        }

        blueLed := Image {
            source: @image-url("images/light.png");
            opacity: 0;
        }
    }
}
index が何番目の目盛なのかを保持するプロパティで、それと前述のロジックで定義された定数を利用して自身の位置を計算しています。
また、lightOn で、自身を光らせるかどうかを計算して、両者の状態を定義し、遷移のアニメーションも定義しています。
export component AppWindow inherits Window {
    ...
    Rectangle {
        ...
        Rectangle {
            ...
            lightHolder := Rectangle {
                x: 0px;
                y: 2px;
                for i in AppState.totalLights + 1: Light {
                    index: i;
                }
            }
        }
    }
}
ライトは、for 文でロジックで定義した数だけループをまわして生成しています。
回転操作の対応
ta := TouchArea {
    property <length> centerX: self.width / 2;
    property <length> centerY: self.height / 2;
    property <length> relativeX;
    property <length> relativeY;
    property <angle> newAngle;
    property <angle> deltaDegrees;
    property <bool> firstTouch: false;
    width: parent.width;
    height: parent.height;

    clicked => {
        firstTouch = false;
    }

    moved => {
        relativeX = ta.mouse-x - centerX;
        relativeY = ta.mouse-y - centerY;
        newAngle = AppState.normalizeAngle(atan2(relativeY / 1px, relativeX / 1px));
        // on first touch work out what angle the dial is at. Then use this to create a delta
        // So further movement will be relative to this angle.
        if !firstTouch {
            firstTouch = true;
            deltaDegrees = AppState.normalizeAngle(AppState.angle - newAngle);
        } else {
            AppState.angle = AppState.normalizeAngle(deltaDegrees + newAngle);
        }
    }
}
タッチ操作から回転を計算しています。中心からの座標に変換して、atan2 で角度に変換しています。
.slint には簡単なコードは書けますが、変数を定義する機能がないのでそれらに対してすべてプロパティを用意していますね。
回転表示
metalKnob := Image {
    source: @image-url("images/metal-dial.png");
    rotation-angle: AppState.angle;
}

...

Image {
    x: 120px * AppState.angle.cos();
    y: 120px * AppState.angle.sin();
    source: @image-url("images/indicator.png");
}
ロジックが保持する angle プロパティに応じて角度や位置を変更するようにしています。
TODO
README に、以下の2点が未対応だと書いてあります。
- [ ] Lock the dial so it cannot be rotated between the blank start and end angles.
※ 2024/12/21 対応済み、この記事の最後に追記しました
- Update the graphics slightly. They are 10 years old and would benefit from a small polish.
前者は最小値から最大値に飛ばないようにしたいってことで、後者はモダンな見た目に改善したいということですね。興味がある人がいたら、是非挑戦してみてください。
上記のコードを改善してみました
操作範囲の限定処理
回転操作はダイアル上でマウスがクリックされた場合に行うべきなのですが、
TouchArea は矩形なので、現状はその範囲のどこをクリックしても反応してしまいます。
また、現状のコードは、タッチが完了した後(押して離された後)に発生する clicked コールバックで処理の初期化をしていて微妙にイマイチでした。
上記を踏まえて、タッチ操作を以下のように改善してみました。
ta := TouchArea {
    property <length> centerX: self.width / 2;
    property <length> centerY: self.height / 2;
    property <length> relativeX;
    property <length> relativeY;
    property <angle> newAngle;
    property <bool> hovering: Math.pow(relativeX / 1px, 2) + Math.pow(relativeY / 1px, 2) < metalKnob.width / 2px * metalKnob.height / 2px;
    property <bool> touching: false;
    property <angle> deltaDegrees;
    width: metalKnob.width;
    height: metalKnob.height;

    mouse-cursor: touching ? move : hovering ? grab : default;

    pointer-event(event) => {
        relativeX = ta.mouse-x - centerX;
        relativeY = ta.mouse-y - centerY;
        newAngle = AppState.normalizeAngle(atan2(relativeY / 1px, relativeX / 1px));
        if event.kind == PointerEventKind.down {
            if hovering {
                touching = true;
                // on first touch work out what angle the dial is at. Then use this to create a delta
                // So further movement will be relative to this angle.
                deltaDegrees = AppState.normalizeAngle(AppState.angle - newAngle);
            }
        } else if event.kind == PointerEventKind.up {
            touching = false;
        } else if event.kind == PointerEventKind.move {
            if touching {
                AppState.angle = AppState.normalizeAngle(deltaDegrees + newAngle);
            }
        }
    }
}
pointer-event を利用して、タッチの押下、移動、離れたを判別しています。
また、押下時の位置が、ダイアル上にあるかを判別するプロパティ hovering を追加して、ある場合のみ回転処理をするようにしました。
TouchArea の mouse-cursor プロパティを、操作時には move、操作可能時には grab にして、マウスの形状も変えました。
(grabbing の方がよかった気がする)
以下のプルリクエストを作成してみたので、近いうちに取り込まれるといいなと思っています。
※ 2024/12/21 取り込まれました。
ソースコードを改善しました ※ 2024/12/21 追記
見た目に影響のない Rectangle がいくつかあったり、
読み取りしかしないプロパティに in がついていたりを修正し、すっきりした感じになおしたのが以下のプルリクエストです。
最小値と最大値のジャンプを阻止しました ※ 2024/12/21 追記
TODO の1番目に挑戦し、親切なレビュープロセスの結果、無事取り込まれました。
おわりに
今回は、Slint のサンプルコードのうち、ダイアルの実装を研究してみました。
簡単なコードで、結構素敵な UI が作れているのではと感じました。
また、上記で作成したプルリクエスト以外にも改善の余地がありそうだったので、引き続き色々いじって遊んでみようと思っています。
明日は @hermit4 さんによる 祝 Slint 1.9リリース です。お楽しみに!

