はじめに
誕生日にCTFを開催したりTsukuCTFのインフラを担当したりしていたtask4233です。
さて、CTFのコンテストページを簡単にサーブできるCTFdを使ったことはあるでしょうか?
設定方法はドキュメントに書かれているのですが、未経験の人にとっては取っ掛かりづらいかもしれません。
そこで、本記事ではCTFdのセッティング方法に関してセッティング方法を簡単に共有します。過去の開催記録は末尾にまとめてあるので、興味があれば参照してください。
今回のゴールは、
- CTFdサーバの構築
- HTTPS化
- メールサーバの構築
です。環境はDebian系のLinuxインスタンス内で実施する想定です。他のディストリビューションを利用する場合は、適宜内容を読み替えてください。実行環境は、GCPのGCEインスタンスやAWSのEC2インスタンスなど、お好みのインスタンスどうぞ。
AWSを利用して構築したい場合は、のみぞうさんの記事が参考になるかもしれません。
構成
このような構成を想定しています。
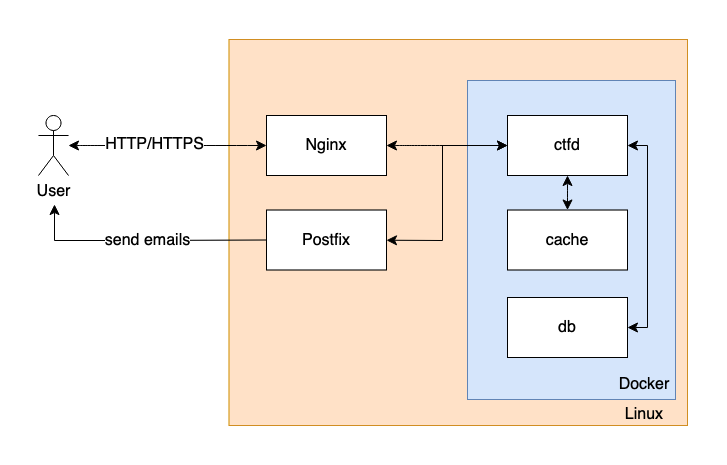
- 外部からの通信 ↔ Linuxインスタンス内のNginx: HTTPS
- Linuxインスタンス内のNginx ↔ Dockerコンテナ内のCTFd: HTTP
初期設定
まずは初期設定をしましょう。次のコマンドで設定出来ます。Dockerと基本的なツールをインストールするためのコマンドです。
#!/bin/bash

# install Docker
sudo apt-get update
sudo apt-get install -y \
    ca-certificates \
    curl \
    git \
    gnupg
sudo install -m 0755 -d /etc/apt/keyrings
curl -fsSL https://download.docker.com/linux/debian/gpg | sudo gpg --dearmor -o /etc/apt/keyrings/docker.gpg
sudo chmod a+r /etc/apt/keyrings/docker.gpg
echo \
  "deb [arch=$(dpkg --print-architecture) signed-by=/etc/apt/keyrings/docker.gpg] https://download.docker.com/linux/debian \
  $(. /etc/os-release && echo "$VERSION_CODENAME") stable" | \
  sudo tee /etc/apt/sources.list.d/docker.list > /dev/null
sudo apt-get update
sudo apt-get install -y \
    docker-ce \
    docker-ce-cli \
    containerd.io \
    docker-buildx-plugin \
    docker-compose-plugin
sudo groupadd docker
sudo gpasswd -a $USER docker
sudo systemctl restart docker
exit
CTFdの導入
次は、CTFdを導入して起動していきましょう。
git clone https://github.com/CTFd/CTFd.git
cd CTFd
docker compose up -d
この状態でインスタンスに割り振られているグローバルIPアドレスの80番ポートにアクセスし、CTFdの初期設定ページが開かれることを確認してください。繋がらない場合は、インスタンスのファイアウォールによって通信が遮断されている可能性があります。設定を見直してください。
確認できたら、以下コマンドでサーバを一旦落としてHTTPS化していきます。
docker compose down
HTTPS化
まずはSSL証明書を発行しましょう。Lets Encryptを利用します。
sudo apt install -y nginx certbot python3-certbot-nginx
sudo certbot --nginx
僕は .dev ドメインを使っていたので、こちらのサイトを参考にしました。
結果、以下のような文字列が出ればOKです。
- - - - - - - - - - - - - - - - - - - - - - - - - - - - - - - - - - - - - - - -
Congratulations! You have successfully enabled https://ctf.task4233.dev
- - - - - - - - - - - - - - - - - - - - - - - - - - - - - - - - - - - - - - - -
Subscribe to the EFF mailing list (email: ***@gmail.com).

IMPORTANT NOTES:
 - Congratulations! Your certificate and chain have been saved at:
   /etc/letsencrypt/live/ctf.task4233.dev/fullchain.pem
   Your key file has been saved at:
   /etc/letsencrypt/live/ctf.task4233.dev/privkey.pem
   Your certificate will expire on 2024-03-23. To obtain a new or
   tweaked version of this certificate in the future, simply run
   certbot again with the "certonly" option. To non-interactively
   renew *all* of your certificates, run "certbot renew"
 - If you like Certbot, please consider supporting our work by:

   Donating to ISRG / Let's Encrypt:   https://letsencrypt.org/donate
   Donating to EFF:                    https://eff.org/donate-le
次に、こちらのファイルをNginxで設定してHTTPS化していきましょう。
/etc/nginx/sites-enabled/default を作成/編集して、最終的にこんな感じの設定ファイルになるはずです。ctf.task4233.dev は自分のドメインに置き換えてください。
server {
	listen 80;
	server_name ctf.task4233.dev
	return 301 https://ctf.task4233.dev$request_uri;
}

server {
 	location / {
 		# First attempt to serve request as file, then
 		# as directory, then fall back to displaying a 404.
 		# try_files $uri $uri/ =404;
		# auth_basic "Restricted";
		# auth_basic_user_file /etc/nginx/.htpasswd; # Basic認証を使いたい場合は、こちらに.htpasswdファイルのパスを設定する
		proxy_pass http://127.0.0.1:8000;
        # proxy_redirect off;
		proxy_set_header Host $host;
		proxy_set_header X-Real-IP $remote_addr;
		proxy_set_header X-Forwarded-For $proxy_add_x_forwarded_for;
		proxy_set_header X-Forwarded-Host $server_name;
	}

    listen [::]:443 ssl http2; # managed by Certbot
    listen 443 ssl http2; # managed by Certbot
    ssl_certificate /etc/letsencrypt/live/ctf.task4233.dev/fullchain.pem; # managed by Certbot
    ssl_certificate_key /etc/letsencrypt/live/ctf.task4233.dev/privkey.pem; # managed by Certbot
    include /etc/letsencrypt/options-ssl-nginx.conf; # managed by Certbot
    ssl_dhparam /etc/letsencrypt/ssl-dhparams.pem; # managed by Certbot
    client_max_body_size 30m;
}

server {
    if ($host = ctf.task4233.dev) {
        return 301 https://$host$request_uri;
    } # managed by Certbot


	listen 80 default_server;
 	listen [::]:80 default_server;

 	server_name ctf.task4233.dev;
    return 404; # managed by Certbot
}
最後にNginxを再起動します。
sudo systemctl restart nginx
メールサーバの設定
Postfixを使います。設定を変える時に個別に再起動すると思ったので、今回はNginx同様Dockerコンテナの外に出しています。
まずはPostfixをインストールしていきましょう。
sudo apt update
sudo apt install -y postfix
そして、/etc/postfix/main.cf にある設定ファイルを編集していきます。次のような設定になるはずです。
# See /usr/share/postfix/main.cf.dist for a commented, more complete version

# Debian specific:  Specifying a file name will cause the first
# line of that file to be used as the name.  The Debian default
# is /etc/mailname.
#myorigin = /etc/mailname

smtpd_banner = $myhostname ESMTP $mail_name (Ubuntu)
biff = no

# appending .domain is the MUA's job.
append_dot_mydomain = no

# Uncomment the next line to generate "delayed mail" warnings
#delay_warning_time = 4h

readme_directory = no

# See http://www.postfix.org/COMPATIBILITY_README.html -- default to 3.6 on
# fresh installs.
compatibility_level = 3.6

# TLS parameters
smtpd_tls_cert_file=/etc/ssl/certs/ssl-cert-snakeoil.pem
smtpd_tls_key_file=/etc/ssl/private/ssl-cert-snakeoil.key
smtpd_tls_security_level=may

smtp_tls_CApath=/etc/ssl/certs
smtp_tls_security_level=may
smtp_tls_session_cache_database = btree:${data_directory}/smtp_scache

smtpd_relay_restrictions = permit_mynetworks permit_sasl_authenticated defer_unauth_destination
myhostname = ctf.task4233.dev # ここを自分のドメインに置き換える
mydomain = ctf.task4233.dev # ここを自分のドメインに置き換える
alias_maps = hash:/etc/aliases
alias_database = hash:/etc/aliases
myorigin = $mydomain
mydestination = $myhostname, ctf.task4233.dev, localhost.localdomain, localhost # ここを自分のドメインに置き換える
# relayhost =
mynetworks = 127.0.0.0/8 [::ffff:127.0.0.0]/104 [::1]/128 192.168.0.0/16 # ここにDocker用のネットワークのサブネットマスクを追加する
mailbox_size_limit = 0
recipient_delimiter = +
inet_interfaces = all
inet_protocols = all
設定を上書きしたらリロードしてください。設定ファイルの変更だけならば、こちらのコマンドによってダウンタイムなしで更新できます。
/etc/init.d/postfix reload
動作確認
ここまで終わったら、CTFdの設定をしていきましょう。
設定はポチポチするだけなので、省略します。
設定に関しては、CTFdのドキュメントが参考になるかもしれません。
余談
ctfcliの利用
CTFdに対してぽちぽち問題を追加するのは面倒ですよね?そこで、ctfcliというCTFdに問題追加をしてくれる便利ツールがあります。設定ファイルをわざわざ書くのが面倒なので、私はこちらのようなgeneratorを利用していました。forkするなりcloneするなりして、よしなに使っていただければ幸いです。
コンテナの雑な監視スクリプト
変なログが出た時にDiscordに雑にメッセージを飛ばしてくれる君です。
#!/bin/bash

CONTAINER_NAME="hoge" # app server of CTFd
WEBHOOK_URL="https://discord.com/api/webhooks/..." # WebHook URL

TARGET_LOG=$(docker inspect ${CONTAINER_NAME} | grep LogPath | awk '{print $2}' | tr -d ',"')

_error_conditions="Exception" # フィルタしたい条件をここに書く

alert() {
	while read message
	do
		echo $message | grep -q "${_error_conditions}"
		if [ $? = "0" ]; then
			curl -H "Content-Type: application/json" -X POST -d "{\"content\":\"\`\`\`\\n$(echo $message | tr -d '\"\n')\\n\`\`\`\"}" "$WEBHOOK_URL"
		fi
	done
}

tail -n 0 --follow=name --retry $TARGET_LOG | alert
おわりに
こういう知見は調べれば分かるしな、と思っていたのですが、誰かのためになるかもしれないので一応公開しました。参考になれば幸いです。
皆さんのCTF開催を楽しみにしています ![]()