はじめに
Googleのspeech-to-text APIとLine Notifyを最近使い始めたのですが、案外簡単に扱えると感じたので、
今回はこの2つの技術を使ったボットの作り方を説明します!
今回つくるもの

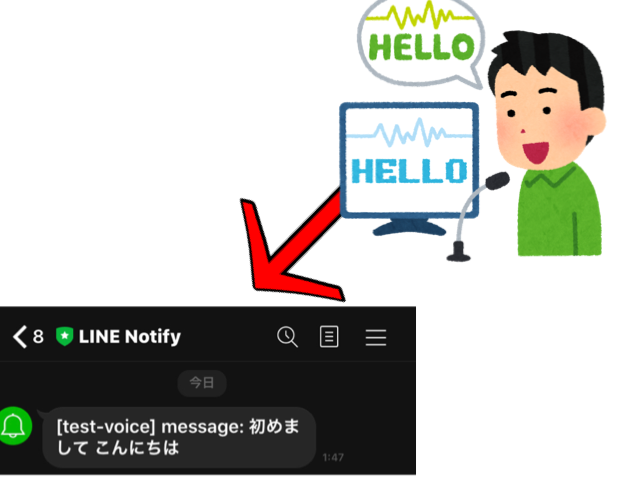
状況が、上記画像のような状況で人が話した内容が文字列となって、それをLine Notifyを使ってLINEに出力するというものを開発します。
実際に動いている動画。
Google Speech-to-Text APIを使ってLineNotifyで出力したー pic.twitter.com/NcBgsGd82P
— たーる (@taarusauce) October 21, 2020
準備
LINE Notifyからアクセストークンを取得する
- LINE Notifyのサイトにアクセス。 https://notify-bot.line.me/ja
- LINEで登録しているメールアドレスとパスワードを入力してログインする

- トップページからバーを探して、自分の名前をクリックしマイページをクリック。

4. トークンを発行するをクリックし、次にトークン名の入力とトークルームを選択する。

5. 英数字の赤文字で表示されたものがアクセストークンになる。これをコピーする。
必要なパッケージのダウンロード
- ターミナルを開いて、下記のコマンドを実行 1回目
pip3 install SpeechRecognition requests python-dotenv numpy
2. コマンド実行 2回目
macの場合
pip3 install PyAudio
ubuntu or debian or Raspberry Piの場合
sudo apt -y upgrade && sudo apt -y update sudo apt install python3-pyaudio
実装
LINEに通知を行う機能の作成
import requests

# Lineにメッセージを送信する関数 送信したい文字列を引数に定義
def send(send_message):
    line_notify_token = <先程作ったアクセストークンをここで指定>
    line_notify_api = 'https://notify-api.line.me/api/notify'

    # トークン情報をヘッダーに載せる
    headers = {'Authorization': f'Bearer {line_notify_token}'}

    data = {'message': send_message}
    # 送信
    requests.post(line_notify_api, headers = headers, data = data)


if __name__ == "__main__":
    text = "test"
    send(text)
モジュールテスト
下記のコマンドを実行して、正しく準備が出来ていたらtestという文字が通知される。
python3 line_notice.py

音声の録音と音声認識を行う機能の作成
import speech_recognition as sr
import numpy as np
import pyaudio
import wave


class voiceFunctionsClass:
    def __init__(self):
        self.CHUNK = 1024
        self.FORMAT = pyaudio.paInt16
        self.CHANNELS = 1
        self.RATE = 48000
        self.RECORD_SECONDS = 5
        self.WAVE_OUTPUT_FILENAME ="recorded.wav"

        self.p = pyaudio.PyAudio()

        self.stream = self.p.open(format=self.FORMAT,
                        channels=self.CHANNELS,
                        rate=self.RATE,
                        input=True,
                        frames_per_buffer=self.CHUNK)

    # 録音処理
    def voice_recode(self):
        print("<<<録音中>>>")

        frames = []
        calc = int(self.RATE / self.CHUNK * self.RECORD_SECONDS)
        for i in range(0, calc):
            data = self.stream.read(self.CHUNK)
            buf = np.frombuffer(data, dtype="int16")
            frames.append(b''.join(buf[::3]))

        print("<<<録音終了>>>")
        # 録音したものを保存
        self.voice_save(frames)


    # 録音保存処理
    def voice_save(self, frames):
        self.stream.stop_stream()
        self.stream.close()
        self.p.terminate()

        wf = wave.open(self.WAVE_OUTPUT_FILENAME, 'wb')
        wf.setnchannels(self.CHANNELS)
        wf.setsampwidth(self.p.get_sample_size(self.FORMAT))
        wf.setframerate(self.RATE / 3)
        wf.writeframes(b''.join(frames))
        wf.close()


    # 音声認識
    def voice_recognize(self):
        print("音声認識を開始します")
        r = sr.Recognizer()
        with sr.AudioFile(self.WAVE_OUTPUT_FILENAME) as source:
            audio = r.record(source)
        result = r.recognize_google(audio, language='ja-JP')
        return result


if __name__ == "__main__":
    voice = voiceFunctionsClass()
    voice.voice_recode()
    print(f"音声認識結果: {voice.voice_recognize()}")
モジュールテスト
python3 voice.py
正常に動作していれば、録音され、録音終了後。話した内容が結果として出力される。
2つの機能を組み合わせたプログラム
import line_notice
import voice


voice_class = voice.voiceFunctionsClass()
voice_class.voice_recode()
voice_result = voice_class.voice_recognize()
line_notice.send(voice_result)
python3 main.py
を実行すると、音声が録音 -> 音声認識が実行 -> Lineに送信という流れで処理が行われるはずです!
github
今回作成したプログラムをGithubに上げました、こちらもぜひご活用ください!
https://github.com/taruscript/speech2Line
まとめ
今回は、2つの技術を使った活用例として作ってみましたが。気軽に割と簡単に作れて初心者にはかなりオススメかと思います!
なにかご不明な点がございましたら僕のTwitterに質問して頂ければ答えられる範囲でお答えしますー!https://twitter.com/taarusauce