はじめに
railsアドベントカレンダー1日目が投稿されていなかったため代わりに投稿します。
皆様、Realm Cloud使ったことありますか?
アプリ向けの組み込みデータベースをクラウドにも対応させたもので、最大の特徴はオフラインでデータ更新が出来、オンラインに繋がればデータをシームレスに同期してくれるという点です。これが非常に便利なんですが今の時代、オフライン利用の需要がないのか日本語の情報が非常に少ないです…
今回はそんな不遇な存在だけど非常に便利なRealm CloudをJWT(Json Web Token)認証で利用するためのRails環境の構築及びRealm Cloudの設定をしてみます。
やり方
- まずは環境です。下記の環境使います。
ruby '2.5.3'

gem 'rails', '~> 5.2.1'
gem 'jwt'
- 次にRealm CloudのJWT認証は、署名する際にRS256が必要なため秘密鍵と公開鍵を作成します。
openssl genrsa -out private.pem 4096
openssl rsa -in private.pem -outform PEM -pubout -out public.pem
- 次に先ほど作成したprivate.pemをcredentialsに登録します。
EDITOR='vi' bin/rails credentials:edit
- 改行データを登録する場合はパイプを入れて下記のように。
rsa_private: |
  -----BEGIN RSA PRIVATE KEY-----
  MIIJKAIBAAKCAgEArdxxxxxxxxxxxxxxxxx
  xxxxxxxxxxxxxxxxxxxxxxxxxxxxxxxxxxx
  略
  -----END RSA PRIVATE KEY-----
- Railsサーバー側で暗号化するため、encode用のクラスを作成。
class JsonWebToken
  class << self
    def encode(payload)
      JWT.encode(payload,
                 OpenSSL::PKey::RSA.new(Rails.application.credentials.config[:rsa_private]),
                 'RS256'
                )
    end
  end
end
- コントローラー側でRealmに登録するためのuser_idキーと値のu2を設定してあげます。
class Api::V1::JsonWebTokensController < ApplicationController
  # devise等使って適宜制限掛けてあげる
  before_action :authenticate_api_user!, only: [:create]

  # json_web_token作成
  def create
    render json: payload(current_api_user)
  end

private
  # 今回は`u2`というcodeを使ってみる。
  def payload(user)
    return nil unless user and user.id
    {
      jwt: JsonWebToken.encode({user_id: user.code})
    }
  end

  def http_token
    @http_token ||= params['data']
  end

  def auth_token
    @auth_token ||= JsonWebToken.decode(http_token)
  end

  def user_id_in_token?
    http_token && auth_token && auth_token[:user_id].to_i
  end
end
- routesはこんな感じです。
# https:///api/v1/json_web_token
Rails.application.routes.draw do
  namespace :api do
    namespace :v1 do
      resource :json_web_token, only: [:create]
    end
  end
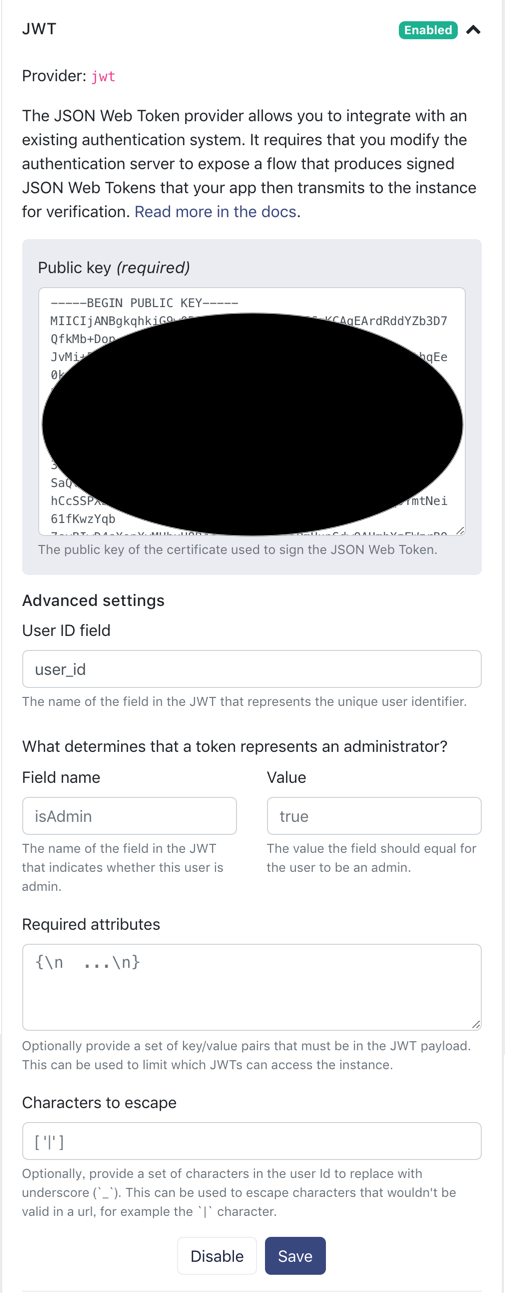
- ここまで来るともう少しです。次にRealm Cloudにブラウザからログインし、JWT認証を設定したいインスタンスを選択してSettingsタブを開きます。下記はすでに設定済みのためEnabled
になってますが、デフォルトはDisabledです。

- 次にJWTを展開するとPublic KeyとUserID fieldを設定する箇所があるのでここに前述の公開鍵とrealmに登録する際に使用するキー名のuser_idを設定してあげてSaveします。
ここまでくればサーバー側の設定は完了です!今回はAndroidで接続テストしてみます。
// 先程作成したRailsサーバーからJWTを取得し、その値をcredentialsに設定します。
val credentials = SyncCredentials.jwt(requireNotNull(success.body()).jwt)
    SyncUser.logInAsync(credentials, "https://example.us1a.cloud.realm.io/auth", object : SyncUser.Callback<SyncUser> {
        override fun onSuccess(result: SyncUser) {}
        override fun onError(error: ObjectServerError) {}
    })
- 上記のコードを実行してRealm Studioで確認してみると、、、無事、u2というユーザーが作成されました!

最後に
このあたりの日本語の情報があまりなく英語のドキュメントのみでかなり苦戦しました…(英語勉強したい)
jwtサーバーを立てる上でこちらのサイトが大変参考になりました。
http://blog.naoshihoshi.com/entry/2018/05/14/153000
皆様のお役にたてれば幸いです!
