はじめに
- 年々偏頭痛が増えているような気がする
- 一般的には気圧に関係していることがよくあるが、自分の場合はいつ痛くなるのか規則性がわからない
- 痛くなった日はスマホのメモ帳にメモしていた
概要
- メモする項目はいつも同じなのでエクセル的なものに淡々と記録できそう
- ただし毎回PCを開いてエクセルを開くのも面倒なのでAndroidで記録専用アプリを作成する
- Androidアプリを作ったことないのでGPT o1に作成依頼
- 作成から動作確認までの備忘録
プロンプト
### やりたいこと
 - 以下のアプリを作りたい

#### googleスプレッドシートで頭痛を記録
 - googleスプレッドシートで頭痛を記録したい

##### 記録する項目
 - 日付
 - 時間
 - 痛い場所(右前・左前・右後・左後から選択)
 - 痛さ度合い(軽い・普通・重いから選択)
 - 閃輝暗点の有無
 - 薬の服用(した場合は薬名を記入)
 - 服用後の痛さ度合い(軽い・普通・重いから選択)

#### androidで記録リクエスト送信
 - androidで記録するためのアプリを作成したい
 - 項目は前項記述の通り
 - 「記録」ボタンを押してスプレッドシートに記録したい
 - またAPIのURLやkeyなど実行に必要なものがある場合は別途設定画面にて設定可能とする
スプレッドシートの準備とAPI用のコード
- 手順に従ってスプレッドシートを準備
- GASコードの記述
function doPost(e) {
  try {
    // JSONボディを解析
    const data = JSON.parse(e.postData.contents);

    // 必要なデータを取得
    const date = data.date;                 // 日付
    const time = data.time;                 // 時間
    const location = data.location;         // 痛い場所(右前・左前・右後・左後)
    const severity = data.severity;         // 痛さ度合い(軽い・普通・重い)
    const hasAura = data.hasAura;           // 閃輝暗点の有無(true / false)
    const tookMedicine = data.tookMedicine; // 薬を服用したか(true / false)
    const medicineName = data.medicineName; // 薬名
    const afterSeverity = data.afterSeverity; // 服用後の痛さ度合い(軽い・普通・重い)

    // スプレッドシートを開く
    const ss = SpreadsheetApp.getActiveSpreadsheet();
    const sheet = ss.getSheetByName("シート1"); // シート名は適宜変更

    // 追記する行を作成
    // 例: 現在時刻を記録日時として使う場合
    const now = new Date();
    const recordRow = [
      date,
      time,
      location,
      severity,
      hasAura ? "あり" : "なし",
      tookMedicine ? "した" : "していない",
      medicineName,
      afterSeverity,
      now // 記録日時として
    ];

    // シートに追記
    sheet.appendRow(recordRow);

    // 正常終了レスポンス
    return ContentService
      .createTextOutput(JSON.stringify({ status: "success" }))
      .setMimeType(ContentService.MimeType.JSON);

  } catch (error) {
    // 例外が起きた場合のレスポンス
    return ContentService
      .createTextOutput(JSON.stringify({ status: "error", message: error }))
      .setMimeType(ContentService.MimeType.JSON);
  }
}
- デプロイ手順に従って実施
- エンドポイントURLをメモしておく
Androidアプリの実装
- UIの実装
activity_main.xml
<?xml version="1.0" encoding="utf-8"?>
<ScrollView
   xmlns:android="http://schemas.android.com/apk/res/android"
   xmlns:app="http://schemas.android.com/apk/res-auto"
   android:layout_width="match_parent"
   android:layout_height="match_parent">

   <LinearLayout
       android:layout_width="match_parent"
       android:layout_height="wrap_content"
       android:orientation="vertical"
       android:padding="16dp">

       <!-- 日付入力 -->
       <TextView
           android:layout_width="wrap_content"
           android:layout_height="wrap_content"
           android:text="日付" />
       <EditText
           android:id="@+id/editTextDate"
           android:layout_width="match_parent"
           android:layout_height="wrap_content"
           android:hint="例: 2023/12/31" />

       <!-- 時間入力 -->
       <TextView
           android:layout_width="wrap_content"
           android:layout_height="wrap_content"
           android:text="時間" />
       <EditText
           android:id="@+id/editTextTime"
           android:layout_width="match_parent"
           android:layout_height="wrap_content"
           android:hint="例: 13:45" />

       <!-- 痛い場所 -->
       <TextView
           android:layout_width="wrap_content"
           android:layout_height="wrap_content"
           android:text="痛い場所" />
       <Spinner
           android:id="@+id/spinnerLocation"
           android:layout_width="match_parent"
           android:layout_height="wrap_content" />

       <!-- 痛さ度合い -->
       <TextView
           android:layout_width="wrap_content"
           android:layout_height="wrap_content"
           android:text="痛さ度合い" />
       <Spinner
           android:id="@+id/spinnerSeverity"
           android:layout_width="match_parent"
           android:layout_height="wrap_content" />

       <!-- 閃輝暗点の有無 -->
       <CheckBox
           android:id="@+id/checkBoxAura"
           android:layout_width="wrap_content"
           android:layout_height="wrap_content"
           android:text="閃輝暗点あり" />

       <!-- 薬の服用チェックボックス -->
       <CheckBox
           android:id="@+id/checkBoxTookMedicine"
           android:layout_width="wrap_content"
           android:layout_height="wrap_content"
           android:text="薬を服用した" />

       <!-- 薬名入力 (デフォルトは非活性にしておく) -->
       <EditText
           android:id="@+id/editTextMedicineName"
           android:layout_width="match_parent"
           android:layout_height="wrap_content"
           android:hint="薬名を入力"
           android:enabled="false" />

       <!-- 服用後の痛さ度合い -->
       <TextView
           android:layout_width="wrap_content"
           android:layout_height="wrap_content"
           android:text="服用後の痛さ度合い" />
       <Spinner
           android:id="@+id/spinnerAfterSeverity"
           android:layout_width="match_parent"
           android:layout_height="wrap_content" />

       <!-- 記録ボタン -->
       <Button
           android:id="@+id/buttonRecord"
           android:layout_width="wrap_content"
           android:layout_height="wrap_content"
           android:text="記録"
           android:layout_marginTop="16dp"/>

   </LinearLayout>
</ScrollView>
- Spinnerの選択肢の定義
strings.xml
<resources>
    <!-- アプリ名やその他文字列がすでにあればそれらは残す -->

    <!-- 痛い場所のリスト -->
    <string-array name="location_array">
        <item>右前</item>
        <item>左前</item>
        <item>右後</item>
        <item>左後</item>
    </string-array>

    <!-- 痛さ度合いのリスト -->
    <string-array name="severity_array">
        <item>軽い</item>
        <item>普通</item>
        <item>重い</item>
    </string-array>

</resources>
- 処理の実装
MainActivity.kt
package com.example.headacheapp

import android.os.Bundle
import android.widget.*
import androidx.appcompat.app.AppCompatActivity
import okhttp3.*
import org.json.JSONObject
import java.io.IOException

class MainActivity : AppCompatActivity() {

    private lateinit var editTextDate: EditText
    private lateinit var editTextTime: EditText
    private lateinit var spinnerLocation: Spinner
    private lateinit var spinnerSeverity: Spinner
    private lateinit var checkBoxAura: CheckBox
    private lateinit var checkBoxTookMedicine: CheckBox
    private lateinit var editTextMedicineName: EditText
    private lateinit var spinnerAfterSeverity: Spinner
    private lateinit var buttonRecord: Button

    // OkHttpClient を使い回す場合はメンバ変数で保持
    private val client = OkHttpClient()

    override fun onCreate(savedInstanceState: Bundle?) {
        super.onCreate(savedInstanceState)
        setContentView(R.layout.activity_main)

        // 1. ViewをIDで取得
        editTextDate = findViewById(R.id.editTextDate)
        editTextTime = findViewById(R.id.editTextTime)
        spinnerLocation = findViewById(R.id.spinnerLocation)
        spinnerSeverity = findViewById(R.id.spinnerSeverity)
        checkBoxAura = findViewById(R.id.checkBoxAura)
        checkBoxTookMedicine = findViewById(R.id.checkBoxTookMedicine)
        editTextMedicineName = findViewById(R.id.editTextMedicineName)
        spinnerAfterSeverity = findViewById(R.id.spinnerAfterSeverity)
        buttonRecord = findViewById(R.id.buttonRecord)

        // 2. Spinnerにアダプタを設定
        setupSpinner(spinnerLocation, R.array.location_array)
        setupSpinner(spinnerSeverity, R.array.severity_array)
        setupSpinner(spinnerAfterSeverity, R.array.severity_array)

        // 3. 薬服用チェックボックスの状態で、薬名入力欄の有効/無効を切り替え
        checkBoxTookMedicine.setOnCheckedChangeListener { _, isChecked ->
            editTextMedicineName.isEnabled = isChecked
            if (!isChecked) {
                editTextMedicineName.setText("")
            }
        }

        // 4. 記録ボタン押下
        buttonRecord.setOnClickListener {
            // UIからデータ取得
            val date = editTextDate.text.toString()
            val time = editTextTime.text.toString()
            val location = spinnerLocation.selectedItem.toString()
            val severity = spinnerSeverity.selectedItem.toString()
            val hasAura = checkBoxAura.isChecked
            val tookMedicine = checkBoxTookMedicine.isChecked
            val medicineName = editTextMedicineName.text.toString()
            val afterSeverity = spinnerAfterSeverity.selectedItem.toString()

            // 入力チェック(例として、日付と時間が未入力ならエラー表示)
            if (date.isBlank() || time.isBlank()) {
                Toast.makeText(this, "日付・時間を入力してください", Toast.LENGTH_SHORT).show()
                return@setOnClickListener
            }

            // JSONオブジェクトを作成 (Apps Script 側で受け取るキーに合わせる)
            val json = JSONObject().apply {
                put("date", date)
                put("time", time)
                put("location", location)
                put("severity", severity)
                put("hasAura", hasAura)
                put("tookMedicine", tookMedicine)
                put("medicineName", medicineName)
                put("afterSeverity", afterSeverity)
            }

            // スプレッドシートAPIへPOST (OkHttpで非同期)
            postDataToSpreadSheet(json)
        }
    }

    /**
     * Spinnerに配列リソースを紐付ける
     */
    private fun setupSpinner(spinner: Spinner, arrayResId: Int) {
        val adapter = ArrayAdapter.createFromResource(
            this,
            arrayResId,
            android.R.layout.simple_spinner_item
        )
        adapter.setDropDownViewResource(android.R.layout.simple_spinner_dropdown_item)
        spinner.adapter = adapter
    }

    /**
     * スプレッドシートのAPIにデータをPOST
     */
    private fun postDataToSpreadSheet(jsonData: JSONObject) {
        // 実際にはGoogle Apps Script のウェブアプリURLを指定する (例: https://script.google.com/macros/s/.../exec)
        // ここでは例として example.com/exec
        val url = "https://example.com/exec"

        // JSONをRequestBodyに変換
        val mediaType = "application/json; charset=utf-8".toMediaTypeOrNull()
        val requestBody = RequestBody.create(mediaType, jsonData.toString())

        val request = Request.Builder()
            .url(url)
            .post(requestBody)
            .build()

        // 非同期通信
        client.newCall(request).enqueue(object : Callback {
            override fun onFailure(call: Call, e: IOException) {
                // 通信エラー時
                runOnUiThread {
                    Toast.makeText(
                        this@MainActivity,
                        "通信に失敗しました: ${e.message}",
                        Toast.LENGTH_LONG
                    ).show()
                }
            }

            override fun onResponse(call: Call, response: Response) {
                // レスポンス取得
                response.use {
                    if (!it.isSuccessful) {
                        // ステータスコードがエラーの場合
                        runOnUiThread {
                            Toast.makeText(
                                this@MainActivity,
                                "サーバーエラー: ${response.code}",
                                Toast.LENGTH_LONG
                            ).show()
                        }
                    } else {
                        // 正常に受け取れた
                        val responseBody = it.body?.string() ?: ""
                        runOnUiThread {
                            // ここでレスポンス(JSON)をパースして成功メッセージを表示する例
                            // (Apps Scriptが {status: "success"} を返す想定)
                            Toast.makeText(
                                this@MainActivity,
                                "記録しました: $responseBody",
                                Toast.LENGTH_LONG
                            ).show()
                        }
                    }
                }
            }
        })
    }
}
改善
- このほかライブラリ定義文の修正
- 日付・時間をEditTextからDatePickerDialogとTimePickerDialogを使用するように設定
- 日付・時間をデフォルトで現在時刻を設定
- 薬名はデフォルトで「イブクイックDX」に設定
- ログの設定
- エンドポイントURLを環境変数化
動作確認
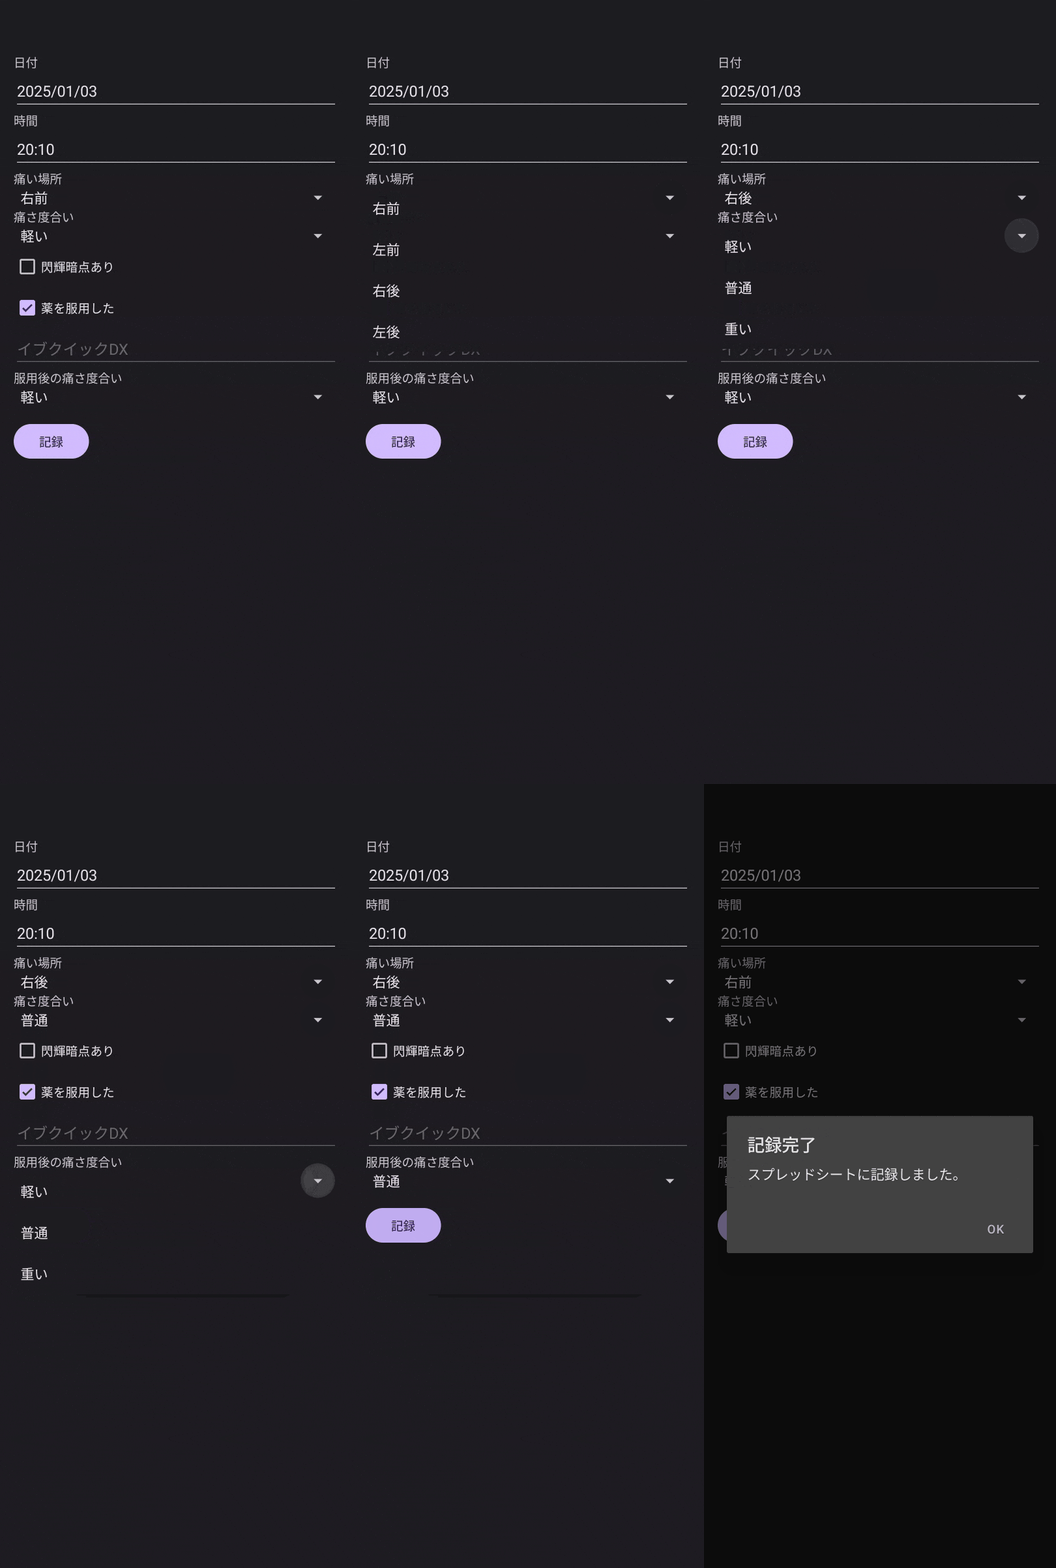
-
apk化して実機に入れてインストール、以下のURL先参考
-
androidより操作
↓
- 確かに記録されている
成果物
- できたコードはgithubに放置
所感
- 無知だったが生成AI(GPT o1)使ったので半日未満で作成完了
- 細かい中身わかってないのでいいのだろうかと思う一方でほか言語を経験しているとある程度概念化されているので開発環境のプロジェクト仕様がなんとなくわかってしまう
- いろいろ改善したい


