免責事項
この記事は初心者視点でザックリとした説明をしています。正確性に欠ける可能性がございますが、ご了承ください。「明らかに違うよ」ということがありましたら、ご指摘くださると幸いです。
環境
OS:最新版ではないMacOS
VirtualBox:5.2.26
Vagrant:2.2.6
Ubuntu:ubuntu/bionic64 v20181129.0.0
目次
- テンプレートエンジンとは
- アンケートをつくる
1. テンプレートエンジンとは
テンプレートエンジンはテンプレートと呼ばれる雛形とデータを合成し、HTML等の成果ドキュメントを出力するライブラリです。
Wikipediaにわかりやすい画像があったのでお借りしました。
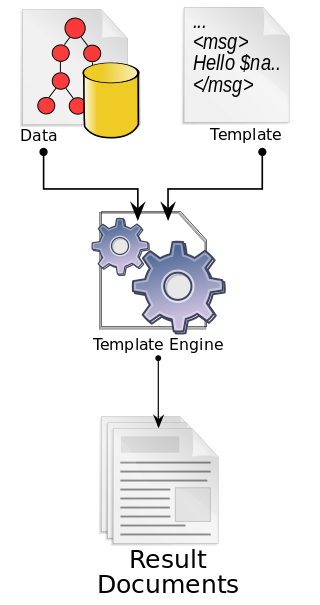
(画像 by Dreftymac at English Wikipedia)
ようするに、HTMLなどのドキュメントを作るのを簡単にしてくれるらしいです。
今回はPugというNode.jsのテンプレートを使って簡単なアンケートを作ります。
Pugは以下のように書きます。
doctype html
html(lang="ja")
  head
    meta(charset="UTF-8")
    title 会員登録ページ
  body
    h1 会員情報
    form(method="post" action="/member/registry")
    メールアドレス: <input type="text" name="mail">
      名前: <input type="text" name="name">
      input(type="radio" name="性別" value="男")
      span 男
      input(type="radio" name="性別" value="女")
      span 女
      button(type="submit") 登録
以下はHTMLです。
<!DOCTYPE html>
<html lang="ja">
<head>
  <meta charset="UTF-8">
  <title>会員登録ページ</title>
</head>

<body>
<h1>会員情報</h1>
<form method="post" action="/member/registry">
  メールアドレス: <input type="text" name="mail">
  名前: <input type="text" name="name">
  <input type="radio" name="性別" value="男" /> 男
  <input type="radio" name="性別" value="女" /> 女
  <button type="submit">登録</button>
</form>
</body>

</html>
見比べてみると、Pugは閉じタグが不要なため簡潔に表現することができます。
閉じタグがないため、改行やインデントなどで全体を構成していきます。
慣れるまで違和感がありますが、慣れてくると以下のようなメリットがあります。
・CSSと書き方の統一(classは. 、idは#)
・ファイル分割ができるため、管理がしやすい。
・繰り返しが楽につくれる
この他にもたくさんのメリットがあるので、Node.jsを使う方にはおすすめのテンプレートエンジンです。
2. アンケートをつくる
Pugは先ほど見た通り、
・要素名(h1やbuttonなど)の後に要素の値を記述します。
・属性(methodやtype)を書く場合は要素名のあとに () を書き、その中に属性を記述していきます。
・属性が2つ以上続く場合には半角スペースで区切ります。
・入れ子構造にする場合はインデントを使います。
というルールがあります。
doctype html
html(lang="ja")
  head
    meta(charset="UTF-8")
    title アンケート
  body
    h1 どのスポーツがやりたいですか?
    form(method="post" action=path)
      span 名前:
      input(type="text" name="name")
      span 年齢:
      input(type="text" name="age")
      span 血液型:
      select(name="blood")
        option(value="A") A型
        option(value="B") B型
        option(value="O") C型
        option(value="AB") D型
      input(type="radio" name="favoriteSport" value=firstItem)
      span #{firstItem}
      input(type="radio" name="favoriteSport" value=secondItem)
      span #{secondItem}
      button(type="submit") 投稿
以上の.pugファイルをつくり、ファイルが保存されているディレクトリに移動し、
コンソールで以下のようにコマンドを打ちコンパイルをしてみます。
今回は表示の確認のためにコンパイルするだけです。
$ pug form.pug --pretty
これでform.htmlファイルを作り出すことができます。
--prettyオプションは、htmlを綺麗な形で出力してくれます。
ディレクトリを見てみて、以下のようなhtmlファイルができていたら確認成功です。
<!DOCTYPE html>
<html lang="ja">
  <head>
    <meta charset="UTF-8">
    <title>アンケート</title>
  </head>
  <body>
    <h1>どのスポーツがやりたいですか?</h1>
    <form method="post"><span>名前:</span>
      <input type="text" name="name"><span>年齢:</span>
      <input type="text" name="age"><span>血液型:</span>
      <select name="blood">
        <option value="A">A型</option>
        <option value="B">B型</option>
        <option value="O">C型</option>
        <option value="AB">D型</option>
      </select>
      <input type="radio" name="favoriteSport"><span></span>
      <input type="radio" name="favoriteSport"><span></span>
      <button type="submit">投稿</button>
    </form>
  </body>
</html>
次にPugファイルを自動的にhtmlに変換してくれて、URLによって内容を変えることができるようにNode.js(JavaScript)ファイルを作っていきます。
以下のようなファイルを作ってください。
'use strict';
const http = require('http');
const pug = require('pug');
const server = http.createServer((req, res) => {
  console.info('[' + new Date() + '] Requested by ' + req.connection.remoteAddress);
  res.writeHead(200, {
    'Content-Type': 'text/html; charset=utf-8'
  });

  switch (req.method) {
    case 'GET':
     if (req.url === '/enquetes/base-soccer') {
      res.write(pug.renderFile('./form.pug', {
        path: req.url,
        firstItem: '野球',
        secondItem: 'サッカー'
     }));
      } else if (req.url === '/enquetes/tennis-basket') {
        res.write(pug.renderFile('./form.pug', {
          path: req.url,
          firstItem: 'テニス',
          secondItem: 'バスケ'
        }));
      }
      res.end();
      break;
    case 'POST':
      let data = '';
      req.on('data', (chunk) => {
        data = data + chunk;
      }).on('end', () => {
        const decodedData = decodeURIComponent(data);
        console.info('[' + new Date() + '] 投稿: ' + decodedData);
        res.write('<!DOCTYPE html><html lang="ja"><body><h1>' +
          decodedData + 'が投稿されました</h1></body></html>');
        res.end();
      });
      break;
    default:
      break;
  }
}).on('error', (e) => {
  console.error('[' + new Date() + '] Server Error', e);
}).on('clientError', (e) => {
  console.error('[' + new Date() + '] Client Error', e);
});
const port = 8000;
server.listen(port, () => {
  console.info('[' + new Date() + '] Listening on ' + port);
});
解説
const http = require('http');
const pug = require('pug');
const server = http.createServer((req, res) => {
  console.info('[' + new Date() + '] Requested by ' + req.connection.remoteAddress);
  res.writeHead(200, {
    'Content-Type': 'text/html; charset=utf-8'
  });
1行目でhttpモジュールをインストールしています。
2行目でpugモジュールをインストールしています。
3行目でhttpモジュールを使い、サーバーを作っています。
(req, res) => { は、サーバーが返すリクエストとレスポンスのオブジェクトです。
6行目のres.writeHead(200, {
'Content-Type': 'text/html; charset=utf-8'
});
は、
レスポンスとしてヘッダに「ステータスコードが200(リクエスト成功)である」こと、「ファイルがhtmlである」こと、「文字コードがutf-8である」ことを書き込んでいます。
  switch (req.method) {
    case 'GET':
     if (req.url === '/enquetes/base-soccer') {
      res.write(pug.renderFile('./form.pug', {
        path: req.url,
        firstItem: '野球',
        secondItem: 'サッカー'
     }));
      } else if (req.url === '/enquetes/tennis-basket') {
        res.write(pug.renderFile('./form.pug', {
          path: req.url,
          firstItem: 'テニス',
          secondItem: 'バスケ'
        }));
      }
      res.end();
      break;
1行目はswitch文の最初です。
2行目にはリクエストがGETである場合、
3行目にはurlが/enquetes/base-soccerである場合、
4行目のres.write()は()内の処理を直接ブラウザに表示します。
pug.renderFile('./form.pug'...は
上で説明した pug form.pugと同じ意味です。
5-7行目はpath: req.urlがurlが/enquetes/base-soccerであることを意味しており、urlが/enquetes/base-soccerである場合、firstItem: '野球', secondItem: 'サッカー'が
form.pugの以下の部分に当てはまるようになるということです。
input(type="radio" name="favoriteSport" value=firstItem)
      span #{firstItem} <= '野球が代入される'
      input(type="radio" name="favoriteSport" value=secondItem)
      span #{secondItem} <= 'サッカーが代入される'
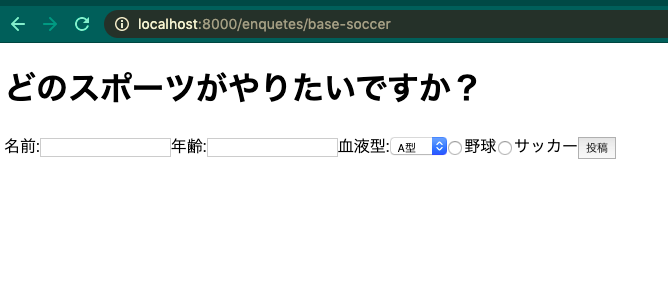
GETメソッドでURLが/enquetes/base-soccer の場合、以下の画像のような表示になるかと思います。
続きの部分の説明になります。
    case 'POST':
      let data = '';
      req.on('data', (chunk) => {
        data = data + chunk;
      }).on('end', () => {
        const decodedData = decodeURIComponent(data);
        console.info('[' + new Date() + '] 投稿: ' + decodedData);
        res.write('<!DOCTYPE html><html lang="ja"><body><h1>' +
          decodedData + 'が投稿されました</h1></body></html>');
        res.end();
      });
      break;
    default:
      break;
1行目はリクエストメソッドがPOSTである場合、
2行目は4行目で使用する変数dataを作成しています。
3-4行目は'data'イベントがあった場合の処理を表しており、
POSTで送られたデータがchunkにバイト文字として少しずつ代入され、data変数に代入されます。chunkはコンソールで表示すると以下のような文字になります。
5行目からは'end'イベントがあった場合の処理が書かれています。
まず変数dataに代入されたバイト文字列はdecodeURIComponent(data);で、
デコードされて、バイト文字列が解除され、decodedData変数に代入されます。
その後、8行目で、res.writeでそのdecodedDataが表示されます。
10行目のres.end()で'end'イベントが終わります。
11行目以降のbreakやdefaultはswitch文の分岐処理です。

POSTメソッドの場合、ブラウザは以下のような表示になります。
POSTメソッドは、GETメソッドで取得したアンケートで、投稿ボタンを押すことを意味します。

}).on('error', (e) => {
  console.error('[' + new Date() + '] Server Error', e);
}).on('clientError', (e) => {
  console.error('[' + new Date() + '] Client Error', e);
});
const port = 8000;
server.listen(port, () => {
  console.info('[' + new Date() + '] Listening on ' + port);
});
1行目から5行目はエラー処理です。
6行目から9行目はサーバーが待ち受ける設定になります。
ポート番号8000番で待ち受けることを意味します。
解説が終わったので、
ファイルを作ったディレクトリ上で、以下のコマンドを打ちサーバーを立ち上げ、ちゃんと表示されるか確認しましょう。
$ node index.js
> [Fri Nov 08 2019 20:26:25 GMT+0900 (GMT+09:00)] Listening on 8000
以上のような表示が出たら、ブラウザで
http://localhost:8000/enquetes/base-soccer
と
http://localhost:8000/enquetes/tennis-basket
にアクセスしてみましょう。
・アンケートが表示されたこと
・URLによってアンケートの表示が違うこと
が確認できたら成功です。
参考
「N予備校 プログラミングコース」
https://www.nnn.ed.nico/
「HTMLタグリファレンス」
http://www.htmq.com/html/form.shtml
「PugでHTMLコーディングを効率化・メリットと使い方を知る」
https://tech.qookie.jp/posts/info-pug-feature/
「【Pug】ゴリラでもわかるJade改めPug入門」
https://blog.mismithportfolio.com/web/20160326pugbegin#d