「Applibot Advent Calendar 2022」1日目の記事になります。
トップバッターです!よろしくお願いします!
はじめに
Unity開発が大規模になっていくにつれて、デザイナーにUnityを触ってもらう機会は多くなってきます。
その中で、エンジニアの実装したプレハブで、デザイン調整などでいじってほしい場所が発生するケースがあります。
しかしデザイナーにとって、プレハブが複雑化するにつれて、いじってほしいパラメータを探すのは大変になります。
そこで、デザイナーが探しやすいように、属性のついたパラメータのオブジェクトをHierarchyとInspectorで表示するようにします。
この記事の通りに実装すれば以下のような表示ができます。
以下のようにScriptでAttributeを使用できます。
using UnityEngine;

public class TestObject : MonoBehaviour
{
    [SerializeField, DesignFitter("いじってほしいパラメータ1")]
    private float _param1;

    [SerializeField] private float _test;

    [SerializeField, DesignFitter("いじってほしいパラメータ2")]
    private float _param2;
}
HierarchyでAttributeを設定したオブジェクトに赤枠のようなマークをつけることができます。
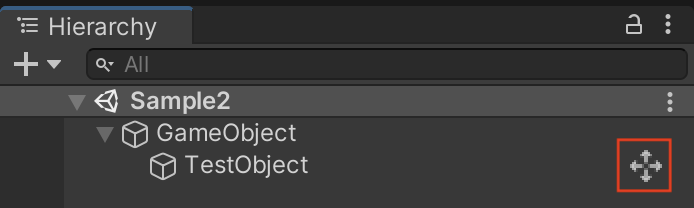
Inspector上ではいじってほしいパラメータの色が変更されます。
概要
DesignFitterAttributeで設定したものに以下の表示を行う
・Attributeを指定したパラメータを持つオブジェクトについてHierarchy上でアイコンを表示する。
・InspectorでAttributeを指定したパラメータの色を変更する。
作業環境
Unity2021.3.5f1
※それ以前のバージョンでも使える場合はございます。
実装の流れ
1.DesignFitterの属性を作成
2.Inspector上で確認できる機能の作成
3.Hierarchy上で確認できる機能の作成
1.DesignFitterの属性を作成
以下のスクリプトを作成します。
using System;
using UnityEngine;

/// <summary>
/// デザイナーに調整してもらいたい変数に使用する属性
/// </summary>
[AttributeUsage(AttributeTargets.Field)]
public class DesignFitterAttribute : PropertyAttribute
{
    /// <summary>
    /// ラベルに表示するテキスト
    /// </summary>
    public string Label { get; }

    /// <summary>
    /// コンストラクタ
    /// </summary>
    /// <param name="label">ラベルとして表示するテキスト</param>
    public DesignFitterAttribute(string label)
    {
        Label = label;
    }
}
これにより以下のようなAttributeの設定ができるようになります。
using UnityEngine;

public class TestObject : MonoBehaviour
{
    [SerializeField, DesignFitter("Inspectorで表示する名前")]
    private float _test;
}
2.Inspector上で確認できる機能の作成
次にAttributeの引数に宣言した文字列の反映と色の変更を行います。
ここからはEditor拡張になりますので、Editorディレクトリを作成してそこに以下のスクリプトを追加してください。
[CustomPropertyDrawer(typeof(DesignFitterAttribute))]
public class DesignFitterAttributeDrawer : PropertyDrawer
{
    /// <summary>
    /// Inspectorで表示したい色
    /// </summary>
    private readonly Color _textColor = new Color(.5f, 1f, .5f);

    public override float GetPropertyHeight(
        SerializedProperty property,
        GUIContent label
    )
    {
        // カスタム対象のAttributeに変換
        var labelAttribute = (DesignFitterAttribute)attribute;

        var customLabel = new GUIContent(labelAttribute.Label);

        return EditorGUI.GetPropertyHeight(
            property: property,
            label: customLabel,
            includeChildren: true
        );
    }

    /// <summary>
    /// 描画処理
    /// </summary>
    public override void OnGUI(
        Rect position,
        SerializedProperty property,
        GUIContent label
    )
    {
        // カスタム対象のAttributeに変換
        DesignFitterAttribute labelAttribute = attribute as DesignFitterAttribute;

        // 属性がDesignFitterAttributeでない場合はそのままの情報を返す
        if (labelAttribute == null)
        {
            EditorGUI.PropertyField(
                position: position,
                property: property,
                label: label
            );
            return;
        }

        // カスタムラベルの情報を作成
        GUIContent customLabel = new GUIContent(labelAttribute.Label);

        // 色の変更
        GUI.color = _textColor;

        // 元の UnityEditor.SerializedProperty とともにカスタムしたラベルで描画
        EditorGUI.PropertyField(
            position: position,
            property: property,
            label: customLabel,
            includeChildren: true
        );

        // 色を白に戻す
        GUI.color = Color.white;
    }
}
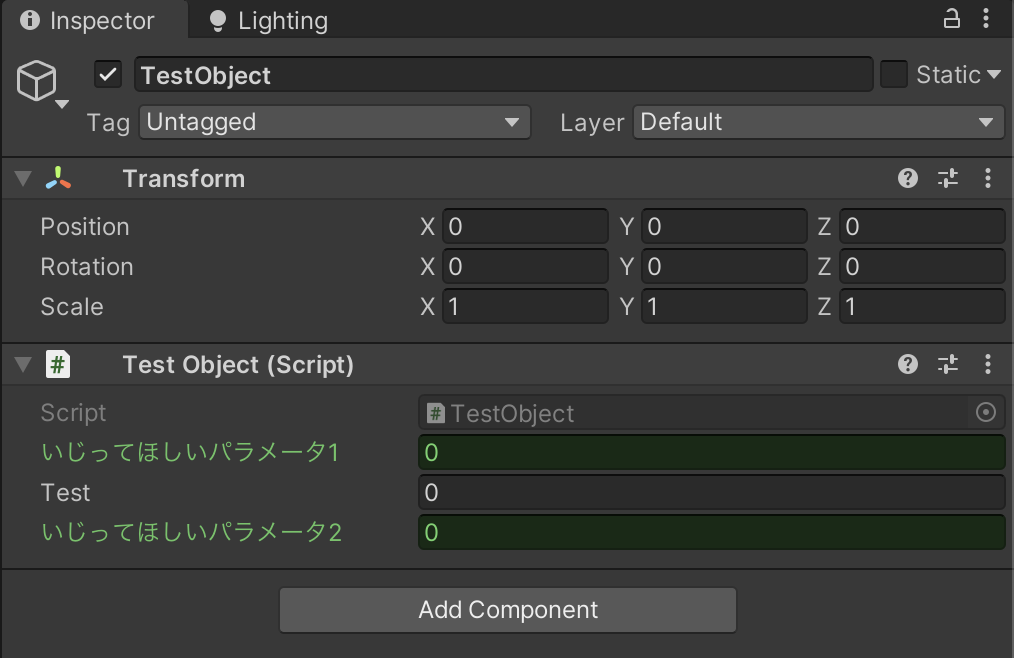
以下のようにテストを書いた場合、Inspectorの表示はその下の画像のようになります。
using UnityEngine;

public class TestObject : MonoBehaviour
{
    [SerializeField, DesignFitter("いじってほしいパラメータ")]
    private float _param;

    [SerializeField] private float _test;
}
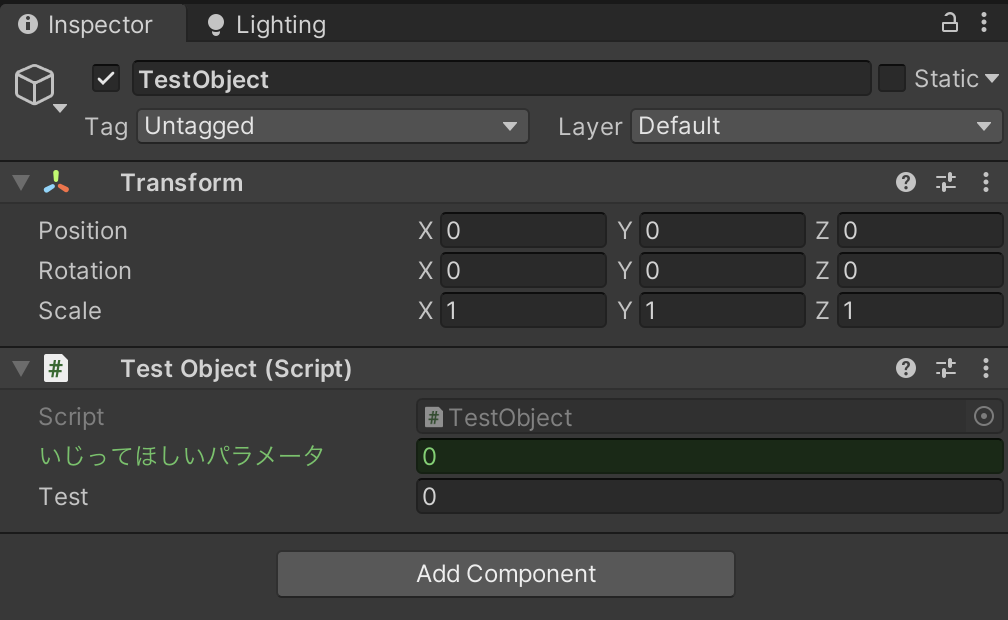
これで触ってほしいパラメータは一目瞭然ですね。
3.Hierarchy上で確認できる機能の作成
Hierarchy上にアイコンを表示します。今回はUnity Editorで使われているアイコンをそのまま使用しました。
これもEditor拡張になりますので、Editorディレクトリを作成してそこに以下のスクリプトを追加してください。
using System.Reflection;
using UnityEditor;
using UnityEngine;

#if UNITY_EDITOR
public class HierarchyExtension : EditorWindow
{
    [InitializeOnLoadMethod]
    private static void Initialize()
    {
        EditorApplication.hierarchyWindowItemOnGUI += HierarchyWindowItemOnGUI;
    }

    // Hierarchy上表示するアイコンの大きさ
    private const int _ICON_SIZE = 16;

    private static void HierarchyWindowItemOnGUI(int instanceId, Rect selectionRect)
    {
        // GameObject が取得できない場合は SceneAsset
        GameObject obj = EditorUtility.InstanceIDToObject(instanceId) as GameObject;
        if (obj == null)
        {
            return;
        }

        // 所持しているコンポーネント一覧を取得
        Component[] components = obj.GetComponents<Component>();

        // コンポーネントが一つもなければ返す
        if (components.Length <= 0)
        {
            return;
        }

        // すべてのコンポーネントを見る
        foreach (Component component in components)
        {
            // オブジェクトにつけられるスクリプトでなければ返す
            if (component is MonoBehaviour == false)
            {
                continue;
            }

            MonoBehaviour monoBehaviour = (MonoBehaviour)component;

            // SerializeFieldで表示しているものをみる
            foreach (FieldInfo fieldInfo in monoBehaviour.GetType().GetFields(
                         BindingFlags.Public |
                         BindingFlags.NonPublic |
                         BindingFlags.Instance |
                         BindingFlags.FlattenHierarchy |
                         BindingFlags.Static
                     ))
            {
                if (fieldInfo.GetCustomAttributes(typeof(DesignFitterAttribute), true).Length > 0)
                {
                    Rect pos = selectionRect;
                    pos.x = pos.xMax - _ICON_SIZE;
                    pos.width = _ICON_SIZE;
                    // 十字マークを表示
                    GUI.DrawTexture(pos, EditorGUIUtility.Load("icons/d_MoveTool.png") as Texture2D);
                }
            }
        }
    }
}
#endif
Hierarchyでアイコンが表示されるようになります。

おまけ
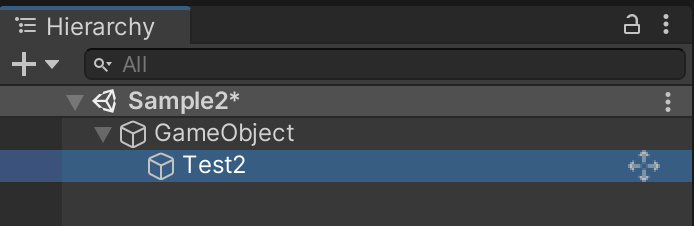
継承クラスでこのAttributeを使用する場合、一部注意する必要があります。
以下のような親クラスを使う場合は、privateにした場合、Hierarchyにアイコンが表示されなくなります。
そのため、親クラスで変数を定義する場合、以下のようにprotectedにする必要があります。
親クラスは以下で作成します。
using UnityEngine;

/// <summary>
/// 継承専用の親クラス
/// </summary>
public class TestBase : MonoBehaviour
{
    [SerializeField, DesignFitter("いじってほしいパラメータ")]
    // protectedで定義する
    protected float _param;
}
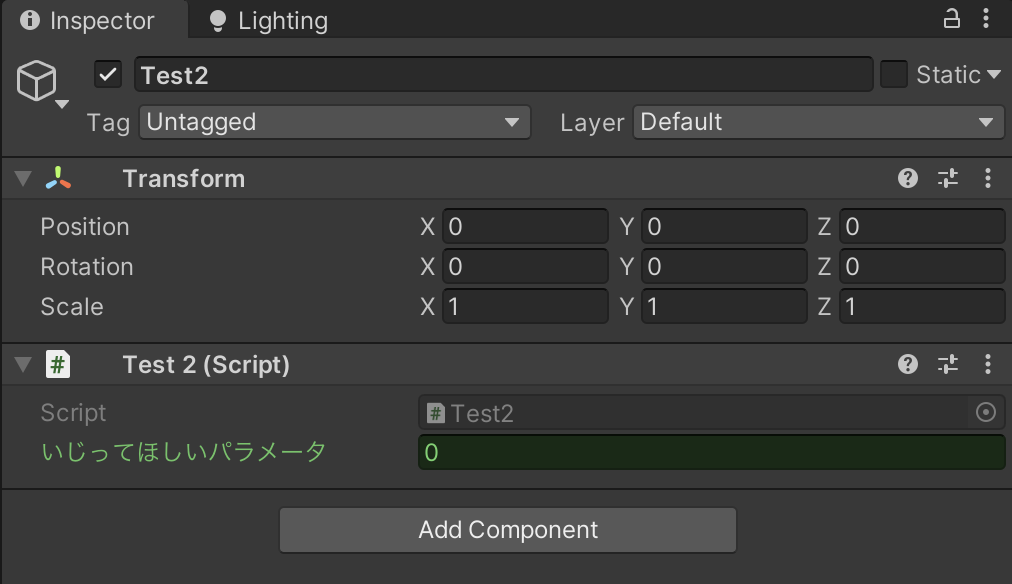
継承クラスを以下で作成します。
public class Test2 : TestBase
{
}
無事、InspectorにもHierarchyにも表示されました。
おわりに
今回はEditor拡張の作成について紹介しました。
チーム開発されている方は便利なものになると思いますので、是非皆さんも使ってみてください。
以上、
「Applibot Advent Calendar 2022」 1日目の記事でした!
明日は、Applibot Advent Calendar 2022の2日目はかずさんです!よろしくお願いします!
関連ブログ