はじめに
SegmentControlのような切り替えタブは良く使うと思いますが
・サクッと色を変えたい
・角を丸くしたい
・NavigationBarに配置したい
・選択肢を多くしたい
と言う時は若干面倒な気がしました。
そこで便利なライブラリを見つけたので使い方を解説します。
ライブラリについて
今回はBetterSegmentedControlというライブラリを使用します。
インポート
CocoaPodsかSPMで入れます。
見た目
UIはこんな感じです。
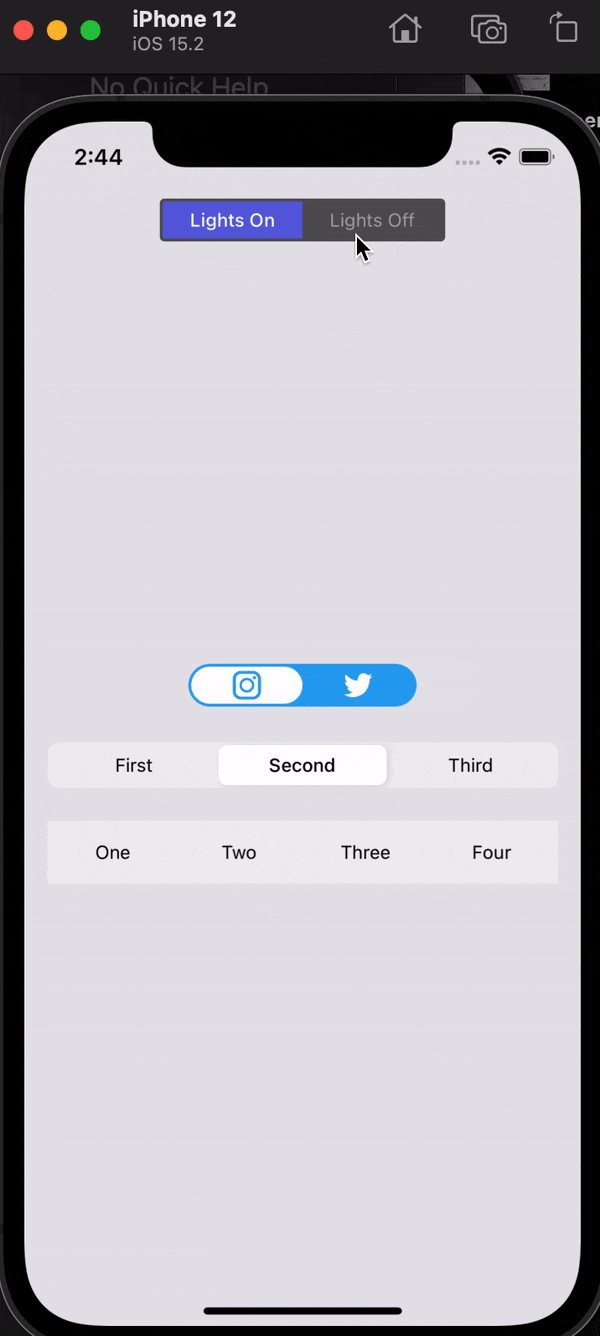
色や形が自由に変えれるのは嬉しい。。。
ソースコード
まずはimport BetterSegmentedControlと書きます。
ViewController.swift
import UIKit
import BetterSegmentedControl

final class ViewController: UIViewController {

    override func viewDidLoad() {
        super.viewDidLoad()
        navigationSegmentedControlSetUp()
        iconsSegmentedControlSetUp()
        appleStyledControlSetUp()
        noSelectedSegmentControlSetUp()
    }
}
セットアップの処理はviewDidLoadに書きますが、量が多い為extensionで分けています。
NavigationBarに配置する
    private func navigationSegmentedControlSetUp() {
        let navigationSegmentedControl = BetterSegmentedControl(
            frame: CGRect(x: 0, y: 0, width: 200.0, height: 30.0),
            segments: LabelSegment.segments(withTitles: ["Lights On", "Lights Off"],
                                            normalTextColor: .lightGray,
                                            selectedTextColor: .white),
            options:[.backgroundColor(.darkGray),
                     .indicatorViewBackgroundColor(UIColor(red: 0.36, green: 0.38, blue: 0.87, alpha: 1.00)),
                     .cornerRadius(3.0),
                     .animationSpringDamping(1.0)])
        navigationSegmentedControl.addTarget(self,
                                             action: #selector(navigationSegmentedControlValueChanged(_:)),
                                             for: .valueChanged)
        navigationItem.titleView = navigationSegmentedControl
    }
navigationItem.titleViewに配置していますね。
選択時の処理
処理はaddTargetのselectorに渡します。
senderのindexで処理を切り替えていますね。
@objc private func navigationSegmentedControlValueChanged(_ sender: BetterSegmentedControl) {
        if sender.index == 0 {
            view.backgroundColor = .systemGray5
        } else {
            view.backgroundColor = .darkGray
        }
    }
この例だとViewの色を変えていますが、データ取得をそれぞれして画面を切り替えるみたいな使い方が多いかと思います。
アイコンの切り替えタブ
    private func iconsSegmentedControlSetUp() {
        let iconsSegmentedControl = BetterSegmentedControl(
            frame: CGRect(x: 0.0, y: 380.0, width: 160, height: 30.0),
            segments: IconSegment.segments(withIcons: [UIImage(named: "insta")!, UIImage(named: "twitter")!],
                                           iconSize: CGSize(width: 20.0, height: 20.0),
                                           normalIconTintColor: .white,
                                           selectedIconTintColor: UIColor(red: 0.16, green: 0.64, blue: 0.94, alpha: 1.00)),
            options: [.cornerRadius(15.0),
                      .backgroundColor(UIColor(red: 0.16, green: 0.64, blue: 0.94, alpha: 1.00)),
                      .indicatorViewBackgroundColor(.white)])
        iconsSegmentedControl.center.x = view.center.x
        view.addSubview(iconsSegmentedControl)
    }
InstagramとTwitterのイメージをタブ内に配置しています。
デフォルトのSegmentControlのようなタブ
    private func appleStyledControlSetUp() {
        let appleStyledControl: BetterSegmentedControl = .appleStyled(
            frame: CGRect(x: 16.0,
                          y: 435,
                          width: view.bounds.width - 32.0,
                          height: 32.0),
            titles: ["First", "Second", "Third"])
        view.addSubview(appleStyledControl)
    }
apple独自のSegmentControlのようなUIです。
かなりシンプル。
4つの選択肢があるタブ
    private func noSelectedSegmentControlSetUp() {
        let noSelectedSegmentControl = BetterSegmentedControl(
            frame: CGRect(x: 16.0, y: 490, width: view.bounds.width - 32.0, height: 44.0),
            segments: LabelSegment.segments(withTitles: ["One", "Two", "Three", "Four"]),
            index: -1)
        noSelectedSegmentControl.addTarget(self, action: #selector(segmentedControl1ValueChanged(_:)), for: .valueChanged)
        view.addSubview(noSelectedSegmentControl)
    }
高さがあり、4つの選択肢が選べるタブです。
まとめ
UI系のライブラリはカスタマイズが効かなかったり慎重に選ぶ必要がありますが
このBetterSegmentedControlは割と使いやすいほうかなと思います。
(特に個人開発)
ソースコードはGitHubにあげていますので下記をご覧ください。
記事が参考になればLGTMのほうお願い致します!