はじめに
TwitterやSmartNewsでおなじみの、横スクロールメニュー。
あれを実装しようと思ったときサクッと作れる便利なライブラリもあるのですが、カスタマイズ性&メンテナンス性も考え今回は自前で実装してみました。
自分の場合はメニューバーにタイトルと画像を表示するパターンで作成しましたが、「カスタマイズをしなくていい」って人はライブラリ使うのもアリかなと思います。
参考までに載せておきます↓
完成サンプル

かなりシンプルなものですが、動きは一応できています
メニューバーはCollectionViewとカスタムCollectionCell、画面はscrollViewとcontainerViewで構成されています。
レイアウト
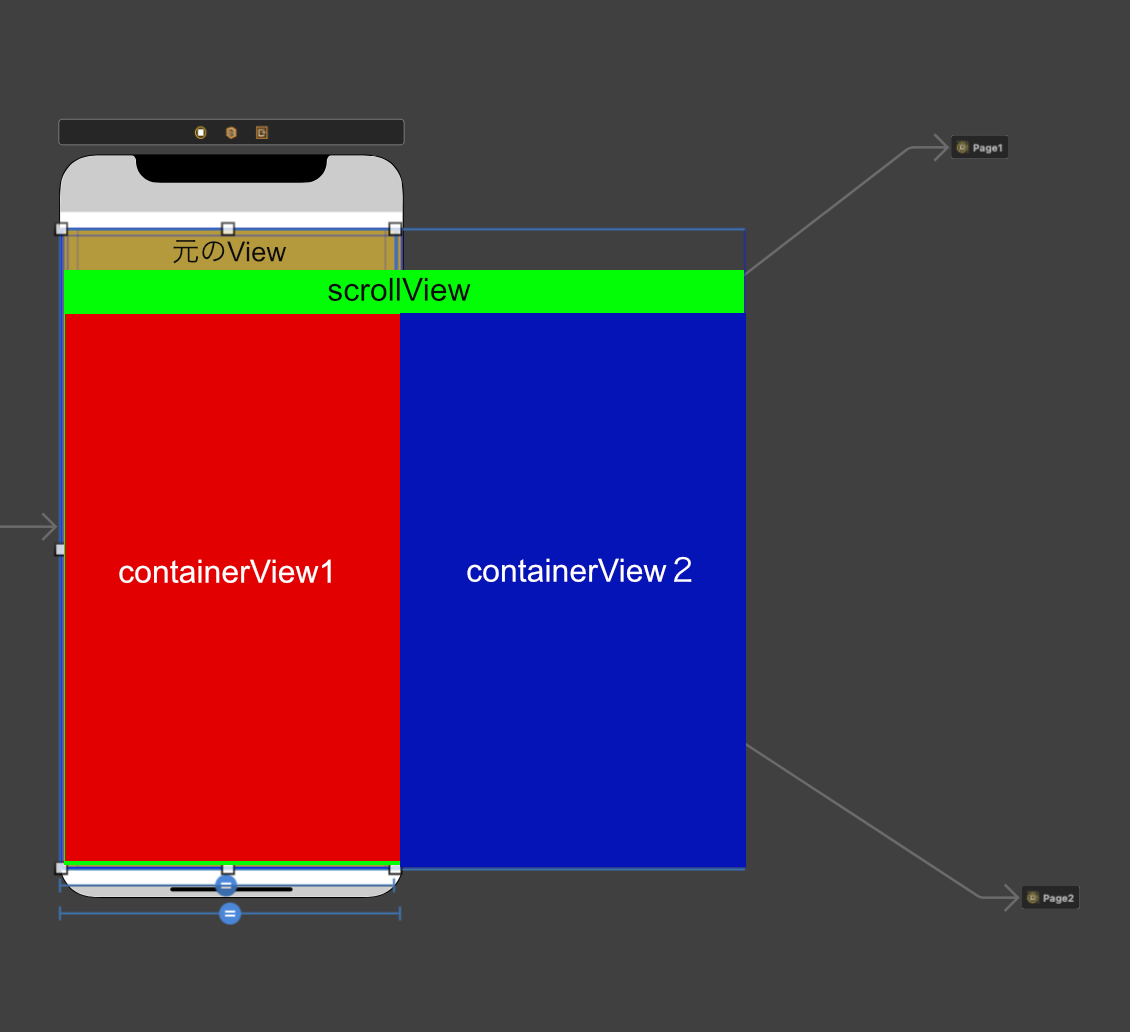
黄色の元Viewの上に画面2倍の横幅であるscrollViewを貼り、その上にcontainerViewを置いて各画面を表示しています。
ソースコード
TopBarMenuController.swift
import UIKit

protocol TopBarMenuControllerDelegate {
    func didTapMenu(indexPath: IndexPath)
}

final class TopBarMenuController: UICollectionViewController, UICollectionViewDelegateFlowLayout {

    var topBarMenuControllerDelegate: TopBarMenuControllerDelegate?

    fileprivate let menuCell = "MenuCell"
    fileprivate let menuItem = [
        MenuCellModel.init(image: UIImage(named: "icon"), name: "page1"),
        MenuCellModel.init(image: UIImage(named: "icon"), name: "page2")
    ]

    //メニューバー内の青いライン
    let menuBottomLine: UIView = {
        let view = UIView()
        view.backgroundColor = .systemBlue
        return view
    }()

    override func viewDidLoad() {
        super.viewDidLoad()

        collectionView.backgroundColor = .white
        collectionView.register(UINib(nibName: menuCell, bundle: nil), forCellWithReuseIdentifier: menuCell)
        collectionView.alwaysBounceHorizontal = true

        //横にスクロールする機能
        if let layout = collectionViewLayout as? UICollectionViewFlowLayout {
            layout.scrollDirection = .horizontal
            layout.minimumLineSpacing = 0
            layout.minimumInteritemSpacing = 0
        }

        view.addSubview(menuBottomLine)
        menuBottomLine.anchor(top: nil, left: view.leftAnchor, bottom: view.bottomAnchor, right: nil, paddingTop: 0, paddingLeft: 0, paddingBottom: 0, paddingRight: 0, height: 2, width: 0)
        menuBottomLine.widthAnchor.constraint(equalTo: view.widthAnchor, multiplier: 1 / 2).isActive = true
    }

    //menuItem配列の数を返す
    override func collectionView(_ collectionView: UICollectionView, numberOfItemsInSection section: Int) -> Int {
        return menuItem.count
    }

    override func collectionView(_ collectionView: UICollectionView, cellForItemAt indexPath: IndexPath) -> UICollectionViewCell {
        guard let cell = collectionView.dequeueReusableCell(withReuseIdentifier: menuCell, for: indexPath) as? MenuCell else {
            return UICollectionViewCell()
        }
        cell.configure(model: menuItem[indexPath.item])
        return cell
    }

    //それぞれのセルサイズを配列の数に合わせる
    func collectionView(_ collectionView: UICollectionView, layout collectionViewLayout: UICollectionViewLayout, sizeForItemAt indexPath: IndexPath) -> CGSize {
        return CGSize(width: view.frame.width / 2, height: view.frame.height)
    }

    //メニューアイテムをタップした時の挙動
    override func collectionView(_ collectionView: UICollectionView, didSelectItemAt indexPath: IndexPath) {
        topBarMenuControllerDelegate?.didTapMenu(indexPath: indexPath)
    }

}
protocolでセルのタップアクションを定義しています。
カスタムセルは下記です。
MenuCell.swift
import UIKit

final class MenuCell: UICollectionViewCell {

    @IBOutlet weak var menuImage: UIImageView!
    @IBOutlet weak var menuName: UILabel!


    override func awakeFromNib() {
        super.awakeFromNib()
    }

    func configure(model: MenuCellModel) {
        menuImage.image = model.image
        menuName.text = model.name
    }

}
続いて、メインのスクロール画面です。
HomeFeedController.swift
import UIKit

final class HomeFeedController: UIViewController, UICollectionViewDelegateFlowLayout {

    @IBOutlet weak var scrollView: UIScrollView!

    private let topBarMenuController = TopBarMenuController(collectionViewLayout: UICollectionViewFlowLayout())

    let vc1 = UIStoryboard.init(name: "Page1", bundle: nil).instantiateInitialViewController() as! Page1ViewController
    let vc2 = UIStoryboard.init(name: "Page2", bundle: nil).instantiateInitialViewController() as! Page2ViewController

    override func viewDidLoad() {
        super.viewDidLoad()
        topBarMenuController.topBarMenuControllerDelegate = self
        scrollView?.delegate = self
        setupTopBarMenuController()
    }

    private func setupTopBarMenuController() {
        //TopBarMenuControllerを設置
        view.addSubview(topBarMenuController.view)
        topBarMenuController.view.anchor(top: navBarController.bottomAnchor, left: view.leftAnchor, bottom: nil, right: view.rightAnchor, paddingTop: 0, paddingLeft: 0, paddingBottom: 0, paddingRight: 0, height: 60, width: 0)
    }
}

extension HomeFeedController: TopBarMenuControllerDelegate {
    //メニューアイテムをタップした時に画面がスライドする機能
    func didTapMenu(indexPath: IndexPath) {
        scrollToPage(page: indexPath.item, animated: true)
    }
}

extension HomeFeedController: UIScrollViewDelegate {
    //画面を横にスクロールした時に青いViewが付いてくる仕様
    func scrollViewDidScroll(_ scrollView: UIScrollView) {
        let x = scrollView.contentOffset.x
        let offset = x / 2
        let hoge = x - view.frame.width
        print(offset)
        topBarMenuController.menuBottomLine.transform = CGAffineTransform(translationX: offset, y: 0)
    }

    func scrollToPage(page: Int, animated: Bool) {
        var frame: CGRect = self.scrollView.bounds
        frame.origin.x = frame.size.width * CGFloat(page)
        frame.origin.y = 0
        self.scrollView.scrollRectToVisible(frame, animated: animated)
    }
}
メニューがタップされた際は、indexPath.item分のページがスライドする仕様です。
func didTapMenu(indexPath: IndexPath) {
        scrollToPage(page: indexPath.item, animated: true)
 }
あとは青い線のViewがくっついてくるようにアニメーションしてあげればOKです。
補足ですが、コードの中に2というマジックナンバーがありますがあれはメニュー数なのでmenuItem.countとしてあげるのがいいかなと思いました。
また実際の動きを見た方が早いと思うので、下記リポジトリをクローンして動かしてみることをおすすめします👀
指摘点やもっと綺麗に書ける等などあれば教えていただけると幸いです🙇♂️