今までの記事
今回試したこと - Push Notification
Parse(MBasS)を使うことの強い理由の1つと思われるPush Notificationサポート。
どれぐらい簡単なのかを試してみた。
設定
やるべきことは、「Apple側の設定」「Parse側の設定」「アプリのコード記述」の3つ。
iOS Dev Centerでの設定
これはPush Notificationを使うならParse関係なく必ずやること。
App ID(Identifiers)の作成
- 新規にApp IDを作成する場合
- 作成時に「App Services」のPush Notificationsにチェックを入れて作成する。
- すでに作成済みのApp IDを使う場合
- Editから「Push Notifications」にチェックを入れて編集をしておく。
作成が終わると「App ID」の「Push Notifications」が以下のようにConfigurableになっている。
通知用証明書の作成
CSR file
開発をおこなっているMacからキーチェンアクセスを起動する。
そして「キーチェンアクセス」から「証明書アシスタント」の「認証局に証明書を要求」を実行して、ファイル(CSR)をディスクに保存しておく。
証明書の作成
「Apple Dev Center」の「Certificates」から証明書を新規に作成する。
- Developmentであれば以下を選択する。
- Apple Push Notification service SSL (Sandbox)
- Productionであれば以下を選択する。
- Apple Push Notification service SSL (Production)
この作成時に、保存しておいたCSR fileをアップロードして作成する。
作成が終わると「App ID」の「Push Notifications」が以下のようにEnabledになっている。
作成した証明書はダウンロードし、読み込んでおく。
プロビジョニングプロファイルの作成
用意した「App ID」を元にプロビジョニングプロファイルを作成しておく。
作成したプロビジョニングプロファイルはダウンロードし、読み込んでおく。
Parseの設定
「Settings」の「Push」を開く。
Apple Push Certificates
開発をおこなっているMacからキーチェンアクセスを起動し、今回作成した証明書を選択しファイル(p12ファイル)を書き出す。
(注意)ここでパスワードを設定しておかないようにしておく。
Push Notification Settings
「Client push enabled?」をYesにしておく。
コード記述
AppDelegate.mに以下のように記述する。
「ParseAppID(Application ID)」と「ParseClientKey(Client Key)」はParseの「Settings」の「Keys」にある値を使う。
- (BOOL)application:(UIApplication *)application didFinishLaunchingWithOptions:(NSDictionary *)launchOptions {
    [Parse setApplicationId:ParseAppID
                  clientKey:ParseClientKey];

    UIUserNotificationType userNotificationTypes = (UIUserNotificationTypeAlert |
                                                    UIUserNotificationTypeBadge |
                                                    UIUserNotificationTypeSound);
    UIUserNotificationSettings *settings = [UIUserNotificationSettings settingsForTypes:userNotificationTypes
                                                                             categories:nil];
    [application registerUserNotificationSettings:settings];
    [application registerForRemoteNotifications];

    return YES;
}

- (void)application:(UIApplication *)application didRegisterForRemoteNotificationsWithDeviceToken:(NSData *)deviceToken {
    PFInstallation *currentInstallation = [PFInstallation currentInstallation];
    [currentInstallation setDeviceTokenFromData:deviceToken];
    currentInstallation.channels = @[ @"global" ];
    [currentInstallation saveInBackground];
}

- (void)application:(UIApplication *)application didReceiveRemoteNotification:(NSDictionary *)userInfo {
    [PFPush handlePush:userInfo];
}
※上記コードはiOS8以降のみ対応になります。
これで準備は完了。
あとは色々な手段でプッシュ通知をするだけ。
プッシュ通知
プッシュ通知は、「ParseのWeb」「REST API」「アプリ」「Cloud Code」から送ることが出来る。
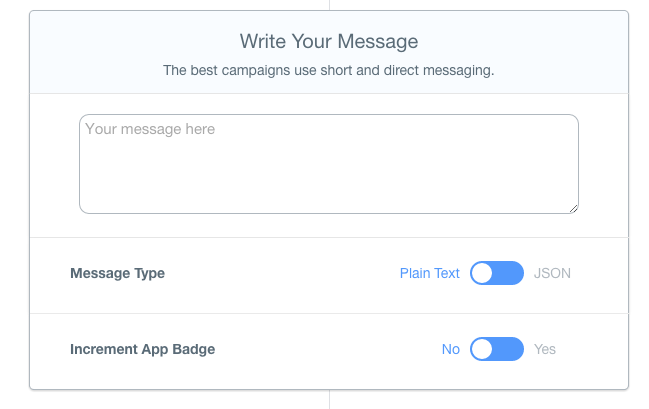
ParseのWeb
「Push」から送りたいプッシュ通知の内容を設定するだけでOK。
REST API
以下のコマンドを叩くだけでOK。
curl -X POST \
  -H "X-Parse-Application-Id: ${APPLICATION_ID}" \
  -H "X-Parse-REST-API-Key: ${REST_API_KEY}" \
  -H "Content-Type: application/json" \
  -d '{
        "where": {
          "deviceType": "ios"
        },
        "data": {
          "alert": "Hello World!"
        }
      }' \
  https://api.parse.com/1/push
Push通知一覧画面
設定したPush通知の一覧は以下のように表示される。
まとめ
Push Notificationを自前で全てやろうとすると非常に面倒(運用も含めて)なので、諦めている個人開発者も多いはず。
しかし、たったこれだけの設定で利用出来るだけでなく、色々とカスタマイズ出来るというのは非常にありがたい。
そして、値段も100万端末/月なので、利用しない手はないでしょう。
今回、紹介しきれなかった「チャンネル」の話や他のプッシュ通知の方法については、また別の機会にアップします。


