概要
スクレイピングやブラウザテストなどで、Puppeteerがよく紹介されています。ところが、Windows向けの環境構築の記事があまり見当たりませんでした。本記事では、Puppeteerの環境構築と、ヘッドレスChromeの簡単なチュートリアルをまとめました。
Puppeteerとは
PuppeteerはChrome Devtools Protocolを利用して、マウスやキーボードの操作をせずに、ブラウザを操作できるライブラリです。
作業環境
- Windows10 Pro
- Git-bash
(PowerShellを使う場合は、WindowsでPowerShellスクリプトの実行セキュリティポリシーを変更する。「このシステムではスクリプトの実行が無効になっているため……」というエラーが表示され、実行できません。)
環境構築
node.jsのインストール(nodist)
今回は、お手軽に環境を構築したいのでインストーラーを利用します。環境パス・環境変数も設定してくれるのでトラブルも少なく済みます!
nodistのインストール
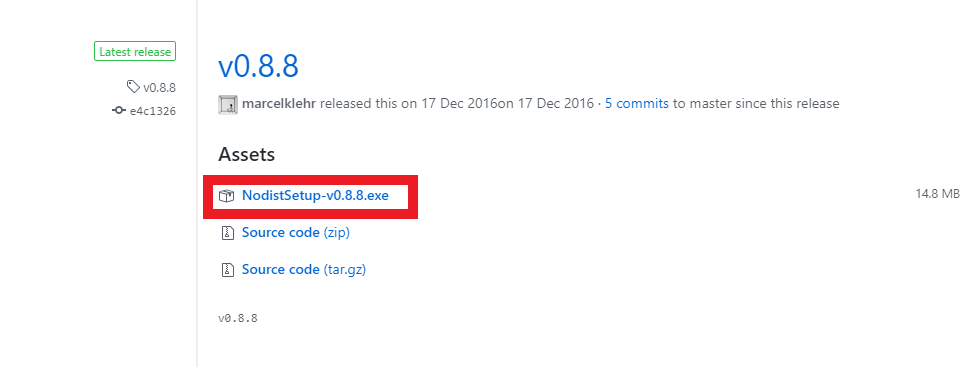
nodistのページ( https://github.com/marcelklehr/nodist/releases )で、インストーラー(NodistSetup-v0.8.8.exe)をダウンロードし、インストールする。最新バージョンは、v0.8.8(2018年3月27日現在)
- インストールできたらGit-bashを起動し、以下のコマンドを実行します。
$ nodist -v
0.8.8
バージョンが出たら成功です。
あわせて、nodeとnpmのバージョンを確認し、インストールができたか確認します。
- nodeのバージョンを確認
$ node -v
v7.2.1
- npmのバージョンを確認
$ npm -v
4.0.5
Node.jsのアップデート
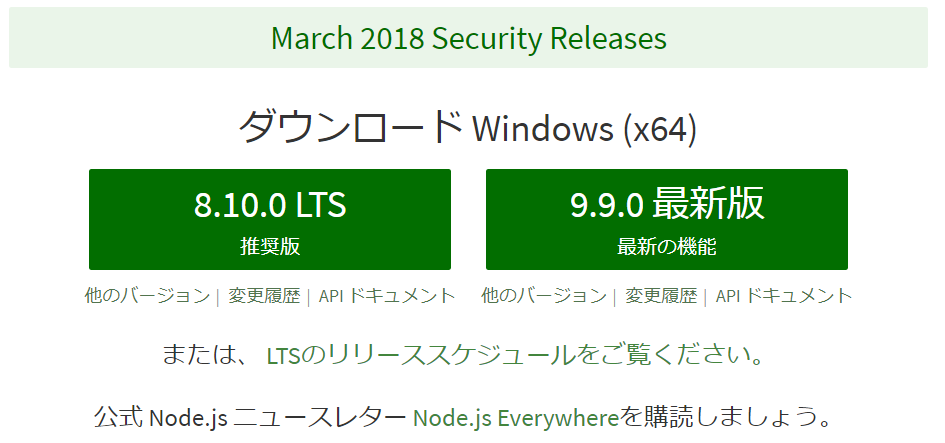
今回は、LTSの最新バージョンである8.10.0(2018年3月27日現在)のNode.jsをインストールします。
LTSとは「Long-term Support」のことで、長期間(Maintenanceモードを含めて2年半)にわたってサポートされることを意味しています。LTSに関する詳しい内容は、nodejs/Release: Node.js Foundation Release Working Group(英語)に記載されています。
nodistを利用してNode.jsのインストール(アップデート)を行います。
まずは、インストール可能なNode.jsのバージョンの一覧を確認します。
$ nodist dist
以下のようにNode.jsのバージョンが表示されます。
  ...
  0.1.14
  0.1.15
  0.1.16
  ...
  8.9.0
  8.9.1
  8.9.2
  8.9.3
  8.9.4
  8.10.0
  ...
  9.7.1
  9.8.0
  9.9.0
ここでは8.10.0のNode.jsをインストールします。
$ nodist 8.10.0
8.10.0
Installing 8.10.0

Installation successful.
Node.jsのインストールが完了しました。
念のため、Node.jsのバージョンを確認します。
$ node -v
v8.10.0
v8.10.0と表示されました。
Yarnのインストール
今回は、npmと互換性のあるパッケージマネージャー「Yarn」を使います。モジュールのバージョンが厳密に固定され、キャッシュされたパッケージのインストールが高速化されるという特徴があるそうです。
$ npm install -g yarn --scripts-prepend-node-path
nodistを利用している場合?、下記のエラーが出ました。エラーメッセージの指示通り
--scripts-prepend-node-pathのオプションつけて、実行します。
$ npm install -g yarn
npm WARN lifecycle The node binary used for scripts is C:\Program Files (x86)\Nodist\bin\node.exe but npm is us                               ing C:\Program Files (x86)\Nodist\v-x64\7.2.1\node.exe itself. Use the `--scripts-prepend-node-path` option to                                include the path for the node binary npm was executed with.
C:\Program Files (x86)\Nodist\bin\yarn -> C:\Program Files (x86)\Nodist\bin\node_modules\yarn\bin\yarn.js
C:\Program Files (x86)\Nodist\bin\yarnpkg -> C:\Program Files (x86)\Nodist\bin\node_modules\yarn\bin\yarn.js
C:\Program Files (x86)\Nodist\bin
`-- yarn@1.5.1
プロジェクトの作成
今回のプロジェクト用にディレクトリを用意します。
$ mkdir sample
$ cd sample

# 今回のディレクトリを確認
$ pwd
/c/Users/****/dev/projects/Puppeteer/sample
package.jsonの作成
新しいプロジェクトを開始するため、package.jsonを作成します。
何も考えず、yarn init -yすると、 "Can't answer a question unless a user TTY"と怒られます。 そこで、winpty yarn.cmd init -yとして実行します。(-yを付けることで、必要な情報を自動で設定します。)
Using an interactive yarn command? yarn.cmd init
https://github.com/yarnpkg/yarn/issues/743#issuecomment-332905650
$ winpty yarn.cmd init -y
yarn init v1.5.1
warning The yes flag has been set. This will automatically answer yes to all questions, which may have security implications.
success Saved package.json
Done in 0.05s.
package.jsonが作成されました。
{
  "name": "sample",
  "version": "1.0.0",
  "main": "index.js",
  "license": "MIT"
}
Puppeteerのインストール
それでは、GoogleChrome/puppeteer: Headless Chrome Node APIをインストールします。
yarn add puppeteer を実行します。Windowsの場合、280MB ぐらいダウンロードするようです。
Note: When you install Puppeteer, it downloads a recent version of Chromium (~170Mb Mac, ~282Mb Linux, ~280Mb Win) that is guaranteed to work with the API. To skip the download, see Environment variables.
https://github.com/GoogleChrome/puppeteer
$ yarn add puppeteer
yarn add v1.5.1
info No lockfile found.
[1/4] Resolving packages...
[2/4] Fetching packages...
[3/4] Linking dependencies...
[4/4] Building fresh packages...
success Saved lockfile.
success Saved 36 new dependencies.
info Direct dependencies
└─ puppeteer@1.2.0
...
Done in 50.29s.
Puppeteerのインストールが完了すると、先程のpackage.jsonが更新されます。
"dependencies"に"puppeteer": "^1.2.0"が追記されます。
{
  "name": "sample",
  "version": "1.0.0",
  "main": "index.js",
  "license": "MIT",
  "dependencies": {
    "puppeteer": "^1.2.0"
  }
}
Puppeteerを動かす(スクリーンショットを保存する)
下準備は完了です。
それでは、実際にPuppeteerを動かして、指定したURL先のスクリーンショットを保存してみます。
まずindex.jsを作成します。今回は、Yahoo!(https://yahoo.co.jp)のスクリーンショットを保存します。
const puppeteer = require('puppeteer');

(async () => {
  const TARGET_URL = 'https://yahoo.co.jp';
  const browser = await puppeteer.launch();
  const page = await browser.newPage();
  await page.goto(TARGET_URL);
  await page.screenshot({path: 'example.png'});

  await browser.close();
})();
実行します。
$ node index.js
少し待つと、example.pngというスクリーンショットが保存されます。
$ ls
example.js  example.png  node_modules/  package.json  yarn.lock
- 保存されたスクリーンショット

あれ、ページの左上しかスクリーンショットが撮影できていないようです…
スクリーンショットを保存する(ページ全体)
Puppeteerでは、初期サイズが横800px x 縦600pxになっています。そのため800px x 600pxでスクリーンショットが保存されました。
Puppeteer sets an initial page size to 800px x 600px, which defines the screenshot size. The page size can be customized with Page.setViewport().
Page.setViewport()を使用し、サイズを変更することができますが、Page.screenshot()にfullPage: trueを指定し、ページ全体のスクリーンショットを保存します。
先ほどの、index.jsを修正します。
保存するファイル名ScreenshotsFull.pngと、fullPage: trueを変更しました。
await page.screenshot({path: 'ScreenshotsFull.png', fullPage: true});
const puppeteer = require('puppeteer');

(async () => {
  const TARGET_URL = 'https://yahoo.co.jp';
  const browser = await puppeteer.launch();
  const page = await browser.newPage();
  await page.goto(TARGET_URL);
  await page.screenshot({path: 'ScreenshotsFull.png', fullPage: true});

  await browser.close();
})();
実行します。
$ node index.js
少し待つと、ScreenshotsFull.pngというスクリーンショットが保存されます。
- 保存されたスクリーンショット(ページ全体)

まとめ
おつかれさまでした!Windwosでも、簡単にPuppeteerでヘッドレスChromeを操作できたのではないでしょうか。公式サイトには、PDFを生成する方法など各種サンプルが掲載されています。APIドキュメントと合わせて、いろいろと出来そうです!
pupetter とついつい typo しやすいので注意です。(慣れるまで大変でした…)