(2019/11/23追記)
新規ロットのM5Stack GrayにはMPU-9250が搭載されていないため本記事の内容に当てはまりませんのでご注意ください。
本製品に搭載の9軸センサにつきまして、初期モデルに搭載のMPU9250から、2019年8月14日当社入荷分以降はMPU6886 + BMM150という組み合わせに変更されました。(2019年8月14日)
https://www.switch-science.com/catalog/3648/
MPU-9250には、DMP(Digital Motion Processor)という小さなチップが乗っかっており、歩数計や動作割り込みなどのモーション関連の処理を動かすことができる。
MPU-9250 到着-Sabotenboy's sigh
目的
DMPで歩数計機能を走らせ、M5Stackの画面に表示する。
環境
開発環境: Arduino IDE(1.8.7) (arduino-esp32 v1.0.1)
機器: M5Stack Gray
実装
DMPで動かす機能のバイナリをアップロードする部分や、そこへのI2C接続などを実装する必要があるが、それらを実装済みの便利なライブラリがあるのでそれを利用する。
ライブラリを追加
sparkfun/SparkFun_MPU-9250-DMP_Arduino_Library
をArduino IDEにインストール。
ライブラリを編集
そのまま利用しようとするとエラーが起こるので(元々SparkFunの製品向けのライブラリのため)、一部修正。
ライブラリのインストール先へ行き以下の2点を編集
# define min(X,Y) ((X) < (Y) ? (X) : (Y))
// 上の方(例えば40行目)あたりに追加
architectures=*
歩数を画面に表示
以下のコードを書き込む。(スケッチ例SparkFun MPU-9250 Digital Motion Processing (DMP) Arduino Library > MPU9250_DMP_PedometerをM5Stack用に修正)
*以下のコードは無保証です。自己責任でご利用ください。
/************************************************************
MPU9250_DMP_Pedometer
 Pedometer example for MPU-9250 DMP Arduino Library
Jim Lindblom @ SparkFun Electronics
original creation date: November 23, 2016
https://github.com/sparkfun/SparkFun_MPU9250_DMP_Arduino_Library

The MPU-9250's digital motion processor (DMP) can estimate
steps taken -- effecting a pedometer.

After uploading the code, try shaking the 9DoF up and
down at a "stepping speed."

Development environment specifics:
Arduino IDE 1.6.12
SparkFun 9DoF Razor IMU M0

Supported Platforms:
- ATSAMD21 (Arduino Zero, SparkFun SAMD21 Breakouts)
*************************************************************/
# include <M5Stack.h>
# include <SparkFunMPU9250-DMP.h>


MPU9250_DMP imu;

unsigned long stepCount = 0;
unsigned long stepTime = 0;
unsigned long lastStepCount = 0;

void setup()
{
  M5.begin();

  // Call imu.begin() to verify communication and initialize
  if (imu.begin() != INV_SUCCESS)
  {
    while (1)
    {
      Serial.println("Unable to communicate with MPU-9250");
      Serial.println("Check connections, and try again.");
      Serial.println();
      delay(5000);
    }
  }

  imu.dmpBegin(DMP_FEATURE_PEDOMETER);
  imu.dmpSetPedometerSteps(stepCount);
  imu.dmpSetPedometerTime(stepTime);
  M5.Lcd.setTextSize(4);

  M5.lcd.print("Walked 0 steps");
}

void loop()
{
  stepCount = imu.dmpGetPedometerSteps();
  stepTime = imu.dmpGetPedometerTime();
  if (stepCount != lastStepCount)
  {
    lastStepCount = stepCount;
    M5.lcd.clear();
    M5.Lcd.setCursor(0,0);
    M5.lcd.print("Walked " + String(stepCount) + " steps");
    M5.lcd.print(" (" +
              String((float)stepTime / 1000.0) + " s)");
  }
}
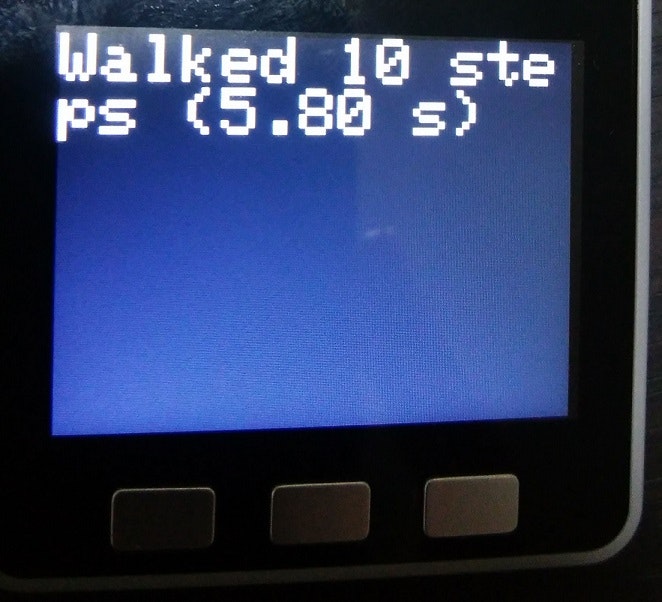
動作イメージ
まとめ
歩数計機能が簡単に利用できた。処理はセンサチップ内で行われるのでメインの処理の邪魔もしないはず。
DMPには他にも傾き検出の機能やタップ機能?等もあるようなので試してみたい。