はじめに
Amazon Elastic Kubernetes Service (Amazon EKS) はAWS上でKubernetesを実行することができる。EKSはeksctlコマンドを用いることで簡単に作成できるが、デフォルトの設定では意外とインターネットアクセスを前提としている点が多い。私自身、インターネットアクセスをしないプライベートEKSの構築にとても苦労したので、その作成・設定方法を備忘録として残しておきたいと思い、本稿を記載する。
必要な設定
プライベートEKSクラスターの構築に必要な設定は大きく分けて3つある。
1.VPCエンドポイントの作成
EKSは内部で様々なAWSリソースにアクセスしており、それらはデフォルトではグローバルIP経由でアクセスしている。プライベートなEKSではグローバルIP経由でのアクセスは不可のため、AWSリソースにアクセスするためのVPCエンドポイントを、EKSと同じVPCに作成する必要がある。必要なVPCエンドポイントは以下の通り。
| サービス | エンドポイント |
|---|---|
| Amazon EC2 | com.amazonaws.region-code.ec2 |
| Amazon Elastic Container Registry (コンテナイメージの取得用) | com.amazonaws.region-code.ecr.api、com.amazonaws.region-code.ecr.dkr、および com.amazonaws.region-code.s3 |
| Application Load Balancerおよび ネットワークロードバランサー | com.amazonaws.region-code.elasticloadbalancing |
| AWS X-Ray | com.amazonaws.region-code.xray |
| Amazon CloudWatch Logs | com.amazonaws.region-code.logs |
| AWS Security Token Service (サービスアカウントに IAM ロールを使用している場合に必要) | com.amazonaws.region-code.sts |
| AWS Auto Scaling (EKSノードをオートスケールする場合に必要) | com.amazonaws.region-code.autoscaling |
参考文献:[1],[2]
2.EKSのプライベートエンドポイント設定
EKSにアクセスするためのAPIエンドポイントの設定が、デフォルトだとパブリックエンドポイントのみとなっており、プライベートネットワークからのアクセスが不可となっている。そのため、eksctlで構築する際に下記のような設定が必要となる。
vpc:
  sharedNodeSecurityGroup: sg-******* #EKSのAPIエンドポイントにアクセスするEC2インスタンスのSGを設定する
  clusterEndpoints:
    publicAccess:  false #パブリックNWからのアクセスを0にしたい場合はfalseにしておくとよい
    privateAccess: true
もしくは
privateCluster:
  enabled: true #こちらの設定だとVPCエンドポイントをeksctlが自動で作成してくれる
  additionalEndpointServices:
  # For Cluster Autoscaler
  - "autoscaling"
  # CloudWatch logging
  - "logs"
参考文献:[1],[3],[4],[5]
3.ECRプライベートリポジトリの設定
EKS内で動作させるPodのDockerイメージの参照先は、デフォルトでは外部のレジストリを参照していることが多い。例えばCloudWatchにEKSのログを送るFluent-Bitのインストール設定ファイル「fluent-bit.yaml」のデフォルト設定は
...
spec:
  selector:
    matchLabels:
      k8s-app: fluent-bit
  template:
    ...
    spec:
      containers:
      - name: fluent-bit
        image: public.ecr.aws/aws-observability/aws-for-fluent-bit:stable
        imagePullPolicy: Always
...
のようにイメージ参照先(image)がpublic.ecr.awsとなっており、ここはインターネットアクセスが無いとアクセスできない。プライベートEKSにおいてこの設定をそのまま用いると、Dockerイメージをpull出来ず、Podが正常に立ち上がらない状態となってしまう。
したがって、プライベートなEKSでFluent-Bitを動作させるためには、
1.fluent-bit.yamlのimageの設定を自身のAWSアカウントのECRアドレスに設定する
2.public.ecr.awsにあるDockerイメージをpullし、自身のAWSアカウントのAmazon Elastic Container Registry(Amazon ECR)のプライベートリポジトリにpushする
といった手順が必要となる。
参考文献:[6]
以上の3つの設定を踏まえると以下のような構成図となる。
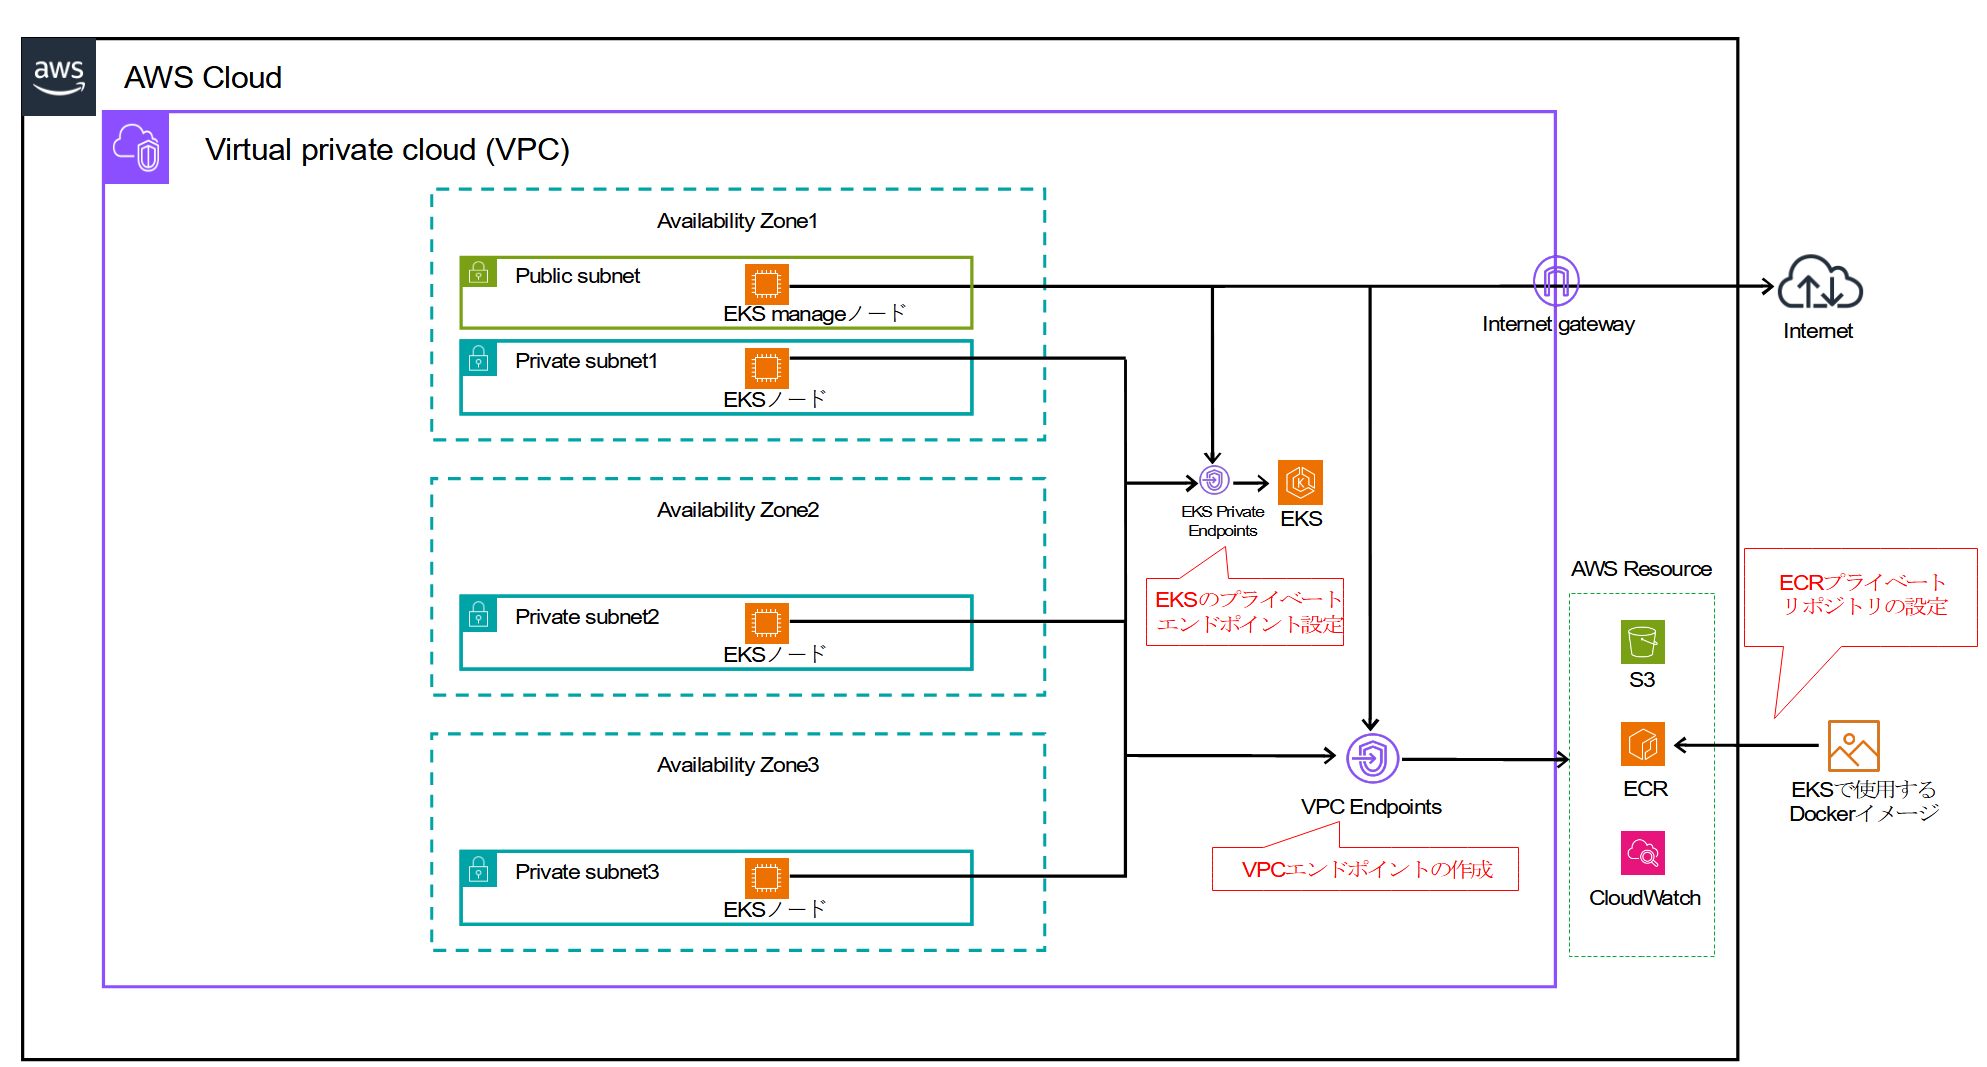
※EKS manageノードはEKS構築作業やkubectlを実行するマシンを意味している
※構成図におけるInternet gateway(IGW)はEKS構築作業に必須のため付けており、EKSおよびEKSノードはIGWを通らない
実際に構築してみた
プライベートEKSクラスターにFluent-Bitをインストールした環境を実際に構築してみた。
VPC、サブネットなど基盤部分
こちらは本稿の主題から外れるので構築手順は割愛。
作成したものは以下の通り。
- VPC×1
- プライベートサブネット×3
- アベイラビリティゾーン3つ分
- パブリックサブネット×1
- ルートテーブル×4
- プライベートサブネット用3つ+パブリックサブネット用1つ
- IGW×1
- ゲートウェイ型S3エンドポイント×1
- ルートテーブル4つ全てに関連付ける
- セキュリティグループ×1
- EKS manageノード用
- ローカルマシンからのSSH接続とVPC内のローカル通信用の設定を追加する
- IAMロール
- EKS manageノード用
- 以下のポリシーを付与
- AmazonEC2ContainerRegistryFullAccess
- AmazonEC2FullAccess
- AmazonEKSClusterPolicy
- AmazonEKSServicePolicy
- AmazonS3FullAccess
- AmazonSSMFullAccess
- AWSCloudFormationFullAccess
- CloudWatchLogsFullAccess
- IAMFullAccess
- EKSへのフルアクセス(カスタマーポリシー)
...
"Effect": "Allow",
"Action": "eks:*",
"Resource": "*"
...
- 以下のポリシーを付与
- EKS manageノード用
- EC2インスタンス×1(EKS manageノード)
- AMI:Amazon Linux 2023
- インスタンスタイプ:t2.xlarge
- ストレージ:32GB
- パブリックサブネットに配置
- 作成したセキュリティグループおよびIAMロールを割り当てる
EKS構築
EKS manageノードで作業EKS構築を進めていく。
1.EKSノードへのssh接続用の公開鍵・秘密鍵作成
EKSノードにパスワード無しでssh接続するために、パスワード無しで鍵を作成する。
[ec2-user@ip-*-*-*-* ~]$ ssh-keygen -t rsa
Generating public/private rsa key pair.
Enter file in which to save the key (/home/ec2-user/.ssh/id_rsa):
Enter passphrase (empty for no passphrase):
Enter same passphrase again:
...
2.kubectlおよびeksctlのインストール
EKSを操作するためのkubectl、およびEKSを構築するためのeksctlを、文献[7]を参考にインストールする。
[ec2-user@ip-*-*-*-* ~]$ sudo curl -L -o /usr/local/bin/kubectl https://s3.us-west-2.amazonaws.com/amazon-eks/1.29.0/2024-01-04/bin/linux/amd64/kubectl
  % Total    % Received % Xferd  Average Speed   Time    Time     Time  Current
                                 Dload  Upload   Total   Spent    Left  Speed
100 47.4M  100 47.4M    0     0  11.6M      0  0:00:04  0:00:04 --:--:-- 11.6M
[ec2-user@ip-*-*-*-* ~]$
[ec2-user@ip-*-*-*-* ~]$ sudo chmod +x /usr/local/bin/kubectl
[ec2-user@ip-*-*-*-* ~]$ kubectl version --client
Client Version: v1.29.0-eks-5e0fdde
Kustomize Version: v5.0.4-0.20230601165947-6ce0bf390ce3
[ec2-user@ip-*-*-*-* ~]$ curl -L "https://github.com/weaveworks/eksctl/releases/latest/download/eksctl_$(uname -s)_amd64.tar.gz" | tar xz -C /tmp
  % Total    % Received % Xferd  Average Speed   Time    Time     Time  Current
                                 Dload  Upload   Total   Spent    Left  Speed
  0     0    0     0    0     0      0      0 --:--:-- --:--:-- --:--:--     0
  0     0    0     0    0     0      0      0 --:--:-- --:--:-- --:--:--     0
  0     0    0     0    0     0      0      0 --:--:-- --:--:-- --:--:--     0
100 33.6M  100 33.6M    0     0  13.8M      0  0:00:02  0:00:02 --:--:-- 31.9M
[ec2-user@ip-*-*-*-* ~]$ sudo mv /tmp/eksctl /usr/local/bin
[ec2-user@ip-*-*-*-* ~]$ eksctl version
0.174.0
3.VPCエンドポイントの作成
本稿の最初に記載した3つの設定項目のうちの1つ「1.VPCエンドポイントの作成」に該当する箇所。
awsコマンドを使用して必要なVPCエンドポイントを作成する。
[ec2-user@ip-*-*-*-* ~]$ REGION=ap-northeast-1 # VPCのリージョン(以降の手順でもこの変数を使用する)
[ec2-user@ip-*-*-*-* ~]$ VPC_ID=vpc-**********
[ec2-user@ip-*-*-*-* ~]$ MANAGE_SG_ID=sg-********** # EKS manageノードに割り当てているSGのID
[ec2-user@ip-*-*-*-* ~]$ SUBNET_IDS="subnet-********** subnet-********** subnet-**********" # プライベートサブネット3つのID
[ec2-user@ip-*-*-*-* ~]$ for i in ec2 ecr.api ecr.dkr elasticloadbalancing xray logs sts autoscaling; do aws ec2 create-vpc-endpoint --vpc-endpoint-type Interface --vpc-id ${VPC_ID} --subnet-ids ${SUBNET_IDS} --security-group-ids ${MANAGE_SG_ID} --service-name com.amazonaws.${REGION}.${i} --output text; done

VPCENDPOINT     2024-03-20T10:04:23.494000+00:00        ipv4    ************    True    False   com.amazonaws.ap-northeast-1.ec2        pending vpce-**********  Interface       vpc-**********
DNSENTRIES      vpce-**********.ec2.ap-northeast-1.vpce.amazonaws.com   **********
DNSENTRIES      vpce-**********-ap-northeast-1d.ec2.ap-northeast-1.vpce.amazonaws.com   **********
DNSENTRIES      vpce-**********-ap-northeast-1c.ec2.ap-northeast-1.vpce.amazonaws.com   **********
DNSENTRIES      vpce-**********-ap-northeast-1a.ec2.ap-northeast-1.vpce.amazonaws.com   **********
DNSENTRIES      ec2.ap-northeast-1.amazonaws.com        ZONEIDPENDING
DNSOPTIONS      ipv4
GROUPS  sg-**********    eks-manage-sg
NETWORKINTERFACEIDS     eni-**********
NETWORKINTERFACEIDS     eni-**********
NETWORKINTERFACEIDS     eni-**********
SUBNETIDS       subnet-**********
SUBNETIDS       subnet-**********
SUBNETIDS       subnet-**********
... # 上記の出力の繰り返し
上記を実行すると以下のようにVPCエンドポイントが作成される。

4.EKS構築設定ファイルを作成
本稿の最初に記載した3つの設定項目のうちの1つ「2.EKSのプライベートエンドポイント設定」に該当する箇所。
eks.yamlを以下のように作成する。
コメントを入れている箇所はそれぞれの環境・要件に合わせて修正すること。
apiVersion: eksctl.io/v1alpha5
kind: ClusterConfig

metadata:
  name: eks-test                       # EKSクラスター名
  region: ap-northeast-1               # リージョン
  version: "1.29"                      # 導入したいEKSのバージョン

vpc:
  sharedNodeSecurityGroup: sg-**********    # EKS manageノードに割り当てているSGのID
  clusterEndpoints:
    publicAccess:  false
    privateAccess: true
  id: "vpc-**********"                      # EKSを配置するVPCのID
  subnets:
    private:
      ap-northeast-1a:
          id: "subnet-**********"           # プライベートサブネット1(a)のID
      ap-northeast-1c:
          id: "subnet-**********"           # プライベートサブネット2(c)のID
      ap-northeast-1d:
          id: "subnet-**********"           # プライベートサブネット3(d)のID

managedNodeGroups:
  - name: eks-node-group1                          # ノードグループ名
    labels: { role:  test }                        # ラベル
    instanceType: t2.xlarge                        # EKSノードのインスタンスタイプ
    minSize: 2                                     # EKSノードの最小台数
    maxSize: 6                                     # EKSノードの最大台数
    desiredCapacity: 2                             # EKSノードの初期台数
    volumeSize: 20                                 # EKSノードのストレージ容量
    privateNetworking: true
    ssh:
      allow: true
      publicKeyPath: ~/.ssh/id_rsa.pub
    tags:
      nodegroup-role: test                         # EKSノードグループにつけるタグ

addons:                                            # 必要に応じてアドオンを追加
- name: vpc-cni
  version: latest
- name: coredns
  version: latest
- name: kube-proxy
  version: latest
- name: aws-ebs-csi-driver
  version: latest
5.EKS構築
eksctlコマンドおよび4で作成したeks.yamlを用いてEKSを構築する。
[ec2-user@ip-*-*-*-* ~]$ eksctl create cluster -f eks.yaml

2024-03-20 12:39:08 [?]  eksctl version 0.174.0
2024-03-20 12:39:08 [?]  using region ap-northeast-1
2024-03-20 12:39:08 [!]  warning, having public access disallowed will subsequently interfere with some features of eksctl. This will require running subsequent eksctl (and Kubernetes) commands/API calls from within the VPC.  Running these in the VPC requires making updates to some AWS resources.  See: https://docs.aws.amazon.com/eks/latest/userguide/cluster-endpoint.html for more details
2024-03-20 12:39:08 [!]  security group rules may be added by eksctl; see vpc.manageSharedNodeSecurityGroupRules to disable this behavior
2024-03-20 12:39:08 [?]  using existing VPC (vpc-**********) and subnets (private:map[ap-northeast-1a:{subnet-********** ap-northeast-1a ********** } ap-northeast-1c:{subnet-********** ap-northeast-1c ********** } ap-northeast-1d:{subnet-********** ap-northeast-1d ********** }] public:map[])
2024-03-20 12:39:08 [!]  custom VPC/subnets will be used; if resulting cluster doesn't function as expected, make sure to review the configuration of VPC/subnets
2024-03-20 12:39:08 [?]  nodegroup "eks-node-group1" will use "" [AmazonLinux2/1.29]
2024-03-20 12:39:08 [?]  using SSH public key "/home/ec2-user/.ssh/id_rsa.pub" as "eksctl-eks-test-nodegroup-eks-node-group1-**********"
2024-03-20 12:39:08 [?]  using Kubernetes version 1.29
2024-03-20 12:39:08 [?]  creating EKS cluster "eks-test" in "ap-northeast-1" region with managed nodes
2024-03-20 12:39:08 [?]  1 nodegroup (eks-node-group1) was included (based on the include/exclude rules)
2024-03-20 12:39:08 [?]  will create a CloudFormation stack for cluster itself and 0 nodegroup stack(s)
2024-03-20 12:39:08 [?]  will create a CloudFormation stack for cluster itself and 1 managed nodegroup stack(s)
2024-03-20 12:39:08 [?]  if you encounter any issues, check CloudFormation console or try 'eksctl utils describe-stacks --region=ap-northeast-1 --cluster=eks-test'
2024-03-20 12:39:08 [?]  Kubernetes API endpoint access will use provided values {publicAccess=false, privateAccess=true} for cluster "eks-test" in "ap-northeast-1"
2024-03-20 12:39:08 [?]  CloudWatch logging will not be enabled for cluster "eks-test" in "ap-northeast-1"
2024-03-20 12:39:08 [?]  you can enable it with 'eksctl utils update-cluster-logging --enable-types={SPECIFY-YOUR-LOG-TYPES-HERE (e.g. all)} --region=ap-northeast-1 --cluster=eks-test'
2024-03-20 12:39:08 [?]
2 sequential tasks: { create cluster control plane "eks-test",
    2 sequential sub-tasks: {
        2 sequential sub-tasks: {
            wait for control plane to become ready,
            1 task: { create addons },
        },
        create managed nodegroup "eks-node-group1",
    }
}
2024-03-20 12:39:08 [?]  building cluster stack "eksctl-eks-test-cluster"
2024-03-20 12:39:09 [?]  deploying stack "eksctl-eks-test-cluster"
2024-03-20 12:39:39 [?]  waiting for CloudFormation stack "eksctl-eks-test-cluster"
2024-03-20 12:40:09 [?]  waiting for CloudFormation stack "eksctl-eks-test-cluster"
2024-03-20 12:41:09 [?]  waiting for CloudFormation stack "eksctl-eks-test-cluster"
2024-03-20 12:42:09 [?]  waiting for CloudFormation stack "eksctl-eks-test-cluster"
2024-03-20 12:43:09 [?]  waiting for CloudFormation stack "eksctl-eks-test-cluster"
2024-03-20 12:44:09 [?]  waiting for CloudFormation stack "eksctl-eks-test-cluster"
2024-03-20 12:45:09 [?]  waiting for CloudFormation stack "eksctl-eks-test-cluster"
2024-03-20 12:46:09 [?]  waiting for CloudFormation stack "eksctl-eks-test-cluster"
2024-03-20 12:47:09 [?]  waiting for CloudFormation stack "eksctl-eks-test-cluster"
2024-03-20 12:48:09 [?]  waiting for CloudFormation stack "eksctl-eks-test-cluster"
2024-03-20 12:49:09 [?]  waiting for CloudFormation stack "eksctl-eks-test-cluster"
2024-03-20 12:51:11 [!]  OIDC is disabled but policies are required/specified for this addon. Users are responsible for attaching the policies to all nodegroup roles
2024-03-20 12:51:11 [?]  creating addon
2024-03-20 12:52:59 [?]  addon "vpc-cni" active
2024-03-20 12:52:59 [?]  building managed nodegroup stack "eksctl-eks-test-nodegroup-eks-node-group1"
2024-03-20 12:52:59 [?]  deploying stack "eksctl-eks-test-nodegroup-eks-node-group1"
2024-03-20 12:52:59 [?]  waiting for CloudFormation stack "eksctl-eks-test-nodegroup-eks-node-group1"
2024-03-20 12:53:30 [?]  waiting for CloudFormation stack "eksctl-eks-test-nodegroup-eks-node-group1"
2024-03-20 12:54:00 [?]  waiting for CloudFormation stack "eksctl-eks-test-nodegroup-eks-node-group1"
2024-03-20 12:55:13 [?]  waiting for CloudFormation stack "eksctl-eks-test-nodegroup-eks-node-group1"
2024-03-20 12:55:13 [?]  waiting for the control plane to become ready
2024-03-20 12:55:14 [?]  saved kubeconfig as "/home/ec2-user/.kube/config"
2024-03-20 12:55:14 [?]  no tasks
2024-03-20 12:55:14 [?]  all EKS cluster resources for "eks-test" have been created
2024-03-20 12:55:14 [?]  nodegroup "eks-node-group1" has 2 node(s)
2024-03-20 12:55:14 [?]  node "ip-*-*-*-*.ap-northeast-1.compute.internal" is ready
2024-03-20 12:55:14 [?]  node "ip-*-*-*-*.ap-northeast-1.compute.internal" is ready
2024-03-20 12:55:14 [?]  waiting for at least 2 node(s) to become ready in "eks-node-group1"
2024-03-20 12:55:14 [?]  nodegroup "eks-node-group1" has 2 node(s)
2024-03-20 12:55:14 [?]  node "ip-*-*-*-*.ap-northeast-1.compute.internal" is ready
2024-03-20 12:55:14 [?]  node "ip-*-*-*-*.ap-northeast-1.compute.internal" is ready
2024-03-20 12:55:15 [?]  creating addon
2024-03-20 12:55:26 [?]  addon "coredns" active
2024-03-20 12:55:26 [?]  creating addon
2024-03-20 12:56:05 [?]  addon "kube-proxy" active
2024-03-20 12:56:05 [!]  OIDC is disabled but policies are required/specified for this addon. Users are responsible for attaching the policies to all nodegroup roles
2024-03-20 12:56:05 [?]  creating addon
2024-03-20 12:57:06 [?]  addon "aws-ebs-csi-driver" active
2024-03-20 12:57:06 [?]  kubectl command should work with "/home/ec2-user/.kube/config", try 'kubectl get nodes'
2024-03-20 12:57:06 [?]  EKS cluster "eks-test" in "ap-northeast-1" region is ready
エラーが発生せずに処理がすべて完了していればOK
6.EKSのPod確認
正常に稼働しているかどうかを確認する。
[ec2-user@ip-*-*-*-* ~]$ kubectl get pods -A

NAMESPACE     NAME                                  READY   STATUS    RESTARTS   AGE
kube-system   aws-node-75cvj                        2/2     Running   0          61m
kube-system   aws-node-x8sq4                        2/2     Running   0          61m
kube-system   coredns-5877997cb7-6flrw              1/1     Running   0          61m
kube-system   coredns-5877997cb7-gw5t2              1/1     Running   0          61m
kube-system   ebs-csi-controller-7ff59ffbc6-cmq7l   6/6     Running   0          60m
kube-system   ebs-csi-controller-7ff59ffbc6-v59kb   6/6     Running   0          60m
kube-system   ebs-csi-node-6tkjf                    3/3     Running   0          60m
kube-system   ebs-csi-node-cql86                    3/3     Running   0          60m
kube-system   kube-proxy-cc9l8                      1/1     Running   0          60m
kube-system   kube-proxy-mb2xs                      1/1     Running   0          60m
全てのPodのステータスがRunningになっていればとりあえずOK
また、AWSコンソールのEKSサービスからもEKSが構築されていることを確認できる。
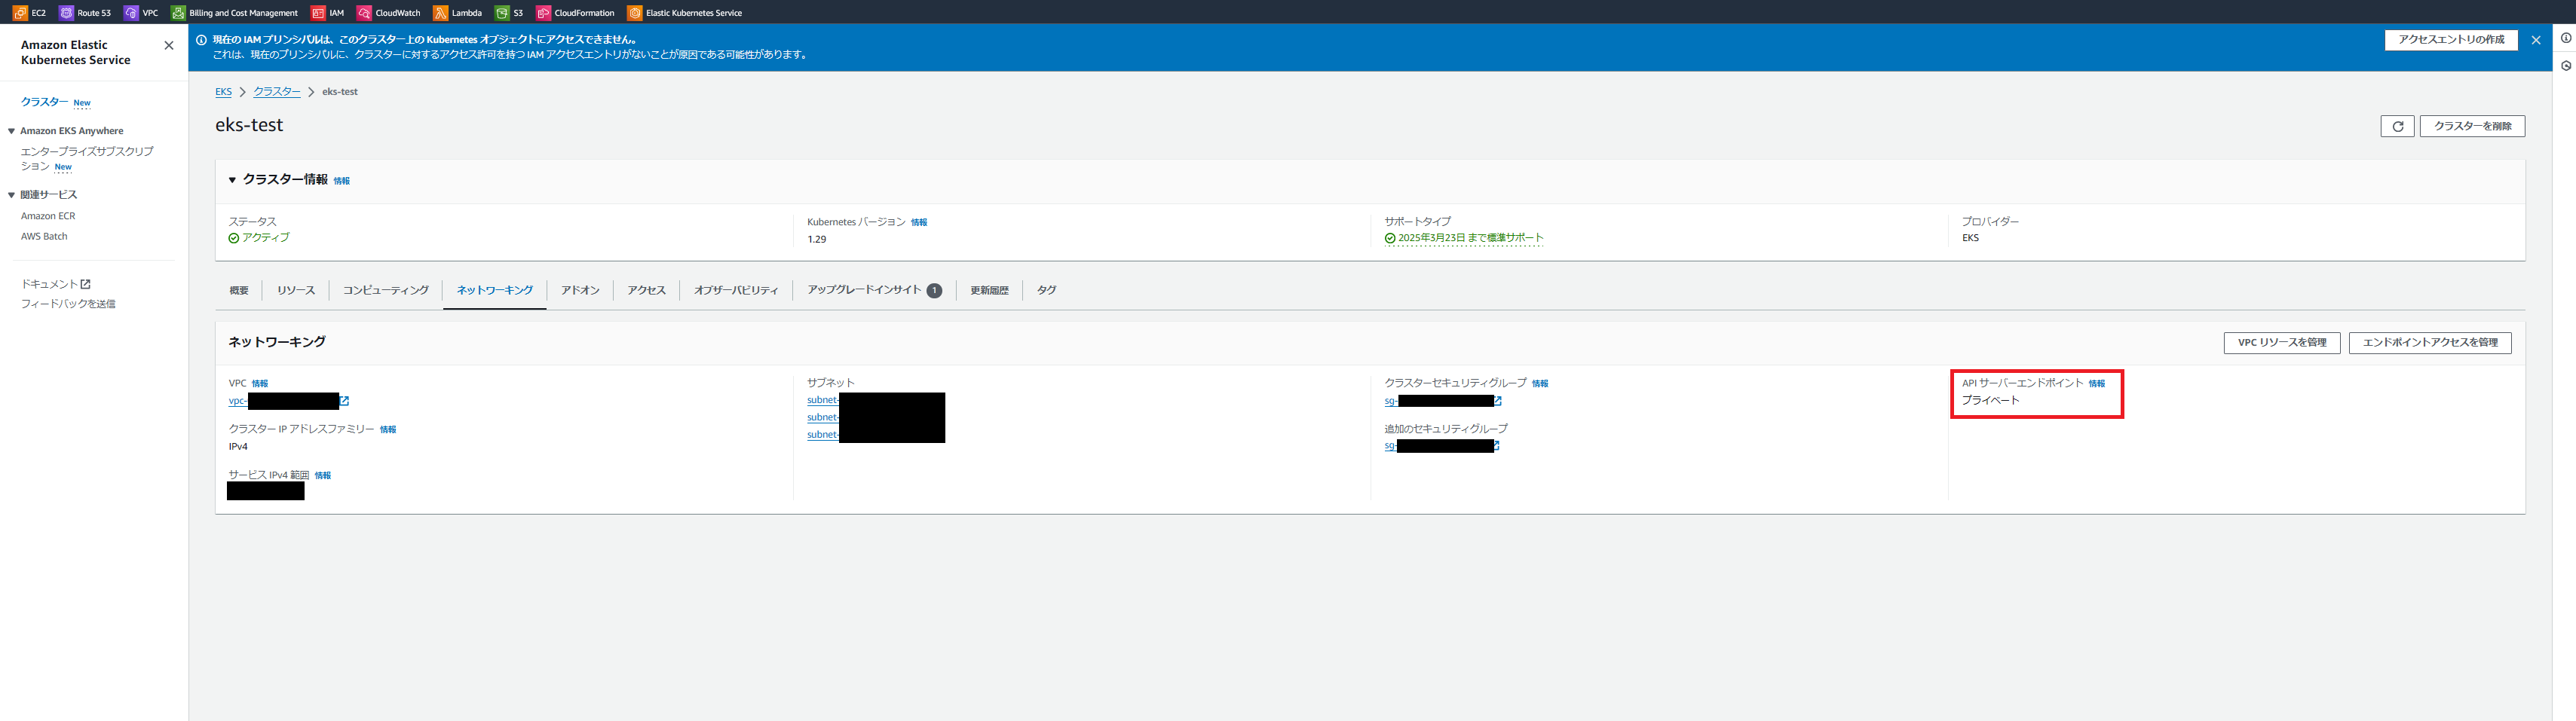
上記画面で「APIサーバーエンドポイント」がプライベートとなっているため、EKSのパブリックエンドポイントは作成されておらず、プライベートエンドポイントのみが作成されていることも確認できる。
7.EKS用のOIDCプロバイダーの作成
EKS内のサービスアカウントがAWSのリソースにアクセスするためには、OIDCプロバイダーによりサービスアカウントとIAMロールを紐づける必要がある。
そのため、文献[8]を参考にEKS用のOIDCプロバイダーを作成する。
#変数設定
[ec2-user@ip-*-*-*-* ~]$ cluster_name=eks-test  # 作成したEKS名
[ec2-user@ip-*-*-*-* ~]$ oidc_id=$(aws eks describe-cluster --name $cluster_name --query "cluster.identity.oidc.issuer" --output text | cut -d '/' -f 5)

#既存のOIDCプロバイダーがあるか確認(何も出力されなければOK)
[ec2-user@ip-*-*-*-* ~]$ aws iam list-open-id-connect-providers | grep $oidc_id | cut -d "/" -f4

#OIDCプロバイダー作成
[ec2-user@ip-*-*-*-* ~]$ eksctl utils associate-iam-oidc-provider --cluster $cluster_name --approve  --region ${REGION}

2024-03-20 15:43:15 [?]  will create IAM Open ID Connect provider for cluster "eks-test" in "ap-northeast-1"
2024-03-20 15:43:15 [?]  created IAM Open ID Connect provider for cluster "eks-test" in "ap-northeast-1"
最後の2行の出力が出ていれば基本的にOK
EKSのログ送信設定
CloudWatch LogsへEKSのログを送信するために、Fluent-BitをEKSに導入する。
参考文献:[6],[9]
1.Fluent-Bit用のNamespace作成
kubectlコマンドでNamespaceを作成する。
[ec2-user@ip-*-*-*-* ~]$ kubectl apply -f https://raw.githubusercontent.com/aws-samples/amazon-cloudwatch-container-insights/latest/k8s-deployment-manifest-templates/deployment-mode/daemonset/container-insights-monitoring/cloudwatch-namespace.yaml

namespace/amazon-cloudwatch created
2.Fluent-bit設定
文献[6]を参考にFluent-Bitのconfigmapを作成する。
#configmapに使用する変数設定
[ec2-user@ip-*-*-*-* ~]$ ClusterName=eks-test  # 作成したEKS名
[ec2-user@ip-*-*-*-* ~]$ RegionName=${REGION}
[ec2-user@ip-*-*-*-* ~]$ FluentBitHttpPort='2020'
[ec2-user@ip-*-*-*-* ~]$ FluentBitReadFromHead='Off'
[ec2-user@ip-*-*-*-* ~]$ [[ ${FluentBitReadFromHead} = 'On' ]] && FluentBitReadFromTail='Off'|| FluentBitReadFromTail='On'
[ec2-user@ip-*-*-*-* ~]$ [[ -z ${FluentBitHttpPort} ]] && FluentBitHttpServer='Off' || FluentBitHttpServer='On'

#configmap作成
[ec2-user@ip-*-*-*-* ~]$ kubectl create configmap fluent-bit-cluster-info \
--from-literal=cluster.name=${ClusterName} \
--from-literal=http.server=${FluentBitHttpServer} \
--from-literal=http.port=${FluentBitHttpPort} \
--from-literal=read.head=${FluentBitReadFromHead} \
--from-literal=read.tail=${FluentBitReadFromTail} \
--from-literal=logs.region=${RegionName} -n amazon-cloudwatch

configmap/fluent-bit-cluster-info created
3.Fluent-bitインストール設定ファイルのダウンロードおよび編集
本稿の最初に記載した3つの設定項目のうちの1つ「3.ECRプライベートリポジトリの設定」に該当する箇所その1。
Fluent-BitをEKSにインストールするための設定ファイル「fluent-bit.yaml」のうち、imageの部分のレジストリURLおよびイメージタグを修正する。
# fluent-bit.yamlダウンロード
[ec2-user@ip-*-*-*-* ~]$ curl -o "fluent-bit.yaml" "https://raw.githubusercontent.com/aws-samples/amazon-cloudwatch-container-insights/latest/k8s-deployment-manifest-templates/deployment-mode/daemonset/container-insights-monitoring/fluent-bit/fluent-bit.yaml"

# 自身のアカウントのECRのURLを変数に格納
[ec2-user@ip-*-*-*-* ~]$ ECR_URL=************.dkr.ecr.${REGION}.amazonaws.com # *は自身のAWSアカウントIDが入る

# 修正前にコピーを取ってから、sedで該当箇所を修正
[ec2-user@ip-*-*-*-* ~]$ cp fluent-bit.yaml fluent-bit.yaml_origin
[ec2-user@ip-*-*-*-* ~]$ sed -i -e "s/public\.ecr\.aws/${ECR_URL}/g" fluent-bit.yaml
[ec2-user@ip-*-*-*-* ~]$ sed -i -e "s/aws-for-fluent-bit\:stable/aws-for-fluent-bit\:latest/g" fluent-bit.yaml

# diffで差分確認
[ec2-user@ip-*-*-*-* ~]$ diff fluent-bit.yaml fluent-bit.yaml_origin

264c264
<         image: ************.dkr.ecr.ap-northeast-1.amazonaws.com/aws-observability/aws-for-fluent-bit:latest
---
>         image: public.ecr.aws/aws-observability/aws-for-fluent-bit:stable
imageの部分が自身のAWSアカウントのECRのURL「************.dkr.ecr.ap-northeast-1.amazonaws.com」に、stableがlatestなっていればOK
4.Fluent-bitのDockerイメージをECRにプッシュ
本稿の最初に記載した3つの設定項目のうちの1つ「3.ECRプライベートリポジトリの設定」に該当する箇所その2。
最初にDockerをインストールする。
[ec2-user@ip-*-*-*-* ~]$ sudo yum -y install docker

Last metadata expiration check: 2:27:11 ago on Wed Mar 20 08:35:35 2024.
Dependencies resolved.
...
Complete!
次に自動起動の設定を追加して起動する。
#Dockerサービスの自動起動設定追加
[ec2-user@ip-*-*-*-* ~]$ sudo systemctl enable docker

Created symlink /etc/systemd/system/multi-user.target.wants/docker.service → /usr/lib/systemd/system/docker.service.

#Dockerサービス起動
[ec2-user@ip-*-*-*-* ~]$ sudo systemctl start docker

#Dockerサービスの状態確認
[ec2-user@ip-*-*-*-* ~]$ sudo systemctl status docker
● docker.service - Docker Application Container Engine
     Loaded: loaded (/usr/lib/systemd/system/docker.service; enabled; preset: disabled)
     Active: active (running) since Wed 2024-03-20 11:06:30 UTC; 34s ago
...
さらにDockerのソケットファイルの所有権をec2-userに変更する。
[ec2-user@ip-*-*-*-* ~]$ sudo chown ec2-user:ec2-user /var/run/docker.sock
その後、ECRにdockerコマンドでログインをする。
ログインしないとdockerコマンドからECRにイメージをpushできない。
[ec2-user@ip-*-*-*-* ~]$ aws ecr get-login-password --region ${REGION} | docker login --username AWS --password-stdin ${ECR_URL}

WARNING! Your password will be stored unencrypted in /home/ec2-user/.docker/config.json.
Configure a credential helper to remove this warning. See
https://docs.docker.com/engine/reference/commandline/login/#credentials-store

Login Succeeded
Login Succeededと出力されればOK
イメージをpushするためのリポジトリをECRに作成する。
[ec2-user@ip-*-*-*-* ~]$ aws ecr create-repository --repository-name aws-observability/aws-for-fluent-bit
{
    "repository": {
        "repositoryArn": "arn:aws:ecr:ap-northeast-1:************:repository/aws-observability/aws-for-fluent-bit",
        "registryId": "************",
        "repositoryName": "aws-observability/aws-for-fluent-bit",
        "repositoryUri": "************.dkr.ecr.ap-northeast-1.amazonaws.com/aws-observability/aws-for-fluent-bit",
        "createdAt": "2024-03-20T11:20:38.526000+00:00",
        "imageTagMutability": "MUTABLE",
        "imageScanningConfiguration": {
            "scanOnPush": false
        },
        "encryptionConfiguration": {
            "encryptionType": "AES256"
        }
    }
}
これでECRにFluent-Bit用のDockerイメージをpushする準備が完了。
次に、Fluent-Bit用のDockerイメージを「public.ecr.aws」からpullする。
[ec2-user@ip-*-*-*-* ~]$ docker pull public.ecr.aws/aws-observability/aws-for-fluent-bit:latest

latest: Pulling from aws-observability/aws-for-fluent-bit
e24f20ed38d8: Pull complete
d5ee7d0772fb: Pull complete
b3522e14c29a: Pull complete
7b5c60005c47: Pull complete
fa7ba58ca6bd: Pull complete
5d11aba8be65: Pull complete
ff5d63d2e5d0: Pull complete
22b4a48068bc: Pull complete
bf17f41befc5: Pull complete
8c197122eeba: Pull complete
1718c07e5d38: Pull complete
e748d46d06f9: Pull complete
971d80d73118: Pull complete
268c2b373127: Pull complete
94bc5e4d5abf: Pull complete
040dd57b0557: Pull complete
07456179860d: Pull complete
Digest: sha256:****
pullしたイメージをpushするためにタグ名を変更。
[ec2-user@ip-*-*-*-* ~]$ docker tag public.ecr.aws/aws-observability/aws-for-fluent-bit ${ECR_URL}/aws-observability/aws-for-fluent-bit
[ec2-user@ip-*-*-*-* ~]$ docker images -a

REPOSITORY                                                                               TAG       IMAGE ID       CREATED       SIZE
************.dkr.ecr.ap-northeast-1.amazonaws.com/aws-observability/aws-for-fluent-bit   latest    104b8ea43948   2 weeks ago   360MB
public.ecr.aws/aws-observability/aws-for-fluent-bit                                      latest    104b8ea43948   2 weeks ago   360MB
変更したタグ名を指定してDockerイメージをECRにpushする。
[ec2-user@ip-*-*-*-* ~]$ docker push ${ECR_URL}/aws-observability/aws-for-fluent-bit

Using default tag: latest
The push refers to repository [************.dkr.ecr.ap-northeast-1.amazonaws.com/aws-observability/aws-for-fluent-bit]
ddd392dfc7c6: Pushed
f5df5ebc7e75: Pushed
ec431e3e781f: Pushed
0bbcd3daa38c: Pushed
fb0ee3ea45a1: Pushed
9953ae53aca9: Pushed
5fe80e486609: Pushed
3b6930ee2680: Pushed
b27723df4f54: Pushed
1a20ab374a99: Pushed
f1697dcf9a9b: Pushed
a2986d8113f0: Pushed
ca4b98095e88: Pushed
0513a6f2e440: Pushed
f8cba6896692: Pushed
6c88c2627129: Pushed
644db467b0a2: Pushed
latest: digest: **** size: 4074
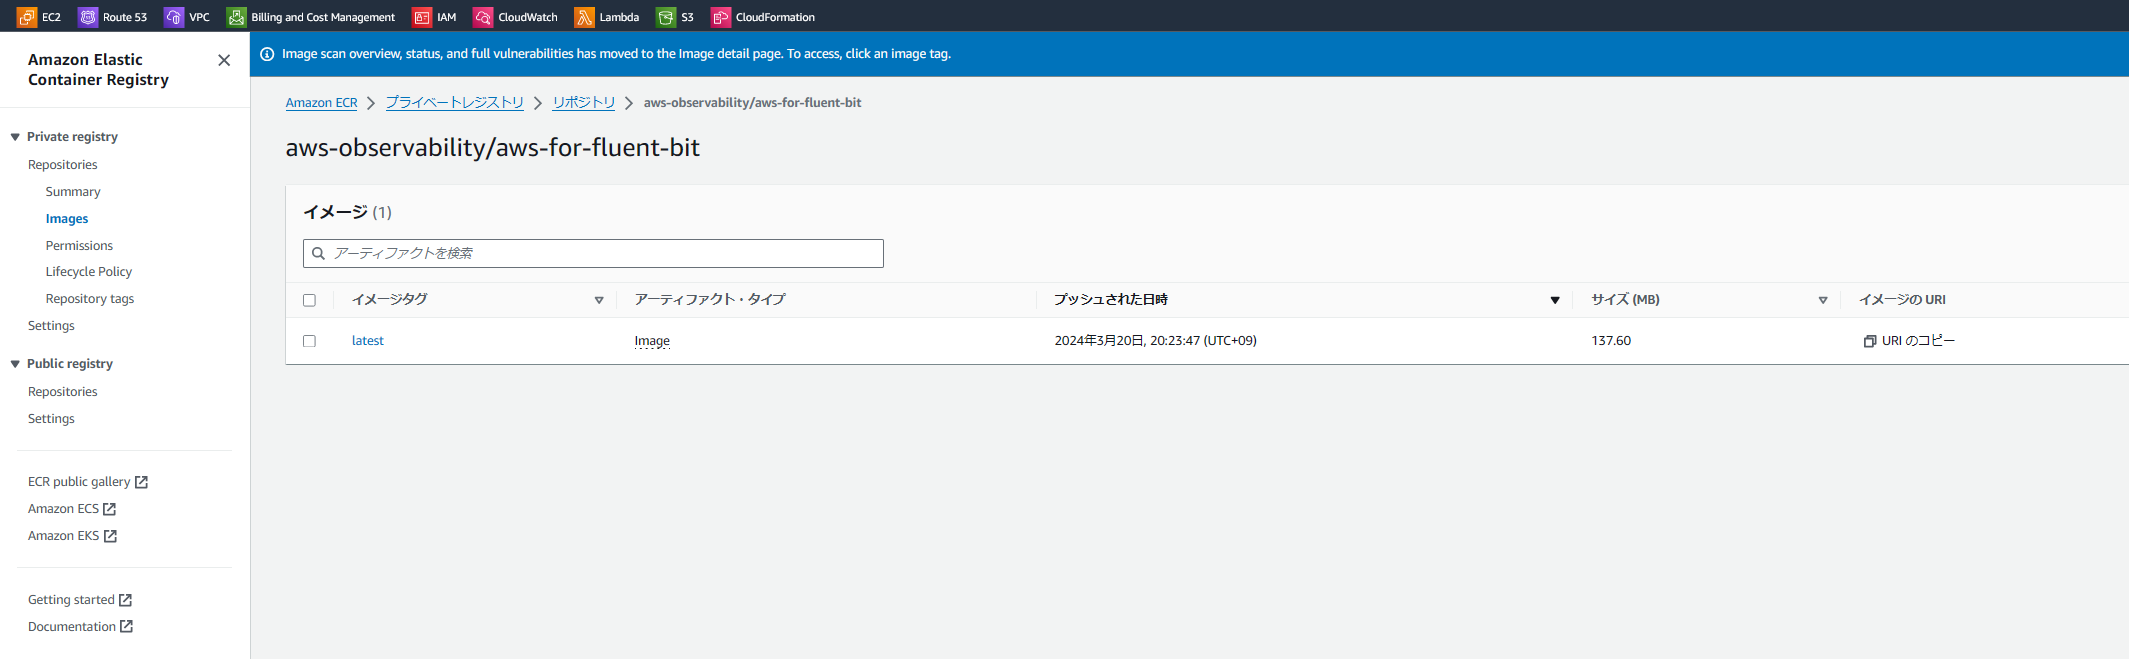
これによりECRのプライベートリポジトリにDockerイメージが格納される。
5.Fluent-Bit用のサービスアカウント・IAMロール作成
文献[9]を参考に、eksctlコマンドを用いてFluent-Bit用のサービスアカウントとIAMロールを1度に作成する。※eksctlバージョン0.171.0以降でできるようになったらしい。
IAMロールにはCloudWatchLogsFullAccessの権限を付与している。
また、fluent-bit.yamlにてサービスアカウント名が「fluent-bit」とデフォルトで指定されているため、ここで作成するサービスアカウント名も「fluent-bit」に合わせている。
[ec2-user@ip-*-*-*-* ~]$ eksctl create iamserviceaccount --name fluent-bit --namespace amazon-cloudwatch --cluster ${cluster_name} --role-name eks-cloudwatchlogs-role --attach-policy-arn arn:aws:iam::aws:policy/CloudWatchLogsFullAccess --approve --region ${REGION}

2024-03-20 17:17:26 [?]  1 iamserviceaccount (amazon-cloudwatch/fluent-bit) was included (based on the include/exclude rules)
2024-03-20 17:17:26 [!]  serviceaccounts that exist in Kubernetes will be excluded, use --override-existing-serviceaccounts to override
2024-03-20 17:17:26 [?]  1 task: {
    2 sequential sub-tasks: {
        create IAM role for serviceaccount "amazon-cloudwatch/fluent-bit",
        create serviceaccount "amazon-cloudwatch/fluent-bit",
    } }2024-03-20 17:17:26 [?]  building iamserviceaccount stack "eksctl-eks-test-addon-iamserviceaccount-amazon-cloudwatch-fluent-bit"
2024-03-20 17:17:26 [?]  deploying stack "eksctl-eks-test-addon-iamserviceaccount-amazon-cloudwatch-fluent-bit"
2024-03-20 17:17:26 [?]  waiting for CloudFormation stack "eksctl-eks-test-addon-iamserviceaccount-amazon-cloudwatch-fluent-bit"
2024-03-20 17:17:56 [?]  waiting for CloudFormation stack "eksctl-eks-test-addon-iamserviceaccount-amazon-cloudwatch-fluent-bit"
2024-03-20 17:17:56 [?]  created serviceaccount "amazon-cloudwatch/fluent-bit"
6.Fluent-Bitインストール
手順3で修正したfluent-bit.yamlを用いてFluent-Bitをインストールする。
[ec2-user@ip-*-*-*-* ~]$ kubectl apply -f fluent-bit.yaml

Warning: resource serviceaccounts/fluent-bit is missing the kubectl.kubernetes.io/last-applied-configuration annotation which is required by kubectl apply. kubectl apply should only be used on resources created declaratively by either kubectl create --save-config or kubectl apply. The missing annotation will be patched automatically.
serviceaccount/fluent-bit configured
clusterrole.rbac.authorization.k8s.io/fluent-bit-role created
clusterrolebinding.rbac.authorization.k8s.io/fluent-bit-role-binding created
configmap/fluent-bit-config created
daemonset.apps/fluent-bit created
7.動作確認
Podのステータスを確認する。
[ec2-user@ip-*-*-*-* ~]$ kubectl get pods -n amazon-cloudwatch

NAME               READY   STATUS    RESTARTS   AGE
fluent-bit-bp8z7   1/1     Running   0          2m29s
fluent-bit-jx8sv   1/1     Running   0          2m29s
RunningになっていればOK
また、イメージをECRからpull出来ていることをイベント等から確認できる。
[ec2-user@ip-*-*-*-* ~]$ kubectl events -n amazon-cloudwatch

...
18m         Normal   Pulled             Pod/fluent-bit-bp8z7   Successfully pulled image "************.dkr.ecr.ap-northeast-1.amazonaws.com/aws-observability/aws-for-fluent-bit:latest" in 6.614s (6.614s including waiting)
...
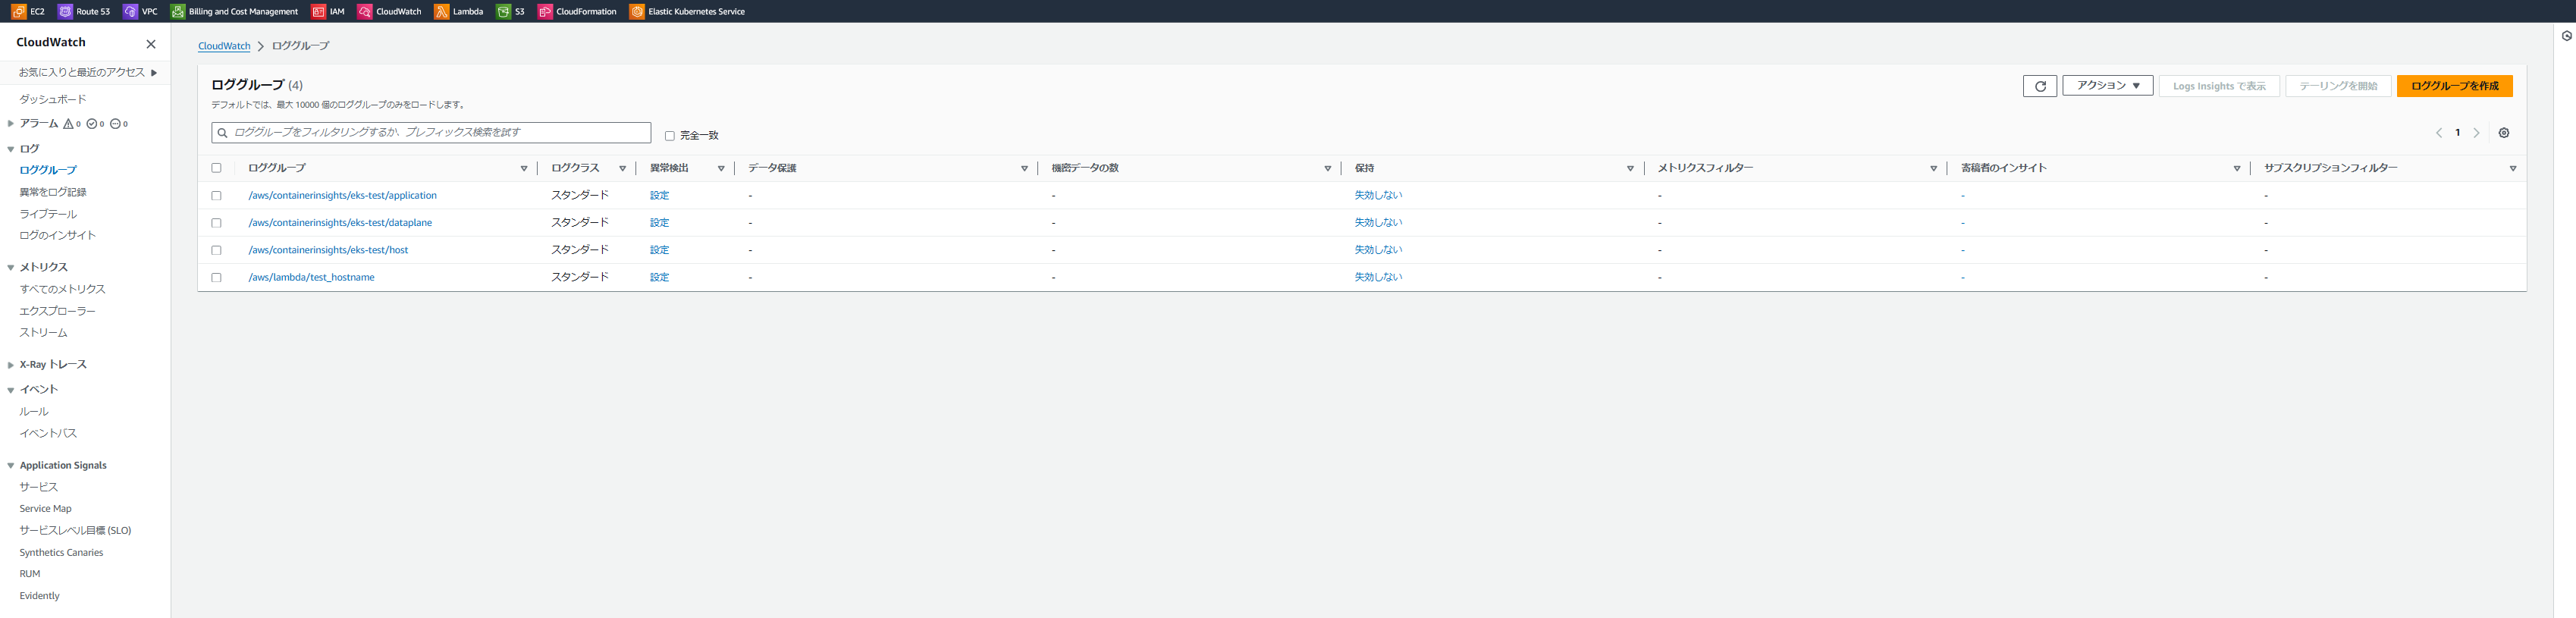
設定が正しければ、CloudWatchのロググループに
- /aws/containerinsights/${eks_cluster_name}/application
- /aws/containerinsights/${eks_cluster_name}/dataplane
- /aws/containerinsights/${eks_cluster_name}/host
が作成されていることがAWSコンソール等で確認できる。
まとめ
プライベートEKSを構築するには、
- VPCエンドポイントの作成
- EKSのプライベートエンドポイント設定
- ECRプライベートリポジトリの設定
の3つの工程が必要であり、その手順を実際に検証し、正常に動作することを確認できた。
プライベートな環境に構築することでセキュアなEKSとなるが、よりセキュアな構成にする場合は
- VPCエンドポイントのポリシーの制限
- EKS manageノードに割り当てているIAMロール等の権限最小化
- EKSの暗号化
などを実施する必要がある。上記についてもいずれチャレンジしたい。
参考文献
[1] https://qiita.com/leomaro7/items/ae40ed156889d5c81e1c , アクセス: 2024-03-17.
[2] https://docs.aws.amazon.com/ja_jp/eks/latest/userguide/private-clusters.html , アクセス: 2024-03-17.
[3] https://eksctl.io/usage/vpc-cluster-access/ , アクセス: 2024-03-17.
[4] https://eksctl.io/usage/eks-private-cluster/ , アクセス: 2024-03-17.
[5] https://eksctl.io/usage/vpc-configuration/#custom-shared-node-security-group , アクセス: 2024-03-17.
[6] https://docs.aws.amazon.com/ja_jp/AmazonCloudWatch/latest/monitoring/Container-Insights-setup-logs-FluentBit.html , アクセス: 2024-03-20.
[7] https://catalog.us-east-1.prod.workshops.aws/workshops/f5abb693-2d87-43b5-a439-77454f28e2e7/ja-JP/020_create_cluster/10_install_eksctl , アクセス: 2024-03-20.
[8] https://docs.aws.amazon.com/ja_jp/eks/latest/userguide/enable-iam-roles-for-service-accounts.html , アクセス: 2024-03-20.
[9] https://docs.aws.amazon.com/ja_jp/eks/latest/userguide/associate-service-account-role.html , アクセス: 2024-03-21.