はじめに
現在弊社の開発しているプロダクトにおいて、リアルタイムにWebアプリケーションへ通知を行う機能が必要だったため、API-GatwayのWebsocketサーバ機能を利用したいと考えました。プロダクトのインフラ管理にTerraformを利用しているため、Websocketサーバも同様にTerraformで管理をしました。
ServerlessFrameworkや、CDKのサンプルは巷に存在していましたが、Terraformの記事はあまり見つからなかったので、同じことをしようとしている人の助けになれば幸いです。
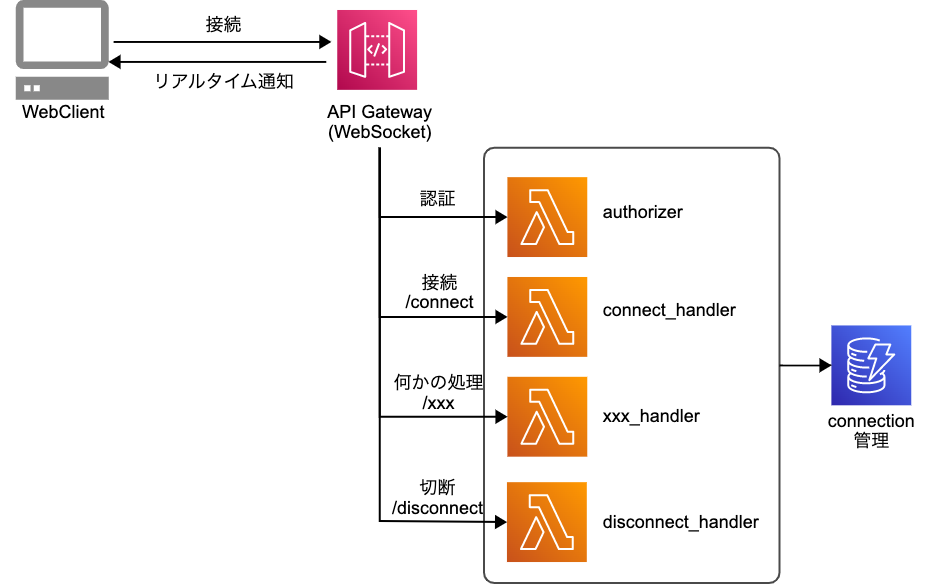
構成
API-Gatewayの各種ハンドラーをLambdaで行う構成としています。(本記事では、connect_handlerのサンプルを記載します)
実際に書いてみる
ディレクトリ構成は以下の通りです。
ディレクトリ構成
.
├── envs
│   ├── dev
│   │   ├── backend.tf
│   │   ├── main.tf
│   │   ├── outputs.tf
│   │   ├── provider.tf
│   │   └── version.tf
│   ├── prd
│   └── stg
└── modules
    └── websocket
        ├── api-gateway.tf
        ├── lambda.tf
        ├── outputs.tf
        ├── variable.tf
        └── connect_handler
            └── src
                └── lambda_function.py
API Gatewayの定義
- api-gatewayv2モジュールを利用して、
protocol_typeをWEBSOCKETに指定します。 - WebsocketのRouteとそのRouteに対応するintegration(lambda)を指定します。
modules/websocket/api-gateway.tf
data "aws_region" "current" {}
data "aws_caller_identity" "current" {}
# websocketのドメイン用のACMは作成済みであることを前提としています。
data "aws_acm_certificate" "default" {
  domain   = "example.com"
  statuses = ["ISSUED"]
}

# Websocketの定義には、aws_apigatewayv2_xxxを利用する
# protocl_typeにWEBSOCKETを指定する
resource "aws_apigatewayv2_api" "example" {
  name                       = "example"
  protocol_type              = "WEBSOCKET"
  description                = "example websocket api"
  route_selection_expression = "$request.body.action"
}

# websocketのrouteを定義する
resource "aws_apigatewayv2_route" "connect" {
  api_id             = aws_apigatewayv2_api.example.id
  route_key          = "$connect"
  target             = "integrations/${aws_apigatewayv2_integration.connect.id}"
}

# routeに対応するintegrationを指定する
resource "aws_apigatewayv2_integration" "connect" {
  api_id             = aws_apigatewayv2_api.example.id
  integration_type   = "AWS_PROXY"
  integration_method = "POST"
  integration_uri    = aws_lambda_function.connect_handler.invoke_arn
}

# api-gatewayのstageを定義
resource "aws_apigatewayv2_stage" "example" {
  api_id = aws_apigatewayv2_api.example.id
  name   = "example"
  access_log_settings {
    destination_arn = aws_cloudwatch_log_group.example.arn
    format = jsonencode({ "requestId" : "$context.requestId", "ip" : "$context.identity.sourceIp", "requestTime" : "$context.requestTime", "httpMethod" : "$context.httpMethod",
    "routeKey" : "$context.routeKey", "status" : "$context.status", "protocol" : "$context.protocol", "responseLength" : "$context.responseLength" })
  }
  # throttling_xxxは定義しないと0になってしまうため、デフォルトの値を定義
  example_route_settings {
    data_trace_enabled       = true
    detailed_metrics_enabled = true
    logging_level            = "INFO"
    throttling_burst_limit   = 5000
    throttling_rate_limit    = 10000
  }
  deployment_id = aws_apigatewayv2_deployment.example.id
  depends_on    = [aws_apigatewayv2_deployment.example]
}

# api-gatewayのdeploymentを定義
resource "aws_apigatewayv2_deployment" "example" {
  api_id      = aws_apigatewayv2_api.example.id
  description = "example deployment"

  triggers = {
    redeployment = sha1(join(",", tolist([
      jsonencode(aws_apigatewayv2_integration.connect),
      jsonencode(aws_apigatewayv2_route.connect),
      jsonencode(aws_apigatewayv2_integration.disconnect),
      jsonencode(aws_apigatewayv2_route.disconnect),
    ])))
  }

  lifecycle {
    create_before_destroy = true
  }
}

resource "aws_cloudwatch_log_group" "example" {
  name = "/aws/apigateway/${aws_apigatewayv2_api.example.name}"
}

# カスタムドメインを利用する場合の定義
resource "aws_apigatewayv2_domain_name" "example" {
  domain_name = "example.com"

  domain_name_configuration {
    certificate_arn = data.aws_acm_certificate.example.arn
    endpoint_type   = "REGIONAL"
    security_policy = "TLS_1_2"
  }
}

resource "aws_apigatewayv2_api_mapping" "example" {
  api_id      = aws_apigatewayv2_api.example.id
  domain_name = aws_apigatewayv2_domain_name.example.id
  stage       = aws_apigatewayv2_stage.example.id
}
Lambdaの定義
-
aws_lambda_permissionにてapi-gatewayから呼び出せるように定義する
lambda.tf
resource "aws_lambda_function" "connect_handler" {
  filename         = "dist/connect_handler.zip"
  function_name    = "connect_handler"
  description      = "websocketのconnect時の処理を実施する"
  role             = aws_iam_role.connect_handler.arn
  source_code_hash = data.archive_file.connect_handler_zip.output_base64sha256
  runtime          = "python3.9"
  handler          = "lambda_function.lambda_handler"
  timeout          = "300"
  memory_size      = "128"
  tracing_config {
    mode = "Active"
  }
}

data "archive_file" "connect_handler_zip" {
  type = "zip"

  source_dir  = "${path.module}/connect_handler/src"
  output_path = "dist/connect_handler.zip"
}

# handlerに対応したrouteを定義する
resource "aws_lambda_permission" "connect_handler" {
  statement_id  = "AllowExecutionFromAPIGateway"
  action        = "lambda:InvokeFunction"
  function_name = aws_lambda_function.connect_handler.function_name
  principal     = "apigateway.amazonaws.com"
  source_arn    = "arn:aws:execute-api:${data.aws_region.current.name}:${data.aws_caller_identity.current.account_id}:${aws_apigatewayv2_api.default.id}/*/${aws_apigatewayv2_route.connect.route_key}"
}

resource "aws_cloudwatch_log_group" "connect_handler" {
  name = "/aws/lambda/connect_handler"
}
Lambda実装
- websocketのconnectionIdを取得して、dynamodbに格納するサンプルです。
connect_handler/src/lambda_function.py
import boto3
import uuid

client = boto3.resource('dynamodb', region_name="ap-northeast-1")
table = client.Table('connection')

def lambda_handler(event, context):
    connection_id = event['requestContext']['connectionId']
    table.put_item(
        Item={
            'id': str(uuid.uuid4()),
            'ws_connection_id': connection_id}
IAMの定義等は省略しておりますが、Websocketの最低限の接続処理が実装完了です。
まとめ
REST APIを実装するときに、API Gatewayを利用する方が多いかと思いますが、Websocketサーバとしても利用できるとても優れたマネージドサービスです。Terraformを利用することで簡単な記載のみでWebsocketサーバの構築が可能になりますので、ぜひお試しください。
参考にした記事