サタクロースの探し方
はじめに
この記事は、「情報検索・検索エンジン Advent Calendar 2019」の記事のひとつとしてまとめたものです。実在の人物や組織とは無関係な話題に努めますが、万が一、特定の団体や人物に関連する話題にふれてしまい、不快な思いをしてしまった方がいらっしゃいましたら、力の限りお詫びしますのでご連絡ください。
情報検索・検索エンジン Advent Calendar 2019
https://qiita.com/advent-calendar/2019/search
サンタクロースってなに?
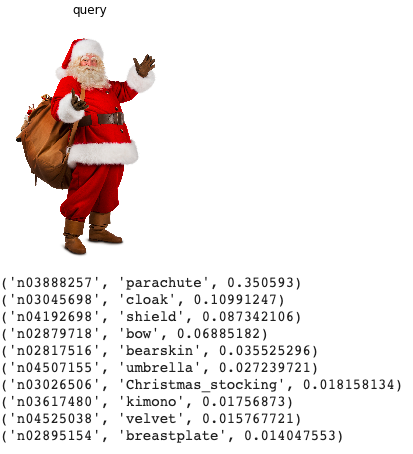
サンタクロースというのは、年に一度、良い子が寝てる間にプレゼントをそっと置いていくという謎の人物です。赤い装束で、白い袋を持ち、一般的には白いヒゲを生やしたおじいさんのようです。
サンタはどこにいるの?
サンタは、一説によると雪の降り積もる北国に生息しているようですが、実際にどこにいるのかは、私も会ったことがないので、わかりません。お手紙は、住所はフィンランドの北極圏のサンタクロース中央郵便局宛に送れば届くそうなので、みなさん送ってみましょう。
Santa Claus' Main Post Office
Tähtikuja 1, FI-96930 Arctic Circle
ネットの力で、追いかけることができるアプリやサービスもあるようですが、どこまで本当かは定かではありません。
Google サンタを追いかけよう
https://santatracker.google.com/intl/ja/village.html
Node Tracks Santa
https://www.noradsanta.org/
本当にいるの?
実際のところ、本物のサンタがいるかどうか、定かではありませんね。でも、存在しないという証明もできません。まさに悪魔の証明です。サンタは神か悪魔か、はたまた妖怪の仕業か、気になるところです。
どうすれば会えるの?
フィンランドの住所まで出向けば、もしかしたら会えるかもしれません。でもそんな時間もお金もないという人は、是非、クリスマスイブの夜、寝ないで待ちましょう。もしくは、サンタが現れそうなところに罠かビデオカメラでも仕込んでおいて、正体を明かしてやりましょう。
ただし、もし捕まえた人が家族や知り合いだったとしても、サンタがいないとはまだいえません。サンタがとっさに変装してるかもしれません。サンタが家族や知り合いに乗り移って操っている可能性すらあります。
検索エンジンで探そう!
これだけインターネットが発達したのですから、検索エンジンでサンタを探すことができるかもしれません。自分のお父さんが実はサンタかもしれませんよね?だったら、インターネット上にお父さんそっくりのサンタがいてもおかしくありません。
というわけで、探します。サンタを。
Where is Santa?
このリポジトリでは、インターネットでサンタクロース情報を収集、インデックス、様々なクエリで検索するためのシステムを公開します。すべてのプログラムは、Google colab 上で試しているので、みなさんが実行することは難しくないと思います。
Crawler for Santa
まずは、サンタの情報を入手するためのクローラを用意します。クローラには、icrawler を使います。Google、Bing、Baidu などの画像検索サイトからダウンロードすることができます。
!pip install icrawler
各サイトで 1,000 件ずつダウンロードするなら、以下のようにします。
from icrawler.builtin import BaiduImageCrawler, BingImageCrawler, GoogleImageCrawler

crawler = GoogleImageCrawler(storage={"root_dir": "google_images"}, downloader_threads=4)
crawler.crawl(keyword="Santa", offset=0, max_num=1000)

bing_crawler = BingImageCrawler(storage={'root_dir': 'bing_images'}, downloader_threads=4)
bing_crawler.crawl(keyword='Santa', filters=None, offset=0, max_num=1000)

baidu_crawler = BaiduImageCrawler(storage={'root_dir': 'baidu_images'})
baidu_crawler.crawl(keyword='Santa', offset=0, max_num=1000)
Indexer for Santa
次に、elasticsearch の sparse_vector を使ってインデックスを作り、cosineSimilaritySparse を使ってベクトル検索をしてみます。ベクトル検索といっても、VGG-16 の出力ラベル 1,000 種類をベクトルとして使うので、embedding とは少し違いますが、やろうと思えば同じやり方でできます。elasticsearch のバージョンは 7.5.1 です。
!wget https://artifacts.elastic.co/downloads/elasticsearch/elasticsearch-7.5.1-linux-x86_64.tar.gz -q
!tar -xzf elasticsearch-7.5.1-linux-x86_64.tar.gz

!chown -R daemon:daemon elasticsearch-7.5.1/
elasticsearch がインストールできたら、起動してみます。Google colab では、サーバ起動は簡単にはできないのですが、daemon として実行することは可能です。
import os
from subprocess import Popen, PIPE, STDOUT
es_server = Popen(['elasticsearch-7.5.1/bin/elasticsearch'],
                  stdout=PIPE, stderr=STDOUT,
                  preexec_fn=lambda: os.setuid(1)  # as daemon
                 )

!ps aux | grep elastic
!sleep 30
!curl -X GET "localhost:9200/"
30秒待ってからサーバの起動状態をチェックしています。クライアント側の環境も整えましょう。
!pip install elasticsearch

from datetime import datetime
from elasticsearch import Elasticsearch
es = Elasticsearch(timeout=60)

doc = {
    'author': 'Santa Claus',
    'text': 'Where is Santa Claus?',
    'timestamp': datetime.now(),
}
res = es.index(index="test-index", doc_type='tweet', id=1, body=doc)
print(res['result'])

res = es.get(index="test-index", doc_type='tweet', id=1)
print(res['_source'])

es.indices.refresh(index="test-index")

res = es.search(index="test-index", body={"query": {"match_all": {}}})
print("Got %d Hits:" % res['hits']['total']['value'])
for hit in res['hits']['hits']:
    print("%(timestamp)s %(author)s: %(text)s" % hit["_source"])
ここまでうまくいけば、次は画像から特徴ベクトルを取り出すことを考えます。今回は、おなじみ VGG-16 を利用しています。
# Load libraries
from keras.applications.vgg16 import VGG16, preprocess_input, decode_predictions
from keras.preprocessing import image
from PIL import Image
import matplotlib.pyplot as plt
import numpy as np
import sys

model = VGG16(weights='imagenet')
さらに、画像と特徴ベクトルの情報を表示するためのプログラムを用意しまして、、
def predict(filename, featuresize, scale=1.0):
    img = image.load_img(filename, target_size=(224, 224))
    return predictimg(img, featuresize, scale=1.0)

def predictpart(filename, featuresize, scale=1.0, size=1):
    im = Image.open(filename)
    width, height = im.size
    im = im.resize((width * size, height * size))
    im_list = np.asarray(im)
    # partition
    out_img = []
    if size > 1:
        v_split = size
        h_split = size
        [out_img.extend(np.hsplit(h_img, h_split)) for h_img in np.vsplit(im_list, v_split)]
    else:
        out_img.append(im_list)
    reslist = []
    for offset in range(size * size):
        img = Image.fromarray(out_img[offset])
        reslist.append(predictimg(img, featuresize, scale))
    return reslist

def predictimg(img, featuresize, scale=1.0):
    width, height = img.size
    img = img.resize((int(width * scale), int(height * scale)))
    img = img.resize((224, 224))
    x = image.img_to_array(img)
    x = np.expand_dims(x, axis=0)
    preds = model.predict(preprocess_input(x))
    results = decode_predictions(preds, top=featuresize)[0]
    return results

def showimg(filename, title, i, scale=1.0, col=2, row=5):
    im = Image.open(filename)
    width, height = im.size
    im = im.resize((int(width * scale), int(height * scale)))
    im = im.resize((width, height))
    im_list = np.asarray(im)
    plt.subplot(col, row, i)
    plt.title(title)
    plt.axis("off")
    plt.imshow(im_list)

def showpartimg(filename, title, i, size, scale=1.0, col=2, row=5):
    im = Image.open(filename)
    width, height = im.size
    im = im.resize((int(width * scale), int(height * scale)))
    #im = im.resize((width, height))
    im = im.resize((width * size, height * size))
    im_list = np.asarray(im)
    # partition
    out_img = []
    if size > 1:
        v_split = size
        h_split = size
        [out_img.extend(np.hsplit(h_img, h_split)) for h_img in np.vsplit(im_list, v_split)]
    else:
        out_img.append(im_list)
    # draw image
    for offset in range(size * size):
        im_list = out_img[offset]
        pos = i + offset
        print(str(col) + ' ' + str(row) + ' ' + str(pos))
        plt.subplot(col, row, pos)
        plt.title(title)
        plt.axis("off")
        plt.imshow(im_list)
        out_img[offset] = Image.fromarray(im_list)
    return out_img
1枚の画像を表示してみましょう。
# Predict an image
scale = 1.0
filename = "google_images/000046.jpg"
plt.figure(figsize=(20, 10))

# showimg(filename, "query", i+1, scale)
imgs = showpartimg(filename, "query", 1, 1, scale)
plt.show()

for img in imgs:
    reslist = predictpart(filename, 10, scale)
    for results in reslist:
        for result in results:
            print(result)
    print()
さらに、elasticsearch へ画像ベクトルのインデックスを作る準備です。ここで何個か注意点があります。まず、cosineSimilaritySparse を使う際は、必ず sparse_vector を mapping で宣言しなければなりません。また、sparse_vector の Key は、__数値__にしましょう。
def createindex(indexname):
    if es.indices.exists(index=indexname):
        es.indices.delete(index=indexname)
    es.indices.create(index=indexname,  body={
        "settings": {
            "index.mapping.total_fields.limit": 10000,
        }
    })

    mapping = {
        "image": {
            "properties": {
                "f": {
                    "type": "text"
                },
                's': {
                    "type": "sparse_vector"
                }
            }
        }
    }
    es.indices.put_mapping(index=indexname, doc_type='image', body=mapping, include_type_name=True)

wnidmap = {}

def loadimages(directory):
    imagefiles = []
    for file in os.listdir(directory):
        if file.rfind('.jpg') < 0:
            continue
        filepath = os.path.join(directory, file)
        imagefiles.append(filepath)
    return imagefiles

def indexfiles(indexname, directory, featuresize=10, docsize=1000):
    imagefiles = loadimages(directory)
    for i in range(len(imagefiles)):
        if i >= docsize:
            return
        filename = imagefiles[i]
        indexfile(indexname, filename, i, featuresize)
        sys.stdout.write("\r%d" % (i + 1))
        sys.stdout.flush()
    es.indices.refresh(index=indexname)

def indexfile(indexname, filename, i, featuresize):
    global wnidmap

    rounddown = 16
    doc = {'f': filename, 's':{}}
    results = predict(filename, featuresize)

    #print(len(results))
    synset = doc['s']
    for result in results:
        score = float(str(result[2]))
        wnid = result[0]
        id = 0
        if wnid in wnidmap.keys():
            id = wnidmap[wnid]
        else:
            id = len(wnidmap)
            wnidmap[wnid] = id
        synset[str(id)] = score

    #print(doc)
    #count = es.count(index=indexname, doc_type='image')['count']
    count = i
    res = es.index(index=indexname, doc_type='image', id=count, body=doc)
いよいよ、画像の特徴ベクトルを elasticsearch へ追加していきます。今回は、画像のファイル名と特徴ベクトル(VGG-16の出力)のみをインデックスしましたが、元画像の URL を追加したり、特徴ベクトルとして中間層の出力を embedding として利用することも原理的には可能です。
createindex("santa-search")

directory = "google_images/"
indexfiles("santa-search", directory, 100, 1000)
# directory = "bing_images/"
# indexfiles("santa-search", directory, 100, 1000)
# directory = "baidu_images/"
# indexfiles("santa-search", directory, 100, 1000)
Searcher for Santa
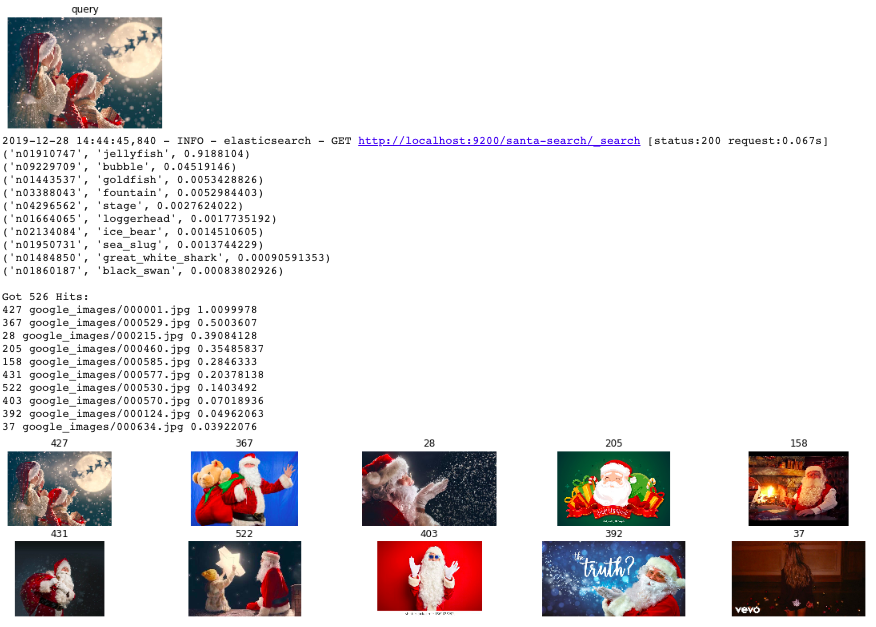
サンタの画像の特徴ベクトルを用いて elasticsearch のインデックスを作りました。いよいよ、この画像の中から真のサンタ "My Santa Claus" を見つけましょう。今回の検索クエリは、__画像__です。試しに、ダウンロードした中から1つ画像を選んで、クエリにしてみましょう。
def searchimg(indexname, filename, num=10, topk=10, scoretype='dot', scale=1.0, partition=1):
    plt.figure(figsize=(20, 10))

    imgs = showpartimg(filename, "query", 1, partition, scale)
    plt.show()

    reslist = []
    for img in imgs:
        results = predictimg(img, num, scale)
        for result in results:
            print(result)
        print()
        res = search(indexname, results, num, topk, scoretype)
        reslist.append(res)
    return reslist

def search(indexname, synsets, num, topk, scoretype='dot', disp=True):
    if scoretype == 'vcos':
        inline = {}
        for synset in synsets:
            score = synset[2]
            if score <= 0.0:
                continue
            wnid = synset[0]
            if wnid not in wnidmap.keys():
                continue
            id = wnidmap[wnid]
            inline[str(id)] = float(score)
        if inline == {}:
            print("Got " +  str(0) + " Hits:")
            return
        #print('wnidmap = ' + str(wnidmap))
        #print('inline = ' + str(inline))

        b = {
            "size": topk,
            "query": {
              "script_score": {
                "query": {"match_all": {}},
                "script": {
                  "source": "cosineSimilaritySparse(params.s, doc['s']) + 0.01",
                  "params": {
                      's': {}
                  }
                }
              }
        }}
        b['query']['script_score']['script']['params']['s'] = inline
        res = es.search(index=indexname, body=b)
        #print(str(b))

        if disp==True:
            print("Got " +  str(res['hits']['total']['value']) + " Hits:")
            topres = res['hits']['hits'][0:topk]
            for hit in topres:
                print(str(hit["_id"]) + " " + str(hit["_source"]["f"]) + " "  + str(hit["_score"]))
            plt.figure(figsize=(20, 10))

            for i in range(len(topres)):
                hit = topres[i]
                row = 5
                col = int(topk / 5)
                if i >= 25:
                    break
                showimg(hit["_source"]["f"], hit["_id"], i+1, col, row)
            plt.show()

        return res
filename = "google_images/000001.jpg"
_ = searchimg('santa-search', filename, 10, 10, 'vcos', 1.0, 1)
どうですか?うまく検索できましたか?うまくいけば、一番近い画像から順に表示されるはずです。インデックスした画像とは別に、新たな画像を用意して、検索してもよいかもしれません。検索エンジンをつかって、世界中のサンタのなかから、あなただけのサンタを探してみましょう。

