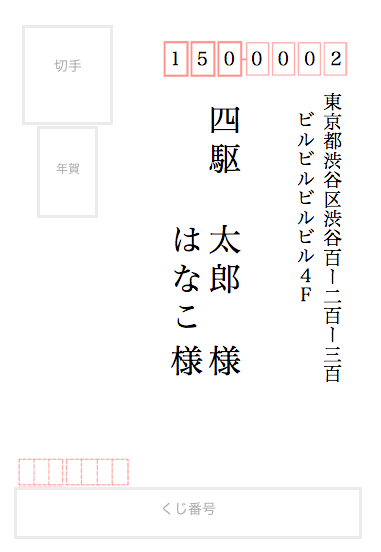
ゴール
↓これをHTMLとCSSで作ってブラウザから印刷するかPDFで保存。

動機
- 年賀状の季節
- 住所データが特定のツール(例えばエクセル)でしか開けないのが嫌になってきた
- Macで宛名印刷するツールが少ない
- CSSの縦書きがW3Cの勧告になったとのこと(CSS Writing ModesがW3C勧告に)
初めての縦書き
がんばりました。
自分用なのでChromeだけで動けばいいです。
<!DOCTYPE html>
<html lang="ja">
<head>
<title>宛名印刷</title>
<style>
 @page {
   size:100mm 558px; /* 148mmだと若干ずれたのでpxで指定 */
   margin:0;
   padding:0;
 }
 @media screen {
   .page {
     background-image:url(nenga.png);
   }
 }
 body {
   width:100mm;
   margin:0;
   padding:0;
   font-family: serif;
 }
 .page {
   width:100mm;
   height:558px; /* 148mmだと若干ずれたのでpxで指定 */
   margin:0;
   padding:0;
   position:relative;
   page-break-after:always;
 }
 #to-name {
   position:absolute;
   top:28mm; right:35mm; /* ずれたら適宜変更 */
   height:93mm;
   font-size:24pt;
   line-height:1.2em;
   writing-mode:vertical-rl;
   text-orientation:upright;
   display:flex;
   margin:0;
   padding:0;
 }
 #to-name > div {
   position:relative;
 }
 #to-postcode3 {
   position:absolute;
   top:12.8mm; left:45.5mm; /* ずれたら適宜変更 */
   margin:0;
   padding:0;
   font-size:14pt;
   letter-spacing:4.2mm;
   font-family: serif;
 }
 #to-postcode4 {
   position:absolute;
   top:12.8mm; left:67.0mm; /* ずれたら適宜変更 */
   margin:0;
   padding:0;
   font-size:14pt;
   letter-spacing:4.1mm;
   font-family: serif;
 }
 #to-address {
   top:30mm; right:8mm; /* ずれたら適宜変更 */
   height:95mm;
   font-size:14pt;
   letter-spacing:0.2mm;
   text-indent:-1em;
   writing-mode:vertical-rl;
   text-orientation:upright;
   position:absolute;
   margin:0;
   padding:0;
 }
 #to-family-name {
   min-height:30mm;
   letter-spacing:0.2em;
   padding-bottom:0.2em;
 }
 #to-first-name {
   min-height:30mm;
   letter-spacing:0.2em;
   padding-bottom:0.2em;
 }
 #to-name-suffix {
   min-height:24mm;
 }
</style>
</head>
<body>
<section class="page">
  <span id="to-postcode3">150</span>
  <span id="to-postcode4">0002</span>
  <div id="to-address">東京都渋谷区渋谷百ー二百ー三百<br>ビルビルビルビル4F<br></div>
  <div id="to-name">
    <div id="to-family-name">四駆<br></div>
    <div id="to-first-name">太郎<br>はなこ</div>
    <div id="to-name-suffix">様<br>様</div>
  </div>
</section>
縦書き記述はwriting-mode:vertical-rl; text-orientation:upright;あたりです。
<section class="page">...</section> が、はがき1枚分になり印刷でも1ページになるようにしてます。
なので、ここを印刷したい住所の数だけページを増やしていく感じになります。
あと、height:148mmの指定だと1pxぐらい大きくなって改ページが入ってしまったので、pxの指定に変えました。
住所データ
JSONで管理することにします。
あんまり深いことは考えず実装が楽な感じにしてみました。
[
  {
    "postcode": "1500002",
    "address-line1": "東京都渋谷区渋谷百ー二百ー三百",
    "address-line2": "ビルビルビルビル4F",
    "address-line3": "",
    "name": [
      {
        "family-name": "四駆",
        "first-name": "太郎",
        "suffix": "様"
      },
      {
        "first-name": "はなこ",
        "suffix": "様"
      }
    ]
  },
  {
    "postcode": "1234567",
    "address-line1": "東京都渋谷区渋谷四百ー五百ー六百",
    "address-line2": "マンションマンション4F",
    "address-line3": "",
    "name": [
      {
        "family-name": "姓",
        "first-name": "名前",
        "suffix": "様"
      },
      {
        "first-name": "名",
        "suffix": "様"
      },
      {
        "first-name": "めい",
        "suffix": "ちゃん"
      },
      {
        "first-name": "メイ",
        "suffix": "くん"
      }
    ]
  },
・・・
]
もちろん、みんな大好きな jq 使います。
例えば、select(.name[]."family-name" == "四駆")とか書けばそれだけ抽出できたりします。
$ jq -r '.[] | select(.name[]."family-name" == "四駆")' address.json
{
  "postcode": "1500002",
  "address-line1": "東京都渋谷区渋谷百ー二百ー三百",
  "address-line2": "ビルビルビルビル4F",
  "address-line3": "",
  "name": [
    {
      "family-name": "四駆",
      "first-name": "太郎",
      "suffix": "様"
    },
    {
      "first-name": "はなこ",
      "suffix": "様"
    }
  ]
}
印刷用データ作成の流れ
まず、先程のsample.htmlから<section class="page">...</section>までを切り出して、print_template.html と page_template.html に分割して変換用のパラメータを埋め込んでおきます。
<section class="page">
  <span id="to-postcode3">{{postcode3}}</span>
  <span id="to-postcode4">{{postcode4}}</span>
  <div id="to-address">{{address}}</div>
  <div id="to-name">
    <div id="to-family-name">{{family-name}}</div>
    <div id="to-first-name">{{first-name}}</div>
    <div id="to-name-suffix">{{suffix}}</div>
  </div>
</section>
これを住所の数だけ置換しながら増やしていきます。
実行
Macを想定。
以下のコマンドを実行。
$ (cat print_template.html; jq -r ' .[] | "-e \"s/{{postcode3}}/"+ .postcode[:3] +"/g\" -e \"s/{{postcode4}}/"+ .postcode[3:7] +"/g\" -e \"s/{{address}}/"+ ."address-line1" +"<br>"+ ."address-line2" +"<br>"+ ."address-line3" +"/g\" -e \"s/{{family-name}}/"+ ([ .name[]."family-name" ] | join("<br>")) +"/g\" -e \"s/{{first-name}}/"+ ([ .name[]."first-name" ] | join("<br>")) +"/g\" -e \"s/{{suffix}}/"+ ([ .name[]."suffix" ] | join("<br>")) +"/g\" page_template.html" ' address.json | xargs -n 13 sed;) >print.html; /Applications/Google\ Chrome.app/Contents/MacOS/Google\ Chrome --headless --print-to-pdf="print.pdf" file:///path/to/print.html
必要なものは以下。
- Google Chrome
- jq
これを実行すると、print.html と print.pdf が同一ディレクトリにできるので、好きな方で印刷するだけです。
最後に
最後になりますが、記事を書いてくれたみなさま、読んでくれたみなさま、ありがとうございます。来年もみなさまにとってよい年でありますよう心よりお祈り申し上げます。
![]() FORK Advent Calendar 2019
FORK Advent Calendar 2019
![]() 24日目 Nuxt.jsとmysqlを連携してデータを表示してみた @ktn
24日目 Nuxt.jsとmysqlを連携してデータを表示してみた @ktn