ごく小さい検討用アプリを書く場合に、私はWin32(C/C++)を利用しているのだけど、
見栄えが古臭いのは気になってしまうところ。。。
ということで、Win32アプリをベースにして、ボタンくらいはかっこよく見せようとがんばってみました。
開発環境はVisualStudio2017を使っています。
いつもは、自分用に用意しているテンプレートプロジェクトをベースにコードを書き足して作業しているので、
一からプロジェクトを作成する場合とはちょっと手順/設定が違うかもしれませんがご容赦ください。
コード置き場:
https://github.com/tanakah-sw/MyWPFTest
1: WPFのプロジェクト作成
VS2017のメニューから、C# WPFアプリを選択してプロジェクトを作成します。
普段、C#なんて使わないので、ちょっとドキドキしますねw
手順が間違っていたらご指摘ください。
MaterialDesignToolkitの導入
https://github.com/ButchersBoy/MaterialDesignInXamlToolkit
これをみたのが、そもそもの動機です。
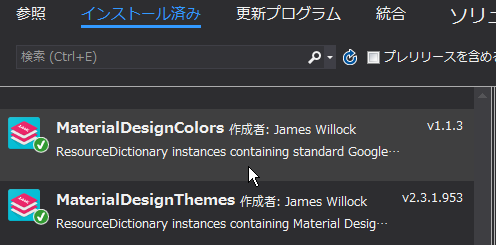
NuGetから以下のパッケージを探してプロジェクトに追加します。

クラスライブラリ/COMの設定
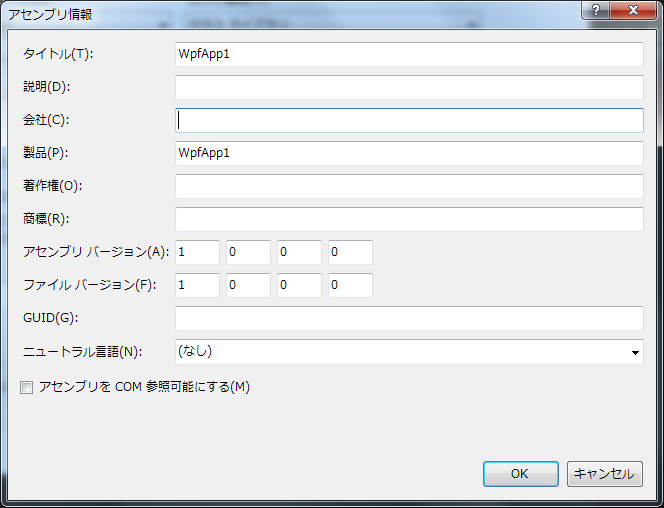
出力の種類をクラスライブラリに設定し、さらにCOM参照可能に設定します。COM相互運用機能の登録にもチェックをつけます。
COMにするのは、WPF/C#のメンバー関数をWin32/C++から呼び出せるようにするためです。


2:C#/Xamlコーディング
画面デザイン
xamlの先頭に以下のコードを書き足して、MaterialDesignToolkitを使用するようにします。
<UserControl
    xmlns="http://schemas.microsoft.com/winfx/2006/xaml/presentation"
    xmlns:x="http://schemas.microsoft.com/winfx/2006/xaml"
    xmlns:materialDesign="http://materialdesigninxaml.net/winfx/xaml/themes"
    xmlns:d="http://schemas.microsoft.com/expression/blend/2008"
    xmlns:mc="http://schemas.openxmlformats.org/markup-compatibility/2006"
    mc:Ignorable="d"

    x:Class="WPFPage.TestPanel"
    TextElement.Foreground="{DynamicResource MaterialDesignBody}"
    TextElement.FontWeight="Regular"
    TextElement.FontSize="11"
    TextOptions.TextFormattingMode="Ideal"
    TextOptions.TextRenderingMode="Auto"
    Background="{DynamicResource MaterialDesignPaper}"
    FontFamily="{DynamicResource MaterialDesignFont}" d:DesignHeight="320" Width="640">
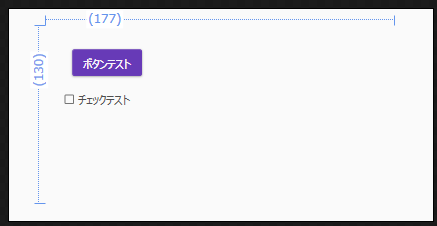
するとMaterialDesignToolkitの部品が追加され、コモンWPFコントロールのうちのいくつかが置き換わります。
ボタンとか、チェックボックスとか。

部品を追加したら、適当にプロパティを設定して完成させます。
<CheckBox Content="チェックテスト" HorizontalAlignment="Left" Height="40" Margin="26,89,0,0" VerticalAlignment="Top" Width="150" FontFamily="Meiryo UI" FontSize="16" Click="ClickCheck" IsChecked="{Binding CheckTest, Mode=OneWay}"/>
<Button Content="ボタンテスト" HorizontalAlignment="Left" Height="40" Margin="40,35,0,0" VerticalAlignment="Top" Width="105" FontFamily="Meiryo UI" FontSize="16" FontWeight="Normal" IsEnabled="{Binding CheckTest}" Click="ClickButton"/>
余談ですが、VisualStudioのエディタが非常に使いづらくてイラつきますね。画面デザイン側は思い通りの位置に部品配置できず、テキスト側は勝手にカーソルが動いたり、ちょっとマウスクリック位置がずれただけで横スクロールしたり。。。苦痛な作業でした。
画面デザインの対応C#コード
今回の設計では、WPF->Win32の手段はPostMessage()で、Win32->WPFの手段はCOM呼び出しで、を想定しています。
PostMessage()にATOMを載せて文字列も送れるようにしてみました。
もっとスマートなやり方があるんでしょうが、C#とか使ったことないんでごめんなさい><
using System;
using System.Windows;
using System.Windows.Controls;
using System.Windows.Interop;
using System.Runtime.InteropServices;


namespace WPFPage
{

    public partial class TestPanel : UserControl
    {
        [DllImport("user32.dll")]
        public static extern int PostMessage(int hWnd, int msg, int wParam, IntPtr lParam);
        [DllImport("kernel32.dll")]
        public static extern int AddAtom(char[] lpstring);

        public static ViewModel lvm=null;

        public TestPanel(bool bcheck)
        {
            InitializeComponent();

            InteropTest.lbt = this;
            lvm = new ViewModel();
            DataContext = lvm;

            lvm.CheckTest = bcheck;
        }


        private void ClickButton(object sender, RoutedEventArgs e)
        {
            HwndSource source = (HwndSource)HwndSource.FromVisual(this);
            Button clicked = (Button)sender;
            lvm.Message = "ClickButton";
            PostMessage(source.Handle.ToInt32(), 0x0111, 0, (IntPtr)AddAtom(lvm.Message.ToCharArray()));
        }

        private void ClickCheck(object sender, RoutedEventArgs e)
        {
            HwndSource source = (HwndSource)HwndSource.FromVisual(this);
            if (lvm.CheckTest == false)
            {
                lvm.CheckTest = true;
                lvm.Message = "Checked";
            }
            else
            {
                lvm.CheckTest = false;
                lvm.Message = "Unchecked";
            }
            PostMessage(source.Handle.ToInt32(), 0x0111, 0, (IntPtr)AddAtom(lvm.Message.ToCharArray()));
        }

        public void UnCheck()
        {
            lvm.CheckTest = false;
        }
    }

    [ClassInterface(ClassInterfaceType.AutoDual)]
    public class InteropTest
    {
        public static TestPanel lbt;

        public void Uncheck()
        {
            lbt.UnCheck();
        }
    }
}
ViewModel
WPFのウリ?のデータバインディングというんでしょうか?見よう見まねでそのあたりを実装してみました。
using System;
using System.ComponentModel;
using System.Runtime.CompilerServices;

namespace WPFPage
{
    public class ViewModel : INotifyPropertyChanged
    {
        public event PropertyChangedEventHandler PropertyChanged;
        private void NotifyPropertyChanged([CallerMemberName] String propertyName = "")
        {
            if (PropertyChanged != null)
            {
                PropertyChanged(this, new PropertyChangedEventArgs(propertyName));
            }
        }

        private string message = "";
        public string Message
        {
            get
            {
                return this.message;
            }
            set
            {
                if (value != this.message)
                {
                    this.message = value;
                    NotifyPropertyChanged();
                }
            }
        }

        private bool checkTest = false;
        public bool CheckTest
        {
            get
            {
                return this.checkTest;
            }
            set
            {
                if (value != this.checkTest)
                {
                    this.checkTest = value;
                    NotifyPropertyChanged();
                }
            }
        }
    }
}
3: Win32のプロジェクトの追加
先ほど作成したWPFのソリューションにWin32のプロジェクトを追加します。
プロパティ設定のポイントは、共通言語ランタイムサポートの設定として/clrを指定することです。
なんかこの時点でまた少しやる気がそがれますね。C++11 STLのスレッドとかPPLとかと容易には共存できないってことですので。
Win32側の"おまじない"
Win32 C++のアプリをベースにするのでWinMain()が必須なのですが、その先頭にCOMアパートメント指定を入れるのがCLRでの流儀のようです。
[System::STAThreadAttribute]
int __stdcall WinMain(HINSTANCE hInstance, HINSTANCE, LPSTR, int)
COMの設定
WPF側に書いたWPFPage.InteropTestを呼び出せるようにします。
COMとか詳しくないんで、こんなんでいいのか不安ですが。。。
  HRESULT hresult;
  CLSID clsid;
  hresult=CLSIDFromProgID(L"WPFPage.InteropTest", &clsid);
  hresult=CoCreateInstance(clsid, NULL, CLSCTX_INPROC_SERVER, IID_IUnknown, (void **)&pUnkWpf);
  hresult=pUnkWpf->QueryInterface(IID_IDispatch, (void **)&pDisWpf);
Win32側からのイベントで、COM関数を実行します。
めんどくさかったので引数なし^^;;;
LPOLESTR funcname=L"UnCheck";
DISPID dispid=0;
hresult=pDisWpf->GetIDsOfNames(IID_NULL, &funcname, 1, LOCALE_SYSTEM_DEFAULT, &dispid);
if(FAILED(hresult)) return false;
DISPPARAMS params;
memset(¶ms, 0, sizeof(DISPPARAMS));
params.cArgs=0;
params.cNamedArgs=0;
params.rgdispidNamedArgs=NULL;
params.rgvarg = NULL;
VARIANT vRet;
VariantInit(&vRet);
hresult=pDisWpf->Invoke(dispid, IID_NULL, LOCALE_SYSTEM_DEFAULT, DISPATCH_METHOD, ¶ms, &vRet, NULL, NULL);
WPFページの貼り付け
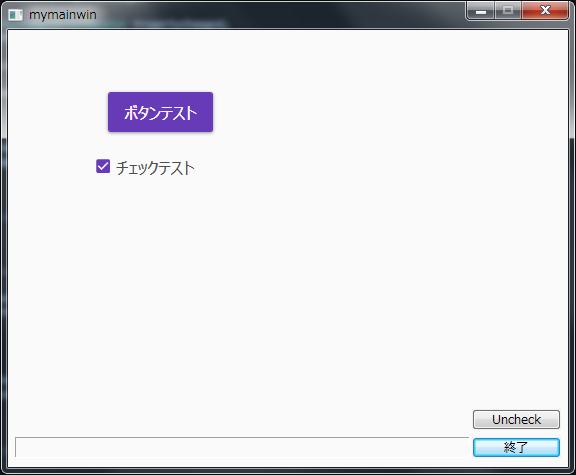
Win32のリソースエディタで用意しておいたSTATICウィンドウの上に、WPFページを貼り付けます。
また、WPFがPostMessage()したメッセージをフックして、情報を取り出します。
(いつも私はWin32プロジェクトをANSI版に設定しているので、ATOMから取り出した文字列をコード変換しています)
namespace ManagedCode
{
  using namespace System;
  using namespace System::Windows;
  using namespace System::Windows::Interop;

  HWND p_hwnd;

  IntPtr ChildHwndSourceHook(IntPtr, int msg, IntPtr wparam, IntPtr lparam, bool% handled)
  {
    if(msg==WM_COMMAND){
      ATOM a=(ATOM)((int)lparam);
      wchar_t wbuf[256];
      GetAtomNameW(a, wbuf, 256);
      DeleteAtom(a);

      char buf[256];
      WideCharToMultiByte(CP_ACP, 0, (LPCWSTR)wbuf, -1, buf, 256, NULL, NULL);

      SetDlgItemText(p_hwnd, IDC_STATIC_MESSAGE, buf);
    }
    return IntPtr(0);
  }

  HWND GetHwnd(HWND parent, int x, int y, int width, int height)
  {
    p_hwnd=parent;
    HwndSourceParameters params;
    params.PositionX=x;
    params.PositionY=y;
    params.Width=width;
    params.Height=height;
    params.ParentWindow=IntPtr(parent);
    params.WindowStyle=WS_VISIBLE| WS_CHILD;

    HwndSource^ source=gcnew HwndSource(params);
    source->AddHook(gcnew HwndSourceHook(ChildHwndSourceHook));

    UIElement^ page=gcnew WPFPage::TestPanel(true);
    source->RootVisual=page;

    return (HWND)source->Handle.ToPointer();
  }
}
表示の調整
WPFのページを透明にすることはできないようです。仕方ないので、Win32側のSTATIC/DIALOGの背景色を合わせます。
  case WM_CTLCOLORSTATIC:
  case WM_CTLCOLORDLG:
    {
      HDC  hdc_ctrl=(HDC)wparam;
      HWND hwnd_ctrl=(HWND)lparam;
      return (LRESULT)hbrush;
    }
    break;
4: 完成
C#で作成したCOMライブラリを、管理者権限でRegAsmを使って登録します。
c:\Windows\Microsoft.NET\Framework\v4.0.30319\RegAsm.exe WPFpage.dll
