はじめに
今回は AWS IoT を試します。
AWSコンソールから Raspberry Pi のLEDを点滅させます。
AWS IoTの設定
AWS IoT ポリシーの作成


- ポリシー名を入力し、アクションとポリシーリソースを 「 * 」 に設定し、「作成」をクリックします。
モノを作成
- IoT:Internet of Things(モノのインターネット) の「モノ」を作成します。


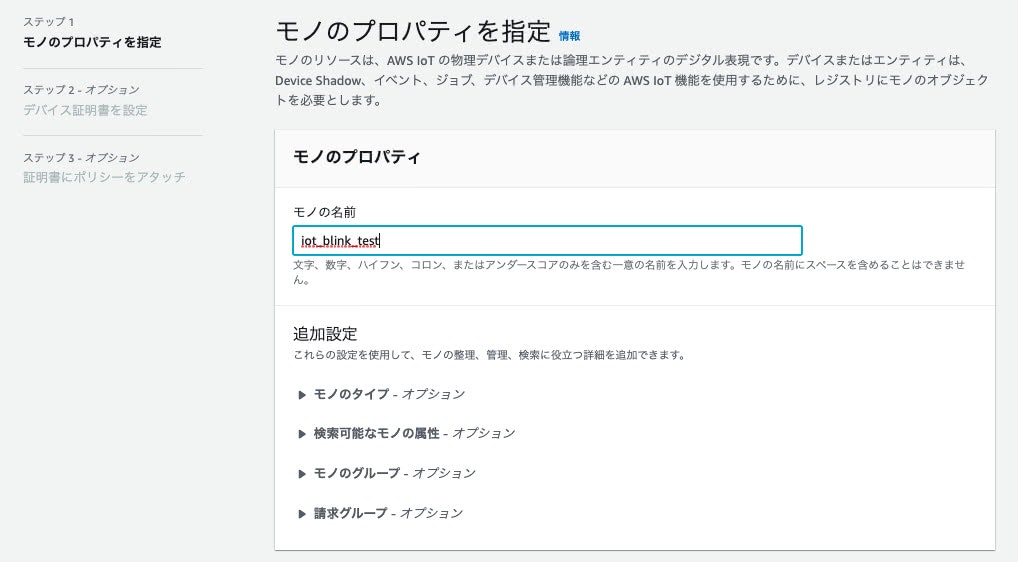
- モノの名前を設定します。
- ここで設定した値を、後述する main.js 内の "clientId" の値などに設定します。
デバイス証明書を設定

証明書にポリシーをアタッチ

- 先ほど作成したポリシーを選択します。
証明書とキーをダウンロード

- デバイス証明書、キーファイル、ルートCA証明書をダウンロードします。
- ダウンロードしたファイルは、後述する main.js と同じディレクトリに配置します。
デバイスデータエンドポイントの確認

- エンドポイントをコピーし、後述する main.js 内の "host" の値に設定します。
Raspberry Piの設定
準備
- OSインストールします。
- LEDや抵抗などの配線を行います。
Node.js と npm のインストール
sudo apt install nodejs
sudo apt install npm
プロジェクト作成、初期化
mkdir iot-led-blink && cd iot-led-blink
touch main.js
npm init
ライブラリのインストール
npm install rpi-gpio --save
npm install aws-iot-device-sdk --save
ファイルの配置
- ダウンロードした xxxxx-private.pem.key, xxxxx-certificate.pem.crt, AmazonRootCA1.pem を main.js と同じディレクトリに配置します。
main.js の編集
const awsIot = require("aws-iot-device-sdk");
const gpio = require("rpi-gpio");

const PIN = 8;
const BLINK_LIMIT = 3;
const SLEEP_LIMIT = 6;
let   BLINK_COUNT = 0;
let   SLEEP_COUNT = 0;
let   BLINK_FLAG  = false;
let   LED_FLAG    = false;

const device = awsIot.device({
  keyPath: "xxxxx-private.pem.key",
  certPath: "xxxxx-certificate.pem.crt",
  caPath: "AmazonRootCA1.pem",
  clientId: "iot_blink_test",
  host: "xxxxx.iot.ap-northeast-1.amazonaws.com",
});

device.on("connect", function () {
  console.log("connect");

  device.subscribe("$aws/things/iot_blink_test/shadow/update/delta");

  device.publish(
    "$aws/things/iot_blink_test/shadow/update",
    JSON.stringify({
      state: {
        reported: {
          led: "off",
        },
      },
    })
  );

  gpio.setup(PIN, gpio.DIR_OUT, () => {
    gpio.write(PIN, true);
  });
});

device.on("message", function (topic, payload) {
  console.log("message", topic, payload.toString());

  const shadow = JSON.parse(payload.toString());

  if (shadow.state && shadow.state.led) {
    console.log("led", shadow.state.led);

    BLINK_FLAG = shadow.state.led === "on";

    device.publish(
      "$aws/things/iot_blink_test/shadow/update",
      JSON.stringify({
        state: {
          reported: {
            led: shadow.state.led,
          },
        },
      })
    );
  }
});

gpio.setup(PIN, gpio.DIR_OUT, () => {
  setInterval(() => {
    if (BLINK_FLAG) {
      if (LED_FLAG) {
        gpio.write(PIN, false);
        LED_FLAG = false;
        BLINK_COUNT += 1;
        if (BLINK_COUNT >= BLINK_LIMIT) {
          BLINK_COUNT = 0;
          SLEEP_COUNT = 0;
        }
      } else {
        if (SLEEP_COUNT >= SLEEP_LIMIT) {
          gpio.write(PIN, true);
          LED_FLAG = true;
        } else {
          SLEEP_COUNT += 1;
        }
      }
    } else {
      gpio.write(PIN, true);
      LED_FLAG = true;
    }
  }, 100);
});
実行
node main.js
AWSコンソールから操作
シャドウを確認

- Raspberry Pi 側で実行すると、 Device Shadow 一覧に Classic Shadow が出ます。

- 「Classic Shadow」 をクリックします。

- 「編集」 をクリックします。
シャドウを編集

- 上記の通り "desired" を追加し 「更新」 をクリックします。
確認

- 上記の通り Device Shadow の状態が変更されます。
- Raspberry Pi のLEDが点滅します。
終わりに
AWS IoT を試しました。
AWS Mobile SDKを利用して、Android や iOS でも AWS IoTを利用できるため、今後試していこうと思います。