はじめに
CAP JavaでリモートのREST APIを利用したい場合、CAP JavaはRESTプロトコルをサポートしていないので、SAP Cloud SDKを使うことが選択肢となります。

https://cap.cloud.sap/docs/guides/using-services#supported-protocols
SAP Coud SDKにはOpenAPI Clientという、APIにアクセスするためのクラスを生成してくれるツールが用意されています。生成されたクラスを使用することで、APIのエンドポイントや受け渡すデータ構造をあまり意識せずにコードを書くことができます。
この記事では、CAP + Cloud SDKを使い、Authorization and Trust ManagementのAPIに対してGETおよびPOSTリクエストをする方法について検証します。ソースコードは以下のGitリポジトリにあります。
前提
- BTPサブアカウントにAPIにアクセスするためのDestinationを登録していること
設定に必要な情報はxsuaaのタイプ"apiaccess"のサービスインスタンスから取得

手順
- API仕様(yamlファイル)を取得
- API仕様をインポート
- サービスの定義
- イベントハンドラの実装
- デプロイ
- 開発環境からリモートサービスに接続
1. API仕様(yamlファイル)を取得
SAP Business Accelerator Hubにログインした状態で、以下の画面からAPI仕様をダウンロードします。

2. API仕様をインポート
CAPプロジェクト側で以下の設定を行います。
2.1. pom.xmlの設定
プロジェクトルートのpom.xmlに以下の設定を追加します。
	<properties>
		<cloud.sdk.version><最新のSDKバージョン></cloud.sdk.version>
        ...
  	</properties>

	<dependencyManagement>
		<dependencies>
            ...
			<dependency>
				<groupId>com.sap.cloud.sdk</groupId>
				<artifactId>sdk-modules-bom</artifactId>
				<version>${cloud.sdk.version}</version>
				<type>pom</type>
				<scope>import</scope>
			</dependency>
   		</dependencies>
   	</dependencyManagement>
srv/pom.xmlに以下のdependencyを追加します。
		<dependency>
			<groupId>com.sap.cloud.sdk.datamodel</groupId>
			<artifactId>openapi-core</artifactId>
		</dependency>
		<dependency>
			<groupId>com.sap.cloud.sdk</groupId>
			<artifactId>sdk-core</artifactId>
		</dependency>
さらに、srv/pom.xmlに以下のプラグインを追加します。
			<plugin>
				<groupId>com.sap.cloud.sdk.datamodel</groupId>
				<artifactId>openapi-generator-maven-plugin</artifactId>
				<version>${cloud.sdk.version}</version>
				<executions>
					<execution>
						<goals>
							<goal>generate</goal>
						</goals>
						<phase>generate-sources</phase>
					</execution>
				</executions>
				<configuration>
					<inputSpec>${project.basedir}/api-specs/AuthorizationAPI.yaml</inputSpec>
					<outputDirectory>${project.basedir}/src/gen/java</outputDirectory>
					<apiPackage>customer.openapi.generated.authorization.api</apiPackage>
					<modelPackage>customer.openapi.generated.authorization.model</modelPackage>
					<apiMaturity>released</apiMaturity>
				</configuration>
			</plugin>
outputDirectoryはsrc/gen/javaまたはsrc/main/java配下でないと、生成されたクラスをイベントハンドラから見つけられませんでした
2.2. API仕様をインポート
inputSpecで指定したディレクトリにダウンロードしたyamlファイルを置き、以下のコマンドを実行します。

mvn clean install
その結果、outputDirectoryで指定したパスにクラスが生成されます。

3. サービスの定義
以下のサービスを定義しました。疎通確認のため、簡単なファンクションとアクションのみ定義しています。
- function getRoleCollections: すべてのロールコレクションを取得
-
action createRoleCollection: ロールコレクションを登録
※ロールコレクションは本来割り当てるロールを指定して登録するものですが、簡単にするため名前と説明のみ指定して登録します
type SimpleRoleCollection {
    name: String;
    description: String;
}

service AuthorizationService {
    function getRoleCollections() returns array of  SimpleRoleCollection;
    action createRoleCollection(roleCollection:SimpleRoleCollection) returns SimpleRoleCollection;
}
4. イベントハンドラの実装
4.1. クラスの形
Cloud SDKを使用してAPIを呼び出す場合の特徴として、DestinationAccessorおよびHttpDestinationを使用してBTPに登録したDestinationを取得するところがあります。
また、API仕様をインポートすることで登録されたRoleCollectionsApiのクラスを使用してAPIにアクセスします。
package customer.cap_openapi.handlers;

...
import com.sap.cloud.sdk.cloudplatform.connectivity.DestinationAccessor;
import com.sap.cloud.sdk.cloudplatform.connectivity.HttpDestination;

import customer.openapi.generated.authorization.api.RoleCollectionsApi;
import customer.openapi.generated.authorization.model.RoleCollection;
import customer.openapi.generated.authorization.model.RoleCollectionImport;

@Component
@ServiceName(AuthorizationService_.CDS_NAME)
class AuthorizationServiceHandler implements EventHandler{

    Logger logger = LoggerFactory.getLogger(AuthorizationServiceHandler.class);
    HttpDestination destination = DestinationAccessor.getDestination("xsuaa").asHttp();
    RoleCollectionsApi rolecollectionApi = new RoleCollectionsApi(destination);

}
4.2. GETリクエスト
すべてのロールコレクションを取得するためのイベントハンドラを実装します。RoleCollectionsApiのgetRoleCollectionsというメソッドを使用してリクエストを行います。
    @On(event = GetRoleCollectionsContext.CDS_NAME)
    public void getRoleCollections(GetRoleCollectionsContext context) {
        logger.info("getRoleCollection handler");
        //Send request
        List<RoleCollection> response = rolecollectionApi.getRoleCollections();

        //Map response to SimpleRoleCollection Type
        List<SimpleRoleCollection> roleCollections = response.stream()
                .map(roleCollection -> {
                    SimpleRoleCollection simpleRoleCollection = SimpleRoleCollection.create();
                    simpleRoleCollection.setName(roleCollection.getName());
                    simpleRoleCollection.setDescription(roleCollection.getDescription());
                    return simpleRoleCollection;
                })
                .collect(Collectors.toList());
        context.setResult(roleCollections);
    }
API Clientを作成したことで、APIで定義されたエンドポイントをメソッドとして提案してくれます。

4.3. POSTリクエスト
ロールコレクションを登録するためのイベントハンドラを実装します。ロールコレクションを登録するためのメソッドcreateRoleCollectionはRoleCollectionImportというオブジェクトを引数にとるので、オブジェクトを作成して渡されたパラメータをマッピングしておきます。
    @On(event = CreateRoleCollectionContext.CDS_NAME)
    public void createRoleCollection(CreateRoleCollectionContext context) {
        logger.info("createRoleCollection handler");
        //Map input to RoleCollectionImport Type
        RoleCollectionImport roleCollection = new RoleCollectionImport();
        roleCollection.setName(context.getRoleCollection().getName());
        roleCollection.setDescription(context.getRoleCollection().getDescription());

        //Send request
        RoleCollection created = rolecollectionApi.createRoleCollection(roleCollection);

        //Map response to SimpleRoleCollection Type
        SimpleRoleCollection simpleRoleCollection = SimpleRoleCollection.create();
        simpleRoleCollection.setName(created.getName());
        simpleRoleCollection.setDescription(created.getDescription());
        context.setResult(simpleRoleCollection);
    }
5. デプロイ
5.1. xsuaa, destinationを追加
以下のコマンドでxsuaaとdestinationサービスを使用するための設定を追加します。
cds add xsuaa,destination --for production
5.2. mta.yamlを追加
以下のコマンドでmta.yamlファイルを追加します。
cds add mta
5.3. ビルド、デプロイ
以下のコマンドでビルド、デプロイします。
mbt build -t gen --mtar mta.tar
cf deploy gen/mta.tar
6. 開発環境からリモートサービスに接続
以下の記事の7.1~7.2のステップを実行し、xsuaa, destinationのサービスインスタンスにローカルのCAPプロジェクトをバインドします。
以下のコマンドでサービスを実行します。
cds bind --exec mvn spring-boot:run
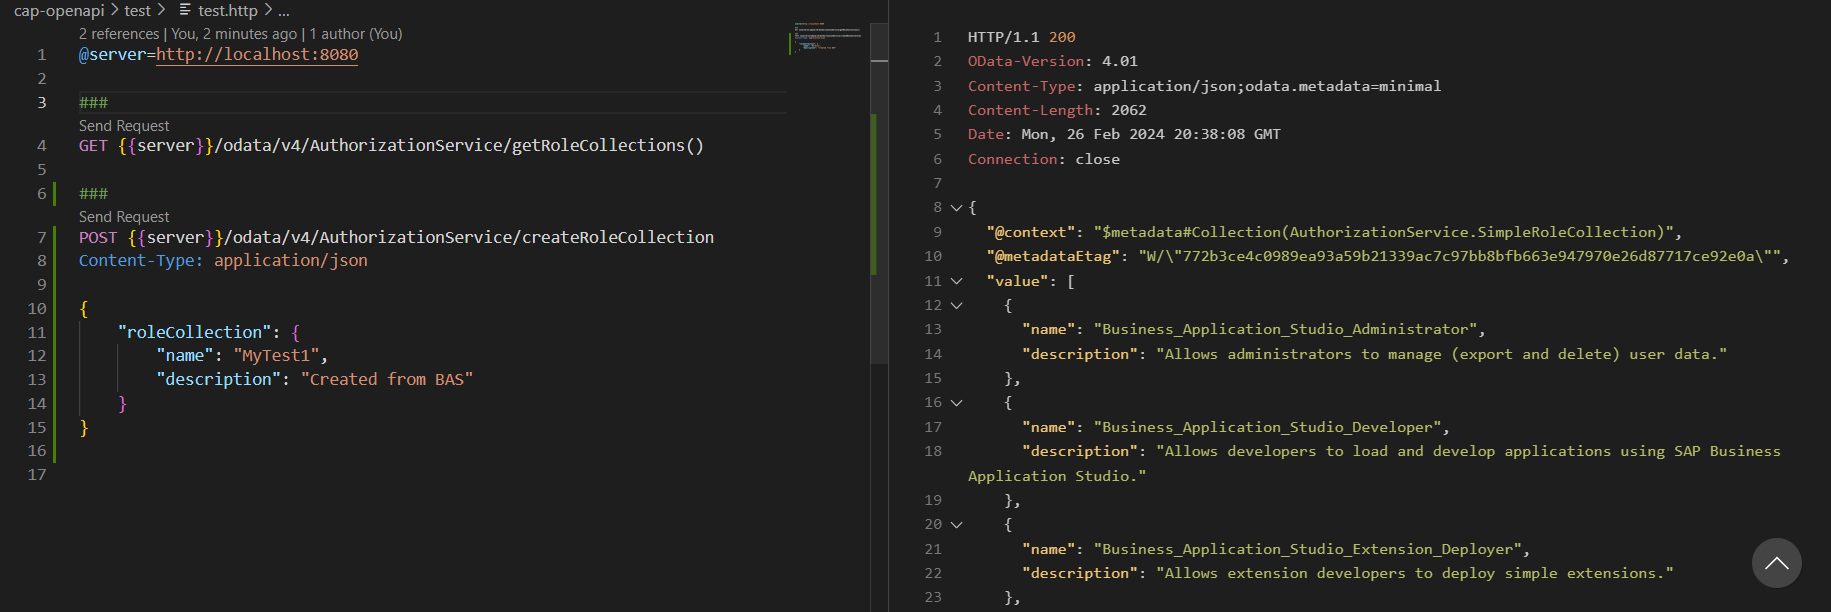
test.httpファイルを作成し、リクエストを実行するとBTPに登録されたロールコレクションの取得、およびロールコレクションの登録ができます。
@server=http://localhost:8080

###
GET {{server}}/odata/v4/AuthorizationService/getRoleCollections()

###
POST {{server}}/odata/v4/AuthorizationService/createRoleCollection
Content-Type: application/json

{
    "roleCollection": {
        "name": "MyTest1",
        "description": "Created from BAS"
    }
}
Cloud SDK単体だとローカル実行時は認証なし、またはベーシック認証しか使用できないということですが、CAPと組み合わせて使うことでハイブリッド実行ができるのは便利ですね。