動機
今回の記事は、「どうしたら一つのコントローラーに書くソースを短くできるか」というテーマです。
UI5の画面に乗る機能が増えてくると、コントローラーのソースが長くなります。また、先頭で定義するDependencyの数も増えて見た目にも重いです。こうなると、目的のコードが見つけにくく、デバッグもしづらくなります。
WebIDEの場合、私が普段使っているノートPCでは1画面に30行ちょっと表示されますが、できれば2、3スクロールくらいで全てのソースを見たいです。
方針
コントローラーのソースを分割して、それぞれのソースを小さくします。ロジックをライブラリに切り出してしまうこともできますが、今回は同じプロジェクトの中で考えてみます。
以下の4つの方法が取れると思います。
- BaseControllerに共通ロジックを移動する
- ビューを分割して、ビューの中にビューを置く
- フラグメントに独自のコントローラーをつける
- 機能ごとに独立したクラスを作ってコントローラーから呼ぶ(説明は割愛)
対象のアプリ
シンプルなフォームと検索ヘルプ、スイッチがある画面です。
スイッチをON/OFFすると右下にあるSubmitボタンの有効/無効が切り替わります。

以下はソースを分割する前のアプリの構成です。
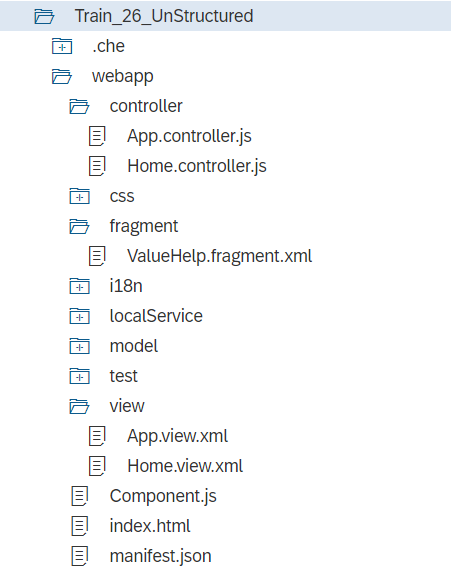
ビュー
<mvc:View xmlns:core="sap.ui.core" xmlns:mvc="sap.ui.core.mvc" xmlns="sap.m"
	xmlns:l="sap.ui.layout"
	xmlns:f="sap.ui.layout.form"
	controllerName="demo.Train_26_UnStructured.controller.Home"
	xmlns:html="http://www.w3.org/1999/xhtml">
	<Page title="Title">
		<content>
			<VBox class="sapUiSmallMargin">
				<f:SimpleForm id="simpleForm"
					editable="true"
					layout="ResponsiveGridLayout"
					title="Products"
					labelSpanXL="3"
					labelSpanL="3"
					labelSpanM="3"
					labelSpanS="12"
					adjustLabelSpan="false"
					emptySpanXL="4"
					emptySpanL="4"
					emptySpanM="4"
					emptySpanS="0"
					columnsXL="1"
					columnsL="1"
					columnsM="1"
					singleContainerFullSize="false" >
					<f:content>
						<Label text="Product ID" />
						<Input value="{homeView>/data/ProductID}"
							showValueHelp="true" valueHelpRequest=".onValueHelpRequest"/>
						<Label text="Product Name" />
						<Input value="{homeView>/data/ProductName}"/>
						<Label text="Supplier ID" />
						<Input value="{homeView>/data/SupplierID}"/>
						<Label text="Category ID" />
						<Input value="{homeView>/data/CategoryID}"/>
					</f:content>
				</f:SimpleForm>
				<Switch change=".onToggle"/>
			</VBox>
		</content>
		<footer>
			<OverflowToolbar>
				<ToolbarSpacer/>
				<Button id="submitButton" text="Submit" type="Accept" enabled="{homeView>/buttons/submit}" press=".onSubmit"/>
			</OverflowToolbar>
		</footer>
	</Page>
</mvc:View>
フラグメント
<core:FragmentDefinition
	xmlns="sap.m"
	xmlns:core="sap.ui.core">
	<SelectDialog
		title="Select Product"
		search="onSearch"
		confirm="onValueHelpClose"
		cancel="onValueHelpClose"
		showClearButton="true"
		items="{
			path : '/Products',
			sorter : {
				path : 'ProductID',
				descending : false
			}
		}">
		<StandardListItem
			title="{ProductID}"
			description="{ProductName}"
			type="Active" />
	</SelectDialog>
</core:FragmentDefinition>
コントローラー
sap.ui.define([
	"sap/ui/core/mvc/Controller",
	"sap/ui/model/json/JSONModel",
	"sap/ui/core/Fragment",
	"sap/ui/model/Filter",
	"sap/ui/model/FilterOperator"
], function (Controller, JSONModel, Fragment, Filter, FilterOperator) {
	"use strict";

	return Controller.extend("demo.Train_26_UnStructured.controller.Home", {

		onInit: function () {
			var oModel = new JSONModel({
				data: {
					ProductID: "",
					ProductName: "test",
					SupplierID: "",
					CategoryID: ""
				},
				buttons: {
					submit: false
				}
			});
			this.getView().setModel(oModel, "homeView");
		},

		onExit: function () {
			var oEventBus = this.getEventBus();
			oEventBus.unsubscribe("formView", "enableSubmit", this._toggleSubmit, this);
		},

		//Formのイベントハンドラ
		onToggle: function (oEvent) {
			var oButton = this.byId("submitButton");
			var bEnabled = oButton.getEnabled();
			oButton.setEnabled(!bEnabled);
		},

		onValueHelpRequest: function (oEvent) {
			this._oSource = oEvent.getSource();
			if (!this._oDialog) {
				Fragment.load({
					name: "demo.Train_26_UnStructured.fragment.ValueHelp",
					controller: this
				}).then(function(oDialog){
					this._oDialog = oDialog;
					this._oDialog.setModel(this.getView().getModel());
					this._oDialog.open();
				}.bind(this));
			} else {
				this._oDialog.open();
			}
		},

		//Fragmentのイベントハンドラ
		onSearch: function (oEvent) {
			var sValue = oEvent.getParameter("value");
			var oFilter = new Filter("ProductName", FilterOperator.Contains, sValue);
			var oBinding = oEvent.getSource().getBinding("items");
			oBinding.filter([oFilter]);
		},

		onValueHelpClose: function (oEvent) {
			var aContexts = oEvent.getParameter("selectedContexts");
			if (aContexts) {
				this._oSource.setValue(aContexts[0].getObject().ProductID);
			}
			oEvent.getSource().getBinding("items").filter([]);
		}

	});

});
1. BaseControllerに共通ロジックを移動する
複数のビューで共通に使う機能をBaseControllerに移動して、各コントローラーはBaseControllerを継承するようにします。「共通化する機能はないかな?」と思ったとしても、最初からBaseControllerを使う構成にしておくことをお勧めします。あとから変更するのは手間なので。
BaseControllerを作成します。とりあえず中身は空です。
※以下は上からコピーしたプロジェクトなのでnamespaceが変わっていますが気にしないでください
sap.ui.define([
	"sap/ui/core/mvc/Controller"
], function (Controller) {
	"use strict";

	return Controller.extend("demo.Train_25_Structuring.controller.BaseController", {

	});

});
各コントローラーはBaseControllerを継承します。
sap.ui.define([
	"demo/Train_25_Structuring/controller/BaseController"
], function (BaseController) {
	"use strict";

	return BaseController.extend("demo.Train_25_Structuring.controller.App", {

	});
});
sap.ui.define([
	"demo/Train_25_Structuring/controller/BaseController",
	"sap/ui/model/json/JSONModel"
], function (BaseController, JSONModel) {
	"use strict";

	return BaseController.extend("demo.Train_25_Structuring.controller.Home", {
		//省略
	});
});
2. ビューを分割して、ビューの中にビューを置く
XMLビューをパーツに分けるときに、パーツをビューにする方法と、フラグメントにする方法があります。ビューはセットでコントローラーも定義するのに対し、フラグメントはフラグメントが乗るビューのコントローラーを間借りするのが一般的だと思います。コントローラーを短くするためには、イベントハンドラが必要になりそうなパーツはビューに切り出した方がいいと思います。
今回は、フォームの部分を独立したビューにします。
フォーム独立後のHome View
<mvc:View xmlns:core="sap.ui.core" xmlns:mvc="sap.ui.core.mvc" xmlns="sap.m" controllerName="demo.Train_25_Structuring.controller.Home"
	xmlns:html="http://www.w3.org/1999/xhtml">
	<Page title="Title">
		<mvc:XMLView viewName="demo.Train_25_Structuring.view.Form"/>
		<footer>
			<OverflowToolbar>
				<ToolbarSpacer/>
				<Button id="submitButton" text="Submit" type="Accept" enabled="{homeView>/buttons/submit}" press=".onSubmit"/>
			</OverflowToolbar>
		</footer>
	</Page>
</mvc:View>
独立したForm view
<mvc:View xmlns:core="sap.ui.core" xmlns:mvc="sap.ui.core.mvc" xmlns="sap.m"
	xmlns:l="sap.ui.layout"
	xmlns:f="sap.ui.layout.form"
	controllerName="demo.Train_25_Structuring.controller.Form"
	xmlns:html="http://www.w3.org/1999/xhtml">
	<VBox class="sapUiSmallMargin">
		<f:SimpleForm id="simpleForm"
			editable="true"
			layout="ResponsiveGridLayout"
			title="Products"
			labelSpanXL="3"
			labelSpanL="3"
			labelSpanM="3"
			labelSpanS="12"
			adjustLabelSpan="false"
			emptySpanXL="4"
			emptySpanL="4"
			emptySpanM="4"
			emptySpanS="0"
			columnsXL="1"
			columnsL="1"
			columnsM="1"
			singleContainerFullSize="false" >
			<f:content>
				<Label text="Product ID" />
				<Input value="{homeView>/data/ProductID}"
					showValueHelp="true" valueHelpRequest=".onValueHelpRequest"/>
				<Label text="Product Name" />
				<Input value="{homeView>/data/ProductName}"/>
				<Label text="Supplier ID" />
				<Input value="{homeView>/data/SupplierID}"/>
				<Label text="Category ID" />
				<Input value="{homeView>/data/CategoryID}"/>
			</f:content>
		</f:SimpleForm>
		<Switch change=".onToggle"/>
	</VBox>
</mvc:View>
コントローラー
sap.ui.define([
	"demo/Train_25_Structuring/controller/BaseController",
	"sap/ui/model/json/JSONModel"
], function (BaseController, JSONModel) {
	"use strict";

	return BaseController.extend("demo.Train_25_Structuring.controller.Home", {
		onInit: function () {
			var oModel = new JSONModel({
				data: {
					ProductID: "",
					ProductName: "test",
					SupplierID: "",
					CategoryID: ""
				},
				buttons: {
					submit: false
				}
			});
			this.getView().setModel(oModel, "homeView");
		},

		onExit: function () {
			var oEventBus = this.getEventBus();
			oEventBus.unsubscribe("formView", "enableSubmit", this._toggleSubmit, this);
		},

	});

});
sap.ui.define([
	"demo/Train_25_Structuring/controller/BaseController",
], function (BaseController) {
	"use strict";

	return BaseController.extend("demo.Train_25_Structuring.controller.Form", {

		onInit: function () {

		},

		onToggle: function (oEvent) {
			//保留
		},

		onValueHelpRequest: function (oEvent) {
			//保留
		}
	});

});
ビューをまたがるイベントのやり取りはどうするか?
Formの下にあるスイッチをON/OFFしたとき、ツールバーのボタンの有効/無効を切り替える必要があります。ビューが分かれたので、Homeビューはそのままではスイッチのchangeイベントに気付くことができません。
EventBus
そこで、EventBusを使います。EventBusの仕組みは以下のようになっています。
SubscriberとPublisherは便宜的に付けた名前で、ビューのコントローラーやコンポーネントが相当します。イベントを受け取る側と発生させる側という意味です。EventBusを使う前提として、受け取る側と発生させる側がチャネルID、イベントIDを共通で知っていることが必要です。

今回のケースに当てはめると、FormコントローラーがPublisher、HomeコントローラーがSubscriberになります。
EventBusの実装
まず、EventBusを取得する処理を書きますが、これはPublisherとSubscriberの両方で必要なのでBaseControllerに実装します。BaseControllerの出番です。
sap.ui.define([
	"sap/ui/core/mvc/Controller"
], function (Controller) {
	"use strict";

	return Controller.extend("demo.Train_25_Structuring.controller.BaseController", {
		getEventBus: function () {
			return this.getOwnerComponent().getEventBus();
		}
	});

});
イベントを受け取る側の設定は、onInitに書きます。
		onInit: function () {
			//省略
			var oEventBus = this.getEventBus();
			oEventBus.subscribe("formView"/*sChannelId*/, "enableSubmit"/*sEventId*/, this._toggleSubmit, this);

		},
イベントを発生させる側の設定は、スイッチがON/OFFされたときのイベントハンドラに書きます。
		onToggle: function (oEvent) {
			var oEventBus = this.getEventBus();
			oEventBus.publish("formView", "enableSubmit", {
				state: oEvent.getParameter("state")
			});
		}
3. フラグメントに独自のコントローラーをつける
「フラグメントはベースにあるビューのコントローラーを間借りするのが一般的」と書いたばかりですが、フラグメントに独自のコントローラーを持たせることもできます。
フラグメントは画面の定義だけでいいのが利点ではなかったのか?それならビューを使えばよいのでは?などの論争も(自分の中で)ありますが、どうしてもフラグメントを使いたいケースとしては、検索ヘルプなどのダイアログ系があるかと思います。
検索ヘルプの場合、フィルターや行を選んだときのイベントなど、いくつかのイベントハンドラが必要になります。さらにイベントハンドラの中で使うDependencyも取り込むとなると、まあまあの行のコードが必要になります。
今回は、以下の記事を参考にフラグメントに独自のコントローラーを定義します。
How to split code in SAPUI5 by using fragments and XML view
まずは、フラグメント用のコントローラーを定義します。形式はビューのコントローラーと同じです。コンストラクタで検索ヘルプが呼ばれた項目のコントロールを受け取るので、選択された値をここでをセットすることができます。
sap.ui.define([
	"sap/ui/core/mvc/Controller",
	"sap/ui/model/Filter",
	"sap/ui/model/FilterOperator"
], function (Controller, Filter, FilterOperator) {
	"use strict";

	return Controller.extend("demo.Train_25_Structuring.fragmentController.ValueHelp", {

		constructor: function (oController) {
			this._oSource = oController;
			return Controller.call(this);
		},

		onSearch: function (oEvent) {
			var sValue = oEvent.getParameter("value");
			var oFilter = new Filter("ProductName", FilterOperator.Contains, sValue);
			var oBinding = oEvent.getSource().getBinding("items");
			oBinding.filter([oFilter]);
		},

		onValueHelpClose: function (oEvent) {
			var aContexts = oEvent.getParameter("selectedContexts");
			//値のセット
			if (aContexts) {
				this._oSource.setValue(aContexts[0].getObject().ProductID);
			}
			oEvent.getSource().getBinding("items").filter([]);
		}
	});
});
フラグメントを呼び出すFormビューのコントローラーは以下のようになります。
DependencyにValueHelpのコントローラーを追加
sap.ui.define([
	"demo/Train_25_Structuring/controller/BaseController",
	"demo/Train_25_Structuring/fragmentController/ValueHelp",
	"sap/ui/core/Fragment"
], function (BaseController, ValueHelp, Fragment) {
検索ヘルプを呼び出す処理
		onValueHelpRequest: function (oEvent) {
			if (!this._oDialog) {
				var oValueHelpController = new ValueHelp(oEvent.getSource());
				Fragment.load({
					name: "demo.Train_25_Structuring.fragment.ValueHelp",
					//フラグメント専用コントローラを指定
					controller: oValueHelpController
				}).then(function(oDialog){
					this._oDialog = oDialog;
					this._oDialog.setModel(this.getView().getModel());
					this._oDialog.open();
				}.bind(this));
			} else {
				this._oDialog.open();
			}
		}
結果
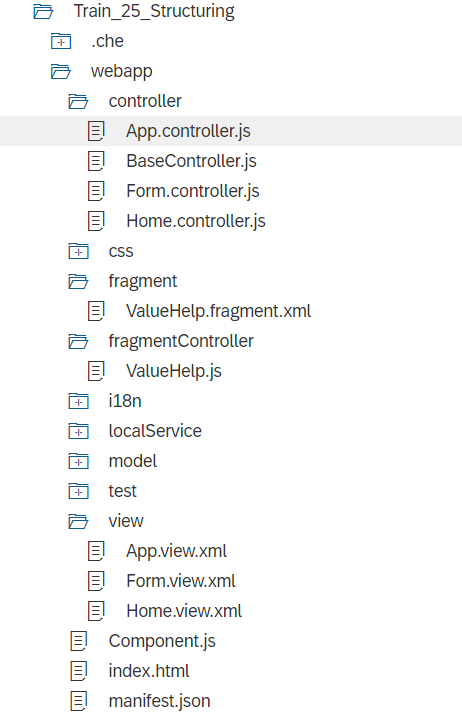
分割後のアプリの構成は以下のようになりました。
Homeコントローラーの行数は、73行から40行に減りました(空白行含む)。
まとめ
- BaseControllerは常に置く
- ビューは一画面の中でも分割する
- フラグメントは必要に応じて専用のコントローラーをつける(無理にとは言わない)